> ## Documentation Index
> Fetch the complete documentation index at: https://docs.speckle.systems/llms.txt
> Use this file to discover all available pages before exploring further.
# Exploration
> The full hierarchy of your model is available for inspection and exploration.
Need help deciding which review tool to use first? Start with [Review
Workflows](/3d-viewer/review-workflows).
## Models panel
The Models panel lets you navigate your 3D model using a familiar tree view:
1. **Hierarchy view:** See models organized by levels, categories, or custom groups.
2. **Visibility controls:** Show, hide, or isolate individual objects or groups with a single click.
Use the panel to focus on the parts of your model you care about, cleanly toggle layers, and understand the structure of complex scenes.
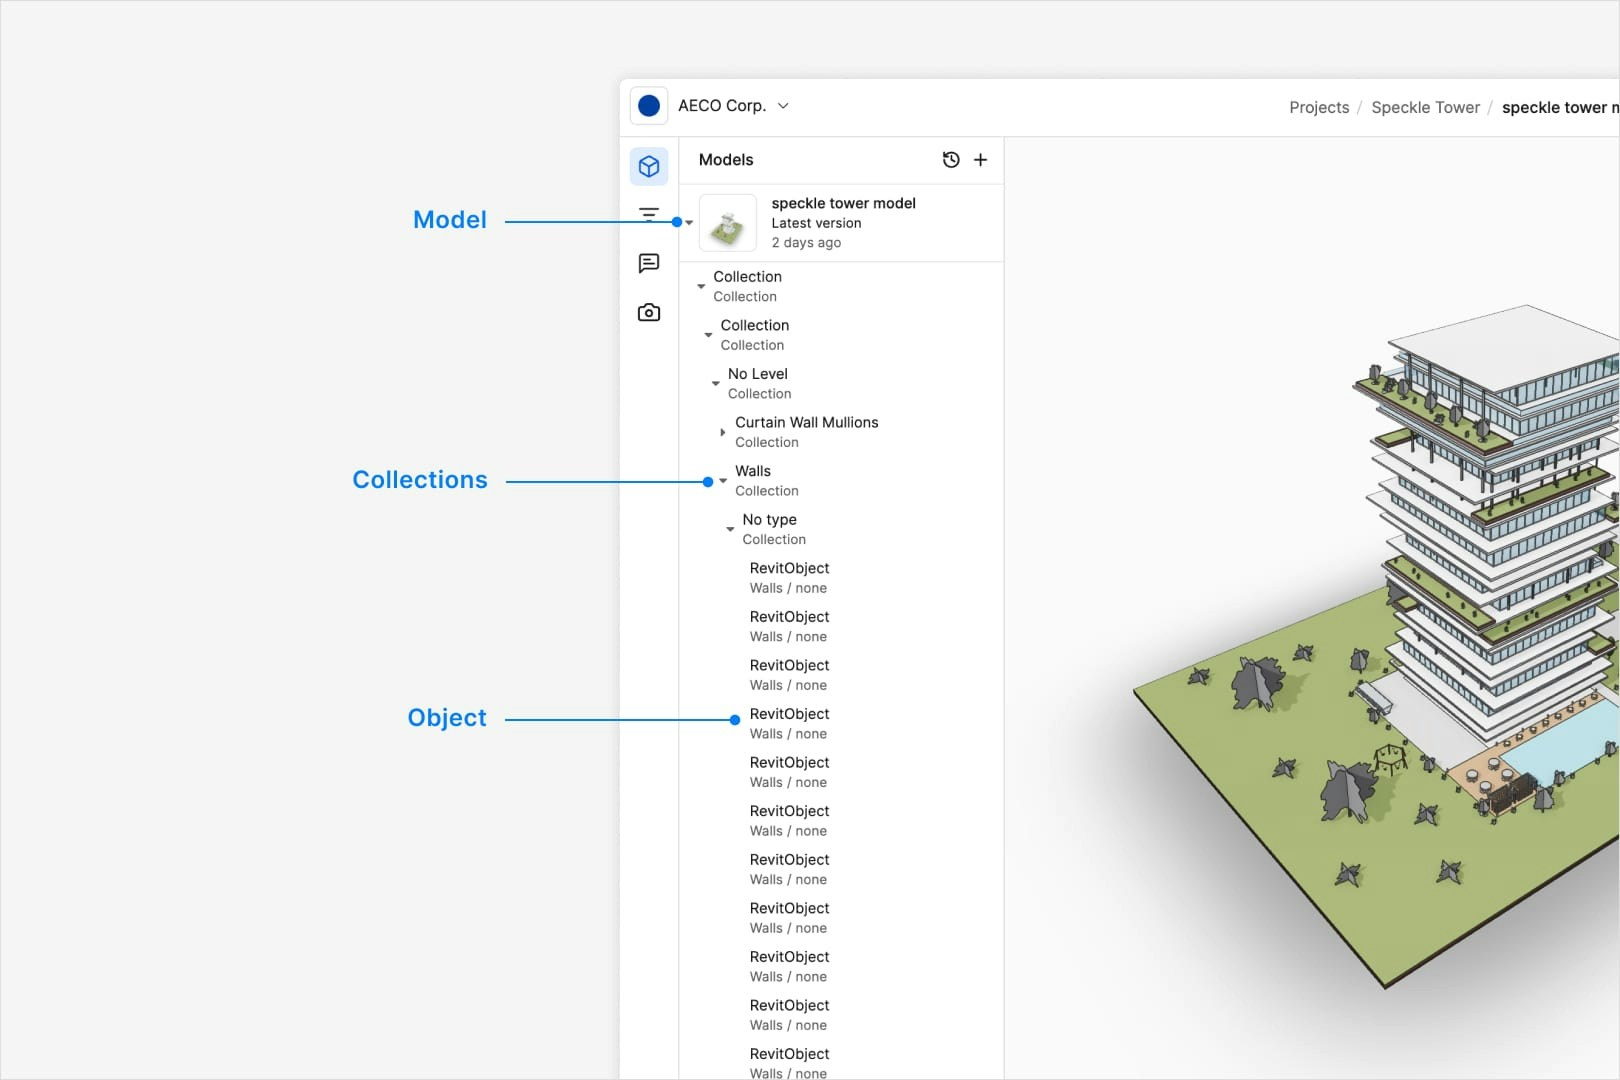 The model hierarchy displayed is as it is exported from the source
application. There are some differences between each connector that reflects
the typical workflows of users in that application.
No, the hierarchy is as it is exported from the source application. Our
developer documentation has more information on how to work with the
underlying data that could achieve this.
## Filter and color by property data
Speckle's filtering tools let you quickly find, highlight, color-code, and analyze parts of your
model based on any property or parameter:
The model hierarchy displayed is as it is exported from the source
application. There are some differences between each connector that reflects
the typical workflows of users in that application.
No, the hierarchy is as it is exported from the source application. Our
developer documentation has more information on how to work with the
underlying data that could achieve this.
## Filter and color by property data
Speckle's filtering tools let you quickly find, highlight, color-code, and analyze parts of your
model based on any property or parameter:
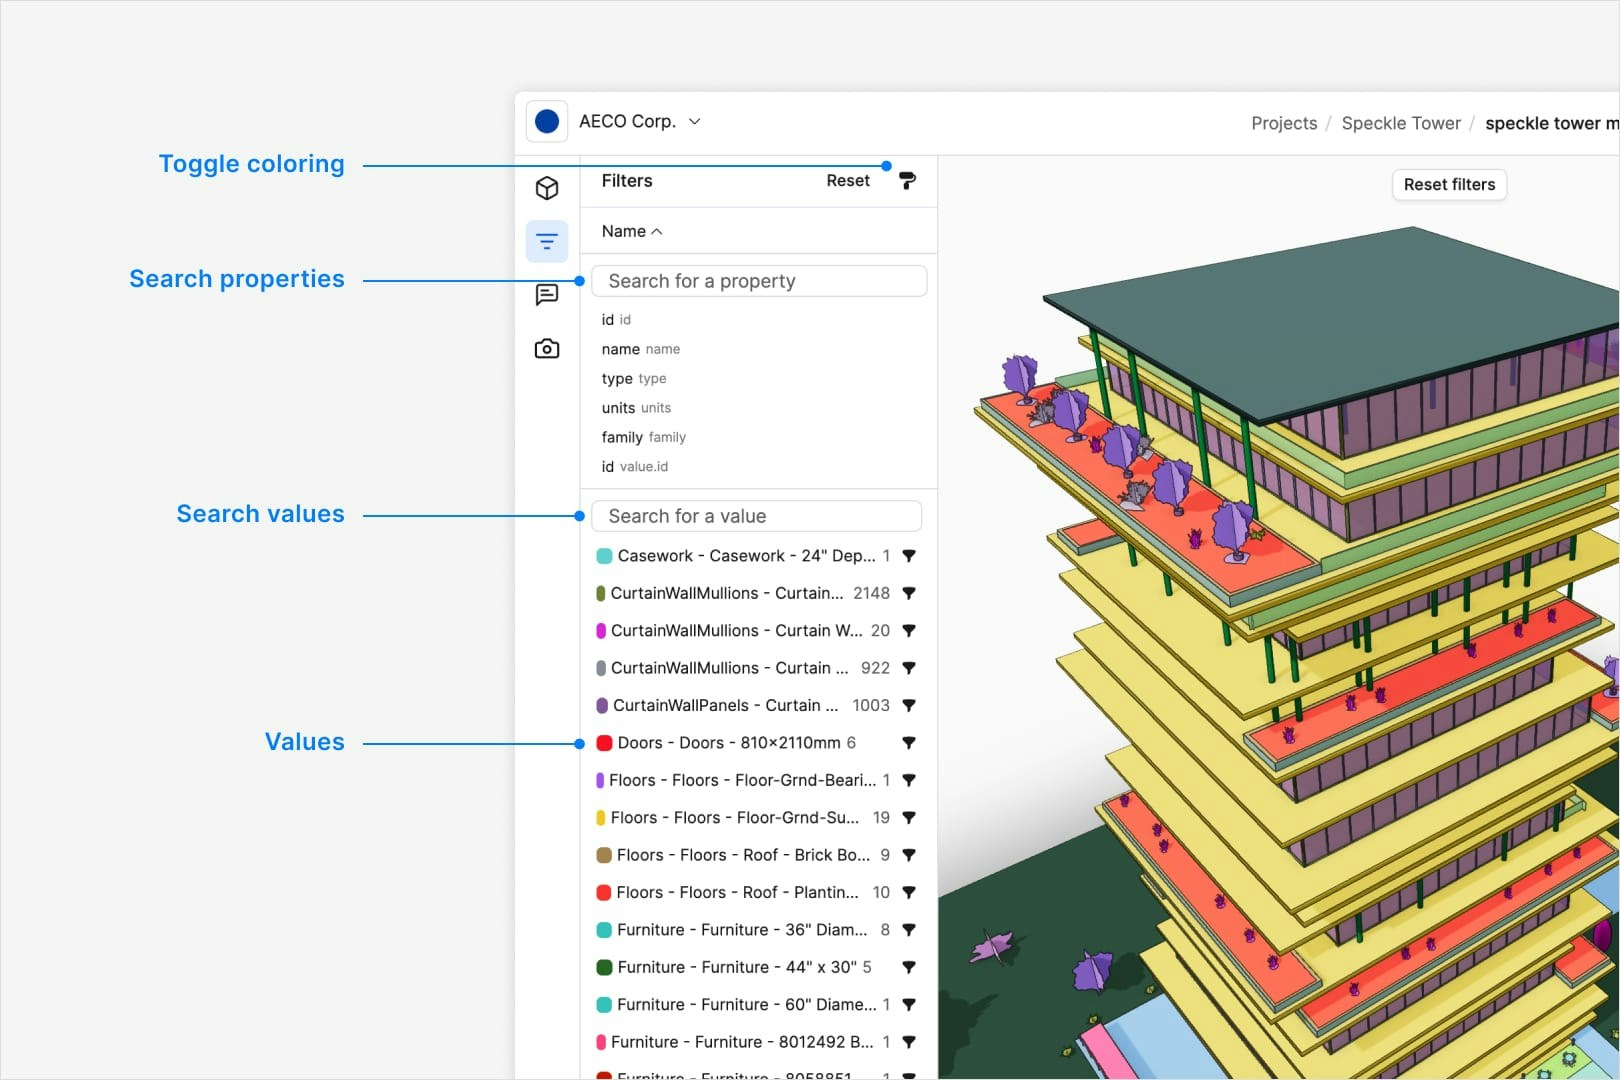 Filter, color, and search:
1. Open the filter panel and choose any property from your model (e.g., category,
level, tag).
2. Type or select values to narrow down the list of objects.
3. Click the brush icon on the top right corner of the panel to color-code values
for that property.
4. Query specific values. Use the search box to look for a particular value within
the filtered property (e.g., all "category" Walls with “FireRating = 2”).
**Tip:** First, use a filter in combination with isolate, then apply another
filter to explore the model further.
You can also start a filtering session from the Selection info panel. Select
an object, then use any property there to open Filters with that context.
Any property in the model can be filtered on, and you can also color-code by
that same property using the brush icon.
No, the property must exist in the model. However you could use the Model
Checker premade automation to add a test for a property and its results can
be used as a filter.
As you type in either the property search bar or the value search bar,
Speckle will show a list of properties that match the text you've typed.
Yes. In Selection info, use **Pin property** on a property value to add it
to your favourites, so it is easier to find when reviewing selected objects.
## Dev(eloper) mode
Dev mode gives you a deeper look into your model's data structure:
* **Full hierarchy view.** See every object, list, and parameter exactly as Speckle stores it.
* **Raw JSON inspection.** View and copy the underlying JSON data for any item; perfect for developers or power users.
Filter, color, and search:
1. Open the filter panel and choose any property from your model (e.g., category,
level, tag).
2. Type or select values to narrow down the list of objects.
3. Click the brush icon on the top right corner of the panel to color-code values
for that property.
4. Query specific values. Use the search box to look for a particular value within
the filtered property (e.g., all "category" Walls with “FireRating = 2”).
**Tip:** First, use a filter in combination with isolate, then apply another
filter to explore the model further.
You can also start a filtering session from the Selection info panel. Select
an object, then use any property there to open Filters with that context.
Any property in the model can be filtered on, and you can also color-code by
that same property using the brush icon.
No, the property must exist in the model. However you could use the Model
Checker premade automation to add a test for a property and its results can
be used as a filter.
As you type in either the property search bar or the value search bar,
Speckle will show a list of properties that match the text you've typed.
Yes. In Selection info, use **Pin property** on a property value to add it
to your favourites, so it is easier to find when reviewing selected objects.
## Dev(eloper) mode
Dev mode gives you a deeper look into your model's data structure:
* **Full hierarchy view.** See every object, list, and parameter exactly as Speckle stores it.
* **Raw JSON inspection.** View and copy the underlying JSON data for any item; perfect for developers or power users.
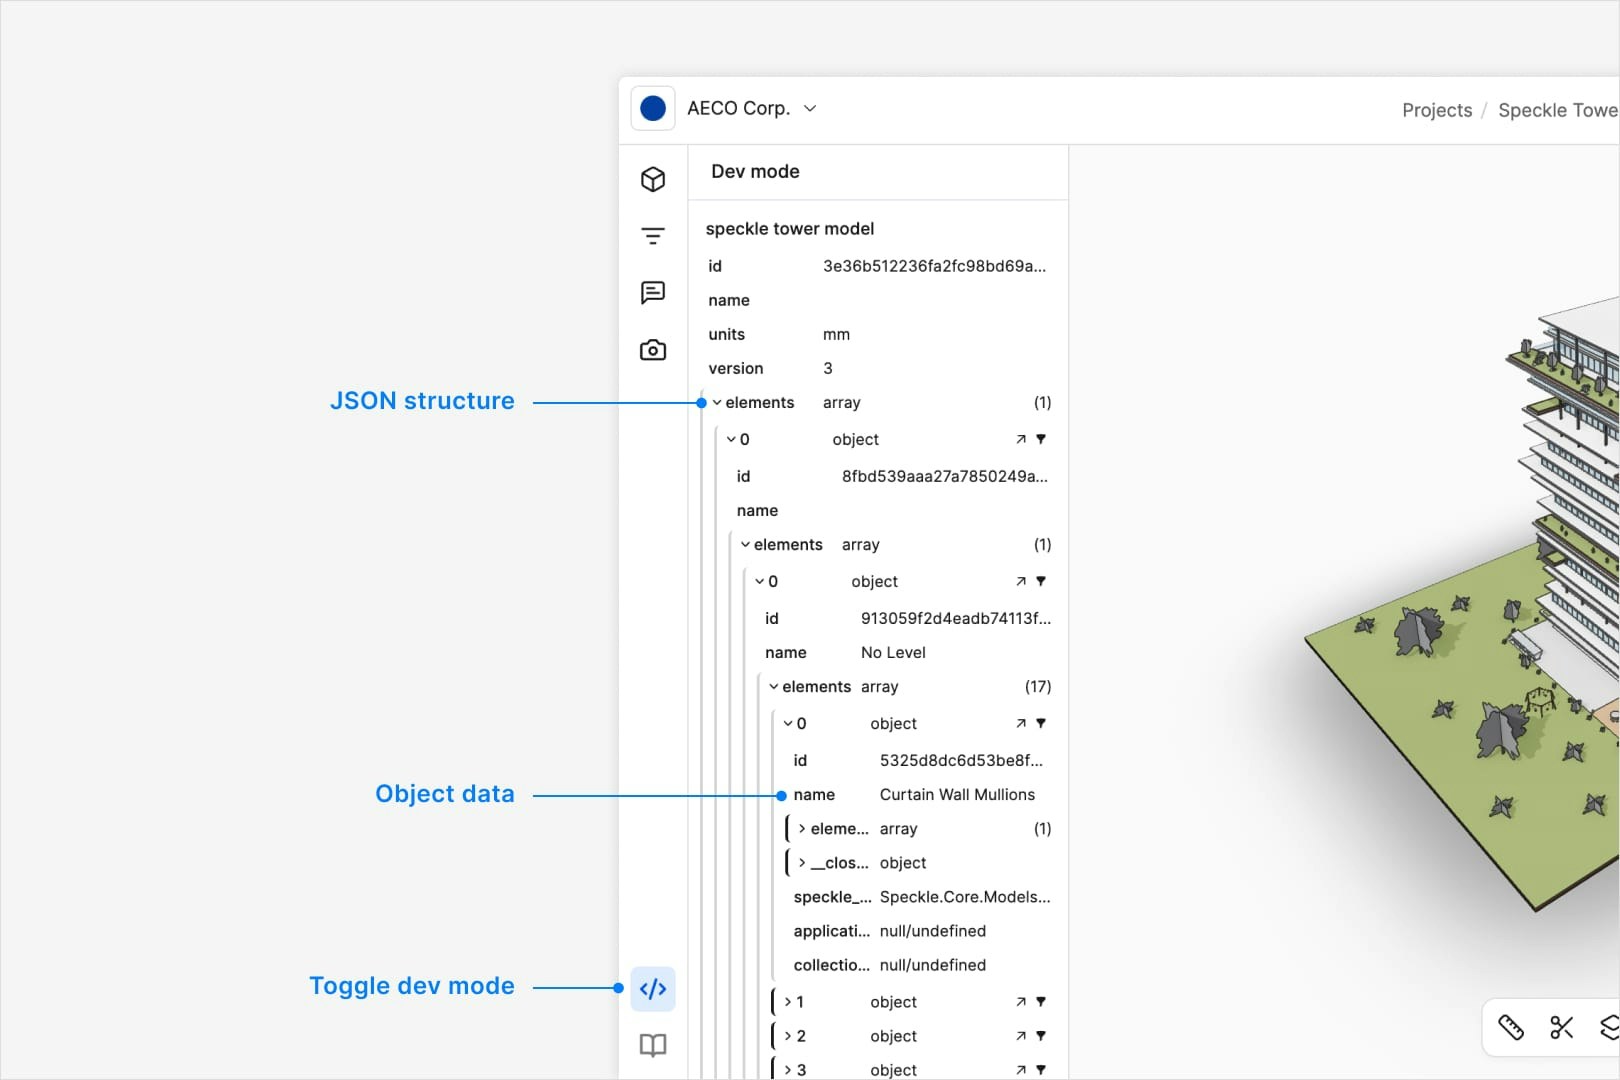 Use Dev mode when you need complete transparency or want to integrate Speckle
data into your own workflows and applications.
Dev mode is enabled by default for all Speckle users.
Click on an object in the hierarchy view to see the data for that object
above the overall hierarchy view.
Dev mode visualises the JSON structure. Our developer docs have more
information on how to access and use the raw data view.
## Measure
Use the Measure tool to verify dimensions, check clearances, and validate design details without leaving the viewer.
Use Dev mode when you need complete transparency or want to integrate Speckle
data into your own workflows and applications.
Dev mode is enabled by default for all Speckle users.
Click on an object in the hierarchy view to see the data for that object
above the overall hierarchy view.
Dev mode visualises the JSON structure. Our developer docs have more
information on how to access and use the raw data view.
## Measure
Use the Measure tool to verify dimensions, check clearances, and validate design details without leaving the viewer.
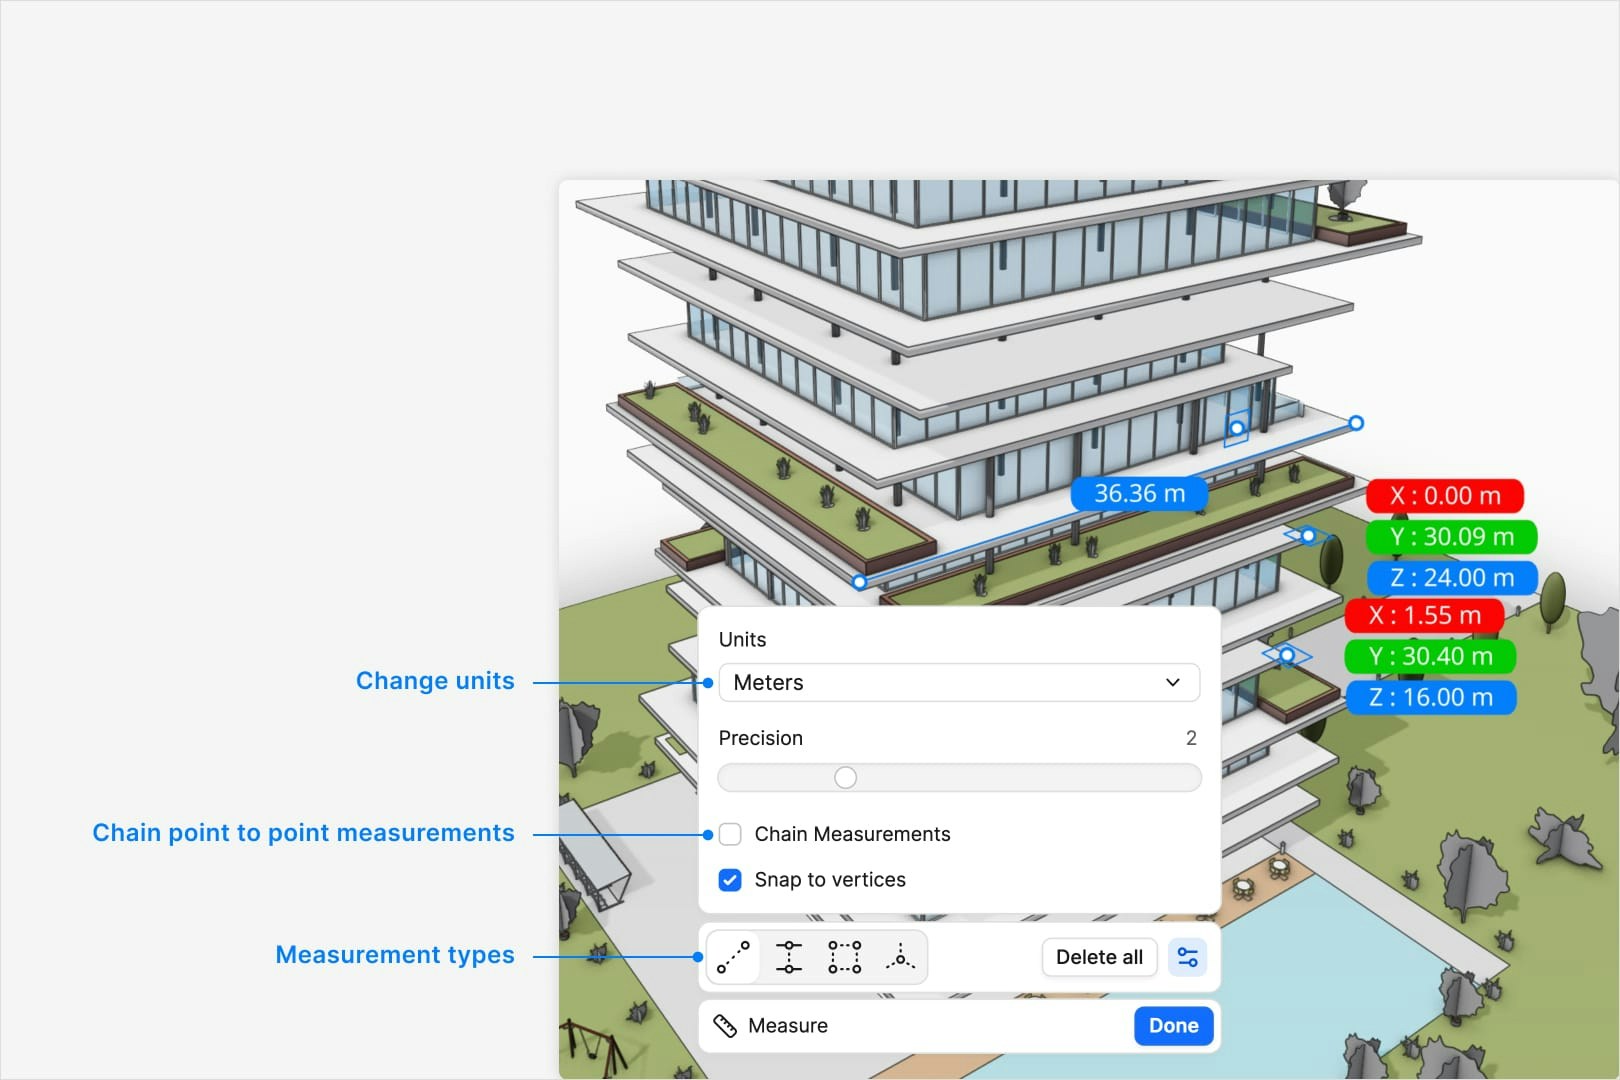 ### Measurement types
* **Point-to-point measurement.** Click two points in the model to get the straight-line distance.
* **Perpendicular measurement.** Measure the shortest distance from a point to a line or plane.
* **Area measurement.** Measure the area of a polygon or closed polyline.
* **Point coordinates.** Get the exact XYZ coordinates at any point in the model.
### Measurement settings
* **Snap to vertices**: Toggle snapping to the nearest vertex on the model.
* **Chain measurements**: Toggle chaining measurements for point-to-point measurements.
* **Units**: Switch to your preferred unit display from standard length units (mm, m, ft, in) in imperial or metric.
* **Precision**: Adjust the decimal precision to suit your needs.
* **Delete measurements**: Delete all measurements from the model.
Press the `Escape` key on your keyboard to stop chaining measurment points,
or conclude the area measurement.
Yes, your first measurement point will be both a start point and also define
the plane of the area measurement.
No, Each area measurement is it's own entity. For more complex area
measurements you can add the Room and Area Scheduler premade automation to
your model.
### Measurement types
* **Point-to-point measurement.** Click two points in the model to get the straight-line distance.
* **Perpendicular measurement.** Measure the shortest distance from a point to a line or plane.
* **Area measurement.** Measure the area of a polygon or closed polyline.
* **Point coordinates.** Get the exact XYZ coordinates at any point in the model.
### Measurement settings
* **Snap to vertices**: Toggle snapping to the nearest vertex on the model.
* **Chain measurements**: Toggle chaining measurements for point-to-point measurements.
* **Units**: Switch to your preferred unit display from standard length units (mm, m, ft, in) in imperial or metric.
* **Precision**: Adjust the decimal precision to suit your needs.
* **Delete measurements**: Delete all measurements from the model.
Press the `Escape` key on your keyboard to stop chaining measurment points,
or conclude the area measurement.
Yes, your first measurement point will be both a start point and also define
the plane of the area measurement.
No, Each area measurement is it's own entity. For more complex area
measurements you can add the Room and Area Scheduler premade automation to
your model.