> ## Documentation Index
> Fetch the complete documentation index at: https://docs.speckle.systems/llms.txt
> Use this file to discover all available pages before exploring further.
# How to use Speckle for ETABS
> Step-by-step guide for using the ETABS connector
export const app_3 = "ETABS"
export const app_2 = "ETABS"
export const app_1 = "ETABS"
export const app_0 = "ETABS"
export const versions_0 = "21 & 22"
export const os_0 = "Windows"
Speckle currently supports {app_0} versions: **{versions_0}**. The {app_0} connector works on **{os_0}**
only.
## Setup
Install your [{app_1} connector](/connectors/installation)
1. Go to **Tools**.
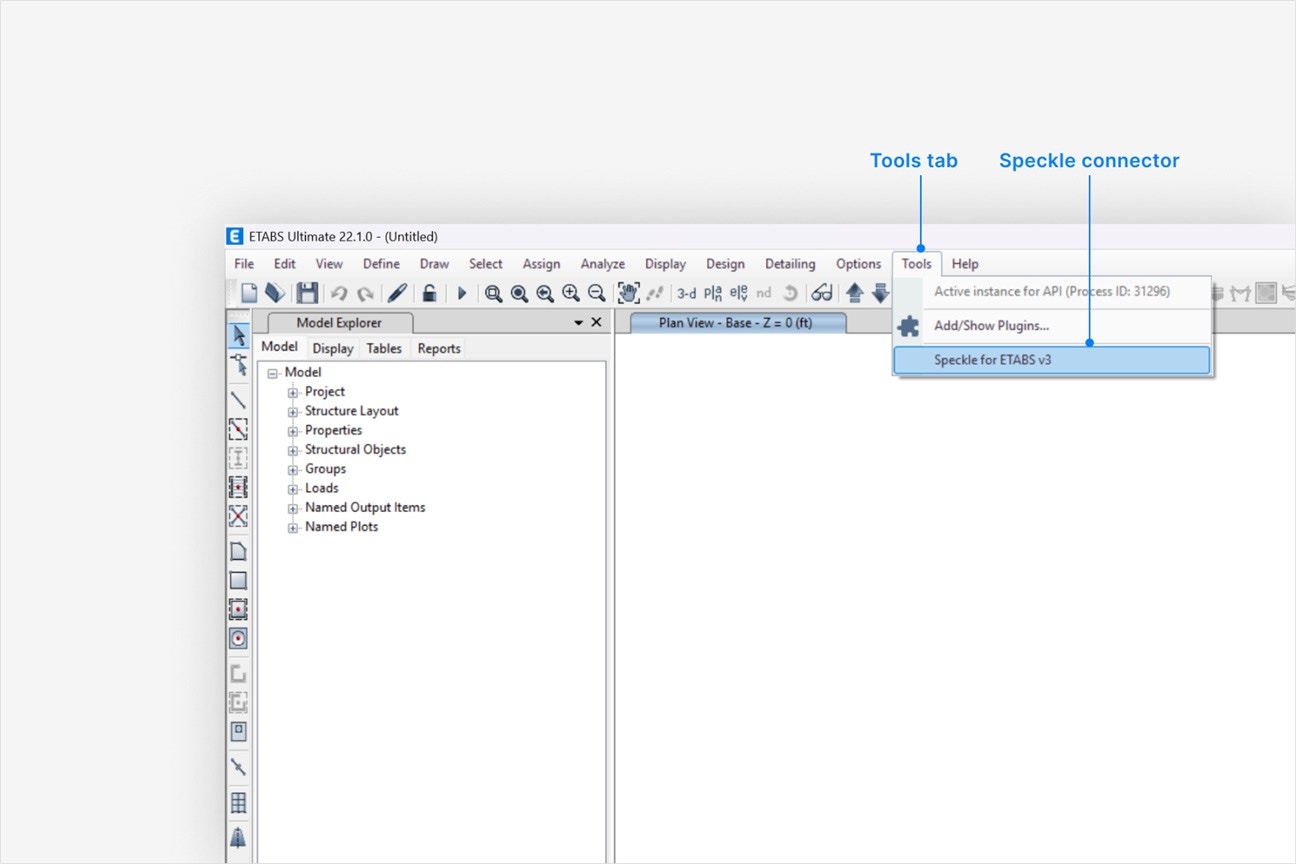 2. Select **Speckle** to open the ETABS connector.
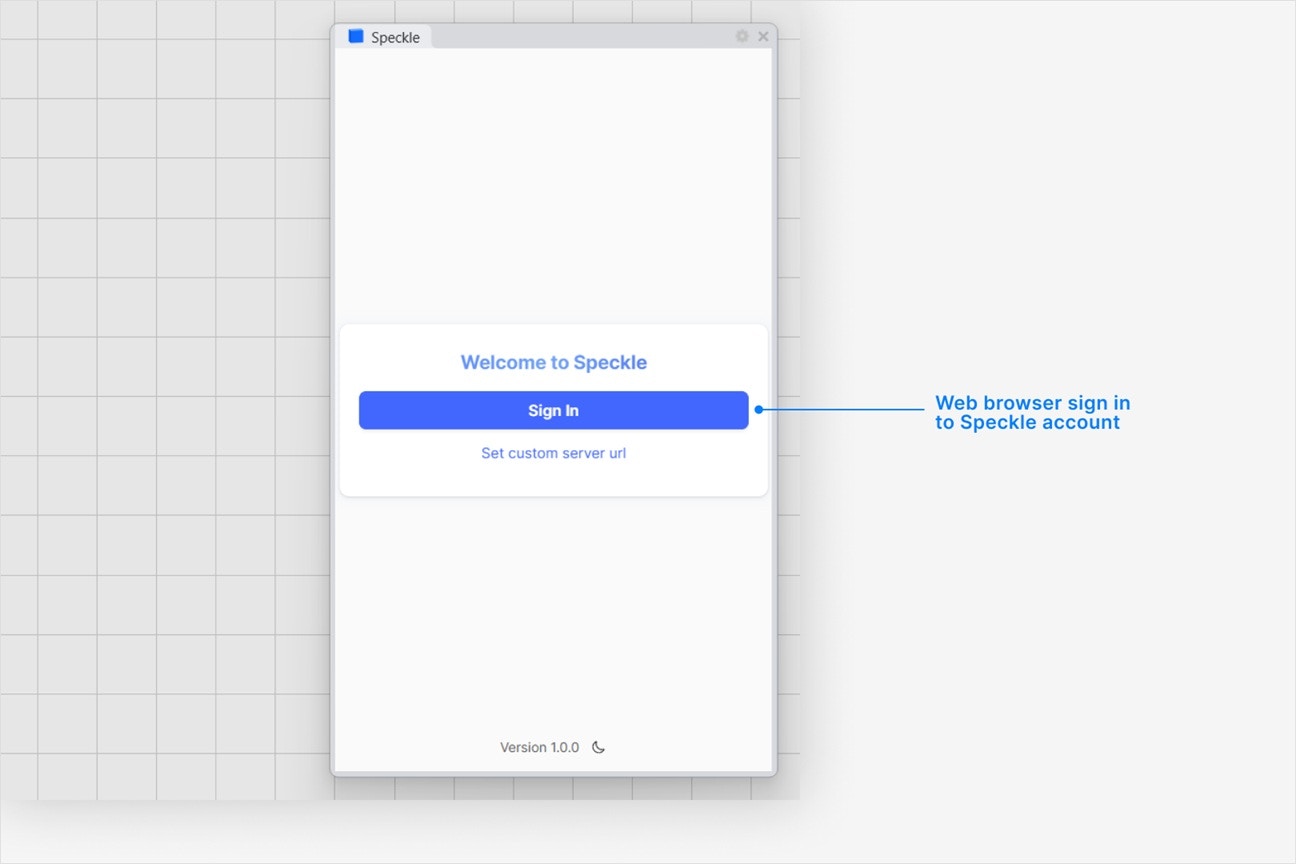
3) Select **Sign in** if you haven't linked your Speckle account.
2. Select **Speckle** to open the ETABS connector.
3) Select **Sign in** if you haven't linked your Speckle account.
 If the plugin is not showing up under Tools, you can manually load the ETABS connector:
1. Navigate to `Tools -> Add/Show Plugins...`
2. Click `Browse` and navigate to the path `{localappdata}\Computers and Structures\ETABS xx\Speckle\`
3. Select the `SpeckleConnectorCSI.dll` file. Click `Add` and then `Ok`.
1. Make sure your version of {app_2} is one of the supported versions.
2. Uninstall and [reinstall your connector](/connectors/installation).
Note: Make sure you are **not** selecting **Run as administrator** when installing - this will install for the administrator user, and not your own user.
Instead, double-click the `.exe` or right-clicking and then selecting `Open` to run the installer.
Installation issues can also be caused by conflicting plugins.
If you're still experiencing problems, please report it in our [Community Forum](https://speckle.community/c/help) and include the following information:
* Your application version
* Your Speckle connector version
If your connector window is floating, **try docking it to your application** to fix blank UI
issues. For major issues, you can sometimes find a `log` file in your directory at
`AppData\Roaming\Speckle\Logs`. Please report your problem in our [Community
Forum](https://speckle.community/c/help) and include the following information: - Your application
version - Your Speckle connector version - A copy of the log
This can happen if our **desktop service** isn't running. Desktop Service is used for
authenticating new accounts. If it's not running, search for **Speckle Desktop Services** in
Windows search and run it.
All Speckle connectors are installed like any other program. You can uninstall them directly from
your system's `Applications`. For a full uninstall, you should also remove **Speckle Desktop
Services** as well as your Speckle connector.
You can always download the latest version of the connector [in the web
app](https://app.speckle.systems/connectors). If a new version of the connector is available, you
will also see a notification in your connector UI.
## Publishing a Model
If the plugin is not showing up under Tools, you can manually load the ETABS connector:
1. Navigate to `Tools -> Add/Show Plugins...`
2. Click `Browse` and navigate to the path `{localappdata}\Computers and Structures\ETABS xx\Speckle\`
3. Select the `SpeckleConnectorCSI.dll` file. Click `Add` and then `Ok`.
1. Make sure your version of {app_2} is one of the supported versions.
2. Uninstall and [reinstall your connector](/connectors/installation).
Note: Make sure you are **not** selecting **Run as administrator** when installing - this will install for the administrator user, and not your own user.
Instead, double-click the `.exe` or right-clicking and then selecting `Open` to run the installer.
Installation issues can also be caused by conflicting plugins.
If you're still experiencing problems, please report it in our [Community Forum](https://speckle.community/c/help) and include the following information:
* Your application version
* Your Speckle connector version
If your connector window is floating, **try docking it to your application** to fix blank UI
issues. For major issues, you can sometimes find a `log` file in your directory at
`AppData\Roaming\Speckle\Logs`. Please report your problem in our [Community
Forum](https://speckle.community/c/help) and include the following information: - Your application
version - Your Speckle connector version - A copy of the log
This can happen if our **desktop service** isn't running. Desktop Service is used for
authenticating new accounts. If it's not running, search for **Speckle Desktop Services** in
Windows search and run it.
All Speckle connectors are installed like any other program. You can uninstall them directly from
your system's `Applications`. For a full uninstall, you should also remove **Speckle Desktop
Services** as well as your Speckle connector.
You can always download the latest version of the connector [in the web
app](https://app.speckle.systems/connectors). If a new version of the connector is available, you
will also see a notification in your connector UI.
## Publishing a Model
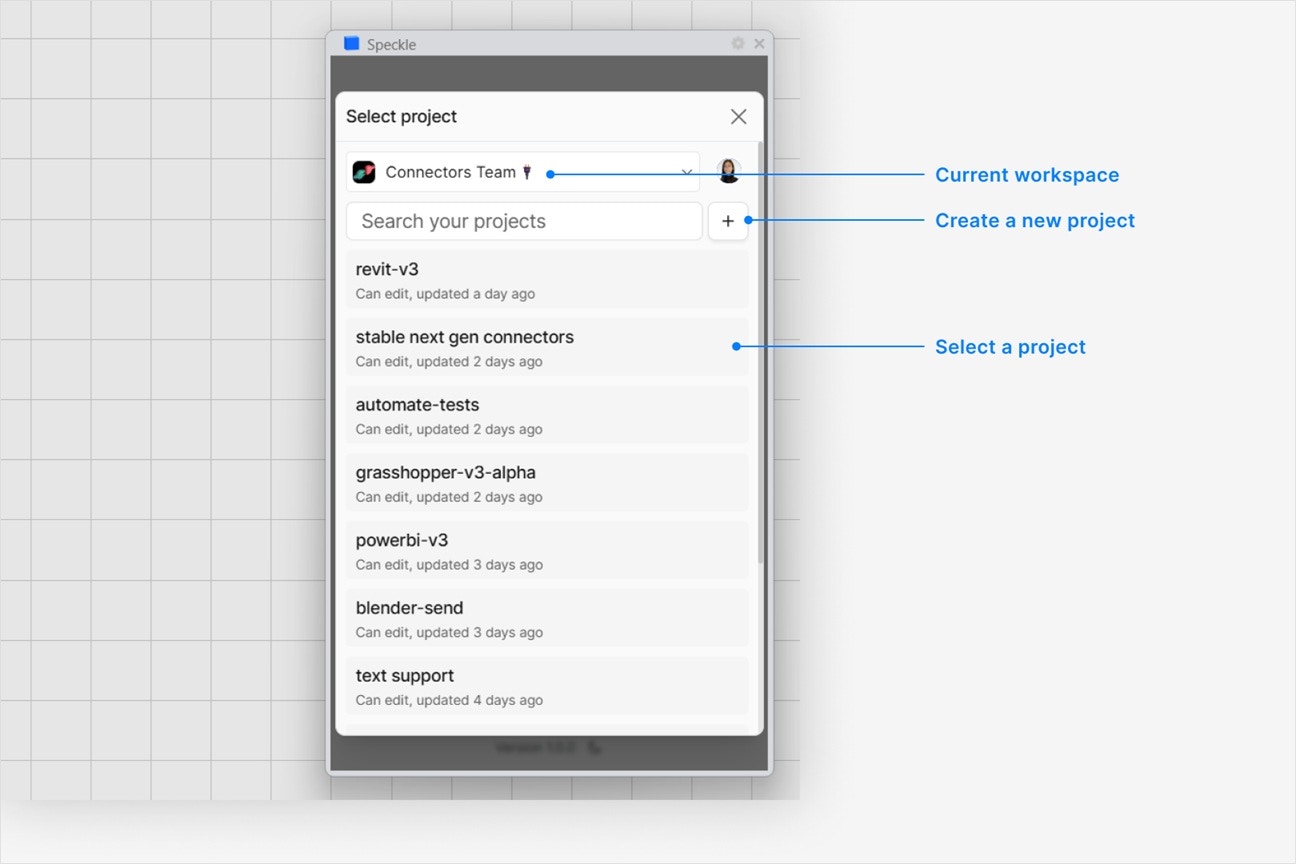
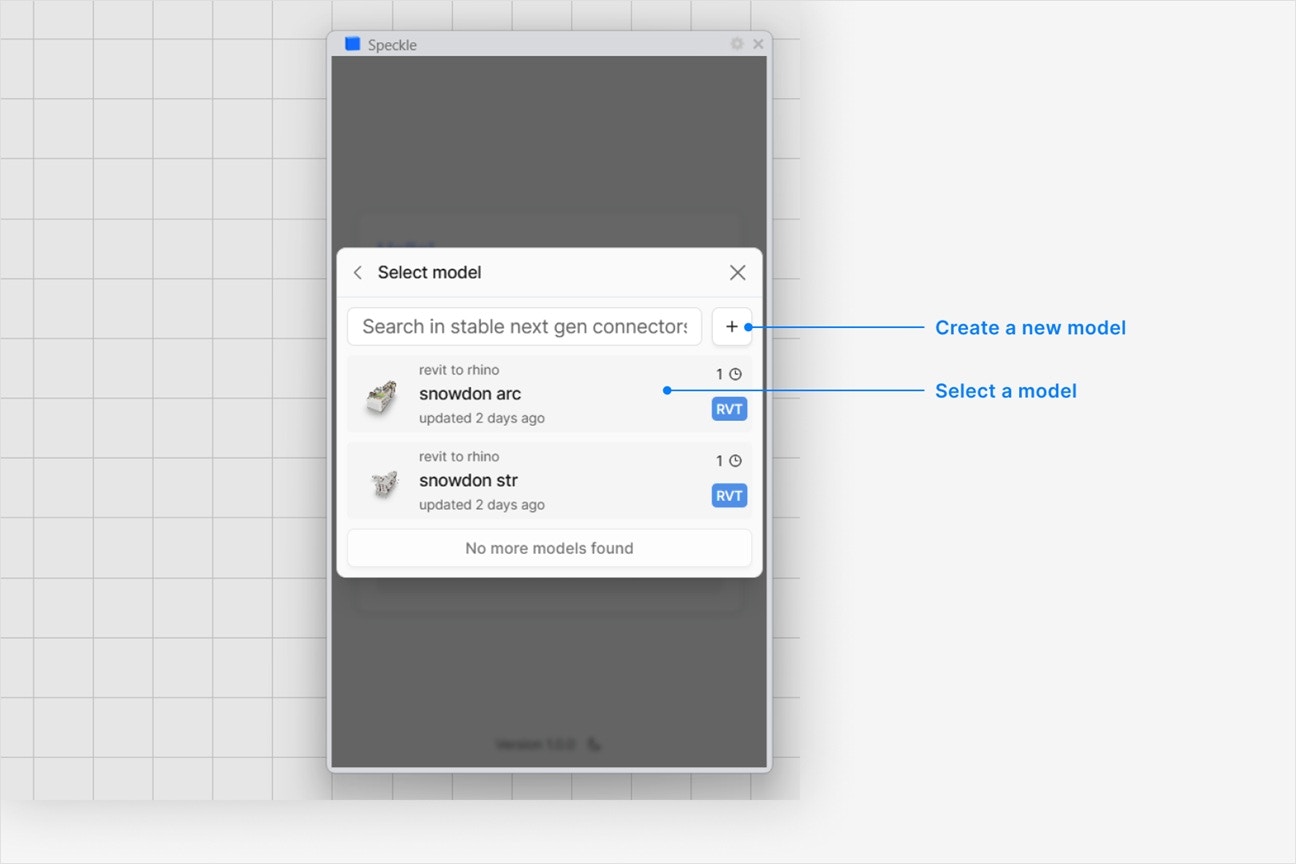
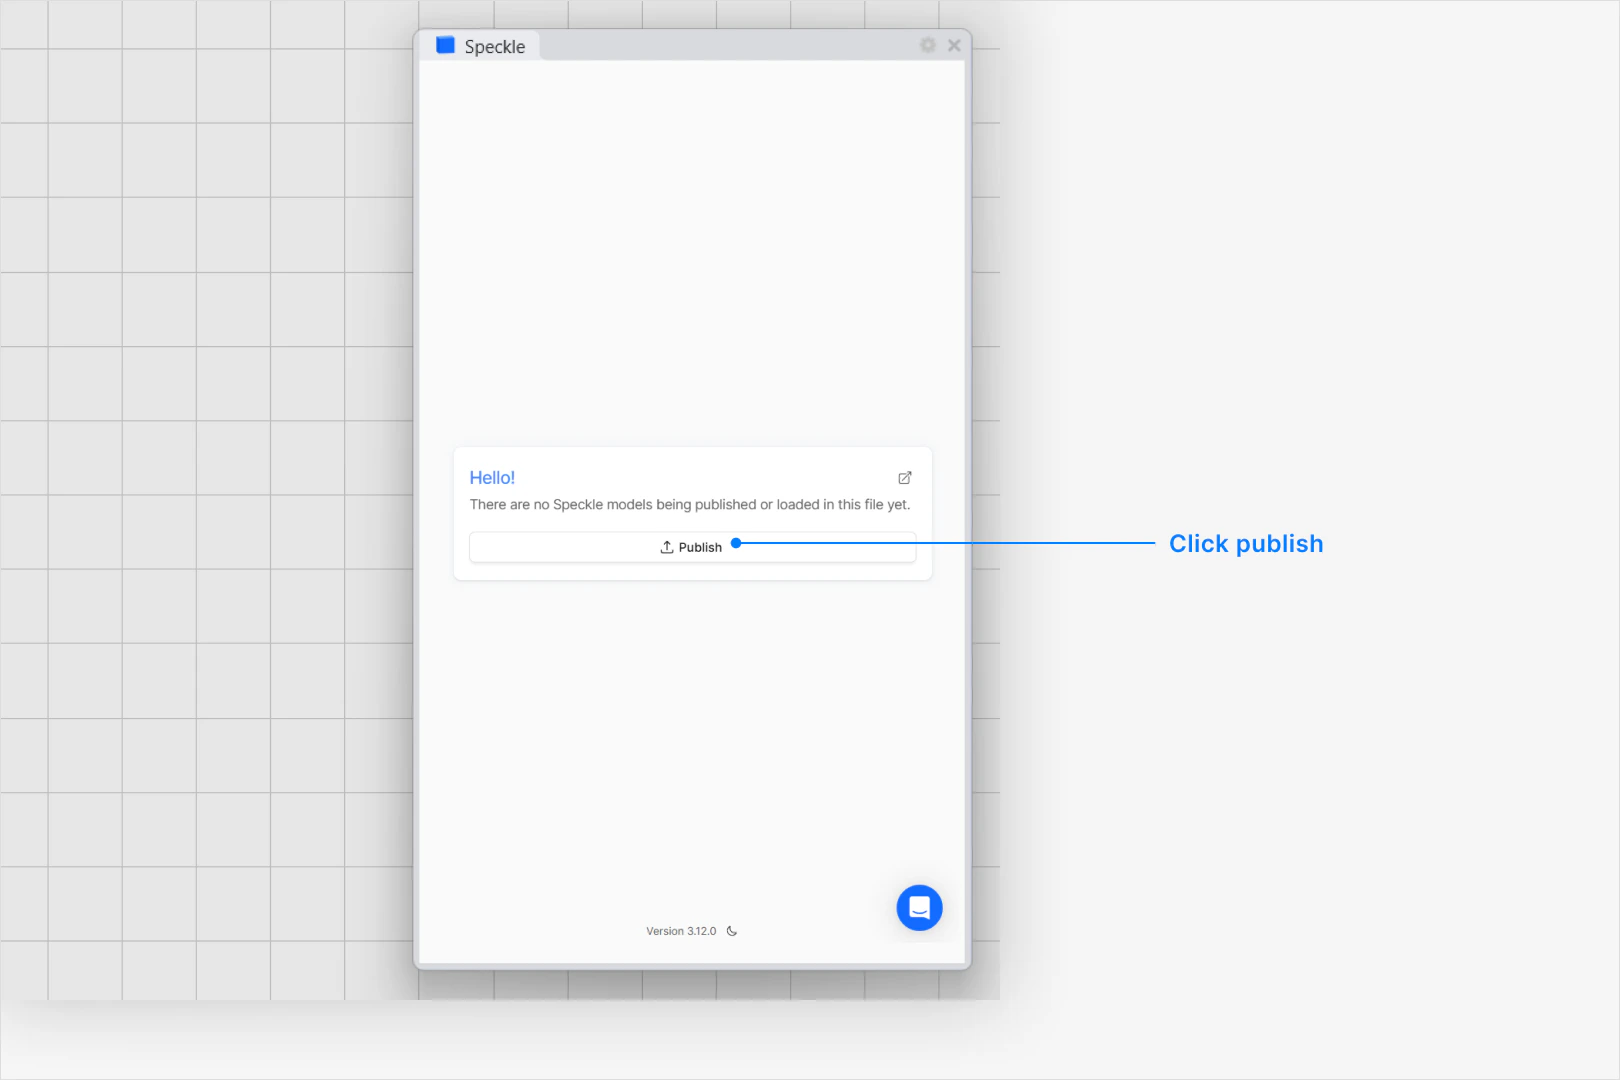 * Select an existing project - or select **New Project** to create one
 * Select an existing model - or select **New Model** to create one
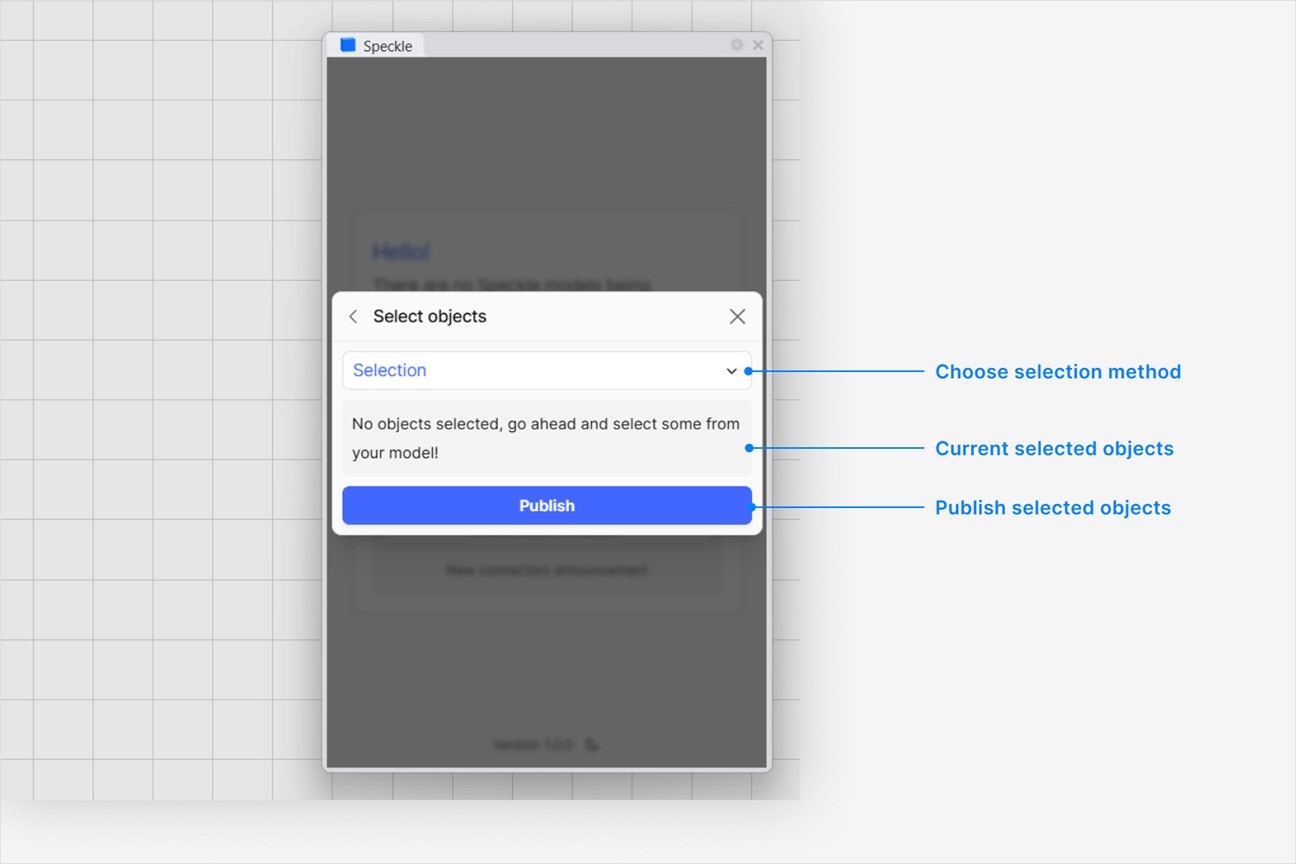
 1. In your application viewport, select the elements you want to publish.
2. Select **Publish**.
1. In your application viewport, select the elements you want to publish.
2. Select **Publish**.
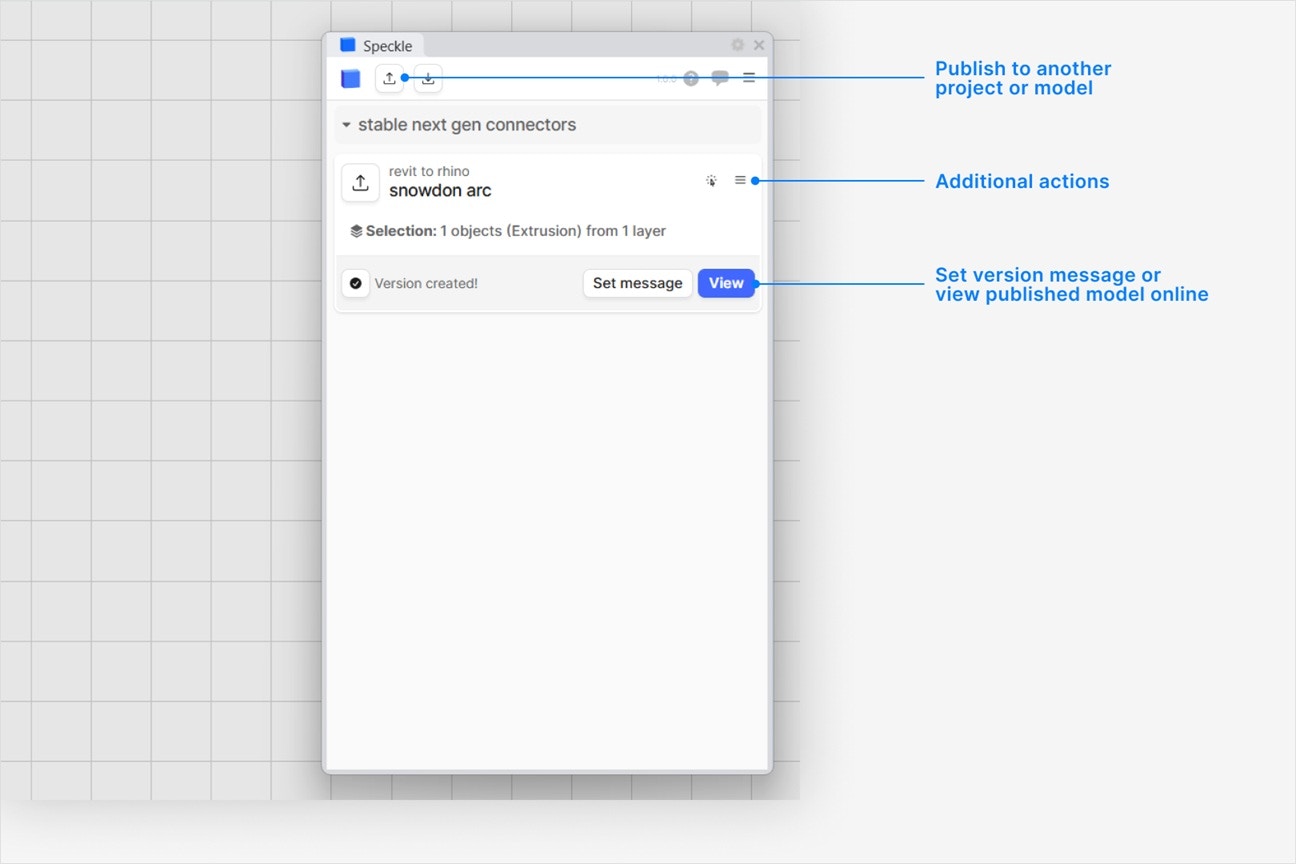 3. Your model is now published to Speckle and is available to the rest of your team.
All selectable model objects can be published: `Joints`, `Frames`, `Tendons`, `Shells` and `Links`. Each published object contains the following information:
* Type
* Geometry as `Mesh` , `Curve` or `Point`
* Children objects, such as `Joints`
* Custom properties
All custom properties can be found under the `properties` field when you select and view an ETABS object in your browser. Custom properties vary depending on the type of ETABS element, and can include:
* Assignments (e.g. `material` and `section`)
* Geometry metrics (e.g. length or area)
* Object ID (e.g. sub-classification for `Frame` -> `Column`, `Beam`, or `Brace`, label, and associated level)
The specific properties for materials and sections will not appear on individual model objects. To view your model materials and sections in your web browser:
1. Open the `Scene Explorer` tab in the Navigation Bar to the left (or press `Shift` + `E`)
2. Click `Switch to Dev Mode`. This will give you full access to all objects and properties in your model.
3. Expand the `sectionProxies` or `materialProxies` item.
4. Expand any item in this list to see a `Section` or `Material` with all of its properties. The section can be matched back to any element based on its `name`, and the material can be matched to any section based on its `name`.
Yes. ETABS analysis results are published as model-level data, not as properties on each individual object.
In the published Speckle model, the model version points to a root object, also called the Root Collection. That root object is the top level of the published data package. ETABS stores available model analysis results there under `info.analysisResults`.
To inspect them in the browser, open the model version, switch the `Scene Explorer` to Dev Mode, and inspect the root object instead of selecting an individual frame, shell, joint, or link.
The following data is not published as properties on individual ETABS objects:
* Load cases, patterns and combinations
* Grids and grid information
* Analysis results, which are published at the root object level under `info.analysisResults`
In the viewer, select the **View Modes** button in the side bar, and switch the view mode to
**Shaded**. If you still don't see your object colors, let us know in our [Community
Forum](https://speckle.community/c/help)
**Image texture files are not supported.** Speckle does **not** transfer bitmaps or other image maps (such as JPG or PNG files) embedded in materials from the source application.
Speckle **does** carry [PBR-style material data](/developers/sdks/python/guides/understanding-speckle-mesh#render-materials) in general—where a connector maps to it, materials can include properties such as base colour, opacity, metalness, roughness, and emissive colour. That is not the same as shipping texture images: you get numeric material parameters, not image assets used for wood grain, brick patterns, and similar in the authoring tool.
Different materials can still appear separately in the destination with distinct colours and PBR fields. What you see may look closer to a consistent shaded or PBR preview than to the full render-appearance with image maps in tools such as Revit or SketchUp. To use image textures in your target application, apply or remap them locally after you publish or load.
After you publish a Speckle model, click on the **Report** button to see any errors that may have
occurred. Click on any item in the report to highlight that item in your application. Some objects
may not be supported for publishing.
## Loading a Model
The {app_3} connector is publish-only.
If you would like to be able to load a model into {app_3}, please reach out on our Community Forum:
[https://speckle.community/c/features](https://speckle.community/c/features/7) Include the following
information: - Which application your Speckle model is published from - Why you want to load your
model into {app_3}- How frequently you would use this workflow (daily, weekly, monthly, longer).
3. Your model is now published to Speckle and is available to the rest of your team.
All selectable model objects can be published: `Joints`, `Frames`, `Tendons`, `Shells` and `Links`. Each published object contains the following information:
* Type
* Geometry as `Mesh` , `Curve` or `Point`
* Children objects, such as `Joints`
* Custom properties
All custom properties can be found under the `properties` field when you select and view an ETABS object in your browser. Custom properties vary depending on the type of ETABS element, and can include:
* Assignments (e.g. `material` and `section`)
* Geometry metrics (e.g. length or area)
* Object ID (e.g. sub-classification for `Frame` -> `Column`, `Beam`, or `Brace`, label, and associated level)
The specific properties for materials and sections will not appear on individual model objects. To view your model materials and sections in your web browser:
1. Open the `Scene Explorer` tab in the Navigation Bar to the left (or press `Shift` + `E`)
2. Click `Switch to Dev Mode`. This will give you full access to all objects and properties in your model.
3. Expand the `sectionProxies` or `materialProxies` item.
4. Expand any item in this list to see a `Section` or `Material` with all of its properties. The section can be matched back to any element based on its `name`, and the material can be matched to any section based on its `name`.
Yes. ETABS analysis results are published as model-level data, not as properties on each individual object.
In the published Speckle model, the model version points to a root object, also called the Root Collection. That root object is the top level of the published data package. ETABS stores available model analysis results there under `info.analysisResults`.
To inspect them in the browser, open the model version, switch the `Scene Explorer` to Dev Mode, and inspect the root object instead of selecting an individual frame, shell, joint, or link.
The following data is not published as properties on individual ETABS objects:
* Load cases, patterns and combinations
* Grids and grid information
* Analysis results, which are published at the root object level under `info.analysisResults`
In the viewer, select the **View Modes** button in the side bar, and switch the view mode to
**Shaded**. If you still don't see your object colors, let us know in our [Community
Forum](https://speckle.community/c/help)
**Image texture files are not supported.** Speckle does **not** transfer bitmaps or other image maps (such as JPG or PNG files) embedded in materials from the source application.
Speckle **does** carry [PBR-style material data](/developers/sdks/python/guides/understanding-speckle-mesh#render-materials) in general—where a connector maps to it, materials can include properties such as base colour, opacity, metalness, roughness, and emissive colour. That is not the same as shipping texture images: you get numeric material parameters, not image assets used for wood grain, brick patterns, and similar in the authoring tool.
Different materials can still appear separately in the destination with distinct colours and PBR fields. What you see may look closer to a consistent shaded or PBR preview than to the full render-appearance with image maps in tools such as Revit or SketchUp. To use image textures in your target application, apply or remap them locally after you publish or load.
After you publish a Speckle model, click on the **Report** button to see any errors that may have
occurred. Click on any item in the report to highlight that item in your application. Some objects
may not be supported for publishing.
## Loading a Model
The {app_3} connector is publish-only.
If you would like to be able to load a model into {app_3}, please reach out on our Community Forum:
[https://speckle.community/c/features](https://speckle.community/c/features/7) Include the following
information: - Which application your Speckle model is published from - Why you want to load your
model into {app_3}- How frequently you would use this workflow (daily, weekly, monthly, longer).