> ## Documentation Index
> Fetch the complete documentation index at: https://docs.speckle.systems/llms.txt
> Use this file to discover all available pages before exploring further.
# Developer Nodes
> Working with Speckle developer nodes
## Using a developer access token for authentication
If you are using Speckle for Grasshopper in a headless Rhino environment such as Rhino Compute, or you want access to a Speckle account via developer access token, you can use the **Speckle Model URL** node.
 The developer token used must have the following scopes enabled:
`profile:read`, `profile:email`, `stream:read`, and `workspace:read` (unless on a non-workspace enabled server), as well as any other write scopes needed
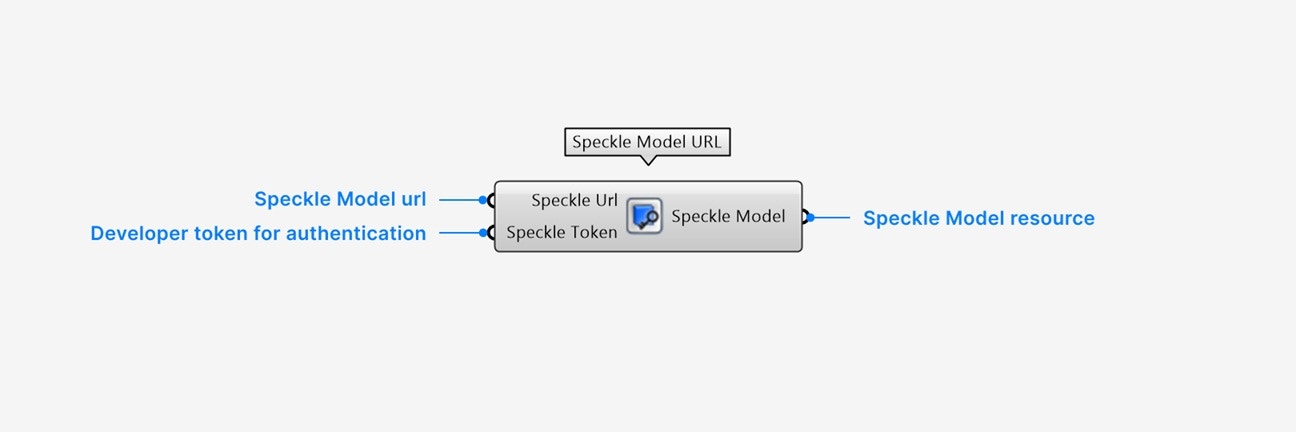
**Inputs**
1. Add the **Speckle URL** input to the Speckle Model you want to create a resource for.
2. Add the **Speckle Token** input string of your developer access token.
Tokens can be created [in the Speckle app](https://app.speckle.systems/settings/user/developer) with your desired permissions.
**Outputs**
1. The **Speckle Model** output contains the Model resource of your input URL.
## Inspecting all attributes on Speckle params
When viewing your model in Speckle's web app, you can switch to [Dev Mode](../../3d-viewer/exploration#dev-eloper-mode) to thoroughly inspect all attributes on your Speckle objects. Some examples of exposed fields in dev mode are:
* The **Speckle ID**, which uniquely identifies this object in the Speckle server.
* **Geometric** attributes
ex: the knot vector of a NURBS curve.
* **Application-specific** attributes on Data Objects
ex: the category, family, and level of Revit Objects.
* Any **children objects** in Data Objects
ex: the baselines of corridor Civil Objects.
* Any **dynamically attached** attributes.
Use the **Deconstruct** node to access all fields of your Speckle param in Grasshopper as you would in Dev Mode in your browser.
The developer token used must have the following scopes enabled:
`profile:read`, `profile:email`, `stream:read`, and `workspace:read` (unless on a non-workspace enabled server), as well as any other write scopes needed
**Inputs**
1. Add the **Speckle URL** input to the Speckle Model you want to create a resource for.
2. Add the **Speckle Token** input string of your developer access token.
Tokens can be created [in the Speckle app](https://app.speckle.systems/settings/user/developer) with your desired permissions.
**Outputs**
1. The **Speckle Model** output contains the Model resource of your input URL.
## Inspecting all attributes on Speckle params
When viewing your model in Speckle's web app, you can switch to [Dev Mode](../../3d-viewer/exploration#dev-eloper-mode) to thoroughly inspect all attributes on your Speckle objects. Some examples of exposed fields in dev mode are:
* The **Speckle ID**, which uniquely identifies this object in the Speckle server.
* **Geometric** attributes
ex: the knot vector of a NURBS curve.
* **Application-specific** attributes on Data Objects
ex: the category, family, and level of Revit Objects.
* Any **children objects** in Data Objects
ex: the baselines of corridor Civil Objects.
* Any **dynamically attached** attributes.
Use the **Deconstruct** node to access all fields of your Speckle param in Grasshopper as you would in Dev Mode in your browser.
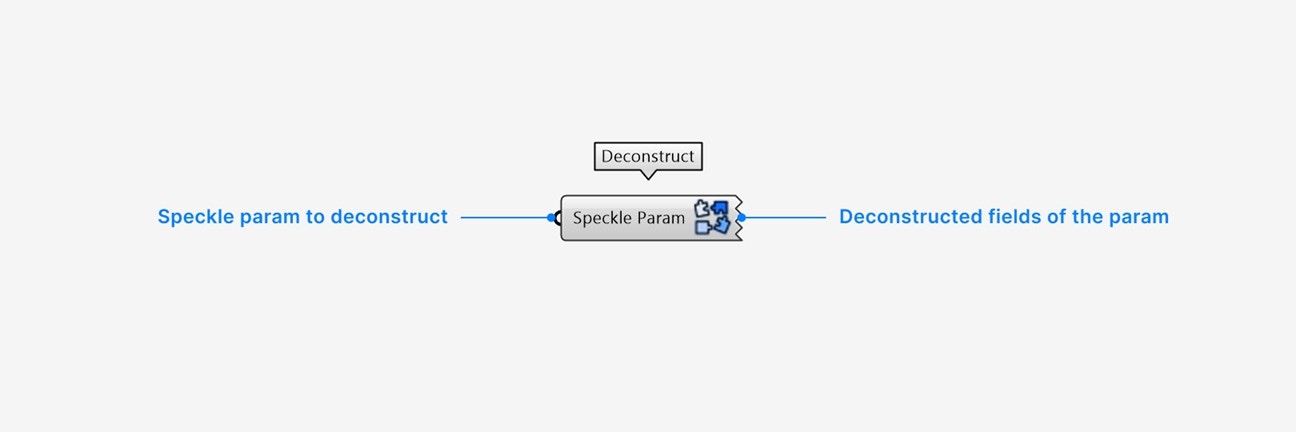 **Inputs**
1. Add a **Speckle Param** input of any Speckle parameter you would like to inspect.
**Outputs**
1. An output will be created for every direct attribute on the input Speckle Param.
**Additional Settings**
`Right-click` an output param for additional settings:
* Select **extract parameter** to automatically create a new param node with the value and name of the output param.
This node is intended for attribute inspection on individual objects, or on lists of objects of the same Speckle type.
If you would like access to properties across different objects, please request this to be added to our passthrough nodes on our forum.
## Synchronous operations
For any scripts operating in contexts which require synchronous solving of nodes, use the **Publish (sync)** and **Load (sync)** nodes instead of the default Publish and Load nodes.
## Using Speckle with C#/Python script nodes
### C# script
Speckle publishes nuget packages for our C# SDK. You will need to install the following nugets for your custom C# script:
* Use the [Speckle.Sdk](https://www.nuget.org/packages/Speckle.Sdk) nuget for publish and load operations, serialization, core objects classes like **Base** and **Collection**, and more.
* Use the [Speckle.Objects](https://www.nuget.org/packages/Speckle.Objects) nuget for access to all geometry and additional object classes.
**Inputs**
1. Add a **Speckle Param** input of any Speckle parameter you would like to inspect.
**Outputs**
1. An output will be created for every direct attribute on the input Speckle Param.
**Additional Settings**
`Right-click` an output param for additional settings:
* Select **extract parameter** to automatically create a new param node with the value and name of the output param.
This node is intended for attribute inspection on individual objects, or on lists of objects of the same Speckle type.
If you would like access to properties across different objects, please request this to be added to our passthrough nodes on our forum.
## Synchronous operations
For any scripts operating in contexts which require synchronous solving of nodes, use the **Publish (sync)** and **Load (sync)** nodes instead of the default Publish and Load nodes.
## Using Speckle with C#/Python script nodes
### C# script
Speckle publishes nuget packages for our C# SDK. You will need to install the following nugets for your custom C# script:
* Use the [Speckle.Sdk](https://www.nuget.org/packages/Speckle.Sdk) nuget for publish and load operations, serialization, core objects classes like **Base** and **Collection**, and more.
* Use the [Speckle.Objects](https://www.nuget.org/packages/Speckle.Objects) nuget for access to all geometry and additional object classes.
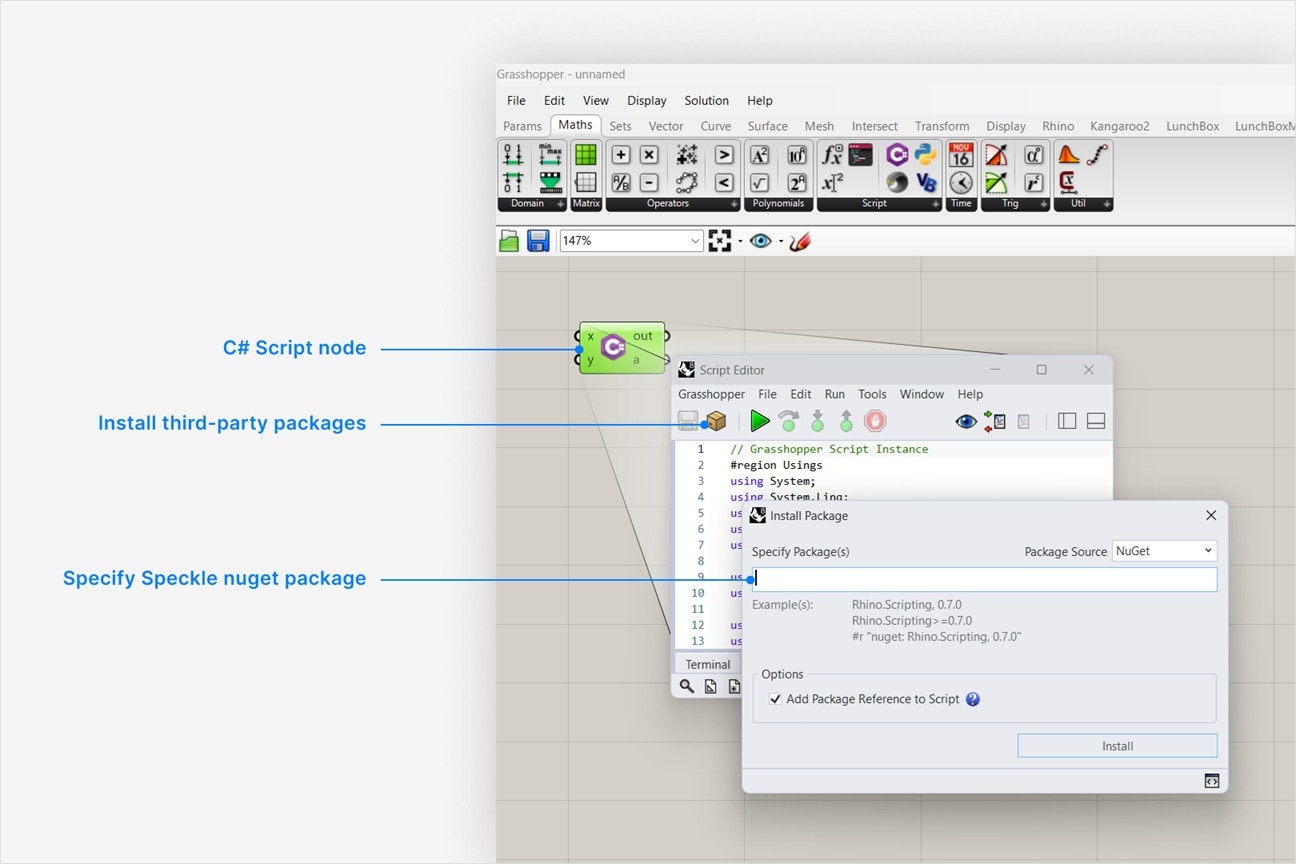 1. This node can be found in **Maths** > **Script**.
2. Double-click the node to open the script editor window.
1. Click the box icon to install a third-party package for your script.
2. Navigate to the Speckle.Sdk nuget package in your web browser (links above).
3. Go to the **Script & Interactive** tab and copy the value to your clipboard. The copied text should look like this, with the most recent version of the sdk.
```
#r "nuget: Speckle.Sdk, 3.5.5"
```
4. In Grasshopper, paste the copied value into the **Specify Package(s)** field and click **Install**.
Repeat the previous step for the Speckle.Objects nuget package. The copied text should look like this, with the most recent version of the sdk.
```
#r "nuget: Speckle.Objects, 3.5.5"
```
### Python script
Speckle python SDK can be installed with pip for your custom Grasshopper python script
* Use the [specklepy](https://pypi.org/project/specklepy/) package for publish and load operations, serialization, all objects classes, and more.
1. This node can be found in **Maths** > **Script**.
2. Double-click the node to open the script editor window.
1. Click the box icon to install a third-party package for your script.
2. Navigate to the Speckle.Sdk nuget package in your web browser (links above).
3. Go to the **Script & Interactive** tab and copy the value to your clipboard. The copied text should look like this, with the most recent version of the sdk.
```
#r "nuget: Speckle.Sdk, 3.5.5"
```
4. In Grasshopper, paste the copied value into the **Specify Package(s)** field and click **Install**.
Repeat the previous step for the Speckle.Objects nuget package. The copied text should look like this, with the most recent version of the sdk.
```
#r "nuget: Speckle.Objects, 3.5.5"
```
### Python script
Speckle python SDK can be installed with pip for your custom Grasshopper python script
* Use the [specklepy](https://pypi.org/project/specklepy/) package for publish and load operations, serialization, all objects classes, and more.
 1. This node can be found in **Maths** > **Script**.
2. Double-click the node to open the script editor window.
1. Click the box icon to install a third-party package for your script.
2. Type `specklepy` into the **Specify Package(s)** field and click **Install**. You can verify this is the pip package name in the link above.
```
specklepy
```
1. This node can be found in **Maths** > **Script**.
2. Double-click the node to open the script editor window.
1. Click the box icon to install a third-party package for your script.
2. Type `specklepy` into the **Specify Package(s)** field and click **Install**. You can verify this is the pip package name in the link above.
```
specklepy
```