> ## Documentation Index
> Fetch the complete documentation index at: https://docs.speckle.systems/llms.txt
> Use this file to discover all available pages before exploring further.
# How to use Speckle for Grasshopper
> Step-by-step guide for using the Grasshopper connector
export const app_2 = "Grasshopper"
export const app_1 = "Grasshopper"
export const app_0 = "Grasshopper"
export const versions_0 = "Rhino 7 & 8"
export const os_0 = "Windows"
Speckle currently supports {app_0} versions: **{versions_0}**.
The {app_0} connector works on **{os_0}** only.
## Setup
The **Rhino** and **Grasshopper** connectors are bundled, so if you installed one, you don't need to install the other.
Install your [{app_1} connector](/connectors/installation)
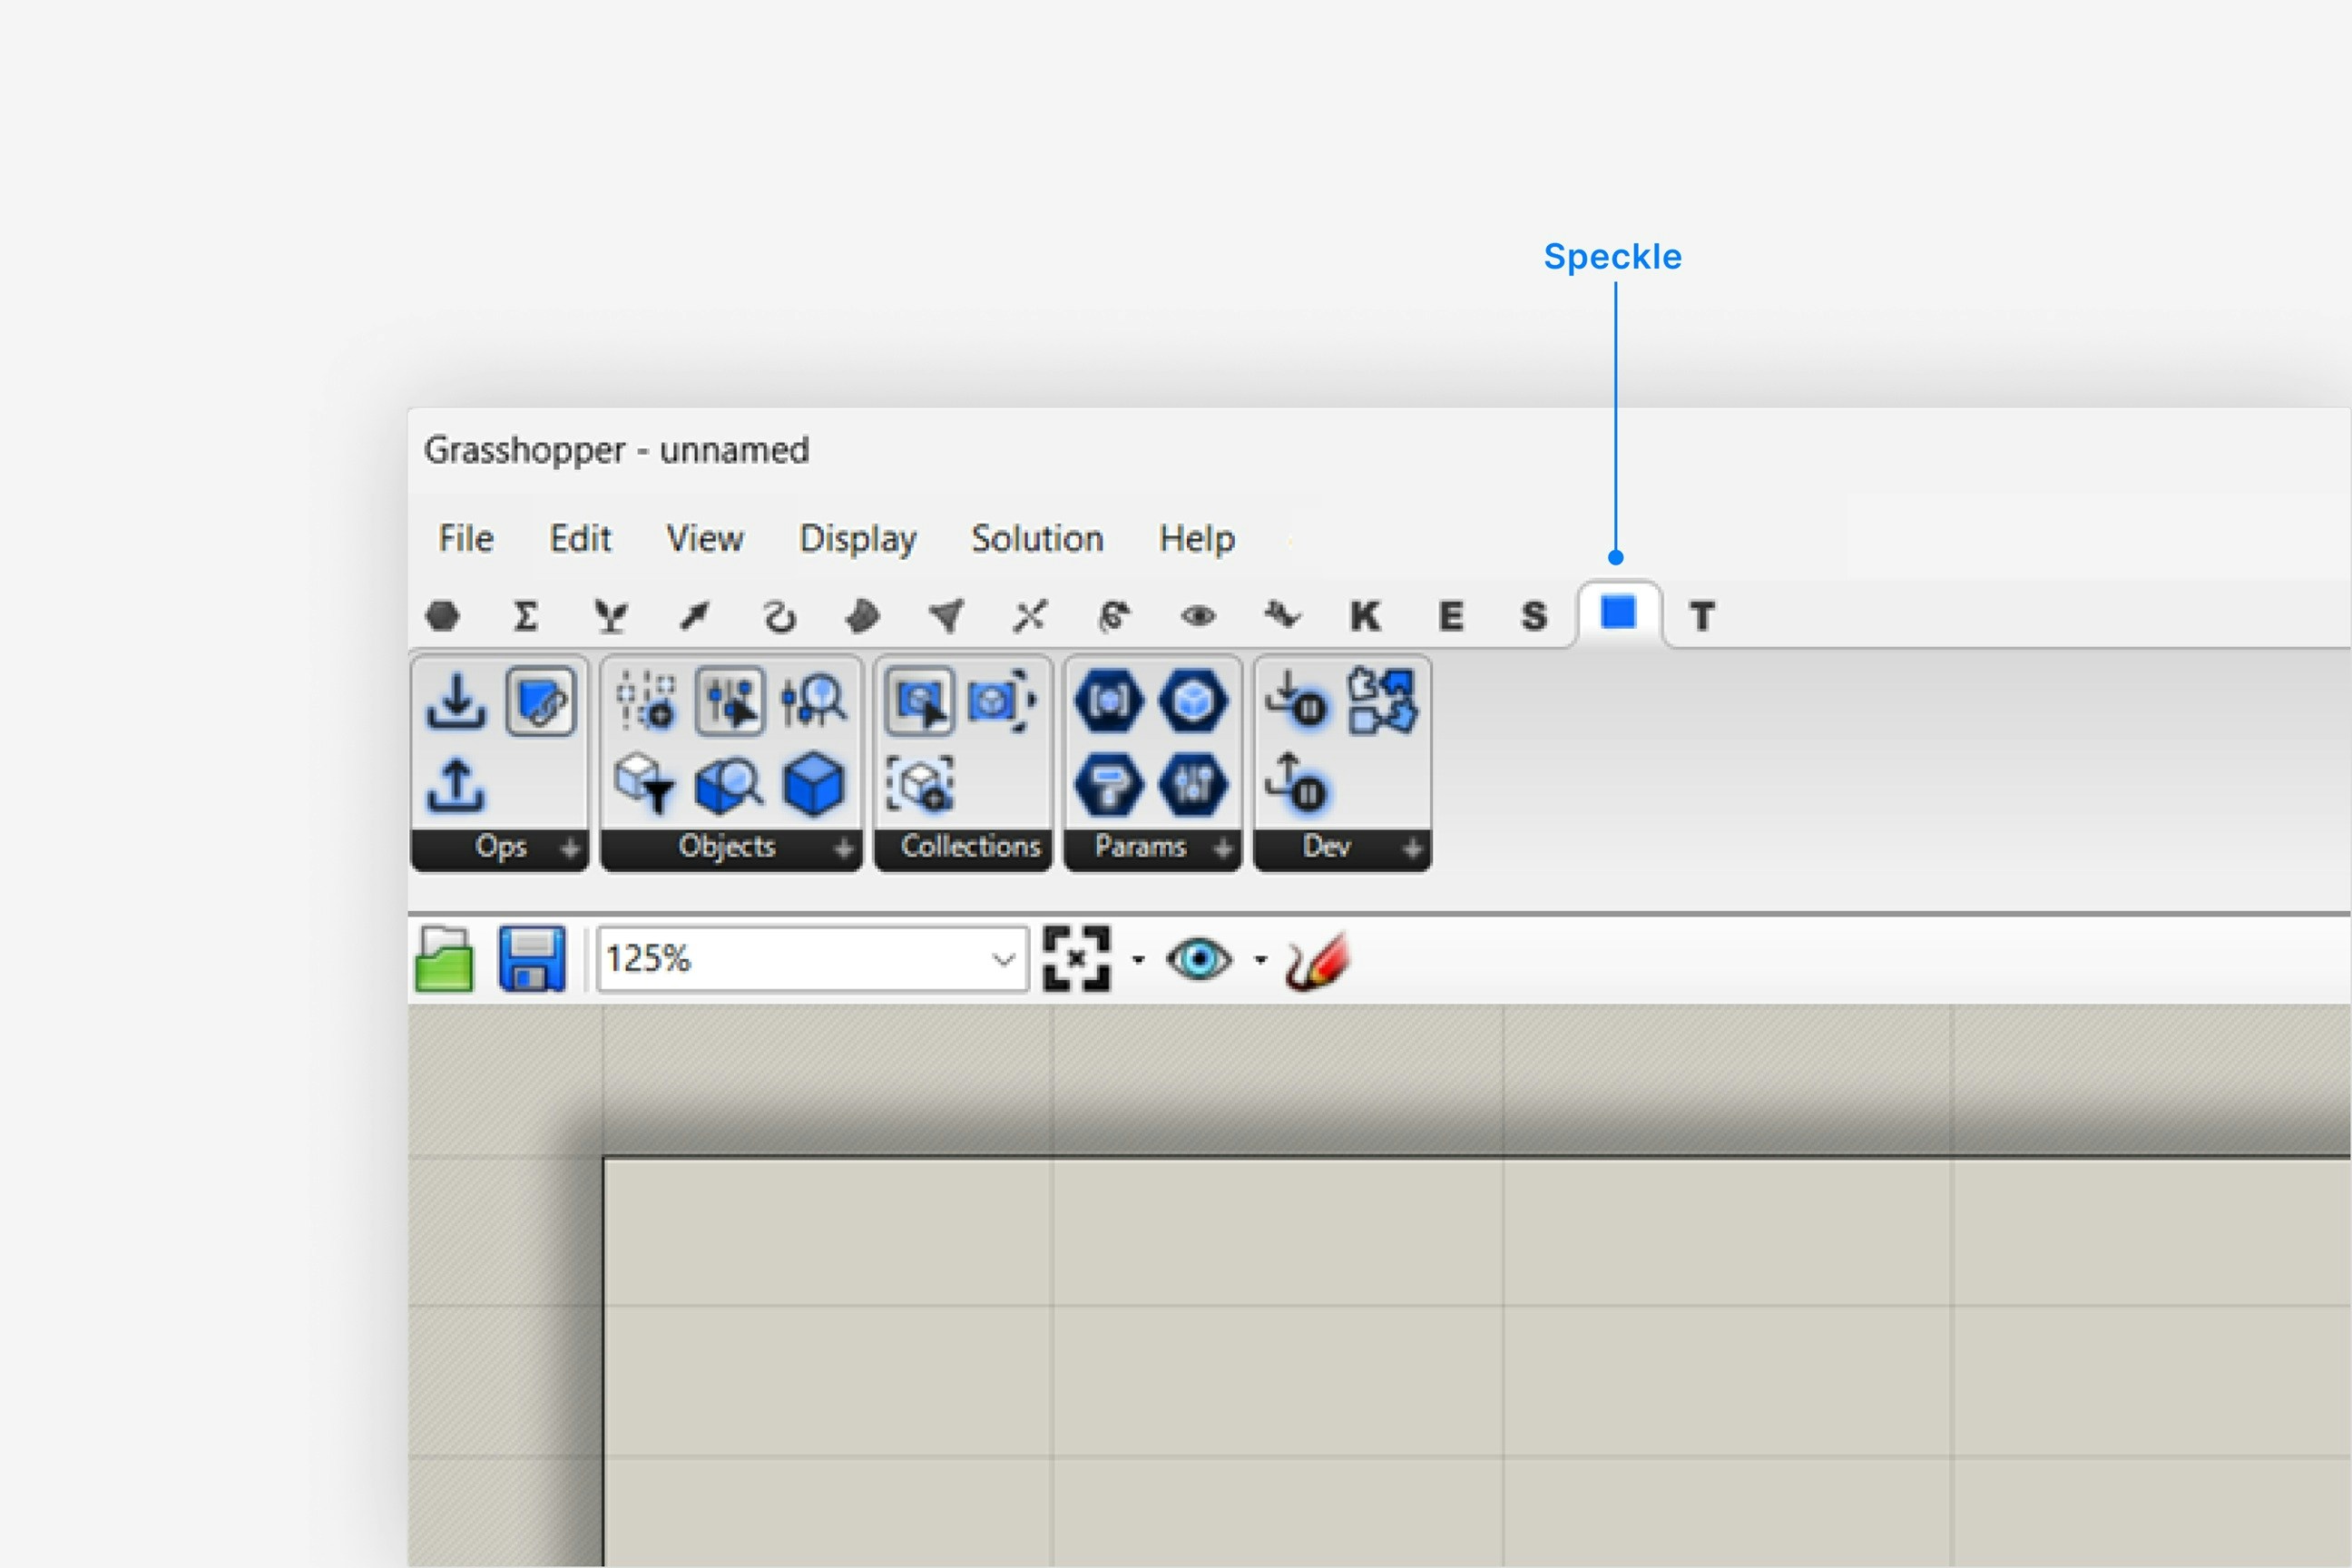
1. Open Grasshopper, and select the **Speckle** tab in the ribbon.
2. If you've already signed in from *any* Speckle connector, skip the next step.
 1. If you've already signed in from *any* Speckle connector, skip this step.
2. Add the **Sign-In** node to the canvas, and click **Sign in**.
3. Complete the sign in process in your web browser.
You only need to sign in to an account once from any Speckle connector.
To switch accounts in Grasshopper, you can select the correct account by right-clicking the **Speckle Model URL** node.
1. Make sure your version of {app_2} is one of the supported versions.
2. Uninstall and [reinstall your connector](/connectors/installation).
Note: Make sure you are **not** selecting **Run as administrator** when installing - this will install for the administrator user, and not your own user.
Instead, double-click the `.exe` or right-clicking and then selecting `Open` to run the installer.
Installation issues can also be caused by conflicting plugins.
If you're still experiencing problems, please report it in our [Community Forum](https://speckle.community/c/help) and include the following information:
* Your application version
* Your Speckle connector version
If your connector window is floating, **try docking it to your application** to fix blank UI issues.
For major issues, you can sometimes find a `log` file in your directory at `AppData\Roaming\Speckle\Logs`.
Please report your problem in our [Community Forum](https://speckle.community/c/help) and include the following information:
* Your application version
* Your Speckle connector version
* A copy of the log
This can happen if our **desktop service** isn't running. Desktop Service is used for authenticating new accounts. If it's not running, search for **Speckle Desktop Services** in Windows search and run it.
All Speckle connectors are installed like any other program. You can uninstall them directly from your system's `Applications`. For a full uninstall, you should also remove **Speckle Desktop Services** as well as your Speckle connector.
You can always download the latest version of the connector [in the web app](https://app.speckle.systems/connectors).
If a new version of the connector is available, you will also see a notification in your connector UI.
## Getting Started
**Template File**: Download our [Grasshopper template file](/connectors/assets) to get started quickly with common Speckle nodes and workflows.
## Publishing a Model
**Sample Files**: Full documentation of all Grasshopper nodes and sample scripts is installed with your connector.
Navigate to **File** > **Special Folders** > **Components Folder** > **Speckle Sample Files** in Grasshopper to find them.
**Template File**: For a quick start, download our [Grasshopper template file](/connectors/assets) with common Speckle nodes and workflows.
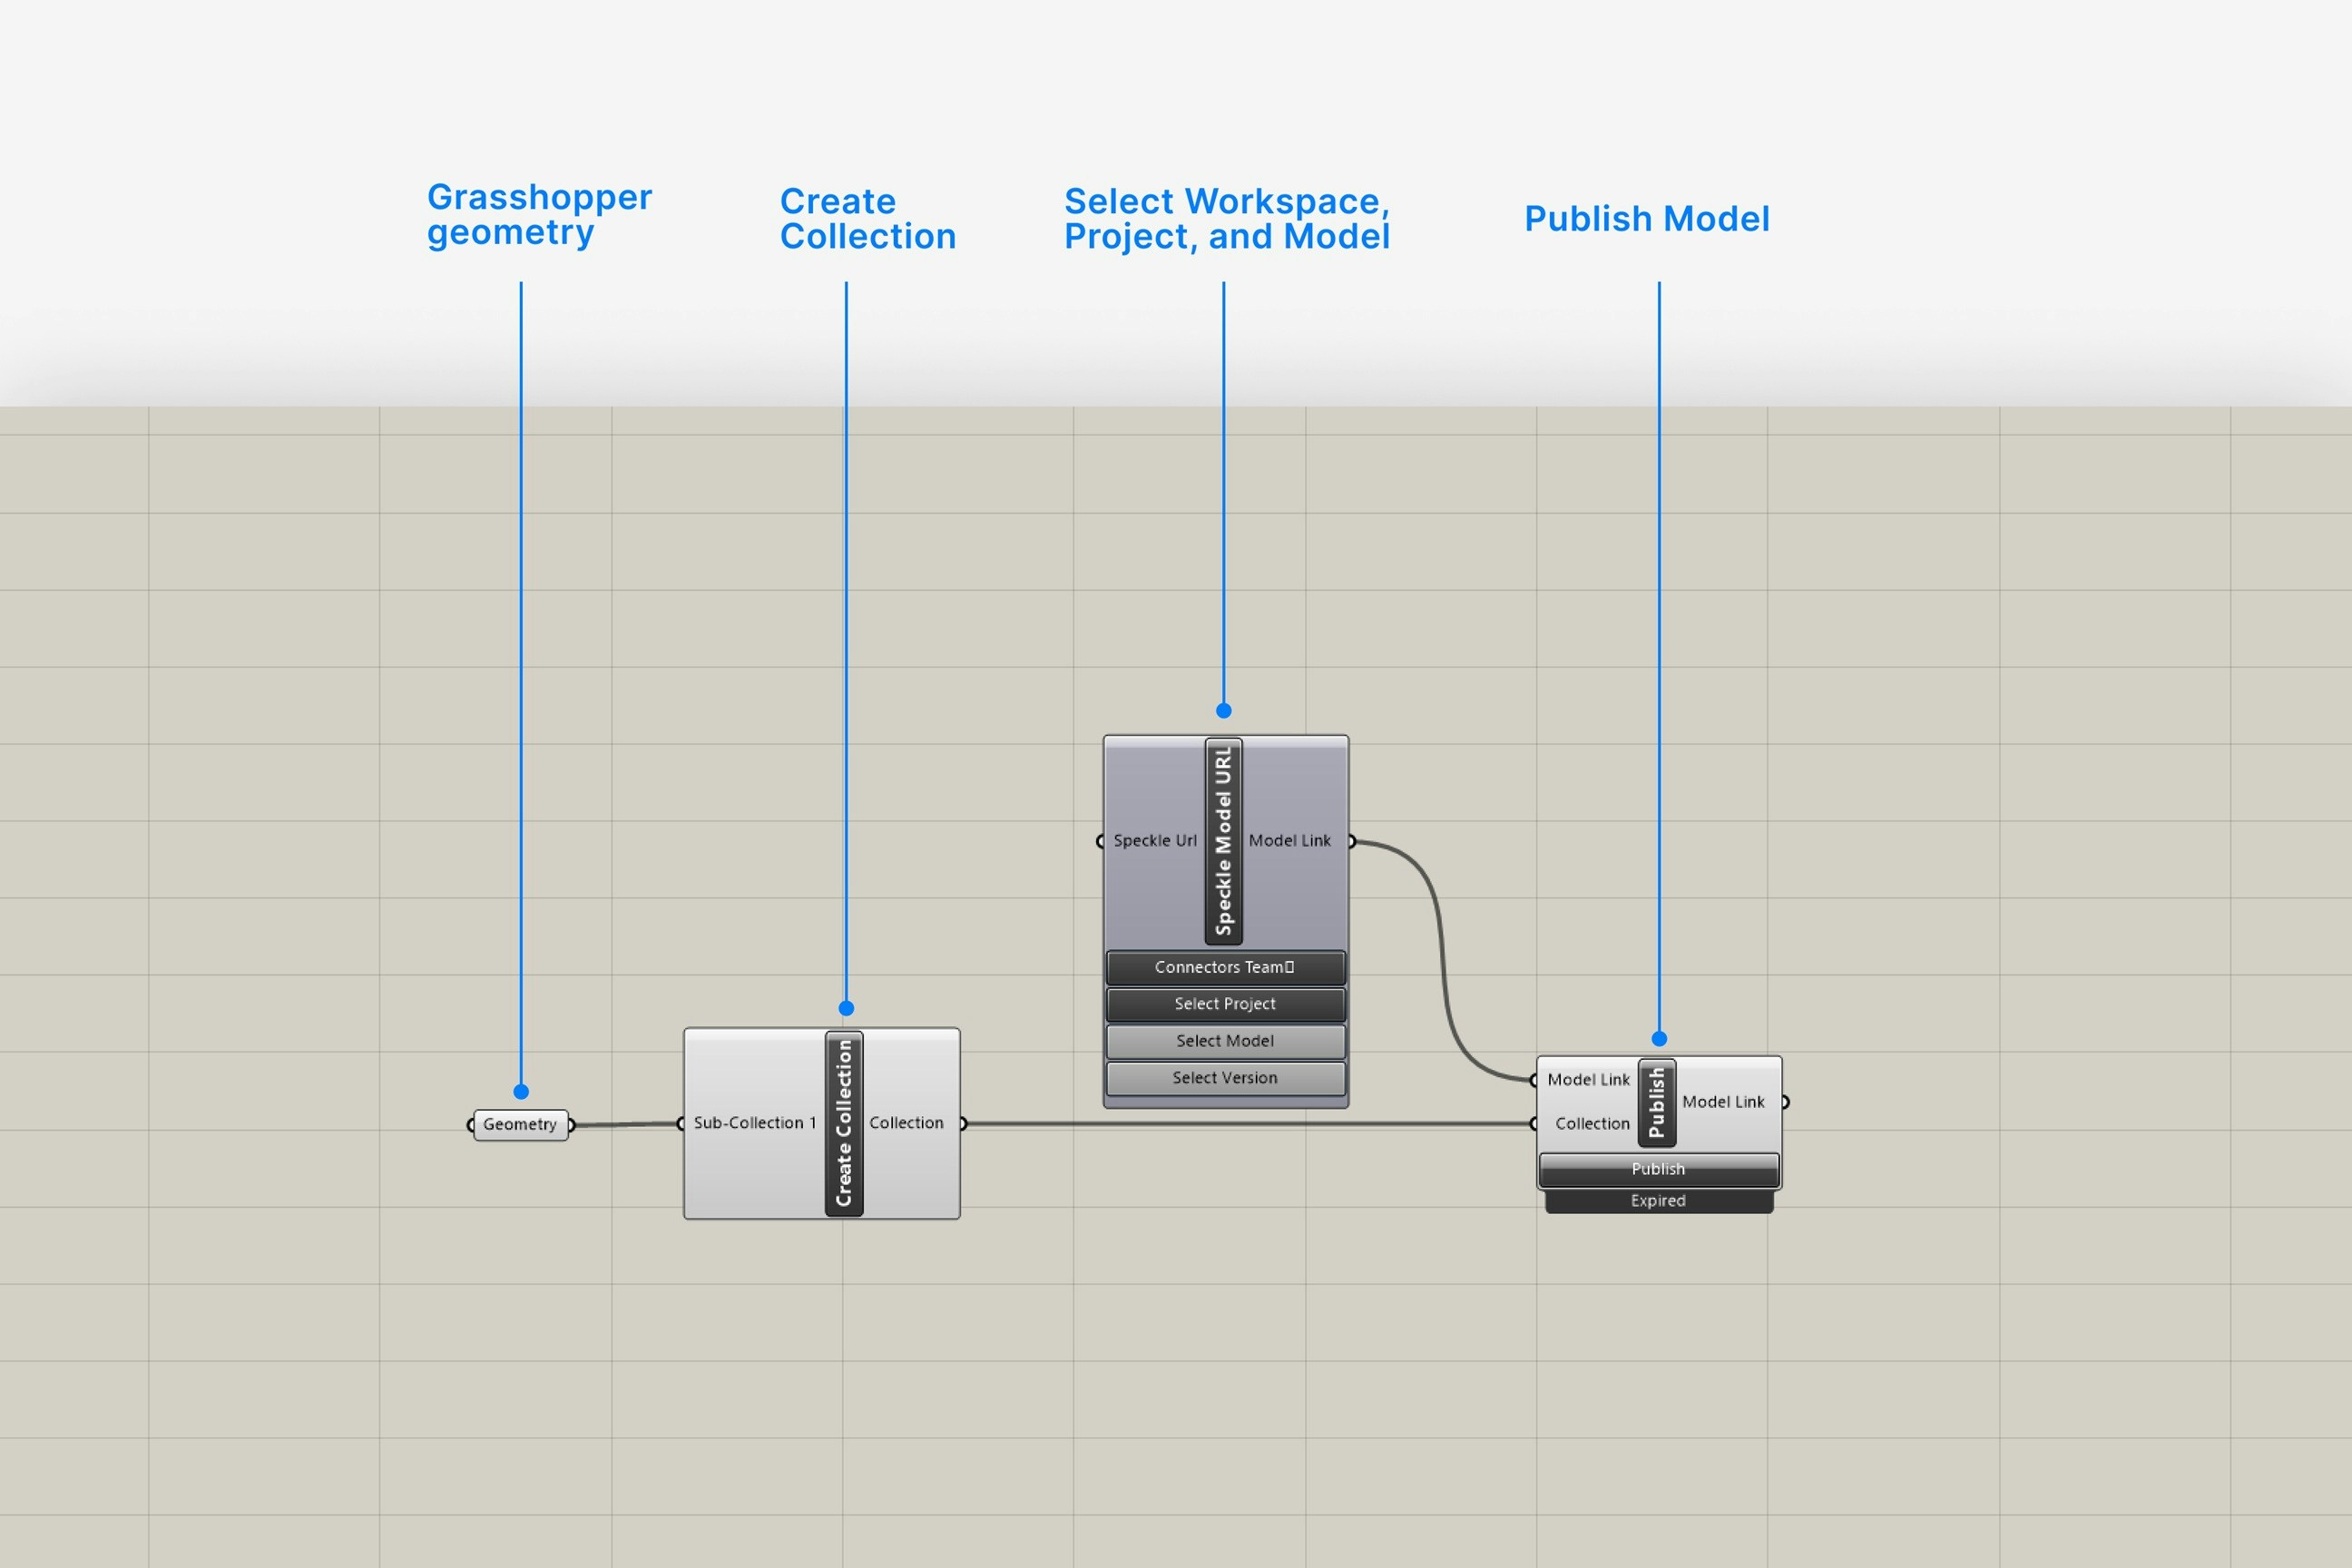
1. Add a **Create Collection** node from the `Collections` category to the canvas.
2. Connect the geometry you want to publish to the input of the **Create Collection** node.
1. Add a **Speckle Model URL** node to the canvas.
2. Choose a project:
* Click on the **Project** button to select a project from the dropdown
* or use the search bar to find another project.
3. Choose a model:
* Click on the **Model** button to select a model from the dropdown
* or use the search bar to find another model.
1. Add a **Publish** node to the canvas and connect your inputs:
* Add your **Create Collection** output to the Collection input.
* Add your **Speckle Model URL** output to the Model Link input.
2. Click **Publish**.
Your model is now published to Speckle and is available to the rest of your team.
1. If you've already signed in from *any* Speckle connector, skip this step.
2. Add the **Sign-In** node to the canvas, and click **Sign in**.
3. Complete the sign in process in your web browser.
You only need to sign in to an account once from any Speckle connector.
To switch accounts in Grasshopper, you can select the correct account by right-clicking the **Speckle Model URL** node.
1. Make sure your version of {app_2} is one of the supported versions.
2. Uninstall and [reinstall your connector](/connectors/installation).
Note: Make sure you are **not** selecting **Run as administrator** when installing - this will install for the administrator user, and not your own user.
Instead, double-click the `.exe` or right-clicking and then selecting `Open` to run the installer.
Installation issues can also be caused by conflicting plugins.
If you're still experiencing problems, please report it in our [Community Forum](https://speckle.community/c/help) and include the following information:
* Your application version
* Your Speckle connector version
If your connector window is floating, **try docking it to your application** to fix blank UI issues.
For major issues, you can sometimes find a `log` file in your directory at `AppData\Roaming\Speckle\Logs`.
Please report your problem in our [Community Forum](https://speckle.community/c/help) and include the following information:
* Your application version
* Your Speckle connector version
* A copy of the log
This can happen if our **desktop service** isn't running. Desktop Service is used for authenticating new accounts. If it's not running, search for **Speckle Desktop Services** in Windows search and run it.
All Speckle connectors are installed like any other program. You can uninstall them directly from your system's `Applications`. For a full uninstall, you should also remove **Speckle Desktop Services** as well as your Speckle connector.
You can always download the latest version of the connector [in the web app](https://app.speckle.systems/connectors).
If a new version of the connector is available, you will also see a notification in your connector UI.
## Getting Started
**Template File**: Download our [Grasshopper template file](/connectors/assets) to get started quickly with common Speckle nodes and workflows.
## Publishing a Model
**Sample Files**: Full documentation of all Grasshopper nodes and sample scripts is installed with your connector.
Navigate to **File** > **Special Folders** > **Components Folder** > **Speckle Sample Files** in Grasshopper to find them.
**Template File**: For a quick start, download our [Grasshopper template file](/connectors/assets) with common Speckle nodes and workflows.
1. Add a **Create Collection** node from the `Collections` category to the canvas.
2. Connect the geometry you want to publish to the input of the **Create Collection** node.
1. Add a **Speckle Model URL** node to the canvas.
2. Choose a project:
* Click on the **Project** button to select a project from the dropdown
* or use the search bar to find another project.
3. Choose a model:
* Click on the **Model** button to select a model from the dropdown
* or use the search bar to find another model.
1. Add a **Publish** node to the canvas and connect your inputs:
* Add your **Create Collection** output to the Collection input.
* Add your **Speckle Model URL** output to the Model Link input.
2. Click **Publish**.
Your model is now published to Speckle and is available to the rest of your team.
 You can use the **Speckle Properties** passthrough node to create properties by key-value.
If you keep your params organized with their own names, then you can easily inherit these names when using the **Create Properties** or **Create Collection** nodes.
To sync individual input names:
* Hold down the **TAB** key when plugging in your input property, objects, or collection.
To automatically sync all input names:
* Right-click the **Create Properties** or **Create Collection** node.
* Select **Inherit all names**.
The **Inherit all names** option will lock input name editing and always keep your input names synced with their sources.
Currently, it's not possible to create new projects or models in Grasshopper.
You can right-click your Speckle model to open it in your web browser.
All project management should be done in your web browser.
You can create **Data Objects** which are a simplified version of the objects that are published from other connectors.
If you assign a **builtInCategory** property to a Data Object, it will be loaded as a generic model with that category in Revit.
However, there is currently no way to create elements that will be received as native types like walls and beams in BIM or structural applications.
Right-click your **Speckle Model** node and select **Change accounts** to change your account.
## Loading a Model
**Sample Files**: Full documentation of all Grasshopper nodes and sample scripts is installed with your connector.
Navigate to **File** > **Special Folders** > **Components Folder** > **Speckle Sample Files** in Grasshopper to find them.
**Template File**: For a quick start, download our [Grasshopper template file](/connectors/assets) with common Speckle nodes and workflows.
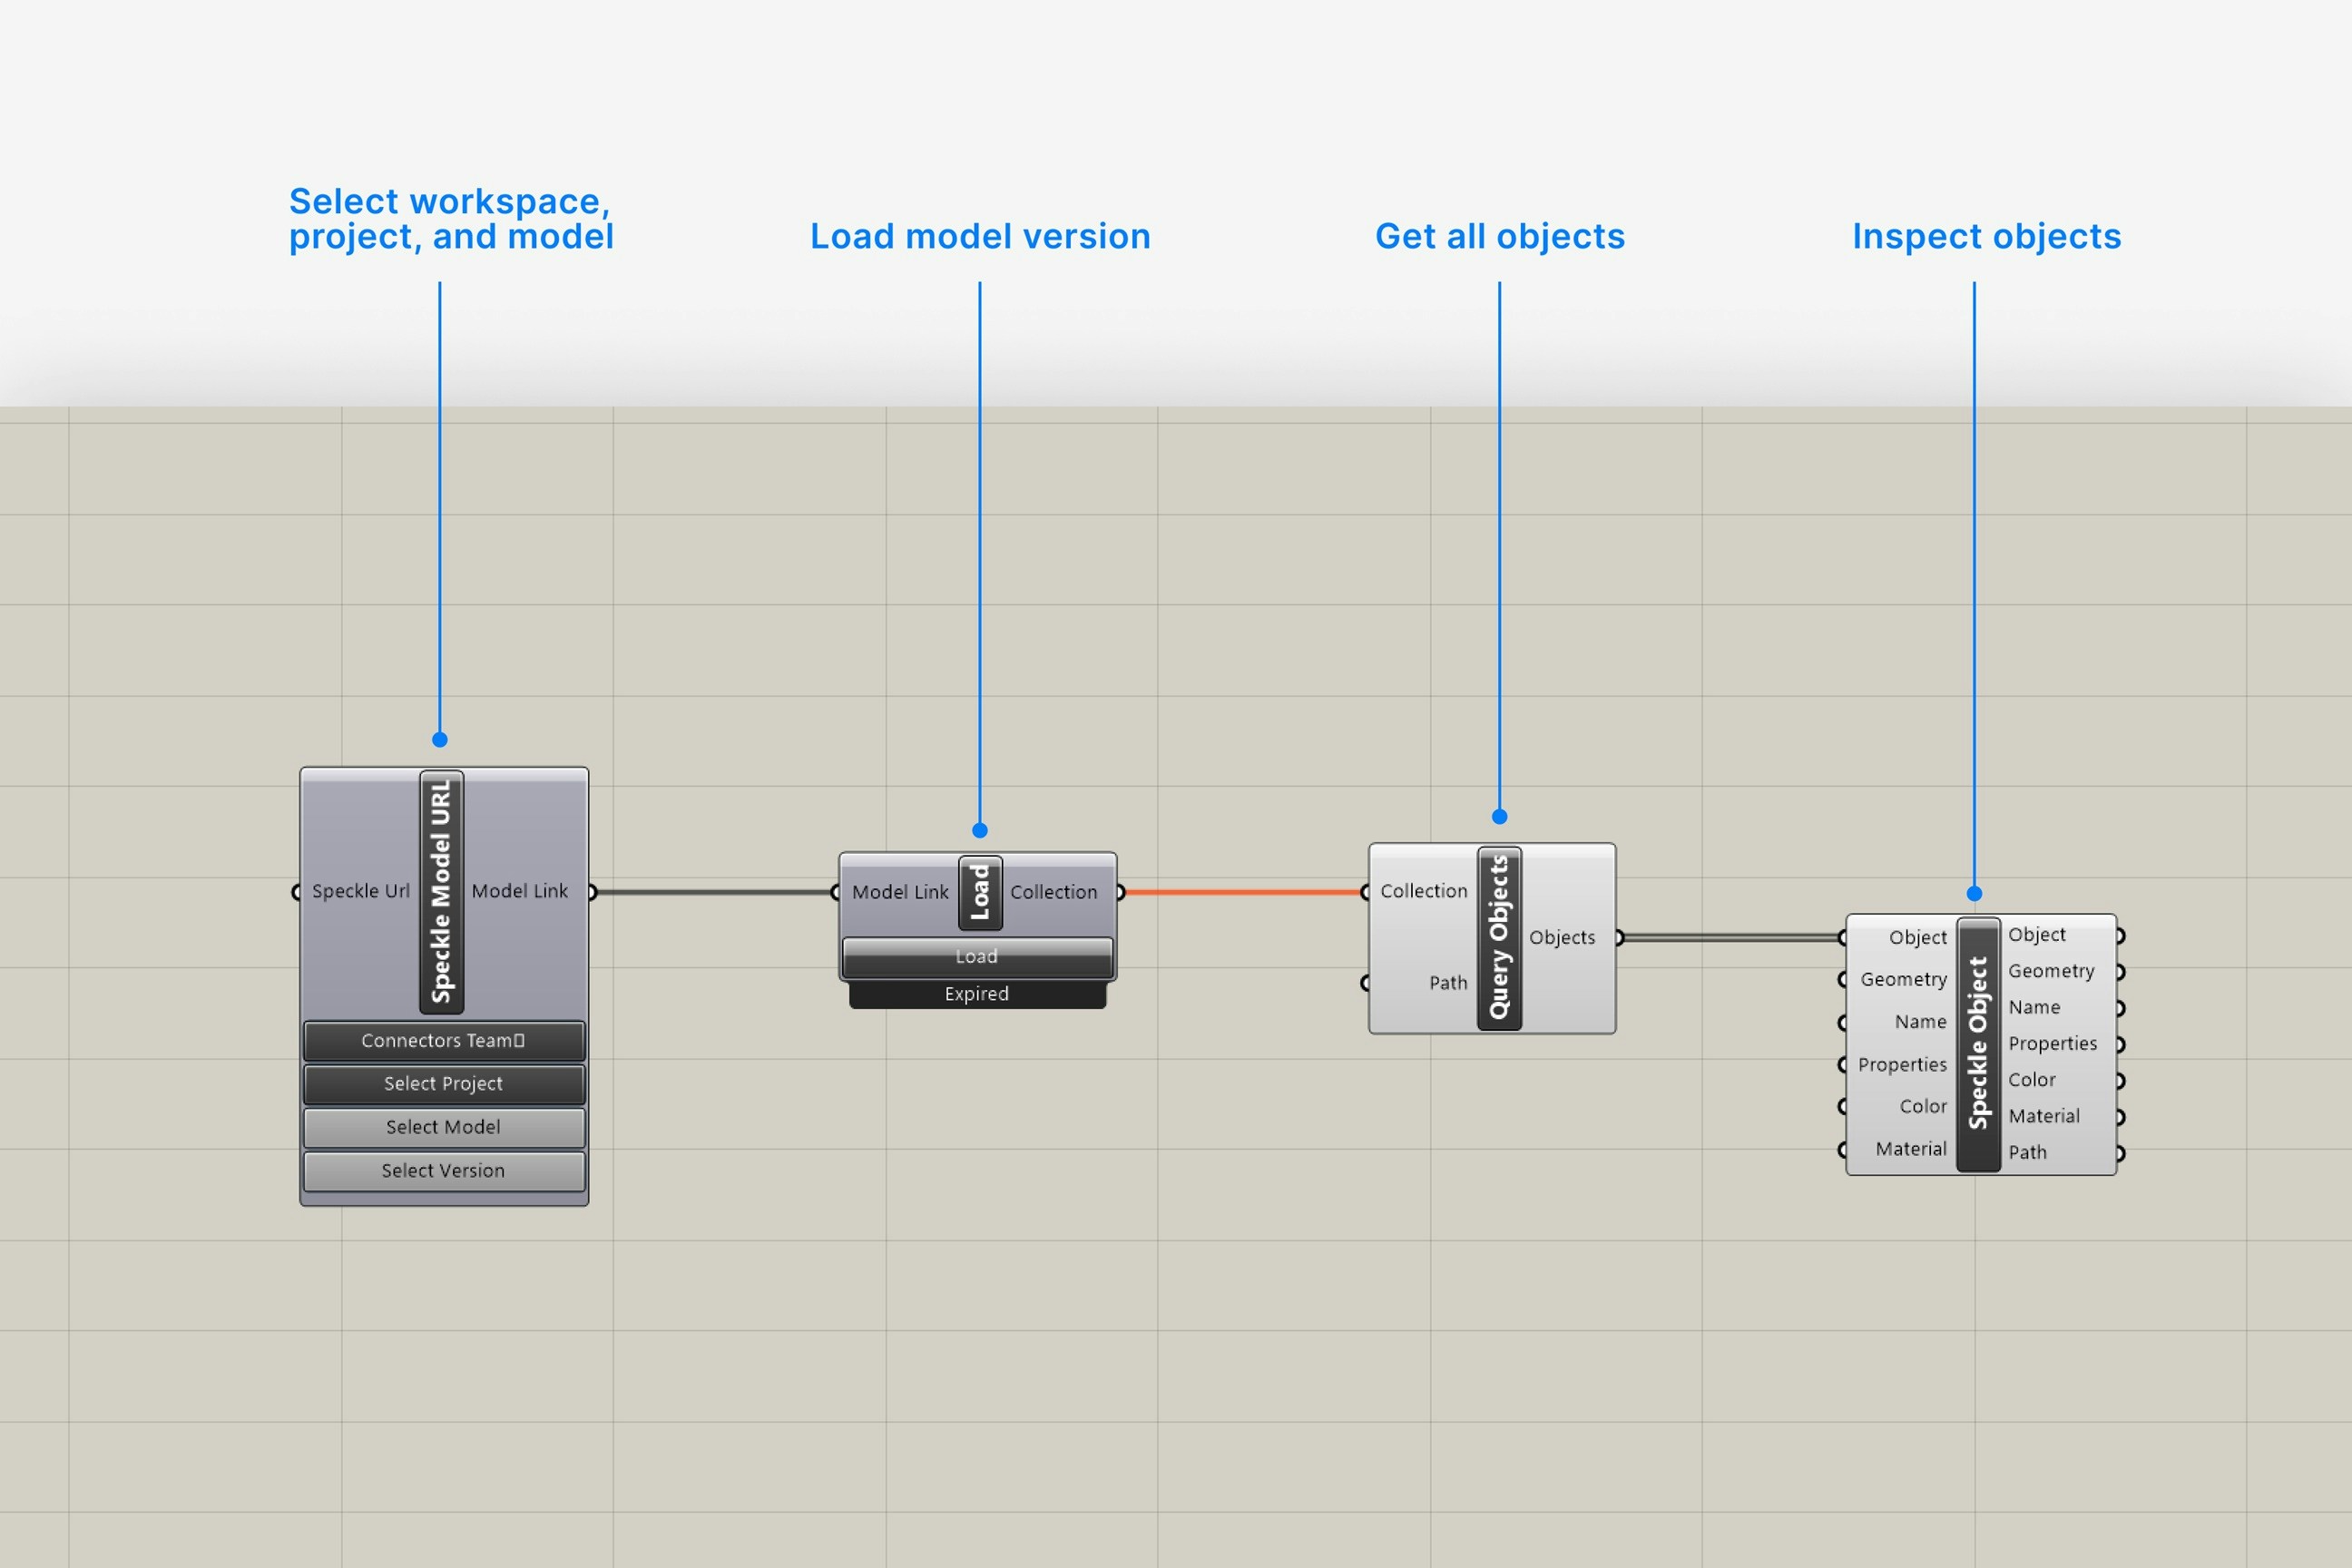
1. Add a **Speckle Model URL** node to the canvas.
2. Choose a project:
* Click on the **Project** button to select a project from the dropdown
* or use the search bar to find another project.
3. Choose a model:
* Click on the **Model** button to select a model from the dropdown
* or use the search bar to find another model.
4. Choose a version:
* Latest version is loaded by default.
* To load a specific version, click on the **Version** button and select.
1. Add a **Load** node to the canvas and connect your input:
* Add your **Speckle Model URL** output to the Model Link input.
2. Click **Load**.
Your selected model version is now loaded in Grasshopper.
1. Add a **Query objects** node to the canvas and connect your input:
* Add your **Load** output to the collection input.
2. You can now work with your loaded objects in Grasshopper.
You can use the **Speckle Properties** passthrough node to create properties by key-value.
If you keep your params organized with their own names, then you can easily inherit these names when using the **Create Properties** or **Create Collection** nodes.
To sync individual input names:
* Hold down the **TAB** key when plugging in your input property, objects, or collection.
To automatically sync all input names:
* Right-click the **Create Properties** or **Create Collection** node.
* Select **Inherit all names**.
The **Inherit all names** option will lock input name editing and always keep your input names synced with their sources.
Currently, it's not possible to create new projects or models in Grasshopper.
You can right-click your Speckle model to open it in your web browser.
All project management should be done in your web browser.
You can create **Data Objects** which are a simplified version of the objects that are published from other connectors.
If you assign a **builtInCategory** property to a Data Object, it will be loaded as a generic model with that category in Revit.
However, there is currently no way to create elements that will be received as native types like walls and beams in BIM or structural applications.
Right-click your **Speckle Model** node and select **Change accounts** to change your account.
## Loading a Model
**Sample Files**: Full documentation of all Grasshopper nodes and sample scripts is installed with your connector.
Navigate to **File** > **Special Folders** > **Components Folder** > **Speckle Sample Files** in Grasshopper to find them.
**Template File**: For a quick start, download our [Grasshopper template file](/connectors/assets) with common Speckle nodes and workflows.
1. Add a **Speckle Model URL** node to the canvas.
2. Choose a project:
* Click on the **Project** button to select a project from the dropdown
* or use the search bar to find another project.
3. Choose a model:
* Click on the **Model** button to select a model from the dropdown
* or use the search bar to find another model.
4. Choose a version:
* Latest version is loaded by default.
* To load a specific version, click on the **Version** button and select.
1. Add a **Load** node to the canvas and connect your input:
* Add your **Speckle Model URL** output to the Model Link input.
2. Click **Load**.
Your selected model version is now loaded in Grasshopper.
1. Add a **Query objects** node to the canvas and connect your input:
* Add your **Load** output to the collection input.
2. You can now work with your loaded objects in Grasshopper.
 If you want to access geometry properties like what you would see in **dev mode** in your browser, you can use the **Deconstruct** node.
Yes. Copy your URL to a **Panel** and connect it to your **Speckle Model URL** node.
Right-click your **Speckle Model URL** node and select **Change accounts** to change your account.
If you want to access geometry properties like what you would see in **dev mode** in your browser, you can use the **Deconstruct** node.
Yes. Copy your URL to a **Panel** and connect it to your **Speckle Model URL** node.
Right-click your **Speckle Model URL** node and select **Change accounts** to change your account.