> ## Documentation Index
> Fetch the complete documentation index at: https://docs.speckle.systems/llms.txt
> Use this file to discover all available pages before exploring further.
# Power BI Data Gateway
> Setting up data gateways for Power BI scheduled refresh
export const PowerBIVersionFetcher = ({fallbackVersion = '3.3.3'}) => {
const [version, setVersion] = useState(fallbackVersion);
const [downloadUrl, setDownloadUrl] = useState(`https://releases.speckle.dev/build-artifacts/powerbi-v3/speckle.powerbi.installer-${fallbackVersion}.zip`);
const parseXMLResponse = xmlText => {
try {
const parser = new DOMParser();
const xmlDoc = parser.parseFromString(xmlText, 'text/xml');
const contents = xmlDoc.getElementsByTagName('Contents');
const powerBIEntries = [];
for (const content of contents) {
const key = content.getElementsByTagName('Key')[0]?.textContent;
const lastModified = content.getElementsByTagName('LastModified')[0]?.textContent;
if (key && key.includes('build-artifacts/powerbi-v3/speckle.powerbi.installer-') && key.endsWith('.zip')) {
const versionMatch = key.match(/speckle\.powerbi\.installer-(\d+\.\d+\.\d+)\.zip$/);
if (versionMatch) {
powerBIEntries.push({
version: versionMatch[1],
key: key,
lastModified: new Date(lastModified)
});
}
}
}
if (powerBIEntries.length === 0) {
throw new Error('No Power BI build artifacts found');
}
powerBIEntries.sort((a, b) => b.lastModified - a.lastModified);
return powerBIEntries[0].version;
} catch (parseError) {
console.error('Error parsing XML:', parseError);
throw parseError;
}
};
const fetchLatestVersion = async () => {
try {
const response = await fetch('https://releases.speckle.dev');
if (!response.ok) {
throw new Error(`HTTP error! status: ${response.status}`);
}
const xmlText = await response.text();
const latestVersion = parseXMLResponse(xmlText);
setVersion(latestVersion);
} catch (fetchError) {
console.error('Error fetching latest version:', fetchError);
}
};
useEffect(() => {
fetchLatestVersion();
}, [fallbackVersion]);
useEffect(() => {
if (version) {
const url = `https://releases.speckle.dev/build-artifacts/powerbi-v3/speckle.powerbi.installer-${version}.zip`;
setDownloadUrl(url);
}
}, [version]);
return ;
};
Data gateways enable scheduled refresh of your Power BI reports, ensuring your Speckle data stays up-to-date automatically. This is especially useful for production reports that need to reflect the latest model versions without manual intervention.
## Choosing the Right Gateway Mode
**Personal Mode** is ideal for individual users who need to:
* Connect their own Power BI reports to on-premises data sources
* Use scheduled refresh for data updates
* Keep setup simple with minimal configuration
**Standard Mode** is recommended for organizations that need to:
* Share data sources across multiple users
* Integrate with other Microsoft services (Power Apps, Power Automate, Azure Logic Apps)
* Use advanced features like DirectQuery and Live Connection
* Have centralized management and monitoring capabilities
Microsoft recommends using Standard Mode for most organizational scenarios due to its enhanced
capabilities and flexibility.
## Personal Mode Gateway
1. Download and install Power BI connector from [https://app.speckle.systems/connectors](https://app.speckle.systems/connectors) .
2. Download and install [**On-premises data gateway (personal mode)**](https://go.microsoft.com/fwlink/?LinkId=820925\&clcid=0x409).
3. Open the installed data gateway.
4. Select **Sign In** and sign in to your account.
 Verify the gateway appears in Power BI service under **Settings** > **Manage connections and gateways** > **On-premises data gateways**. Select **On-premises data gateways (Personal mode)** from the gateway type menu.
5. Select the **Connectors** tab and verify Speckle appears in the connectors list.
Verify the gateway appears in Power BI service under **Settings** > **Manage connections and gateways** > **On-premises data gateways**. Select **On-premises data gateways (Personal mode)** from the gateway type menu.
5. Select the **Connectors** tab and verify Speckle appears in the connectors list.
 Check the path shown in the data gateway and make sure the **Speckle.pqx** file is there. If not, copy it from the installed location and paste it there.
6. Publish your report.
1. Open your published report in Power BI Service.
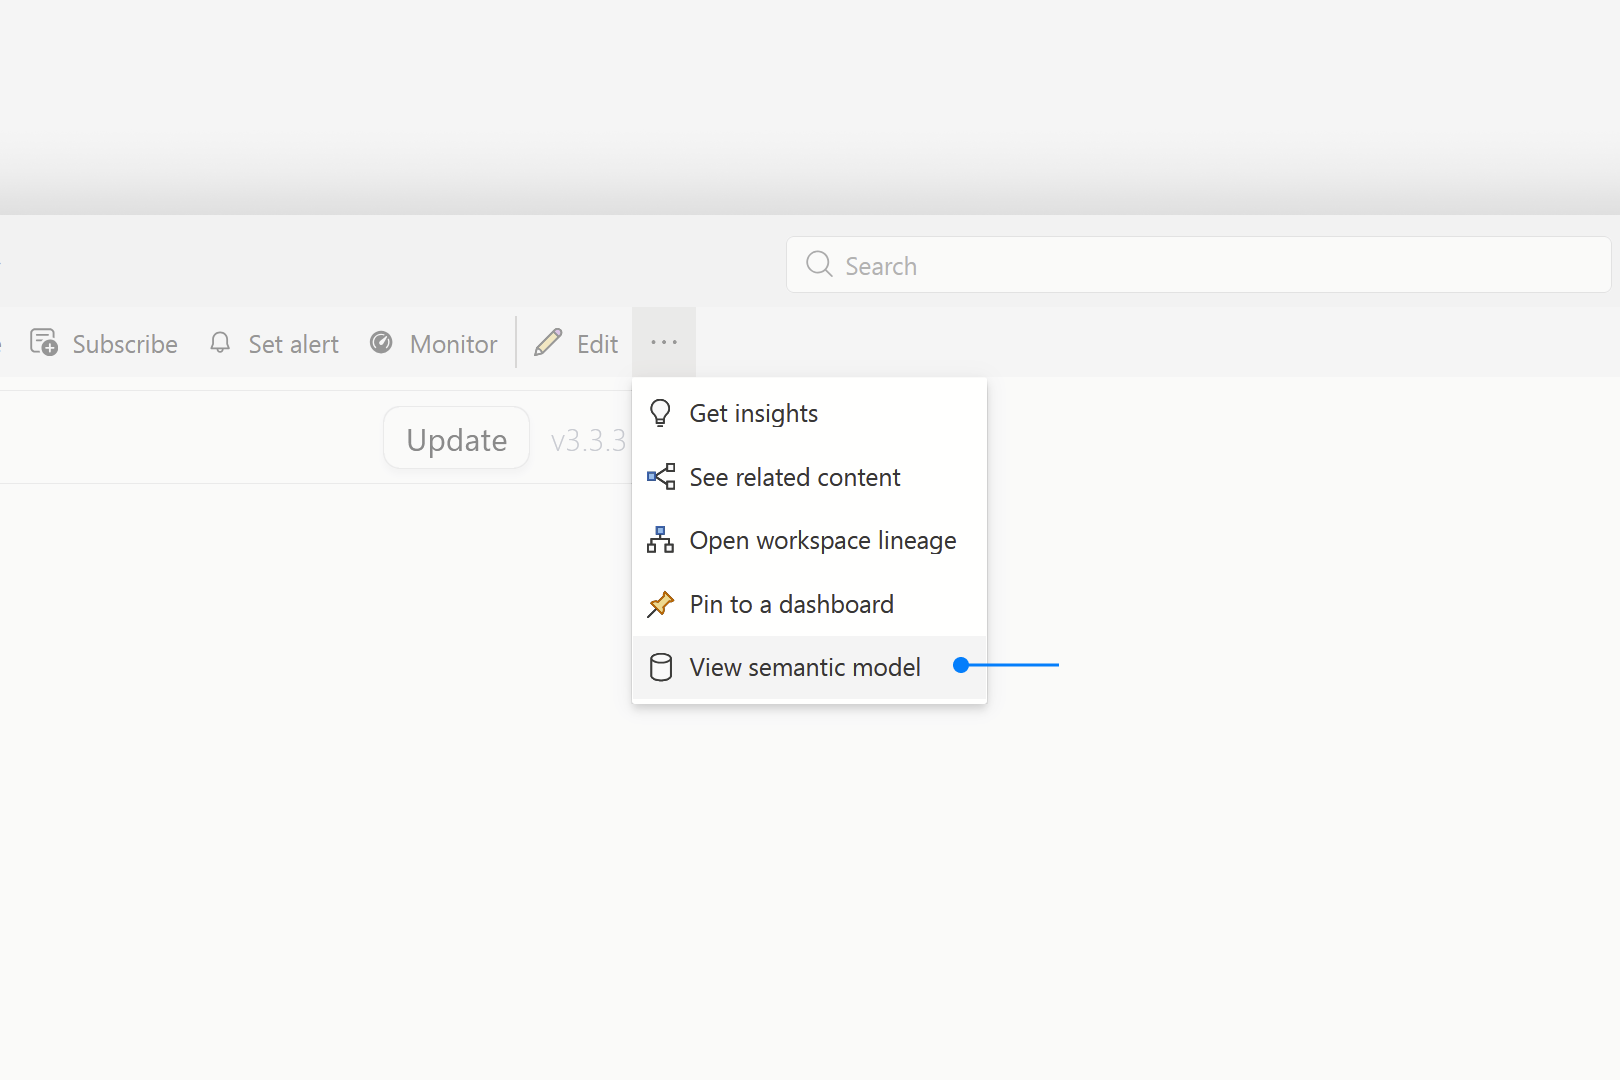
2. Select **More Options (…) > View semantic model** from the top bar.
Check the path shown in the data gateway and make sure the **Speckle.pqx** file is there. If not, copy it from the installed location and paste it there.
6. Publish your report.
1. Open your published report in Power BI Service.
2. Select **More Options (…) > View semantic model** from the top bar.
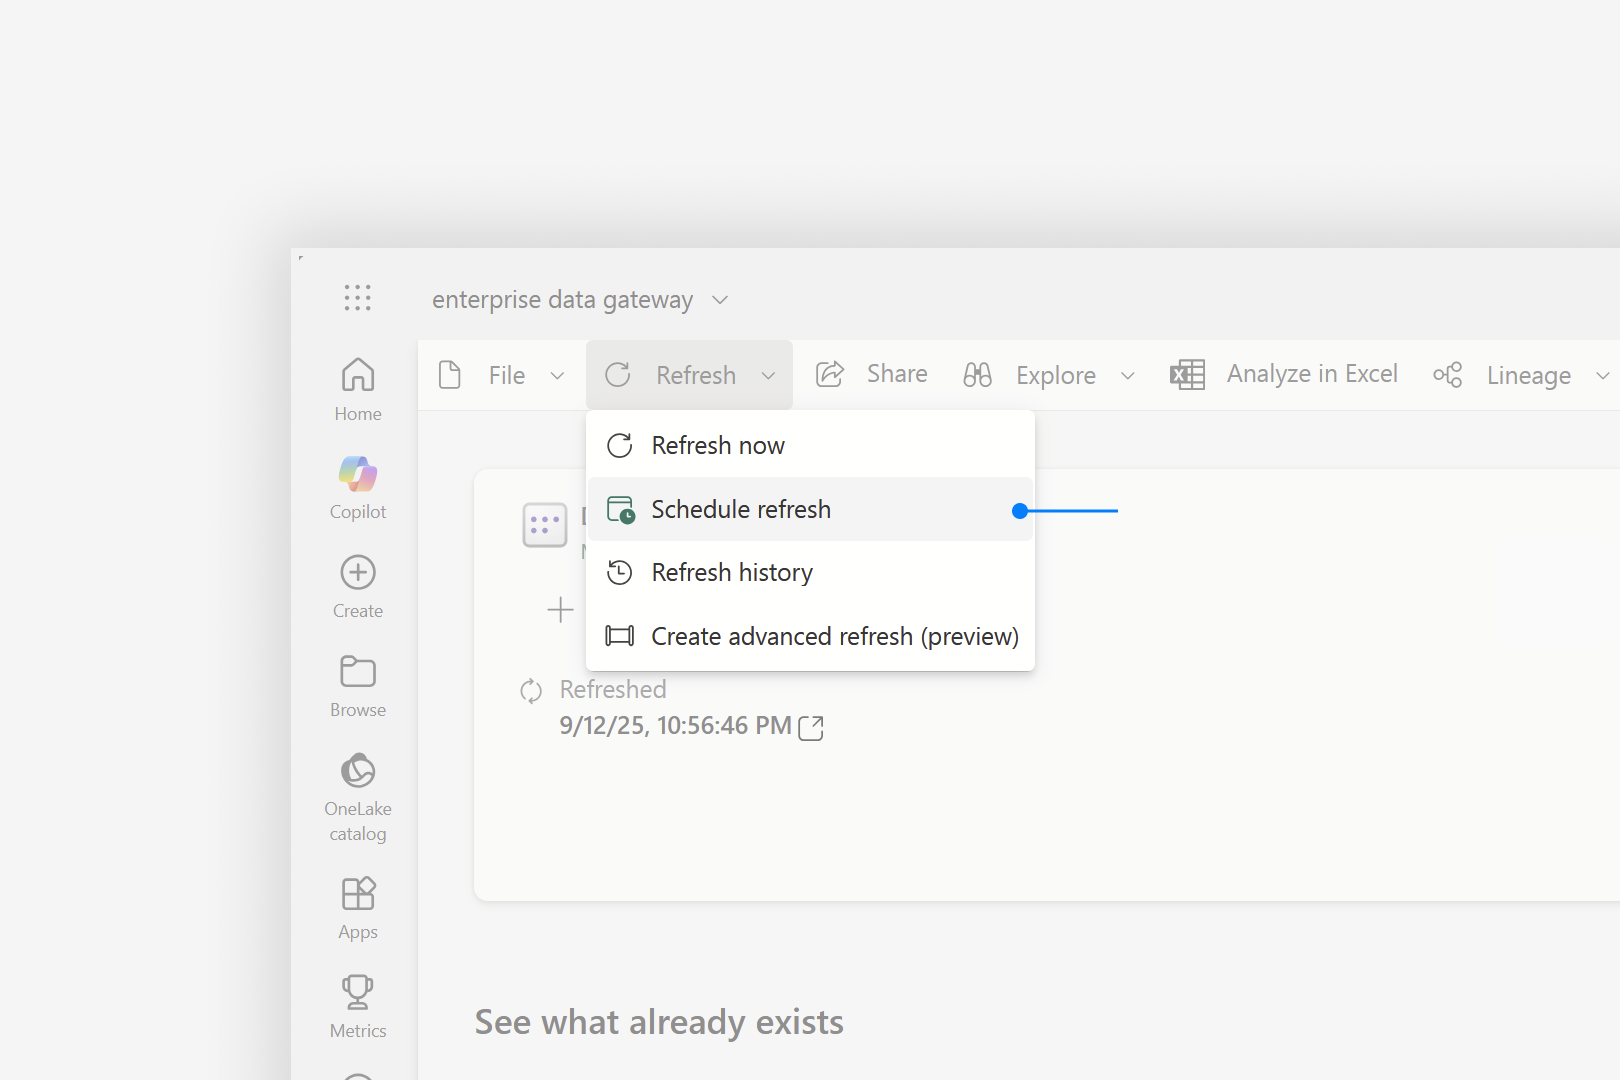
 3. Select **Refresh > Schedule Refresh**. This opens settings for the semantic model.
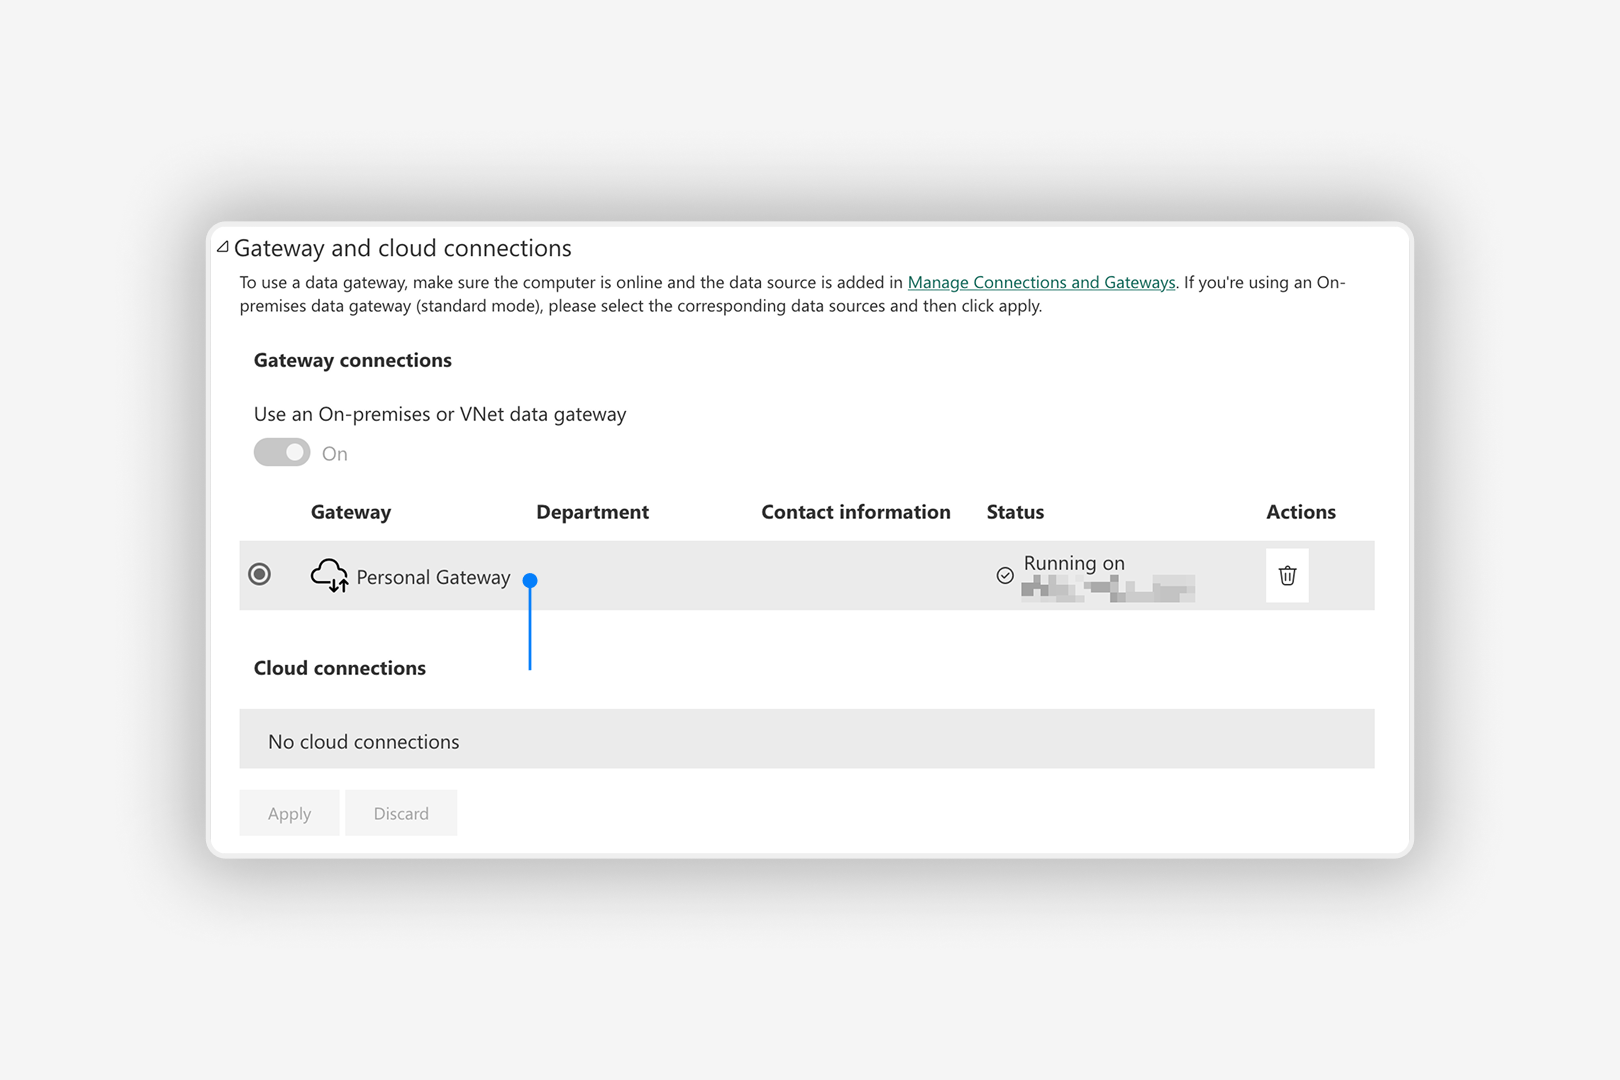
 4. Expand **Gateway and cloud connections** and check if your personal gateway is listed here.
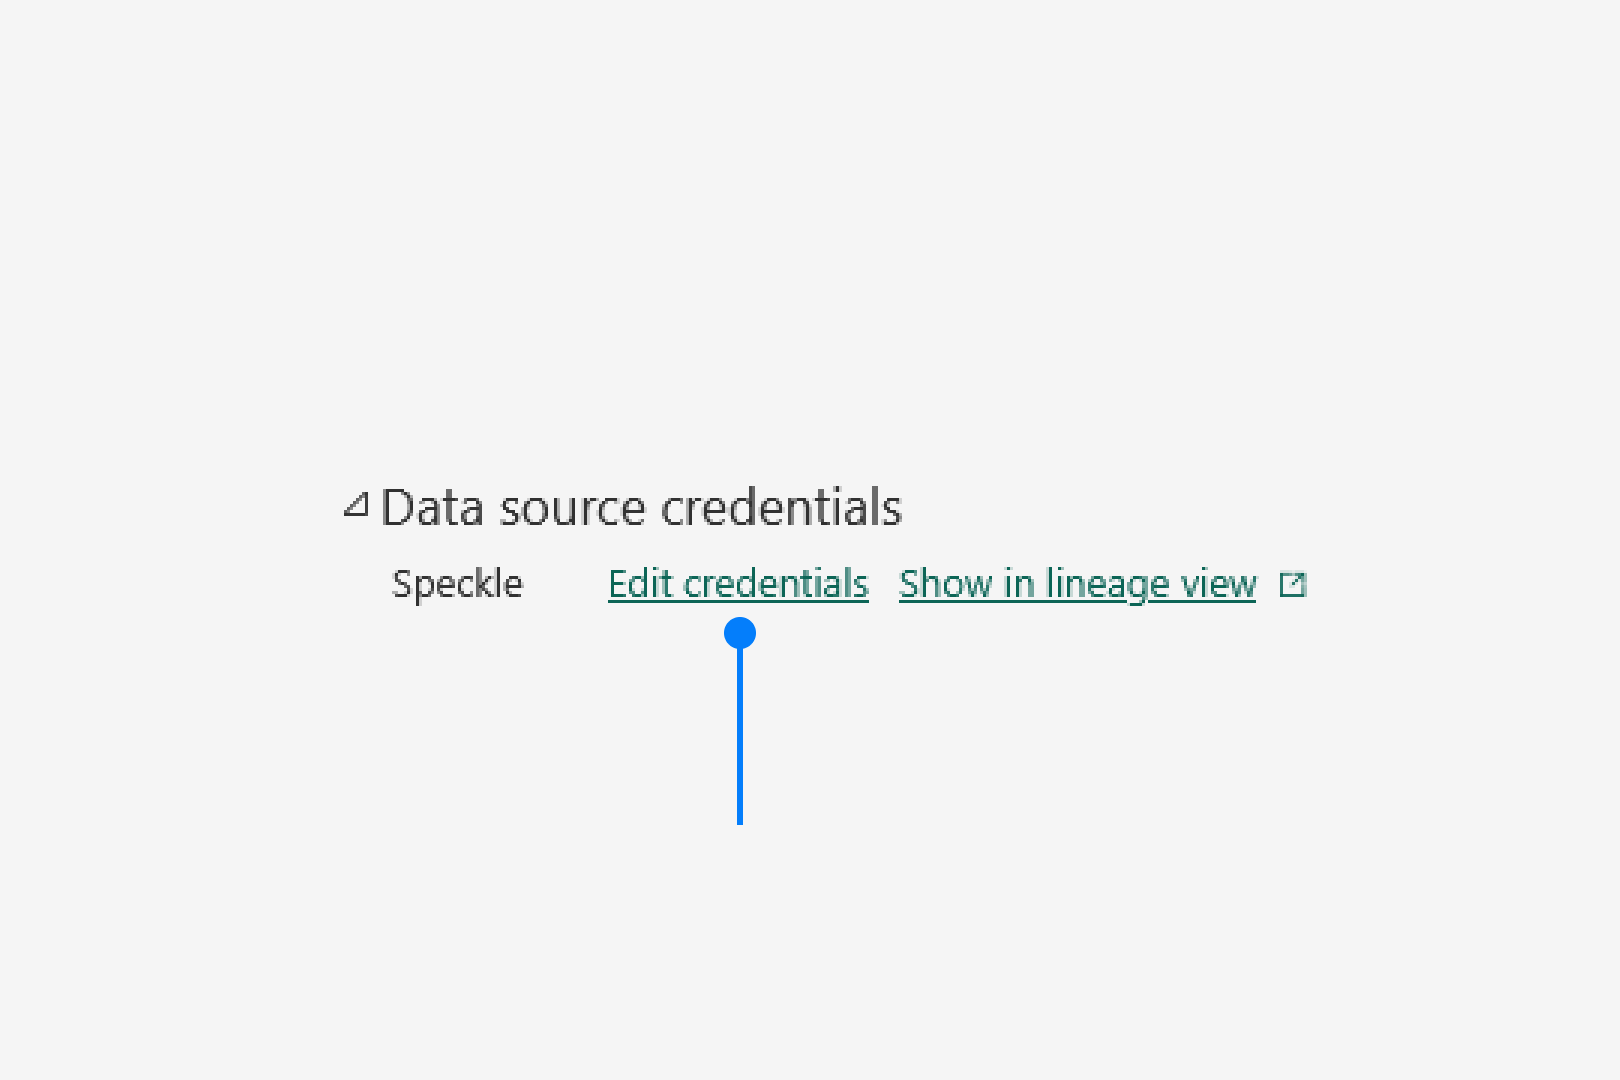
 5. After you confirm the personal gateway is listed, select **Data source credentials**, then select **Speckle** > **Edit credentials**.
 6. Select **OAuth2** as your authentication method. Set the privacy level setting according to your needs.
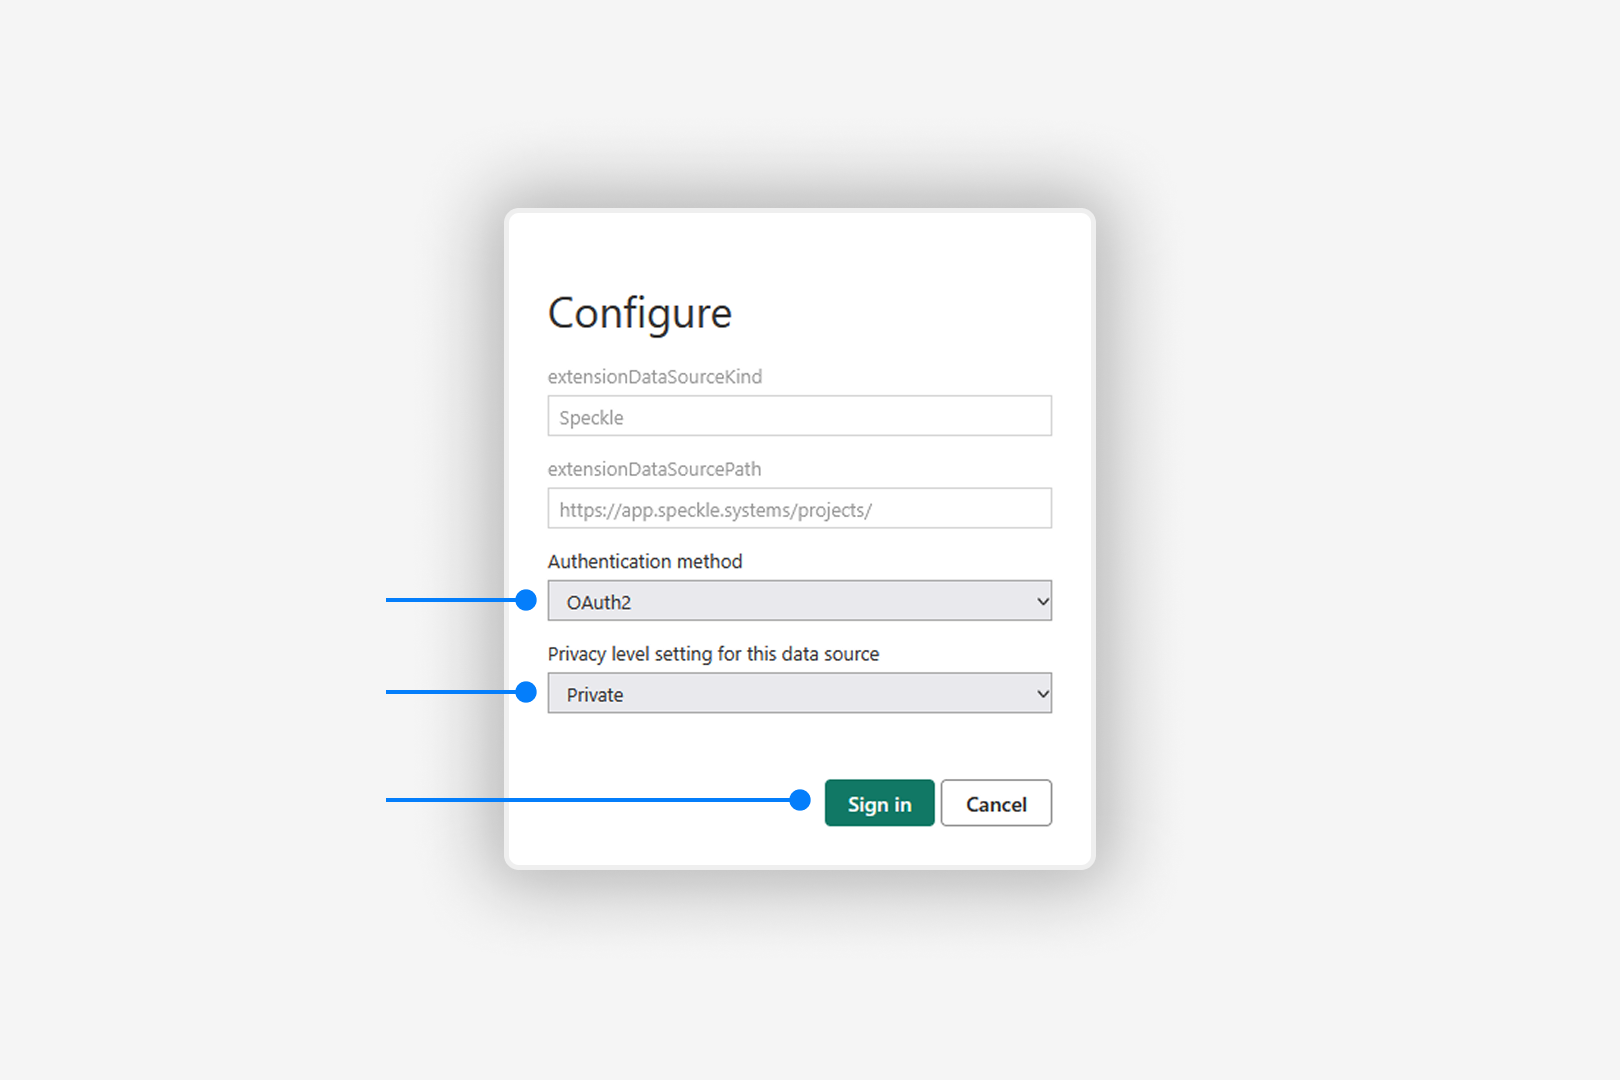 7. Select **Sign in** and sign in to your Speckle account from the window that opens.
You can now configure scheduled refresh.
## Standard Mode Gateway
1. Download and install [On-premises data gateway](https://go.microsoft.com/fwlink/?LinkId=820925\&clcid=0x409). (external)
2. Open the data gateway.
3. Select **Sign In** and sign in to your account.
7. Select **Sign in** and sign in to your Speckle account from the window that opens.
You can now configure scheduled refresh.
## Standard Mode Gateway
1. Download and install [On-premises data gateway](https://go.microsoft.com/fwlink/?LinkId=820925\&clcid=0x409). (external)
2. Open the data gateway.
3. Select **Sign In** and sign in to your account.
 Verify the gateway appears in Power BI service under **Settings** > **Manage connections and gateways** > **On-premises data gateways**.
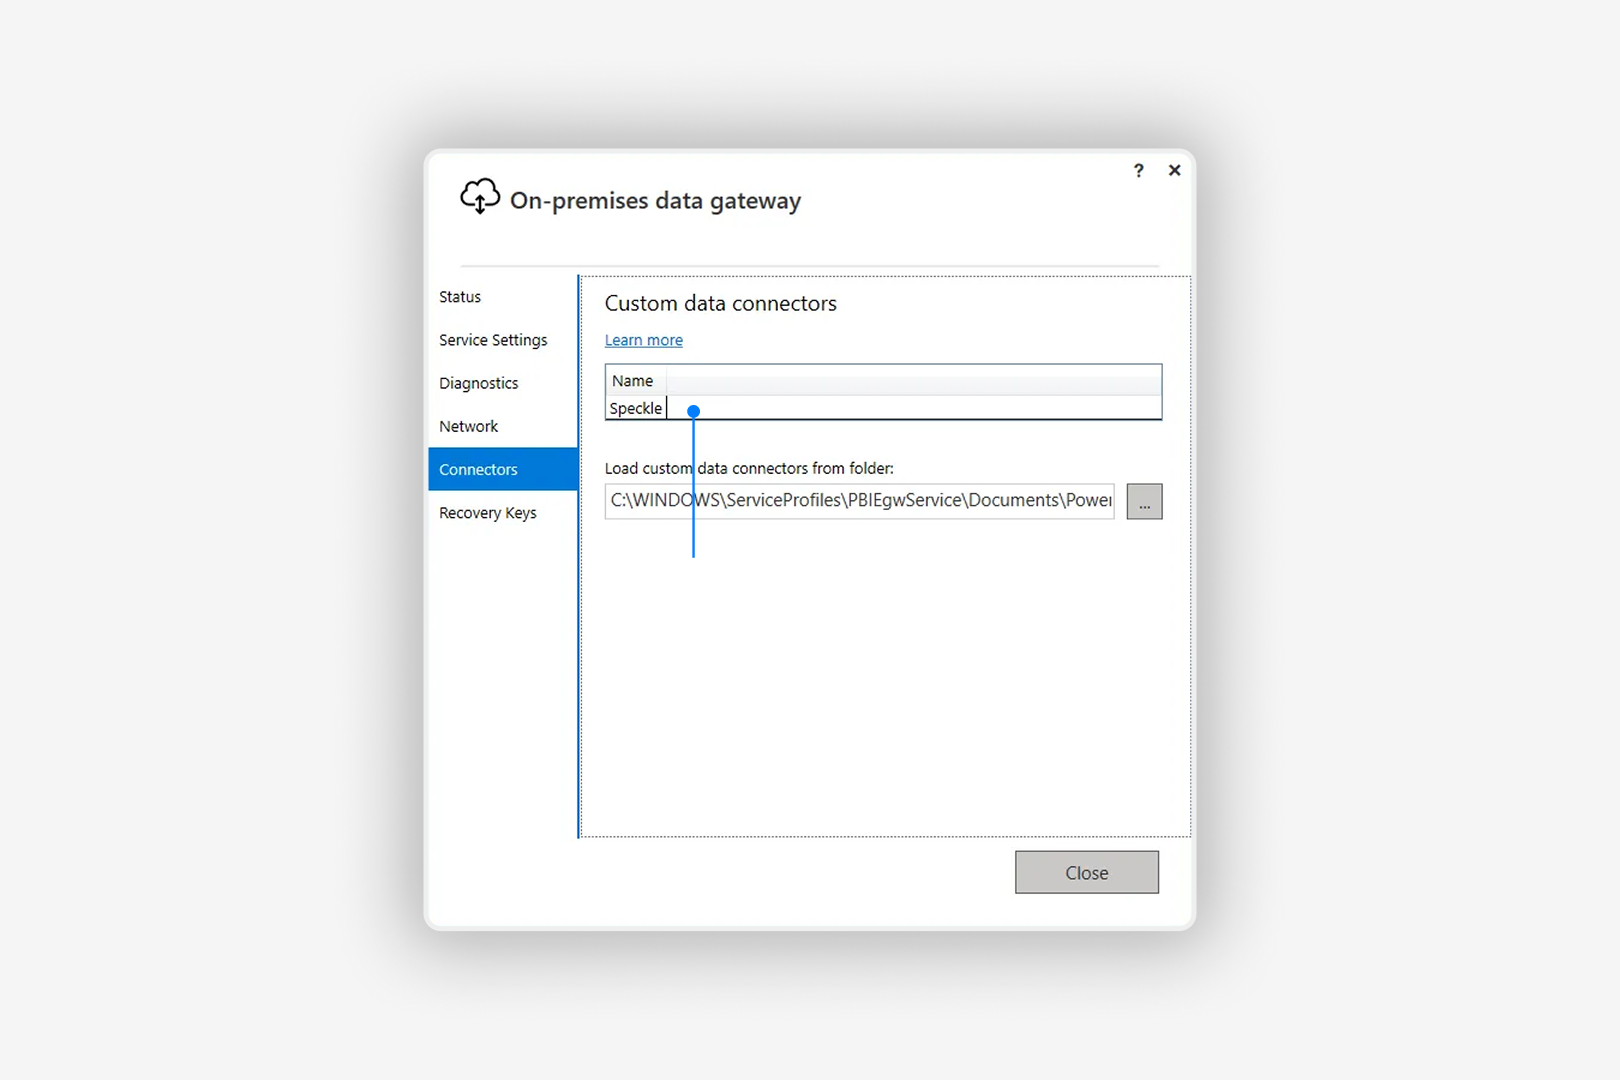
4. Select the **Connectors** tab and copy the path to Custom Connectors folder
Verify the gateway appears in Power BI service under **Settings** > **Manage connections and gateways** > **On-premises data gateways**.
4. Select the **Connectors** tab and copy the path to Custom Connectors folder
 If you see a folder not found warning, go to the path and create the Power BI Desktop and Custom Connectors folders if they're missing.
5. Download Power BI connector zip:
6. Extract the zip file contents and copy the `Speckle.pqx` file.
7. Paste the file to the location shown in the Connectors tab. The default path is:
`C:\WINDOWS\ServiceProfiles\PBIEgwService\Documents\Power BI Desktop\Custom Connectors`
8. Verify Speckle appears under Custom Connectors tab.
If you see a folder not found warning, go to the path and create the Power BI Desktop and Custom Connectors folders if they're missing.
5. Download Power BI connector zip:
6. Extract the zip file contents and copy the `Speckle.pqx` file.
7. Paste the file to the location shown in the Connectors tab. The default path is:
`C:\WINDOWS\ServiceProfiles\PBIEgwService\Documents\Power BI Desktop\Custom Connectors`
8. Verify Speckle appears under Custom Connectors tab.
 1. Open your published report in Power BI Service.
2. From the top bar, select **More Options (…) > View semantic model**.
3. Select **Refresh > Schedule Refresh** to open settings for the semantic model.
4. Expand **Gateway and cloud connections** and check if your gateway is listed.
1. Open your published report in Power BI Service.
2. From the top bar, select **More Options (…) > View semantic model**.
3. Select **Refresh > Schedule Refresh** to open settings for the semantic model.
4. Expand **Gateway and cloud connections** and check if your gateway is listed.
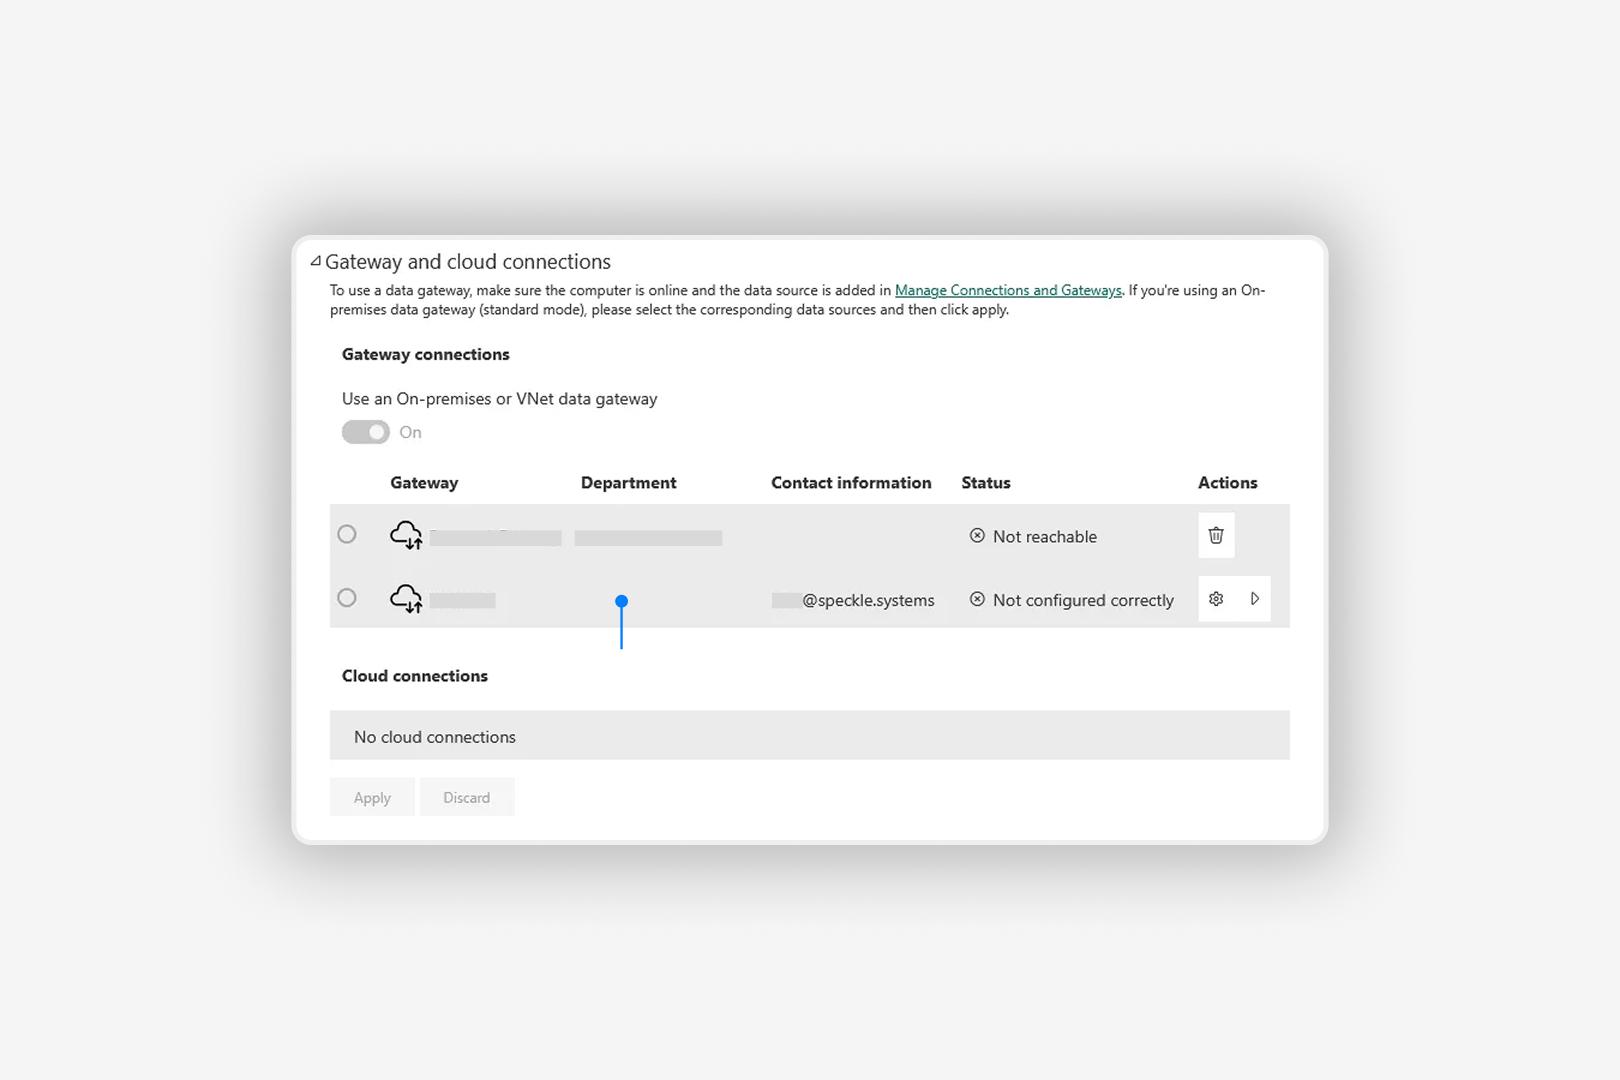 5. If you see "Not configured correctly" under status, select **View data sources (▶️)**.
 6. Select **Manually add to gateway** for the Speckle model you've loaded.
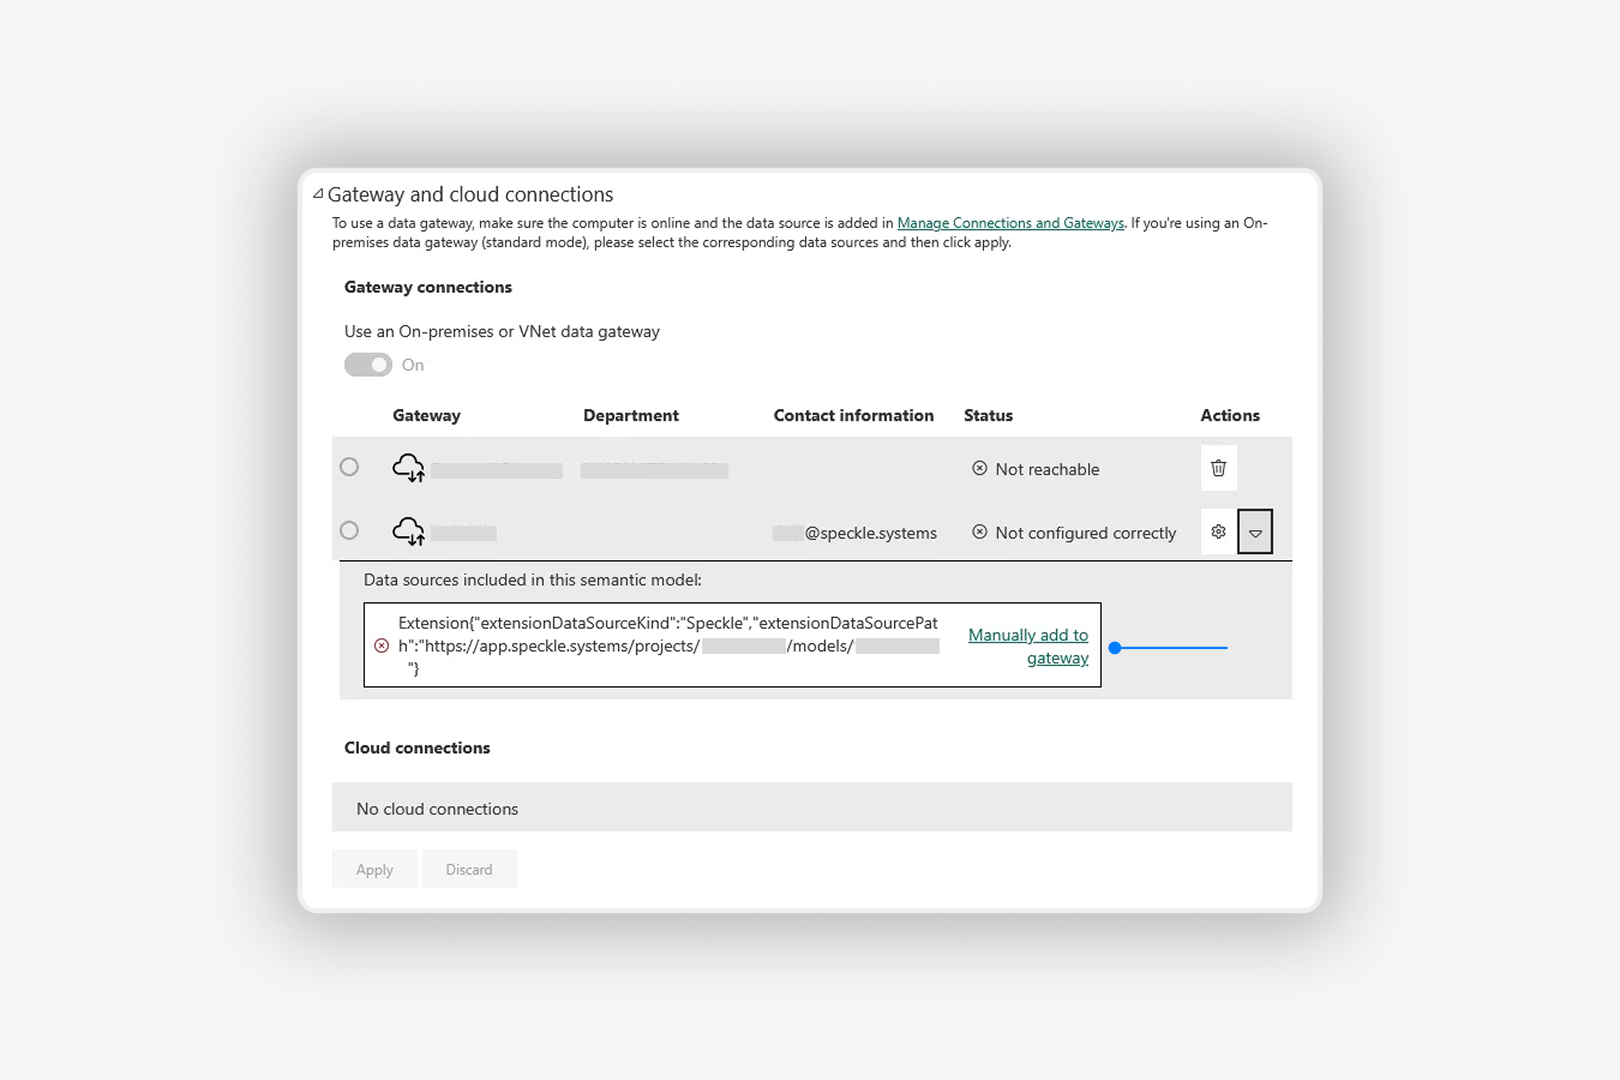 7. Create a new connection.
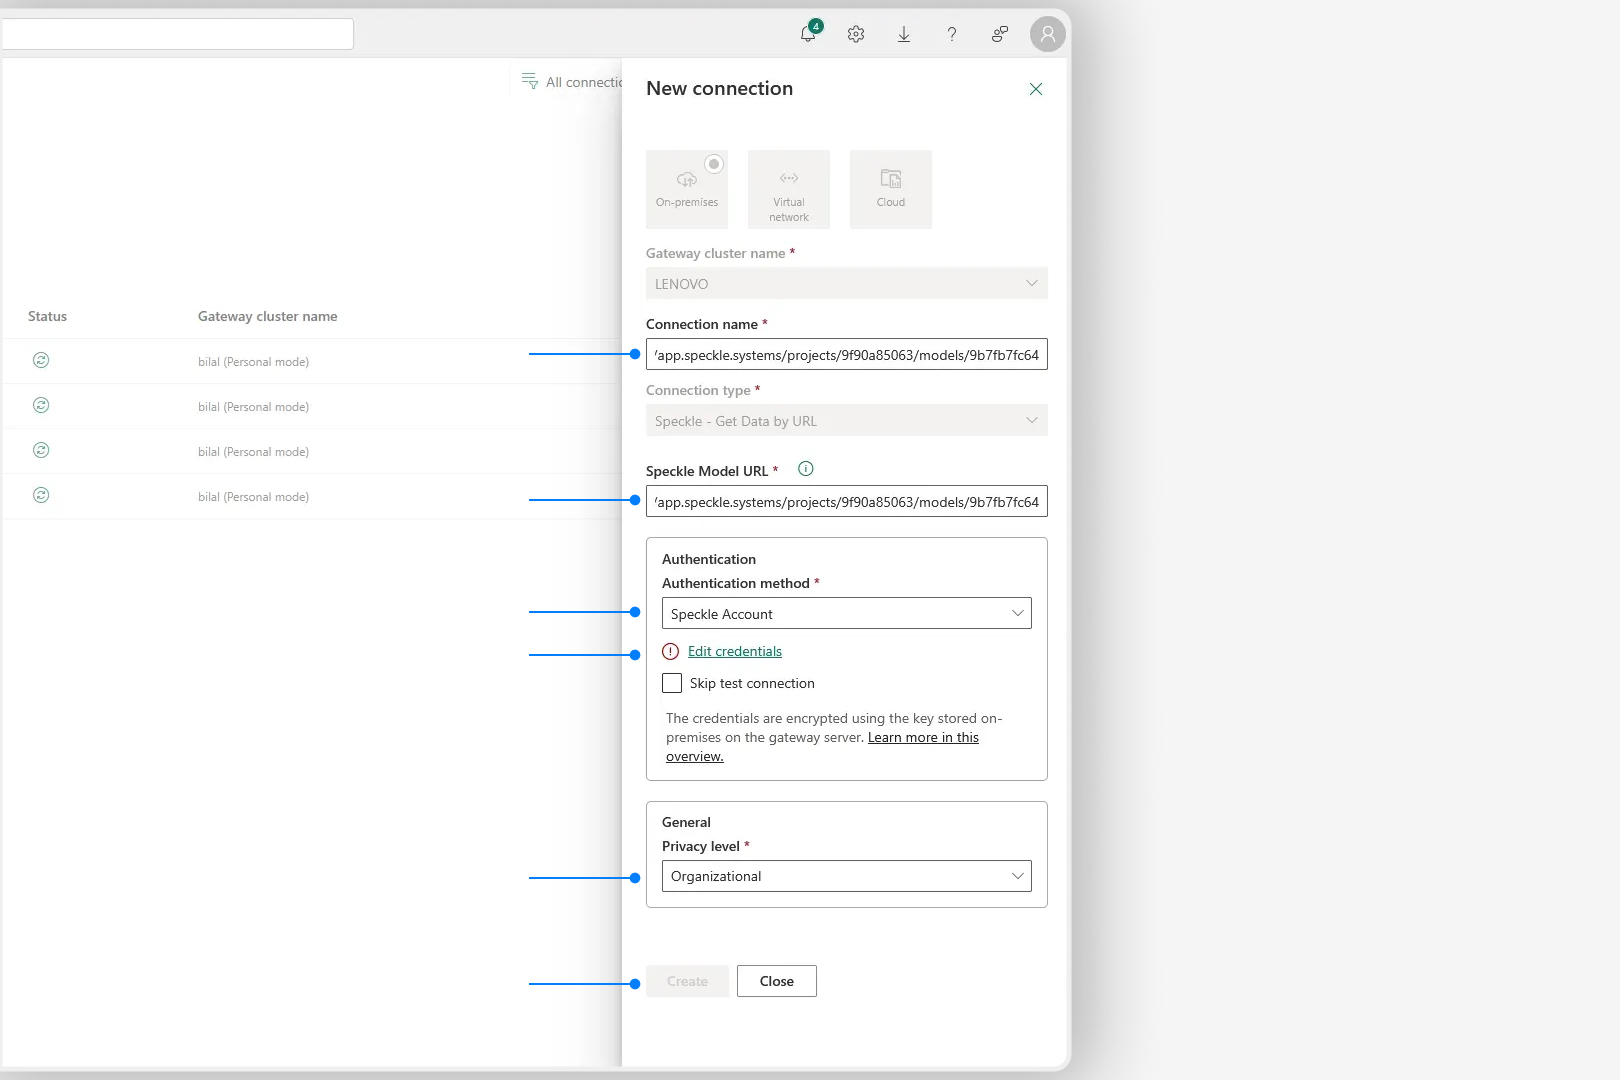 * Name your connection: You can use model URL as the name.
* Paste model URL in **Speckle Model URL** field.
* Select **Speckle Account** as the authentication method.
* Select **Edit credentials** and sign in to your Speckle account in the window that opens.
* Set the privacy level according to your organization settings.
* Select **Create** to create the connection.
8. Go back to the semantic model settings page.
9. Select the newly created collection name from the **Maps to** dropdown and select **Apply**.
* Name your connection: You can use model URL as the name.
* Paste model URL in **Speckle Model URL** field.
* Select **Speckle Account** as the authentication method.
* Select **Edit credentials** and sign in to your Speckle account in the window that opens.
* Set the privacy level according to your organization settings.
* Select **Create** to create the connection.
8. Go back to the semantic model settings page.
9. Select the newly created collection name from the **Maps to** dropdown and select **Apply**.
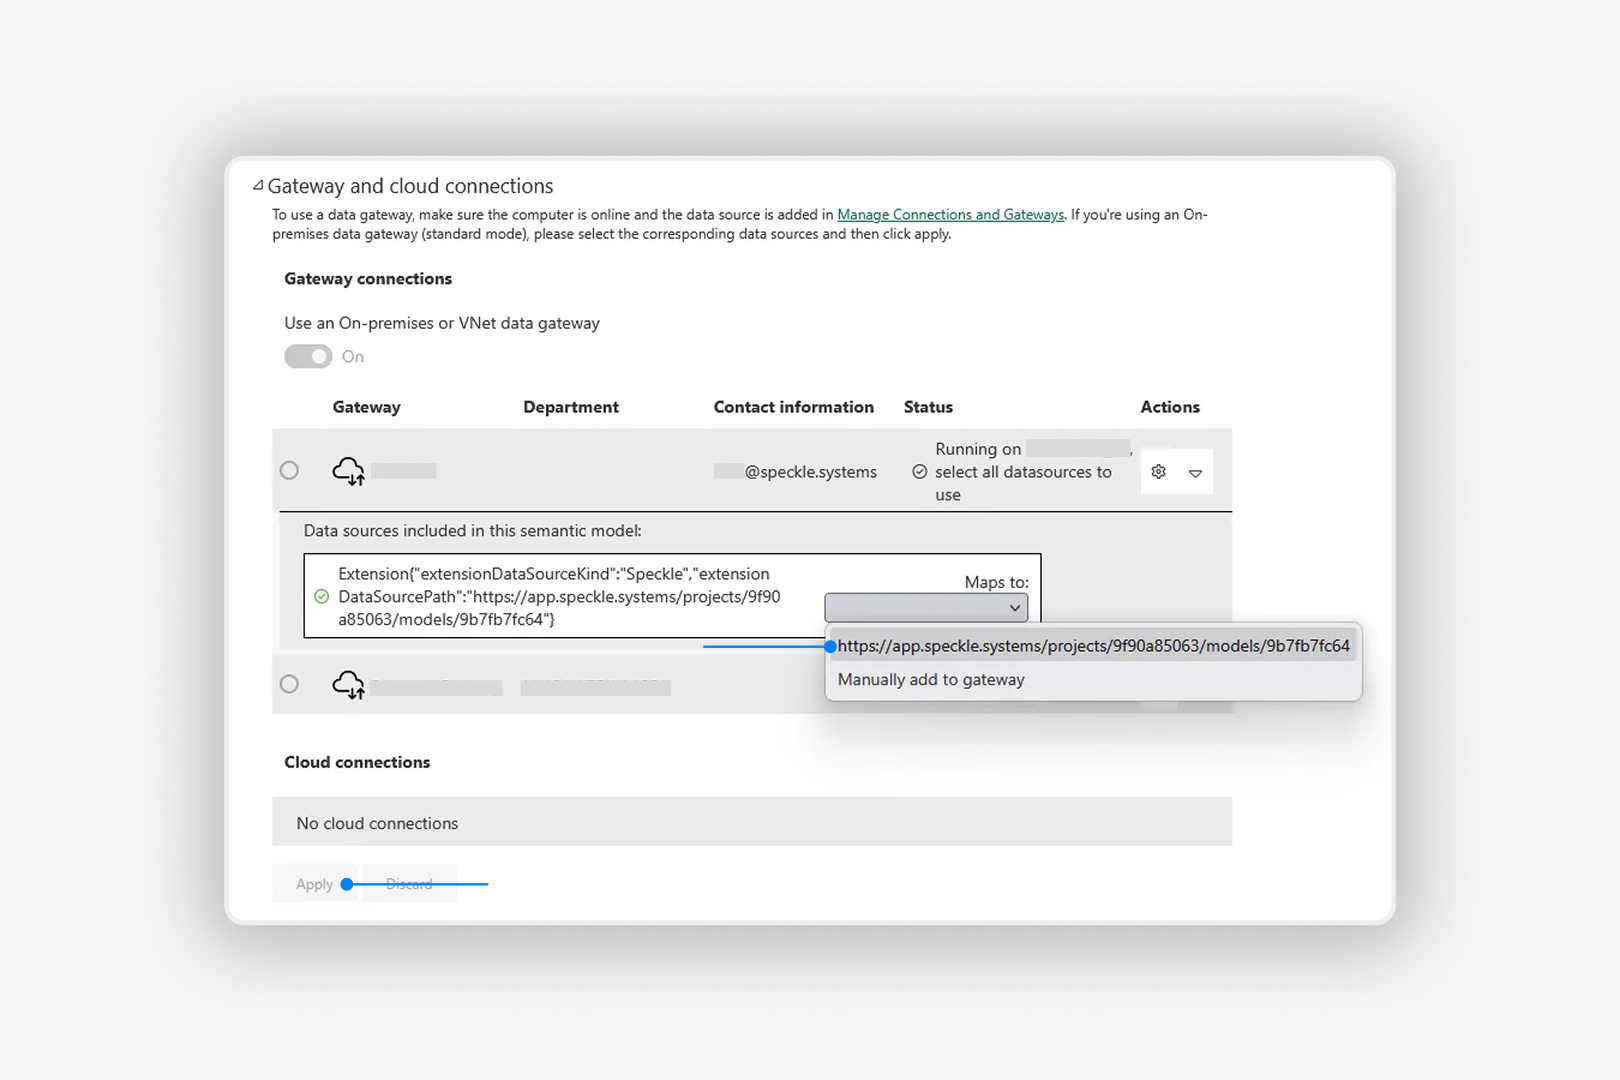 10. Your data gateway is now configured for scheduled refresh.
 To troubleshoot this error:
1. Verify the gateway appears in Power BI service under **Settings** > **Manage connections and gateways** > **On-premises data gateways**.
To troubleshoot this error:
1. Verify the gateway appears in Power BI service under **Settings** > **Manage connections and gateways** > **On-premises data gateways**.
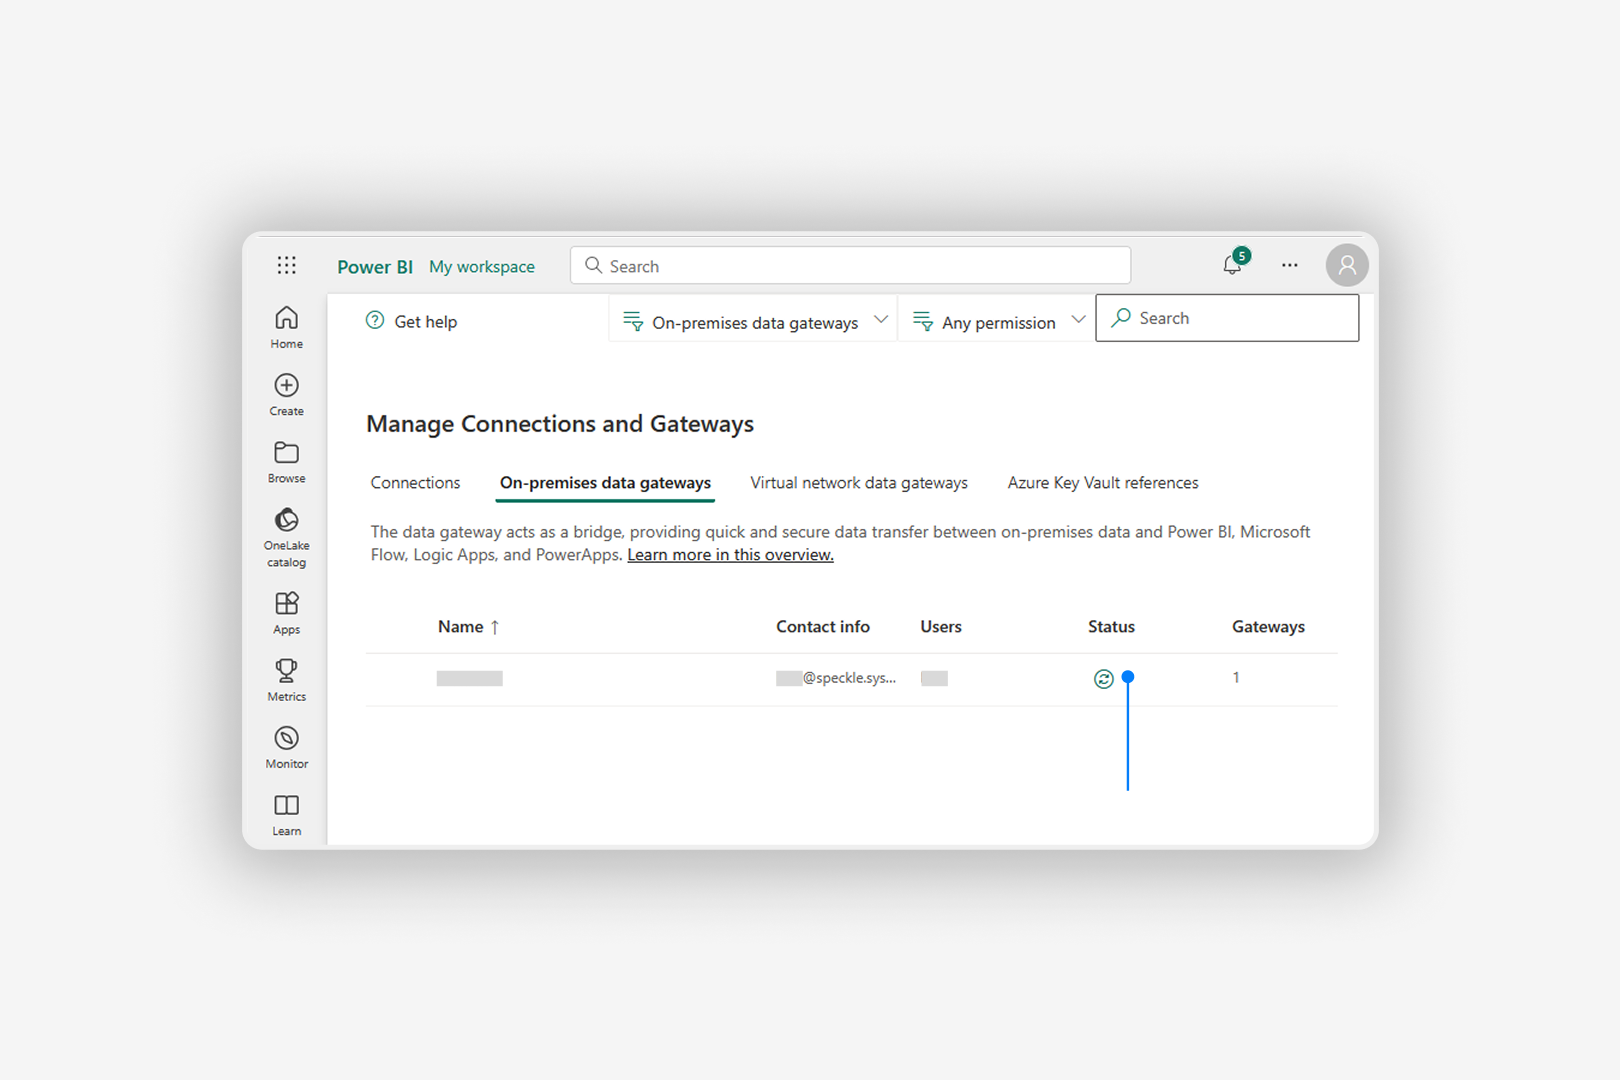 2. Verify Speckle appears in the Connectors tab in data gateway.
3. If both are true, publish a new dataset with default connectors (CSV, Excel, etc.) from Power BI Desktop and set data source credentials for it in Power BI service
4. Go back to the report that throws the error and try again
The report should now work properly.
Why this works:
Custom connectors require a dataset with verified connectors to be published first. After you publish a dataset with standard connectors, custom connectors will work with the data gateway. You only need to do this once per data gateway.
Learn more about data gateways and scheduled refresh from Microsoft: - [On-premises data gateway
(personal
mode)](https://learn.microsoft.com/en-us/power-bi/connect-data/service-gateway-personal-mode) -
[On-premises data gateway (standard
mode)](https://learn.microsoft.com/en-us/power-bi/connect-data/service-gateway-onprem-indepth) -
[Configure scheduled
refresh](https://learn.microsoft.com/en-us/power-bi/connect-data/refresh-scheduled-refresh)
2. Verify Speckle appears in the Connectors tab in data gateway.
3. If both are true, publish a new dataset with default connectors (CSV, Excel, etc.) from Power BI Desktop and set data source credentials for it in Power BI service
4. Go back to the report that throws the error and try again
The report should now work properly.
Why this works:
Custom connectors require a dataset with verified connectors to be published first. After you publish a dataset with standard connectors, custom connectors will work with the data gateway. You only need to do this once per data gateway.
Learn more about data gateways and scheduled refresh from Microsoft: - [On-premises data gateway
(personal
mode)](https://learn.microsoft.com/en-us/power-bi/connect-data/service-gateway-personal-mode) -
[On-premises data gateway (standard
mode)](https://learn.microsoft.com/en-us/power-bi/connect-data/service-gateway-onprem-indepth) -
[Configure scheduled
refresh](https://learn.microsoft.com/en-us/power-bi/connect-data/refresh-scheduled-refresh)