> ## Documentation Index
> Fetch the complete documentation index at: https://docs.speckle.systems/llms.txt
> Use this file to discover all available pages before exploring further.
# Authentication
> Learn how to authenticate with Speckle Server using tokens
## Overview
specklepy uses **personal access tokens** to authenticate with Speckle Server.
Tokens are managed through your Speckle Server profile and can be scoped to limit permissions.
## Get a Personal Access Token
Go to your Speckle Server (e.g., [app.speckle.systems](https://app.speckle.systems))
Click your avatar → Settings → Profile → Developer → Access Tokens
Click "New Token", give it a name and select the required scopes, then copy the token.
Store your token securely! **Treat them like a password**: do not post them anywhere where they could be accessed by others (e.g., public repos).
## Token-Based Authentication
The primary way to authenticate:
```python lines icon="python" focus={6-8} theme={null}
from specklepy.api.client import SpeckleClient
# Create client
client = SpeckleClient(host="app.speckle.systems")
# Authenticate with token
token = "your_token_here" # In production, use environment variables!
client.authenticate_with_token(token)
print(f"✓ Authenticated as: {client.account.userInfo.name}")
```
## Use Environment Variables (Recommended)
Best practice for all environments:
```python lines icon="python" focus={4-6} theme={null}
import os
from specklepy.api.client import SpeckleClient
# Get token from environment
token = os.environ.get("SPECKLE_TOKEN")
server_url = os.environ.get("SPECKLE_SERVER", "app.speckle.systems")
if not token:
raise ValueError("SPECKLE_TOKEN environment variable not set")
# Authenticate
client = SpeckleClient(host=server_url)
client.authenticate_with_token(token)
```
Set the environment variable:
Using `python-dotenv`:
```bash theme={null}
pip install python-dotenv
```
Create `.env` file:
```
SPECKLE_TOKEN=your_token_here
SPECKLE_SERVER=https://app.speckle.systems
```
Load in your script:
```python lines icon="python" theme={null}
from dotenv import load_dotenv
import os
load_dotenv()
token = os.getenv("SPECKLE_TOKEN")
```
```bash theme={null}
export SPECKLE_TOKEN="your_token_here"
export SPECKLE_SERVER="https://app.speckle.systems"
```
Or add to `~/.bashrc` or `~/.zshrc` for persistence.
```powershell theme={null}
$env:SPECKLE_TOKEN="your_token_here"
$env:SPECKLE_SERVER="https://app.speckle.systems"
```
Or set System Environment Variables for persistence.
```cmd theme={null}
set SPECKLE_TOKEN=your_token_here
set SPECKLE_SERVER=https://app.speckle.systems
```
Or use `setx` for persistence:
```cmd theme={null}
setx SPECKLE_TOKEN "your_token_here"
```
## Local Account Files (Optional)
For local development, you can use account credentials stored by Speckle desktop connectors:
```python lines icon="python" focus={4,11-14} theme={null}
from specklepy.api.credentials import get_local_accounts, get_default_account
# Get all locally stored accounts
accounts = get_local_accounts()
for account in accounts:
print(f"Server: {account.serverInfo.url}")
print(f"User: {account.userInfo.name}")
# Get the default account
account = get_default_account()
if account:
client = SpeckleClient(host=account.serverInfo.url)
client.authenticate_with_account(account)
```
Local accounts are created by signing in and authenticating with any Speckle desktop connector (Revit, Rhino, Grasshopper, AutoCAD, etc.).
Account files are stored in:
* **Windows**: `%APPDATA%\Speckle\Accounts`
* **macOS**: `~/.config/Speckle/Accounts`
* **Linux**: `~/.local/share/Speckle/Accounts`
### Account Object Structure
An `Account` object contains:
```python lines icon="python" theme={null}
# Server information
account.serverInfo.url # "https://app.speckle.systems"
account.serverInfo.name # "Speckle"
account.serverInfo.company # "Speckle Systems"
# User information
account.userInfo.id # User ID
account.userInfo.name # "John Doe"
account.userInfo.email # "john@example.com"
# Authentication
account.token # Personal access token
account.isDefault # True/False
```
## Different Speckle Servers
### Connect to Different Servers
```python lines icon="python" focus={4,7,10} theme={null}
from specklepy.api.client import SpeckleClient
# Public Speckle server
client = SpeckleClient(host="https://app.speckle.systems")
# Custom self-hosted server
client = SpeckleClient(host="https://speckle.mycompany.com")
# Local development server (no SSL)
client = SpeckleClient(host="localhost:3000", use_ssl=False)
```
### SSL Certificate Verification
For self-hosted servers with self-signed certificates:
```python lines icon="python" focus={3} theme={null}
client = SpeckleClient(
host="http://speckle.mycompany.com",
verify_certificate=False # Disable SSL verification
)
```
Only disable certificate verification for trusted internal servers.
## Authentication Best Practices
Choose the authentication method that best fits your use case:
**Use environment variables or local accounts**
Store tokens in `.env` files (not committed to git) or use local account files.
```python lines icon="python" theme={null}
from dotenv import load_dotenv
import os
# .env file approach
load_dotenv()
token = os.getenv("SPECKLE_TOKEN")
client.authenticate_with_token(token)
```
**Use environment variables**
Store tokens in environment variables or secret managers (AWS Secrets Manager, Azure Key Vault, etc.).
```python lines icon="python" theme={null}
token = os.environ["SPECKLE_TOKEN"]
client.authenticate_with_token(token)
```
**Use secrets management**
Use GitHub Secrets, GitLab CI/CD variables, or similar.
```yaml theme={null}
# .github/workflows/example.yml
env:
SPECKLE_TOKEN: ${{ secrets.SPECKLE_TOKEN }}
```
**Implement OAuth 2.0 flow**
For web apps where users authenticate themselves. Each user gets their own token via OAuth.
## Checking Authentication Status
Verify your client is authenticated:
```python lines icon="python" focus={2,6} theme={null}
# Check if authenticated
if client.account.token:
print("✓ Authenticated")
# Get current user info
user = client.active_user.get()
print(f"Logged in as: {user.name}")
print(f"Email: {user.email}")
else:
print("✗ Not authenticated")
```
## Token Scopes
When creating a token, you can limit its permissions:
| Scope | Description |
| --------------- | -------------------------- |
| `streams:read` | Read project data |
| `streams:write` | Create and modify projects |
| `profile:read` | Read user profile |
| `Profile:read` | Read user profile |
| `Profile:email` | Access user email |
Scopes will be documented later but for now you can view all those available in the Access Token creation step:
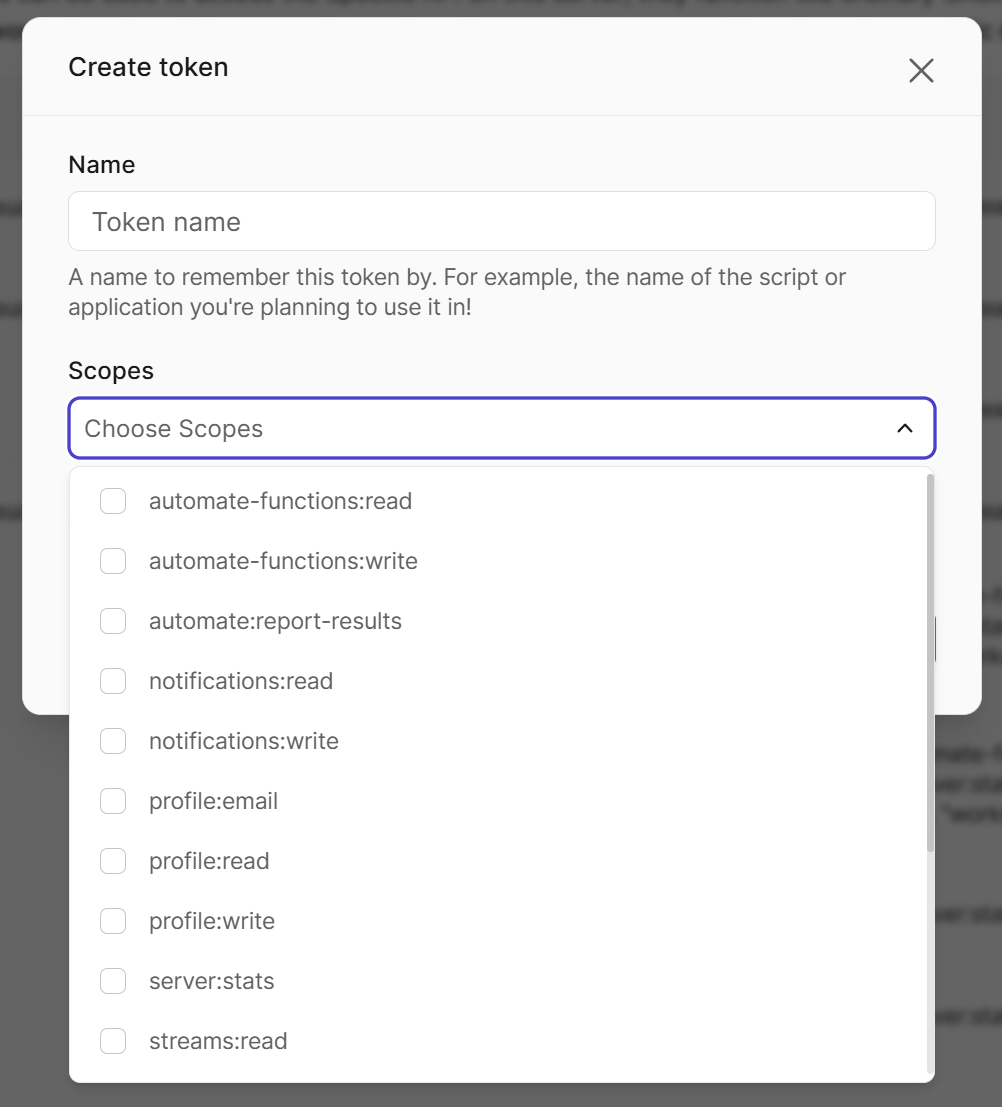 Follow the principle of least privilege - only grant the scopes your application needs.
Scopes retain the nomenclature of v2 Speckle where `project` is `stream`
## Common Authentication Errors
**Error:** `403 Forbidden` or `Invalid token`
**Solution:**
* Verify the token is correct (no extra spaces)
* Check the token hasn't been revoked
* Ensure the token has the required scopes
* Generate a new token if needed
**Error:** `Connection refused` or `Failed to connect`
**Solution:**
* Verify the server URL is correct
* Check your internet connection
* For local servers, ensure the server is running
* Check firewall settings
**Error:** `SSL: CERTIFICATE_VERIFY_FAILED`
**Solution:**
* For self-signed certificates, use `verify_certificate=False`
* Install the certificate in your system's trust store
* For production, use properly signed certificates
**Error:** `No default account found`
**Solution:**
* Use token authentication instead:
```python lines icon="python" theme={null}
token = os.environ.get("SPECKLE_TOKEN")
client.authenticate_with_token(token)
```
## Security Best Practices
**Do:**
* Store tokens in environment variables
* Use `.gitignore` to exclude `.env` files
* Rotate tokens periodically
* Use scoped tokens with minimal permissions
* Revoke tokens when no longer needed
**Don't:**
* Commit tokens to version control
* Share tokens between team members
* Use tokens in client-side code (use OAuth instead)
* Store tokens in plain text files
* Use overly permissive scopes
## Next Steps
Now that you're authenticated, start sending and receiving data:
Build your first Speckle integration
Understand Projects, Models, and Versions
Follow the principle of least privilege - only grant the scopes your application needs.
Scopes retain the nomenclature of v2 Speckle where `project` is `stream`
## Common Authentication Errors
**Error:** `403 Forbidden` or `Invalid token`
**Solution:**
* Verify the token is correct (no extra spaces)
* Check the token hasn't been revoked
* Ensure the token has the required scopes
* Generate a new token if needed
**Error:** `Connection refused` or `Failed to connect`
**Solution:**
* Verify the server URL is correct
* Check your internet connection
* For local servers, ensure the server is running
* Check firewall settings
**Error:** `SSL: CERTIFICATE_VERIFY_FAILED`
**Solution:**
* For self-signed certificates, use `verify_certificate=False`
* Install the certificate in your system's trust store
* For production, use properly signed certificates
**Error:** `No default account found`
**Solution:**
* Use token authentication instead:
```python lines icon="python" theme={null}
token = os.environ.get("SPECKLE_TOKEN")
client.authenticate_with_token(token)
```
## Security Best Practices
**Do:**
* Store tokens in environment variables
* Use `.gitignore` to exclude `.env` files
* Rotate tokens periodically
* Use scoped tokens with minimal permissions
* Revoke tokens when no longer needed
**Don't:**
* Commit tokens to version control
* Share tokens between team members
* Use tokens in client-side code (use OAuth instead)
* Store tokens in plain text files
* Use overly permissive scopes
## Next Steps
Now that you're authenticated, start sending and receiving data:
Build your first Speckle integration
Understand Projects, Models, and Versions