> ## Documentation Index
> Fetch the complete documentation index at: https://docs.speckle.systems/llms.txt
> Use this file to discover all available pages before exploring further.
# Deploy to Kubernetes
> Deploy Speckle server to Kubernetes for enterprise and production environments
To ease new deployments, we are maintaining [a Kubernetes Helm chart](https://hub.docker.com/r/speckle/speckle-server-chart).
This setup is not recommended for use as-is in production for a few reasons, namely:
* Application-level updates: We tend to move quite fast, and if things get busy, blink twice, and you’re on an outdated server. This has security implications, too.
* Database backups: Again, this is up to you, mostly based on your risk appetite when it comes to dealing with live data. We’re healthily paranoid, so we’ve set up replication, failover nodes, and PITR.
* Automatic scalability: for example, the preview service can be quite a monster; that setup can eat up all a vm’s resources, and starve other processes, causing general system-wide instability. Cloud providers can provide horizontal VM auto-scaling, and Kubernetes can provide horizontal pod auto-scaling, but these are not discussed in this guide.
* Monitoring: this setup does not describe integrations for telemetry, metrics, tracing, or logging. Nor does it describe alerting or response actions.
* Firewall and network hardening: running in production requires additional security hardening measures, particularly protecting the network from intrusion or data exfiltration.
If you need help deploying a production server, [we can help](https://speckle.systems/pricing/)!
## Prerequisites
* \[Required] A [DigitalOcean](https://www.digitalocean.com/) account. Please note that this guide will create resources that may incur a charge on DigitalOcean.
* \[Required] [Helm CLI](https://helm.sh/docs/intro/install/) installed.
* \[Required] [Kubernetes CLI client](https://kubernetes.io/docs/tasks/tools/#kubectl) installed.
* \[Required] A domain name, or a sub-domain to which a DNS A Record can be added.
* \[Optional] An email service provider account of your choice (to allow the server to send emails)
* \[Optional] An authentication service of your choice (to allow the server to authenticate users), otherwise username & password authentication will be used.
* \[Optional] The [DigitalOcean CLI client](https://docs.digitalocean.com/reference/doctl/how-to/install/) is installed.
## Create the Kubernetes Cluster
Go to your DigitalOcean dashboard and [create a new Kubernetes cluster](https://cloud.digitalocean.com/kubernetes/clusters/new). We gave the cluster a name but left the configuration as per DigitalOcean's recommended defaults. When prompted to select the node count and size, we selected four nodes. Each node has the default 2 vCPU and 4 GB (`s-2vcpu-4gb`). While this is a minimum, your usage may vary, and we recommend testing under your typical loads and adjusting by deploying new nodes or larger-sized machines in new node-pools.
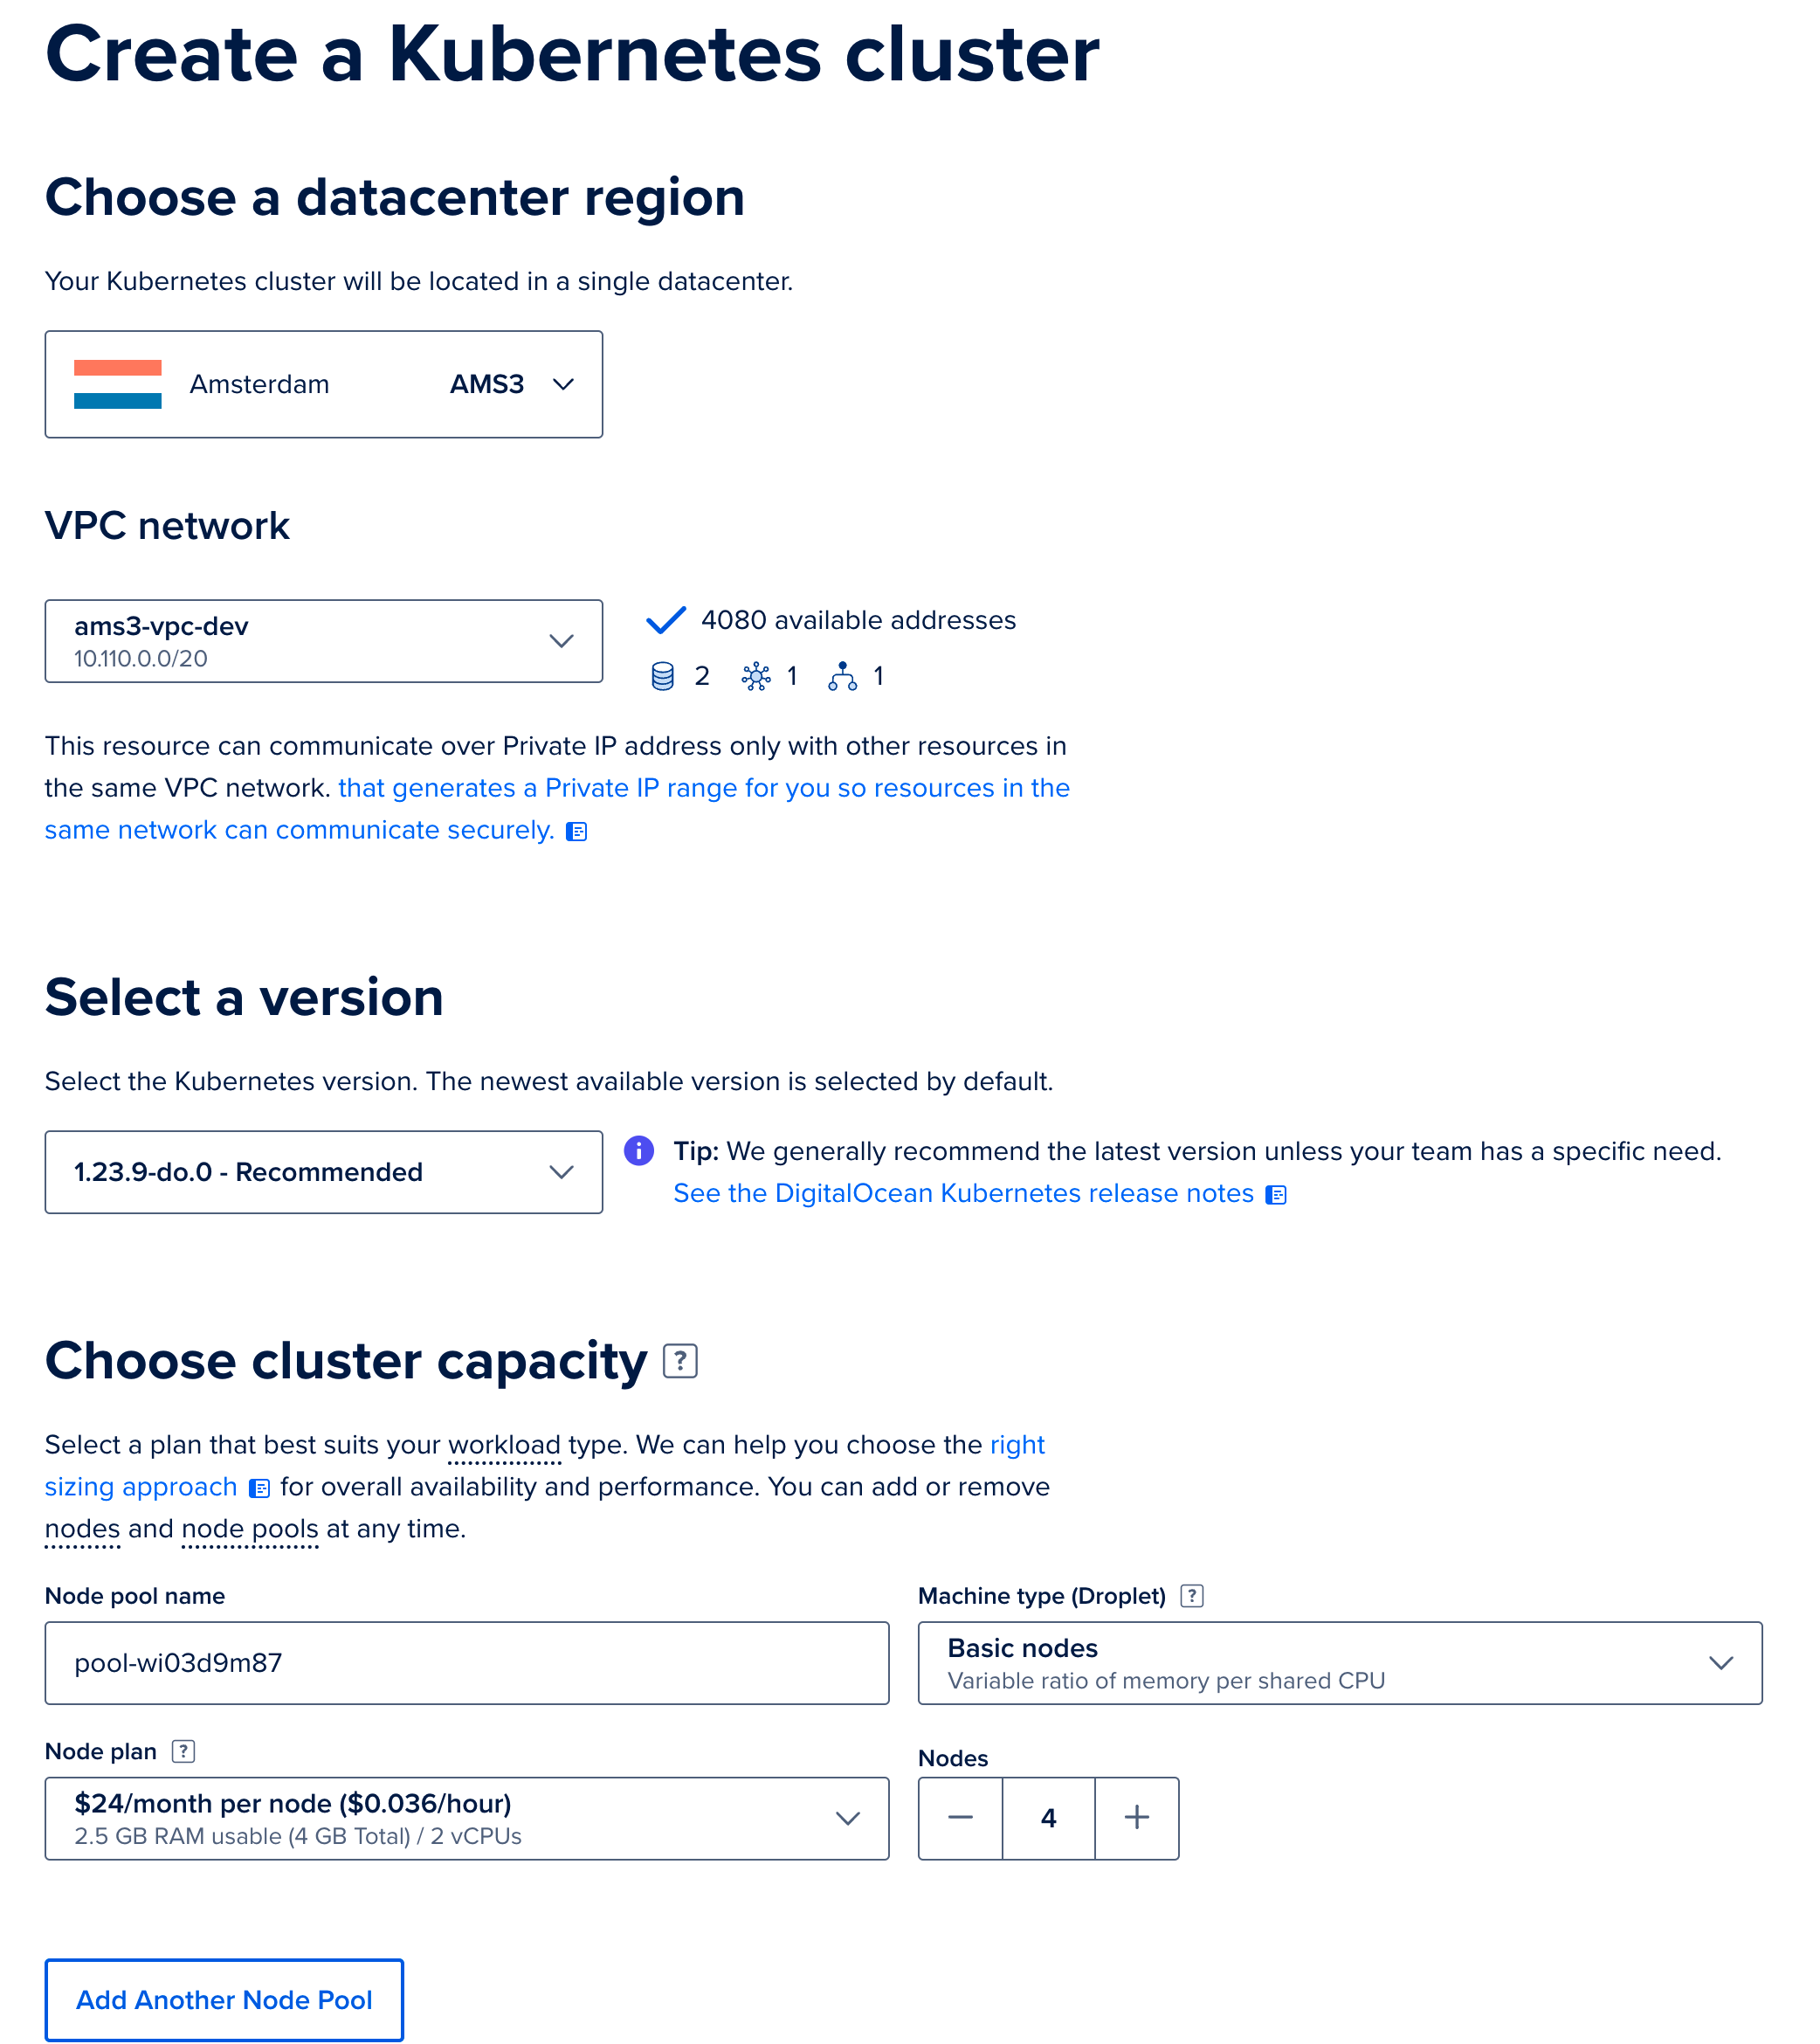 Configure the other options for your Kubernetes cluster, then click the `Create Cluster` button. After the cluster is created and initialized, you should see it in your list of kubernetes clusters:
 To log in to the cluster, follow the getting-started guide on the DigitalOcean dashboard for your cluster. We recommend using the automated option to update your local Kubernetes configuration (kubeconfig) with the [DigitalOcean client, `doctl`](https://docs.digitalocean.com/reference/doctl/how-to/install/).
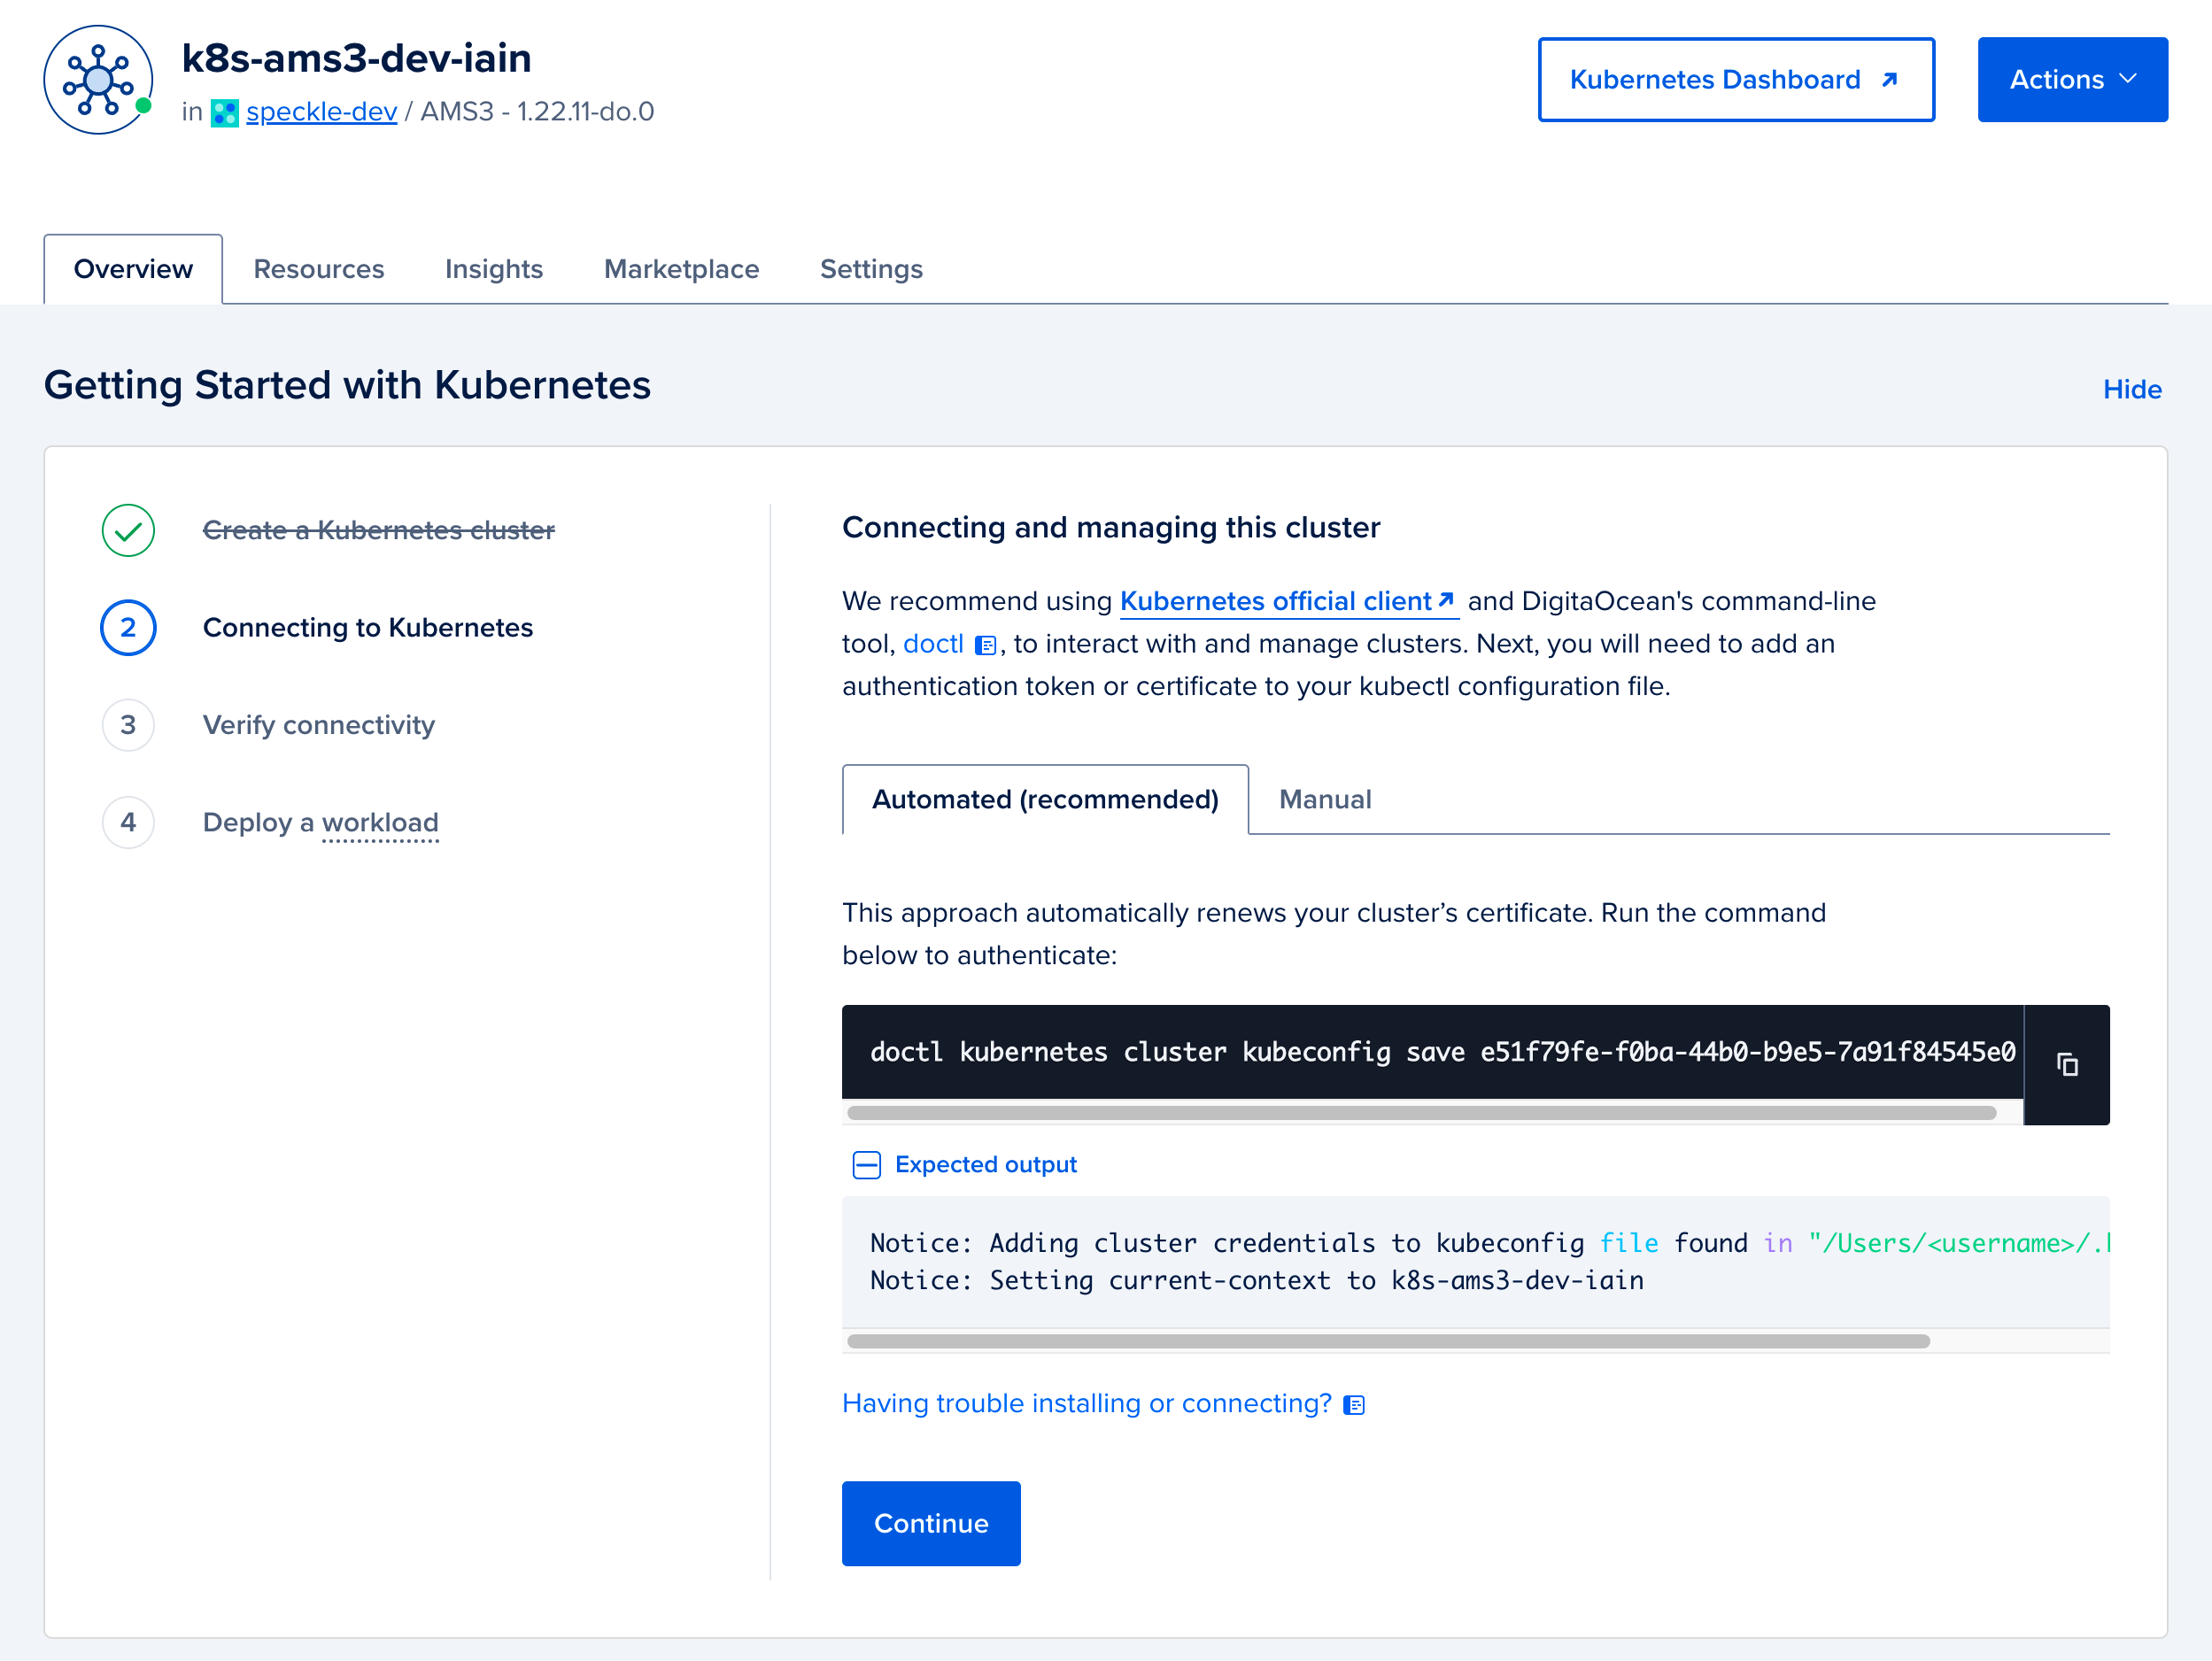 After downloading the kubernetes config, you can verify that your kubernetes client has the cluster configuration by running the following command. A list of kubernetes clusters will be printed; your cluster context should have the prefix `do-`. Make a note of the name, you will use this in place of `${YOUR_CLUSTER_CONTEXT_NAME}` in most of the following steps of this guide.
```shell theme={null}
kubectl config get-contexts
```
After downloading the kubernetes config, you can verify that your kubernetes client has the cluster configuration by running the following command. A list of kubernetes clusters will be printed; your cluster context should have the prefix `do-`. Make a note of the name, you will use this in place of `${YOUR_CLUSTER_CONTEXT_NAME}` in most of the following steps of this guide.
```shell theme={null}
kubectl config get-contexts
```
 Verify that you can connect to the cluster using kubectl by running the following command to show the nodes you have provisioned. Remember to replace `${YOUR_CLUSTER_CONTEXT_NAME}` with the name of your cluster.
```shell theme={null}
kubectl get nodes --context "${YOUR_CLUSTER_CONTEXT_NAME}"
```
You should see something like the following:
Verify that you can connect to the cluster using kubectl by running the following command to show the nodes you have provisioned. Remember to replace `${YOUR_CLUSTER_CONTEXT_NAME}` with the name of your cluster.
```shell theme={null}
kubectl get nodes --context "${YOUR_CLUSTER_CONTEXT_NAME}"
```
You should see something like the following:
 ### (Optional): Configure Valkey
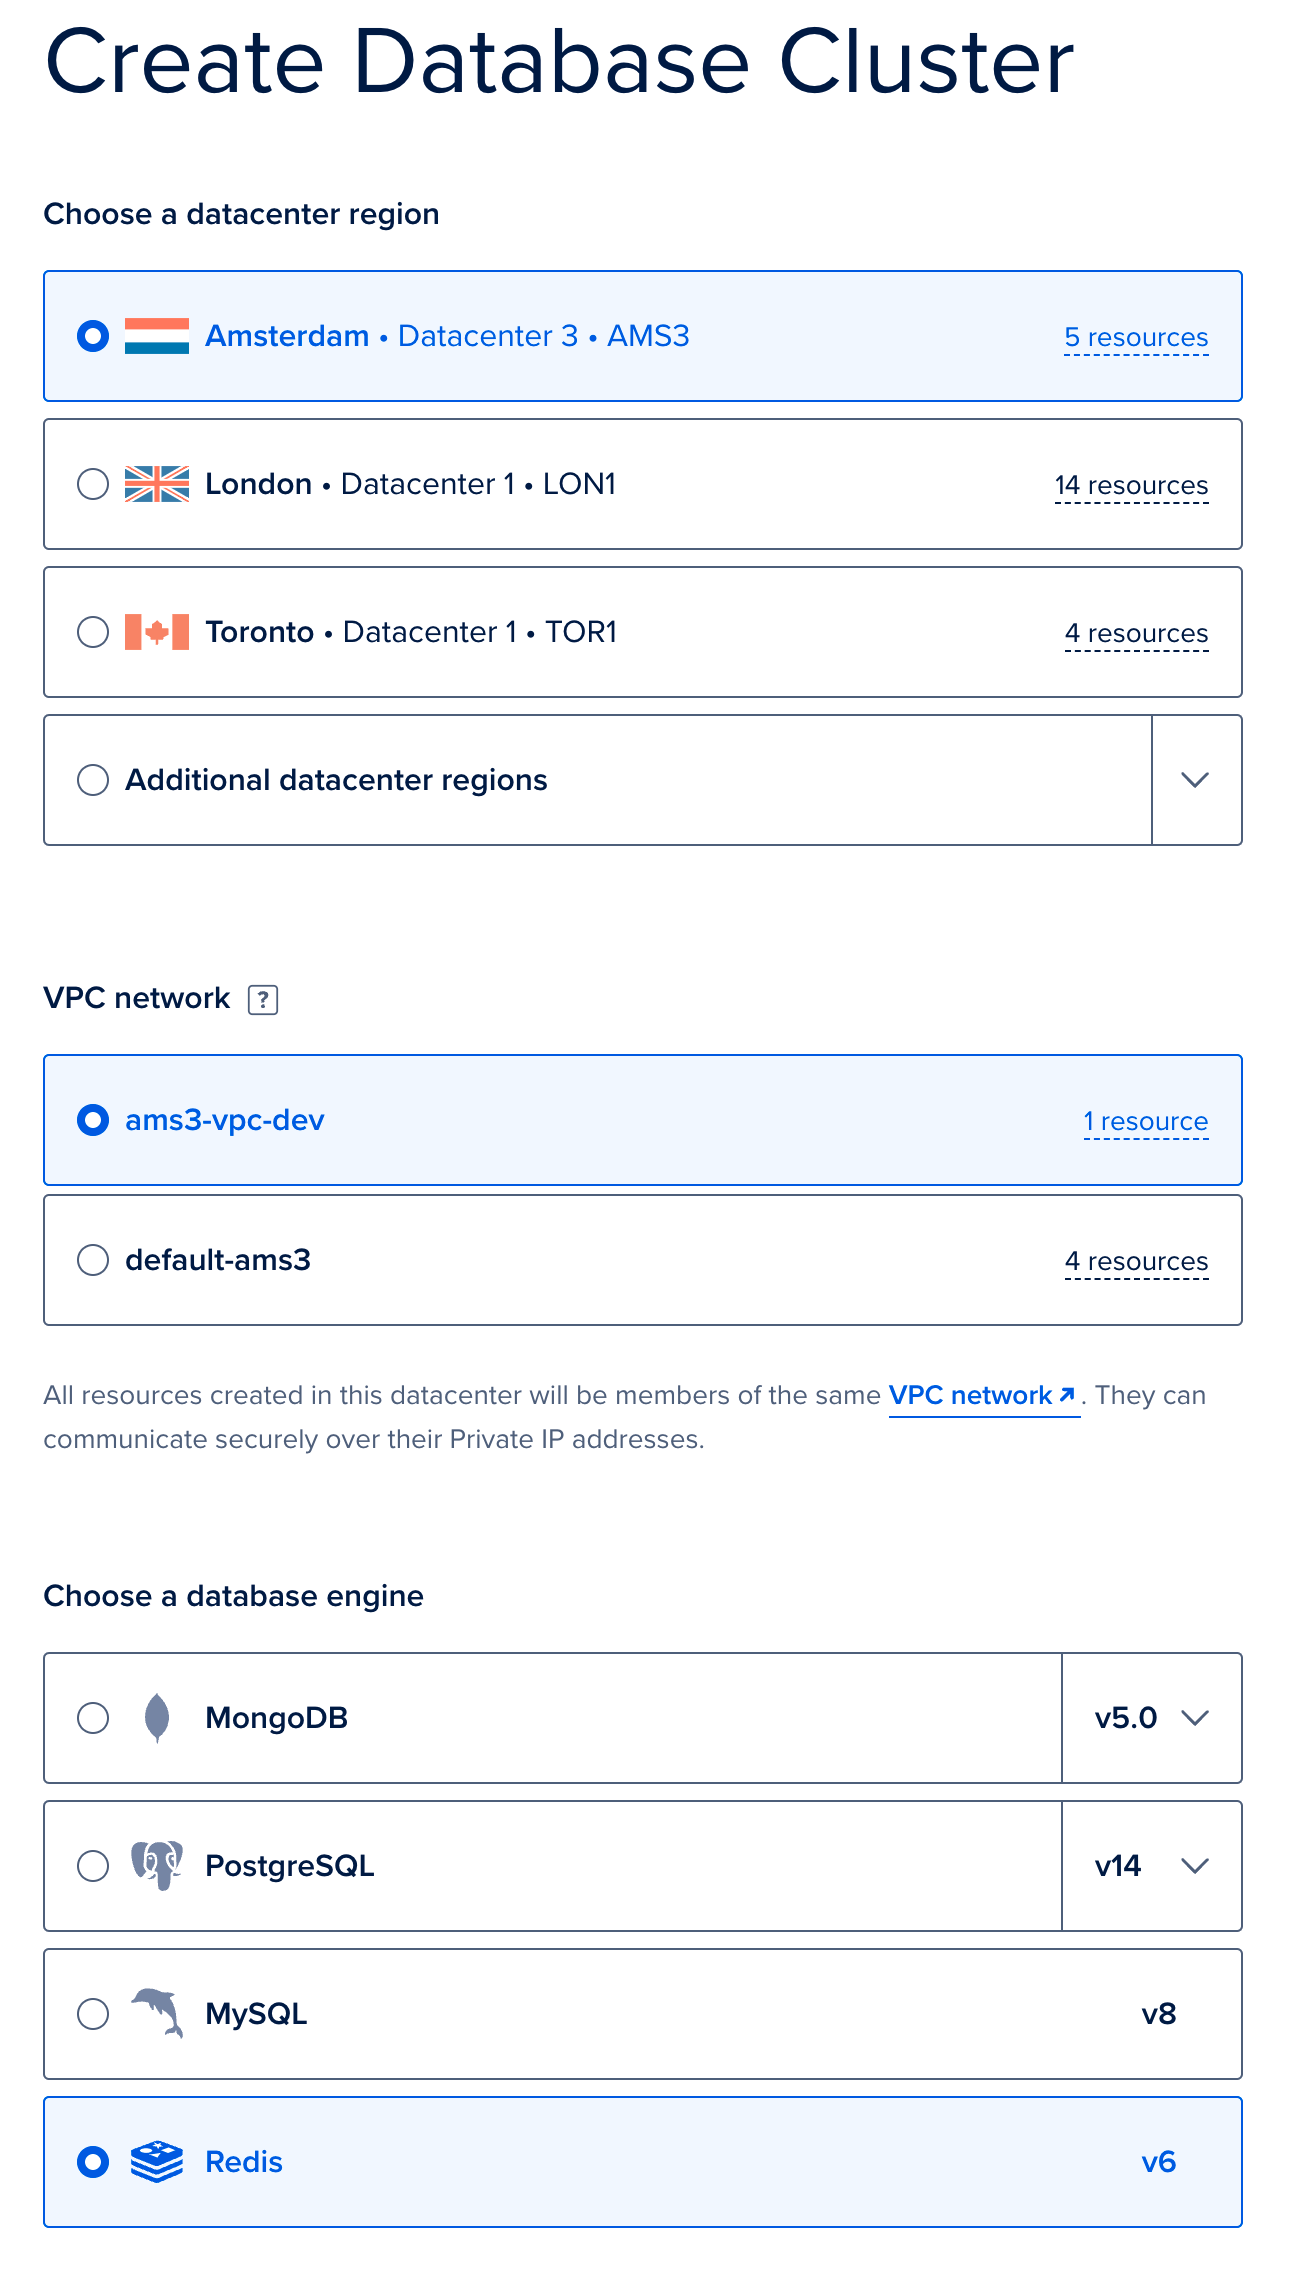
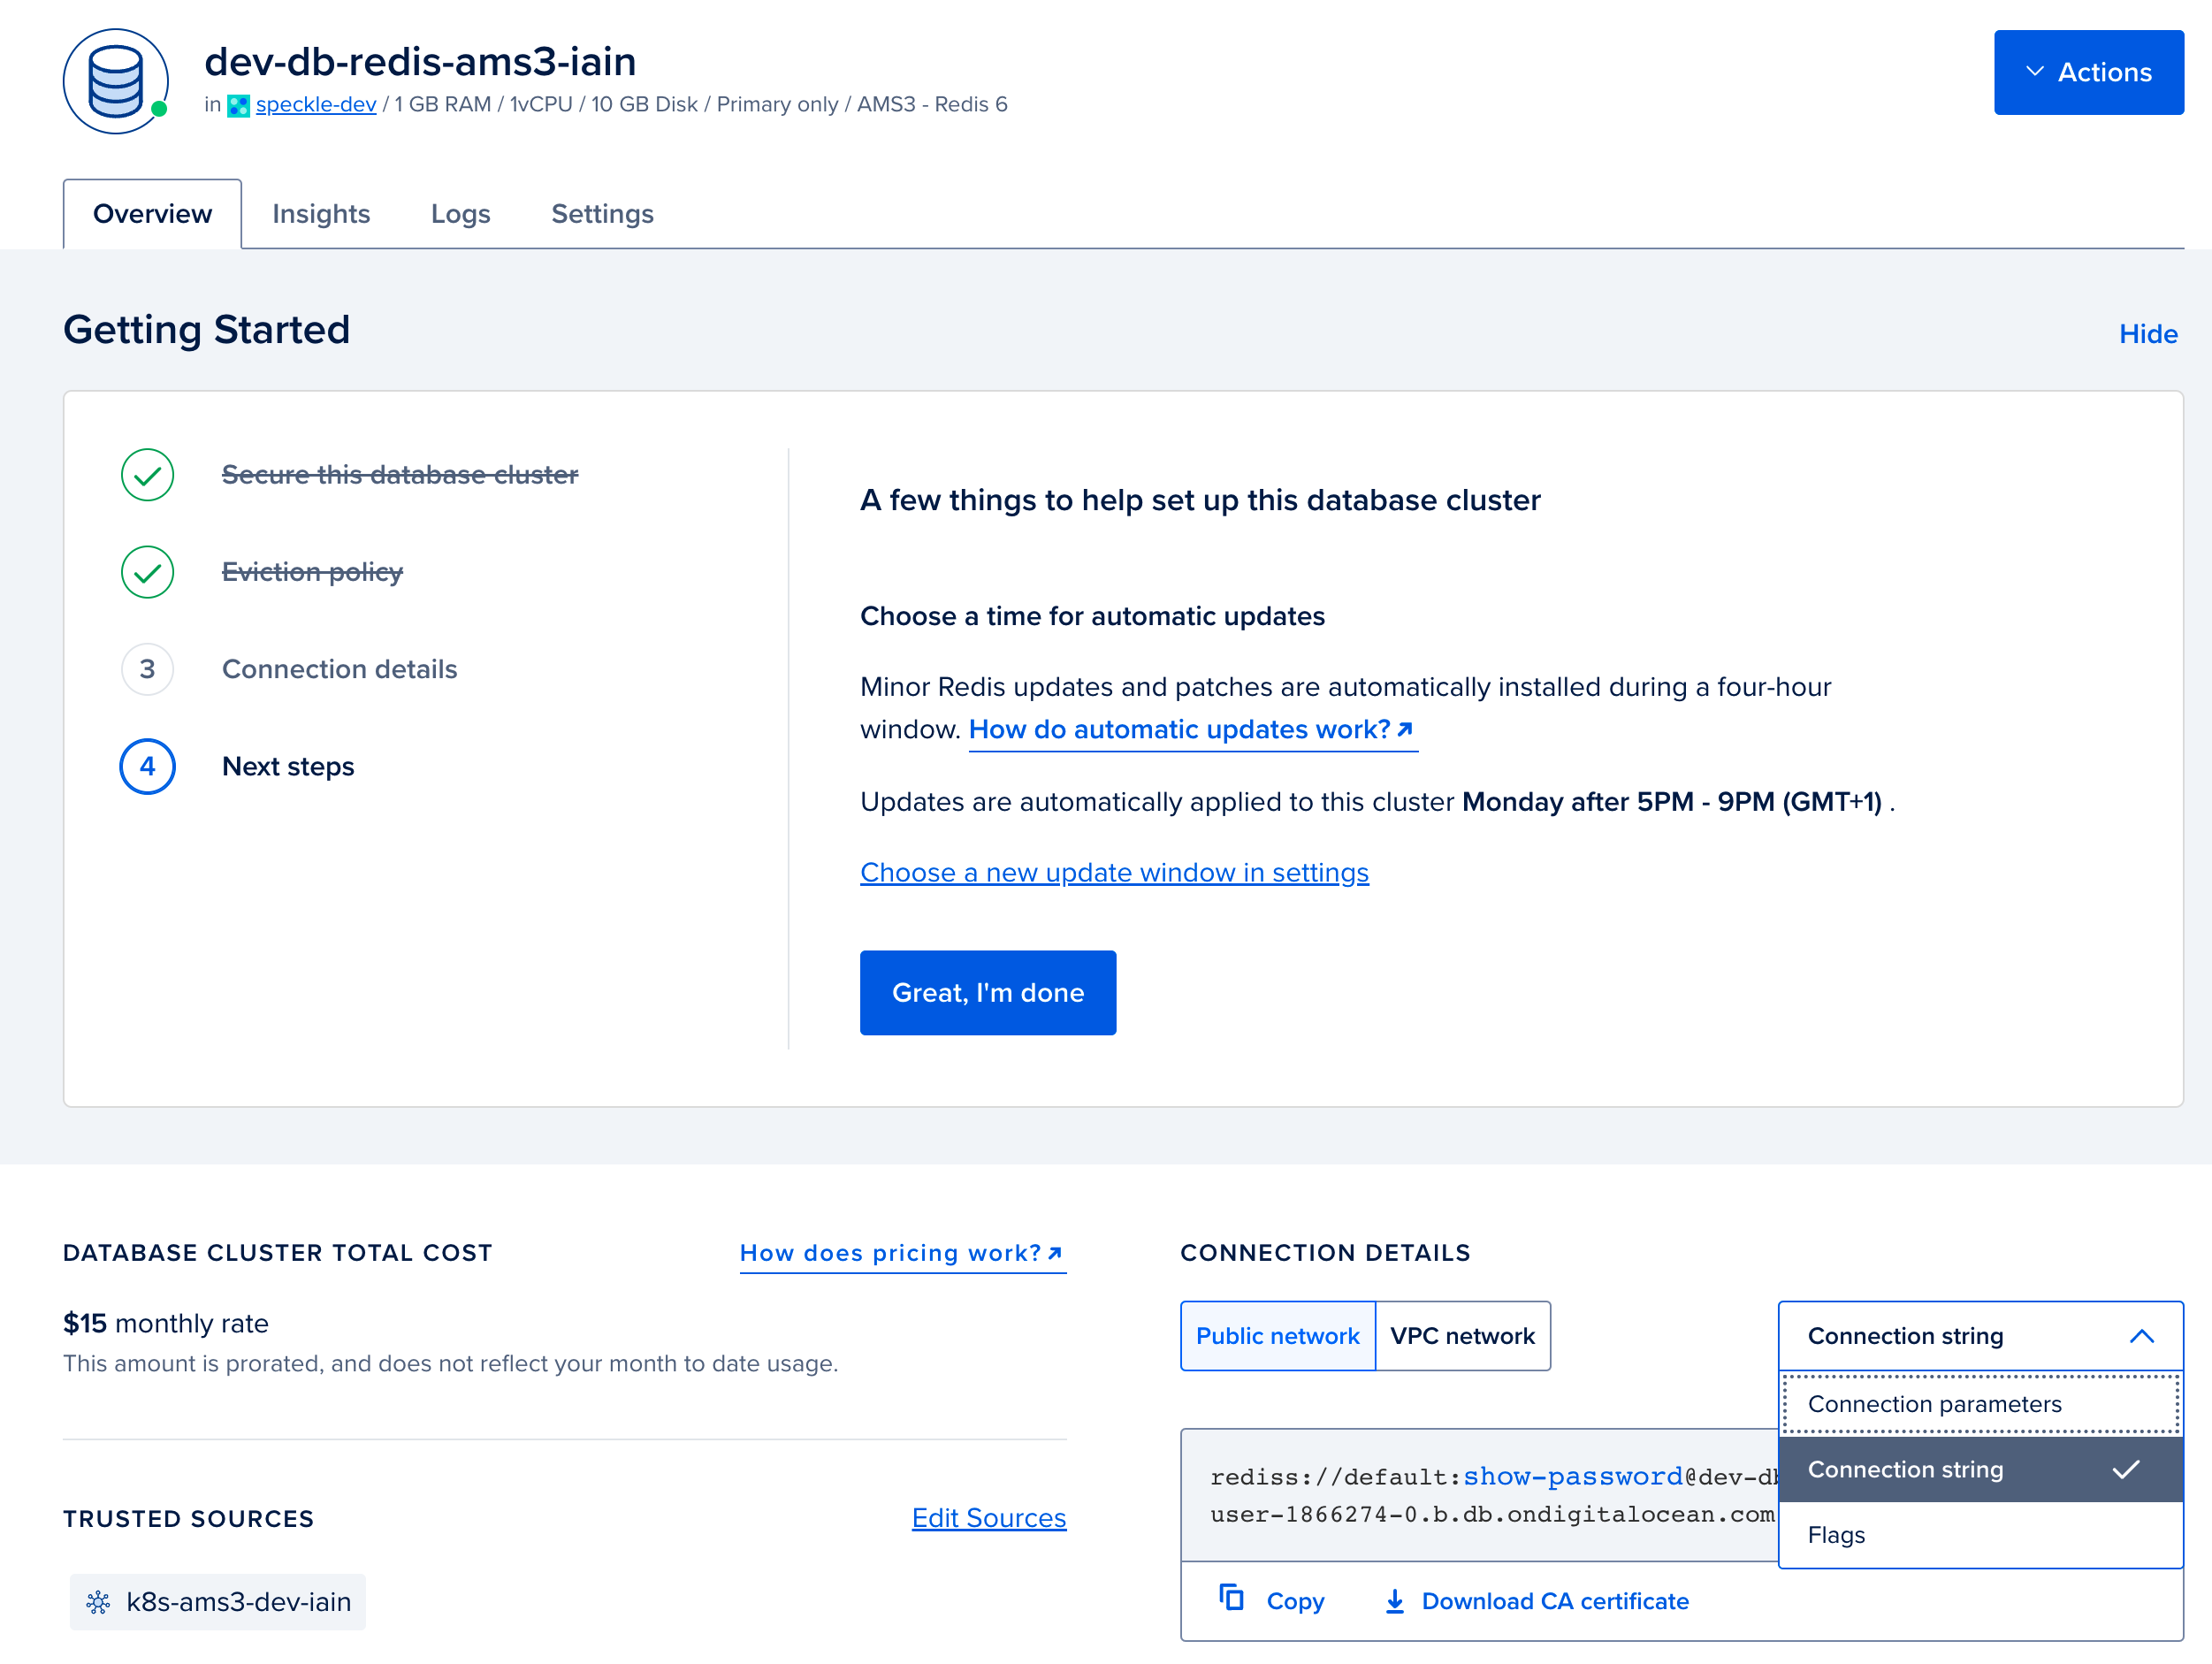
Speckle requires a Valkey cache to function. You can provide your own if you have an existing database. This should be a single-node Valkey cache, not a multi-node cluster. Otherwise, follow the steps below to create a new Valkey database on DigitalOcean.
* We will deploy a managed Valkey provided by DigitalOcean. Go to the [new Database creation page](https://cloud.digitalocean.com/databases/new). Firstly, select the same region and VPC as you used when deploying your Kubernetes cluster, and select Valkey. Provide a name, and click `Create Database Cluster`.
Again, we used the default sizes, but your usage will vary, and we recommend testing under your typical loads and adjusting as needed based on the database size.
### (Optional): Configure Valkey
Speckle requires a Valkey cache to function. You can provide your own if you have an existing database. This should be a single-node Valkey cache, not a multi-node cluster. Otherwise, follow the steps below to create a new Valkey database on DigitalOcean.
* We will deploy a managed Valkey provided by DigitalOcean. Go to the [new Database creation page](https://cloud.digitalocean.com/databases/new). Firstly, select the same region and VPC as you used when deploying your Kubernetes cluster, and select Valkey. Provide a name, and click `Create Database Cluster`.
Again, we used the default sizes, but your usage will vary, and we recommend testing under your typical loads and adjusting as needed based on the database size.
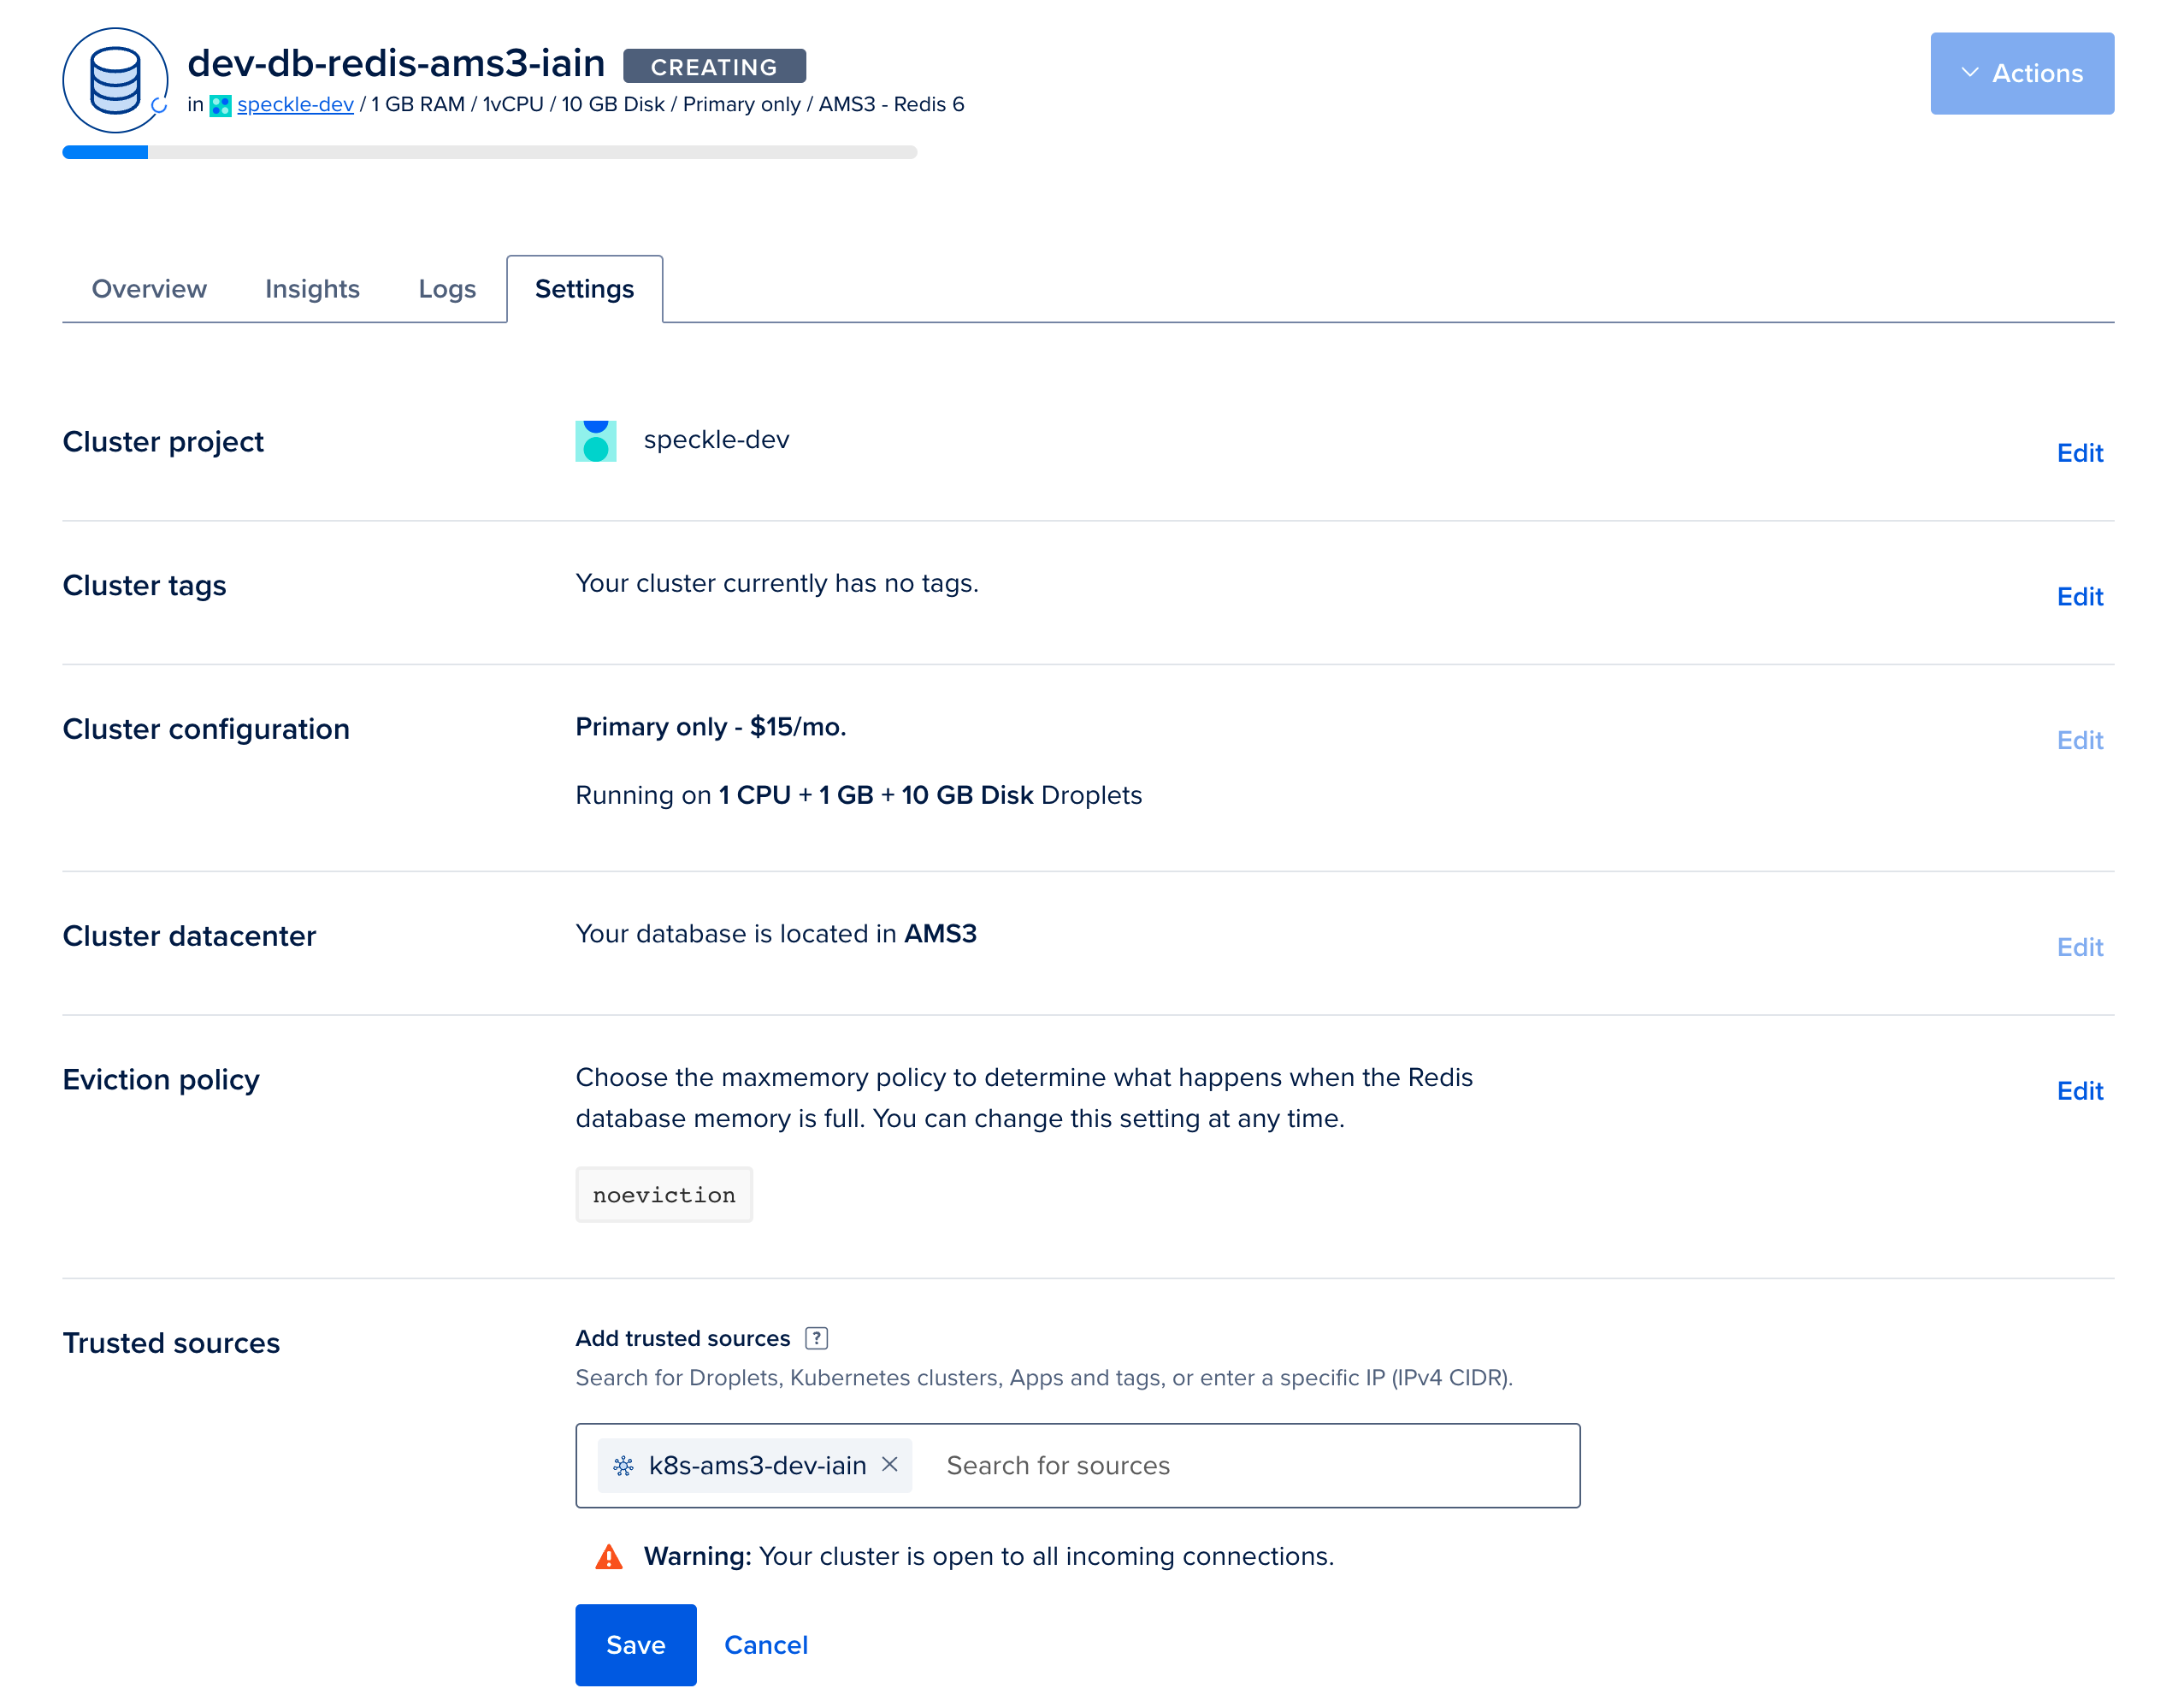
 * From the overview, click on `Secure this database cluster by restricting access.` This will take you to the Trusted Sources panel in the Settings tab. Here, we will improve the security of your database by only allowing connections from your Kubernetes cluster. Type the name of your Kubernetes cluster and add it as a Trusted Source.
 * In the Overview tab for your Valkey database. Select `connection string` from the dropdown, and copy the displayed Connection String. You will require this when configuring your deployment in [step 4](#step-4-configure-your-deployment).
 ### (Optional): Configure Postgres
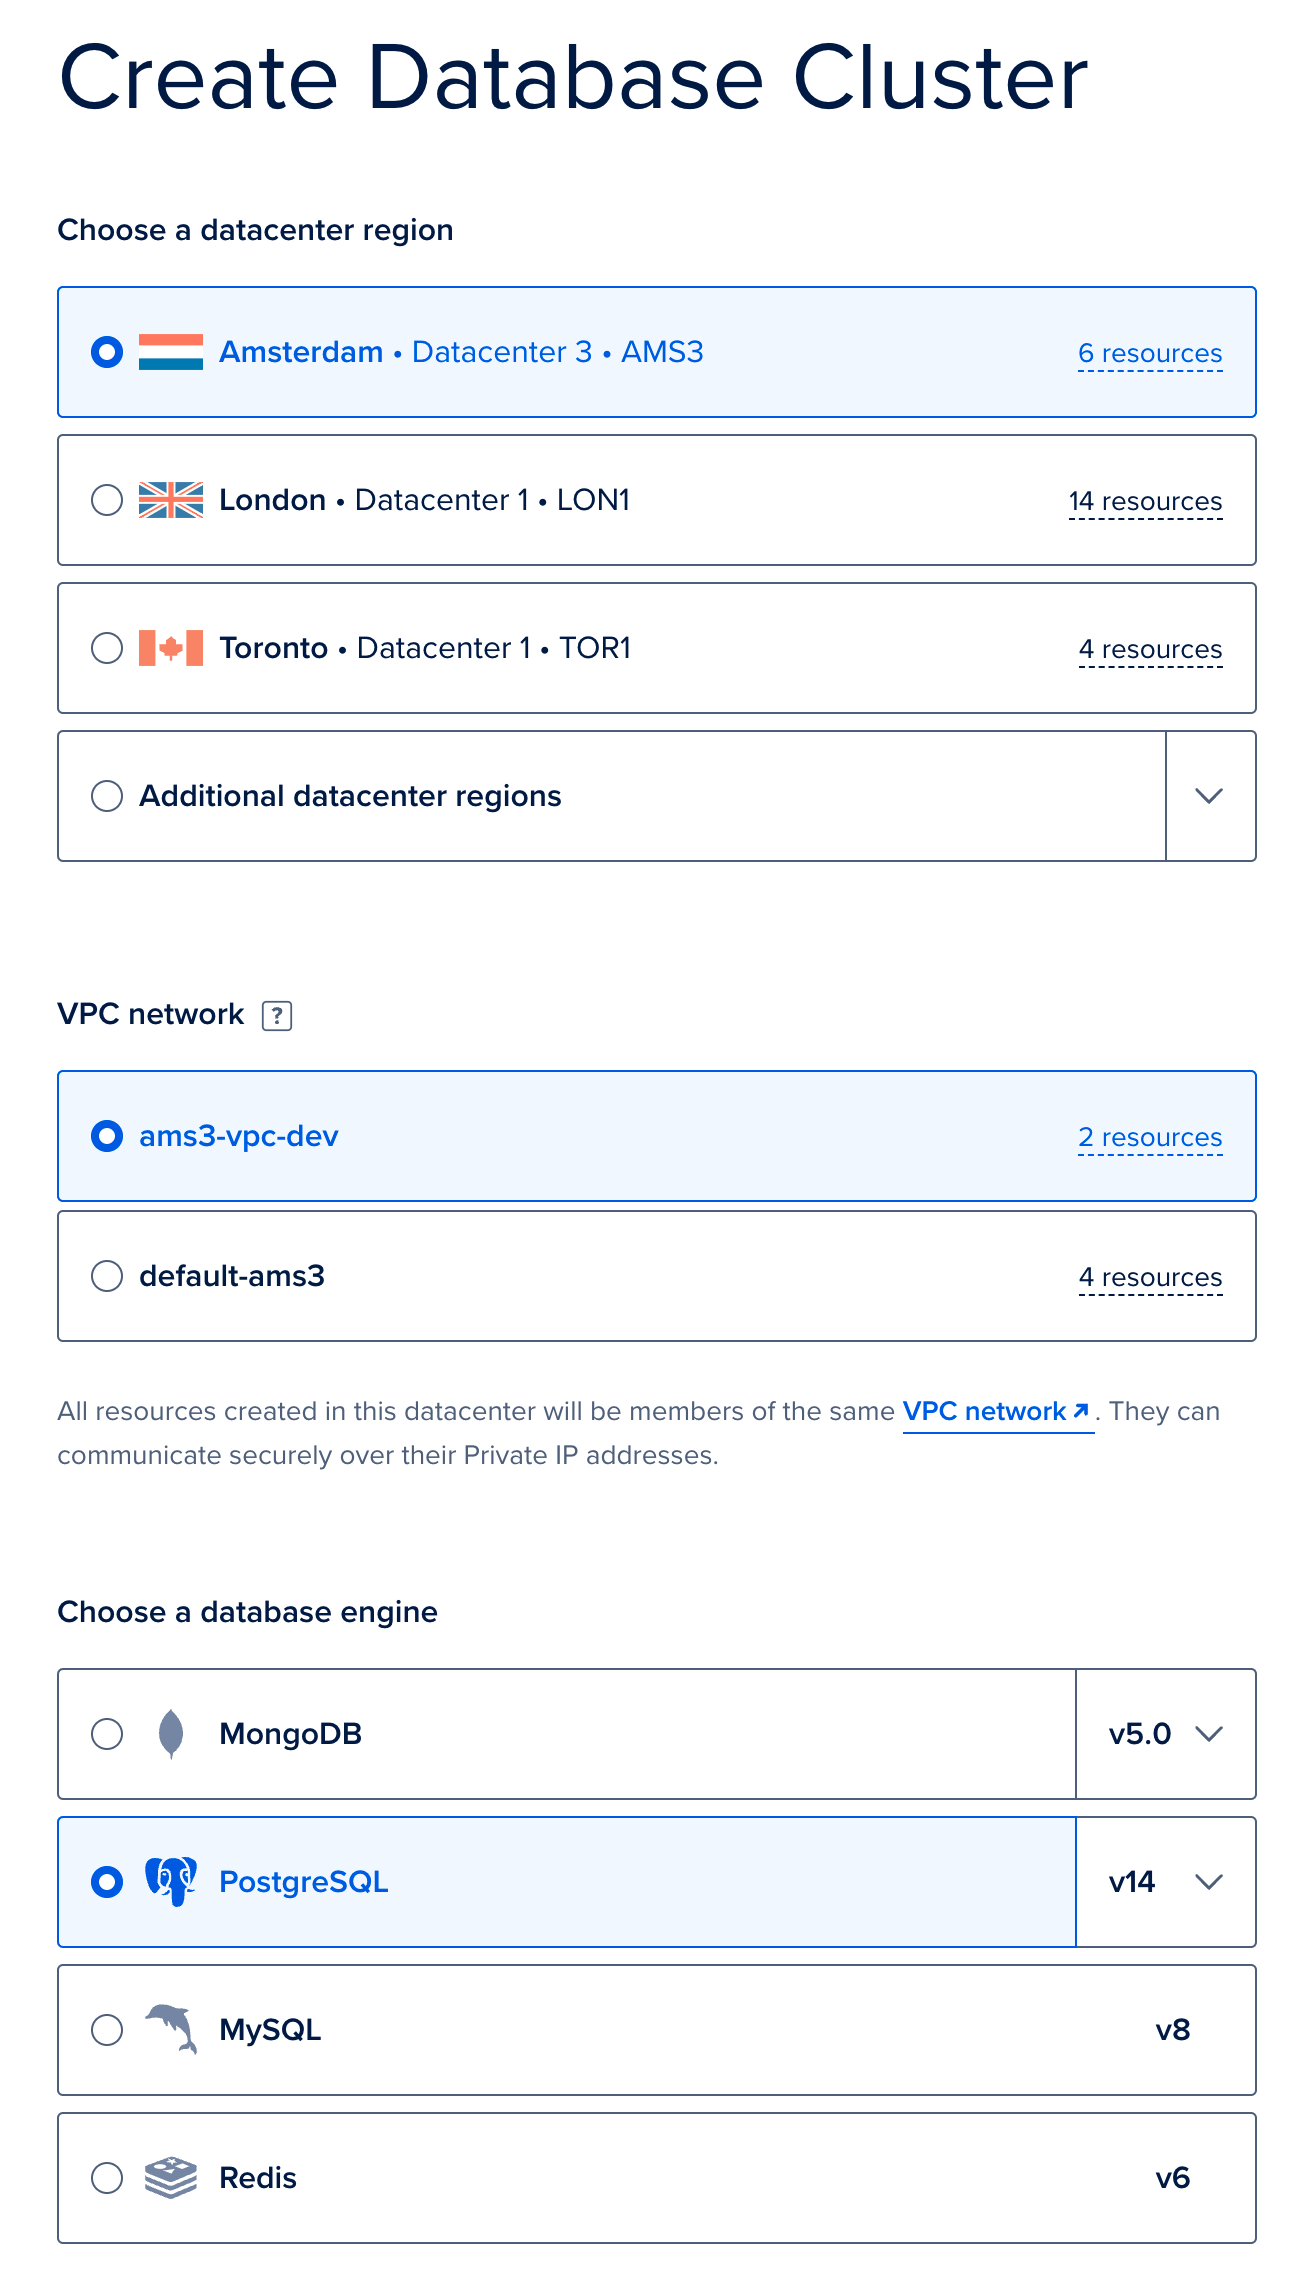
Speckle requires a Postgres database to function. You can provide your own if you have an existing database. Otherwise, follow the following steps to create a new Postgres database in DigitalOcean.
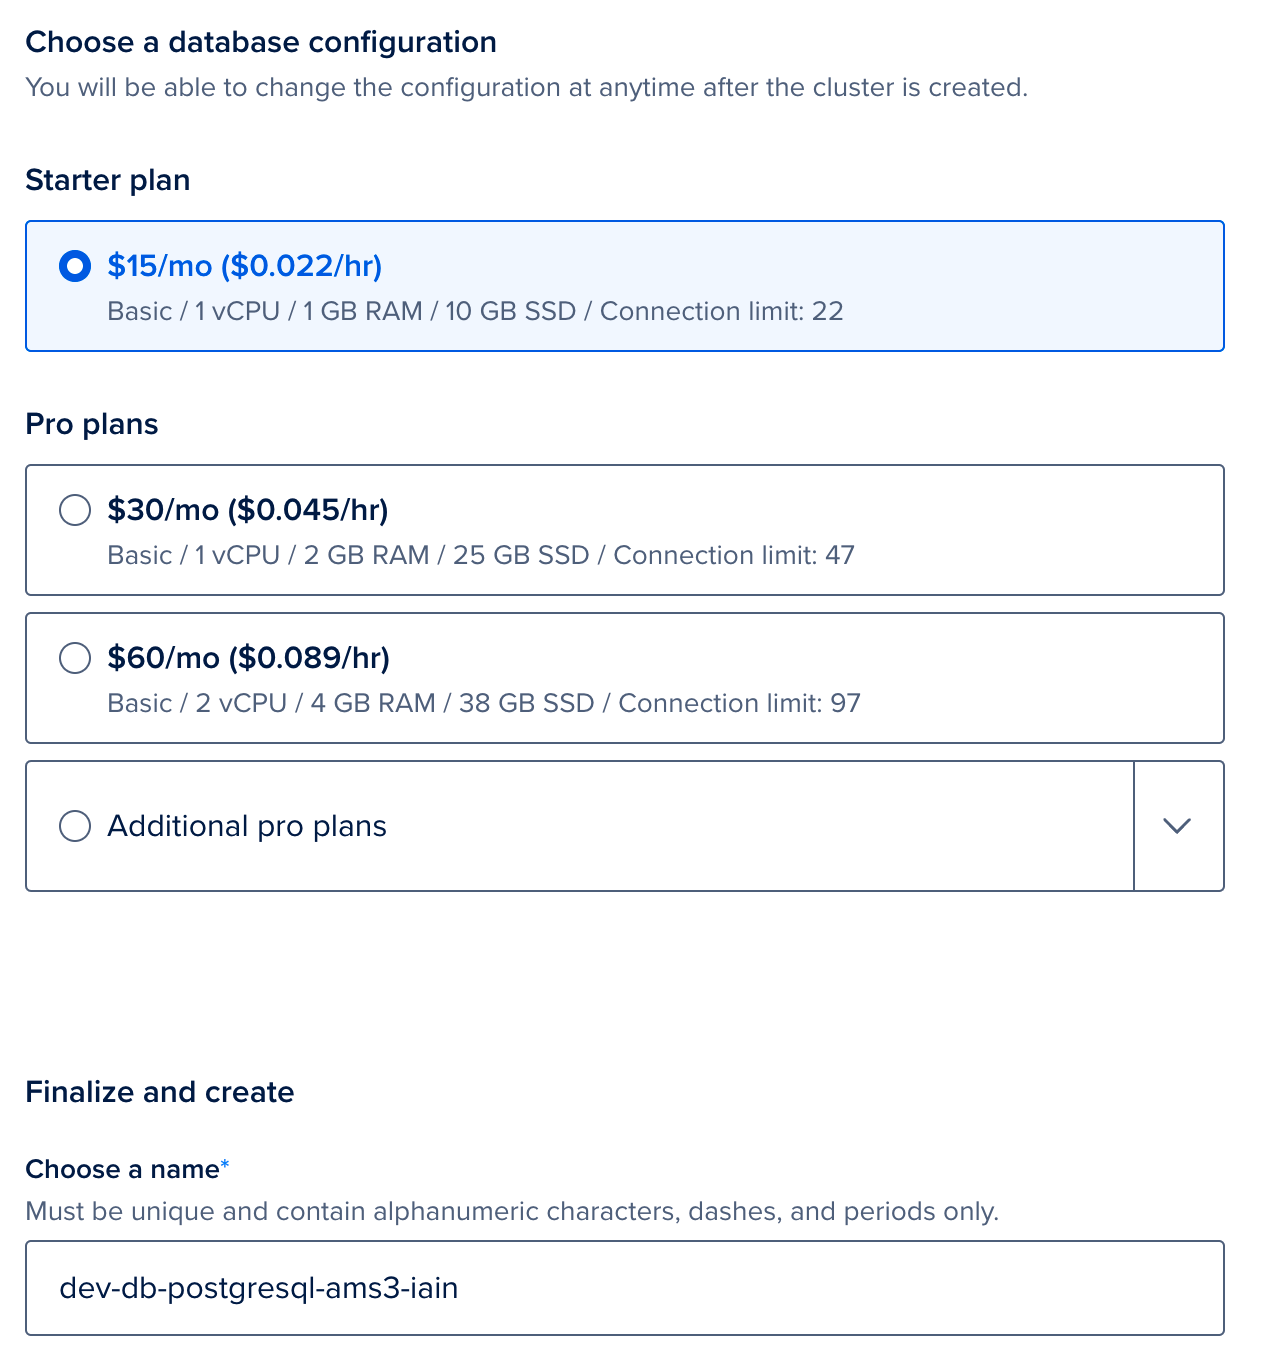
* We will now deploy a managed Postgres provided by DigitalOcean. Go to the [new Database creation page](https://cloud.digitalocean.com/databases/new). Firstly, select the same region and VPC as you used when deploying your Kubernetes cluster, and then select Postgres. Provide a name, and click `Create Database Cluster`.
Again, we used the default sizes, but your usage will vary, and we recommend testing under your typical loads and adjusting as needed based on the database size.
### (Optional): Configure Postgres
Speckle requires a Postgres database to function. You can provide your own if you have an existing database. Otherwise, follow the following steps to create a new Postgres database in DigitalOcean.
* We will now deploy a managed Postgres provided by DigitalOcean. Go to the [new Database creation page](https://cloud.digitalocean.com/databases/new). Firstly, select the same region and VPC as you used when deploying your Kubernetes cluster, and then select Postgres. Provide a name, and click `Create Database Cluster`.
Again, we used the default sizes, but your usage will vary, and we recommend testing under your typical loads and adjusting as needed based on the database size.
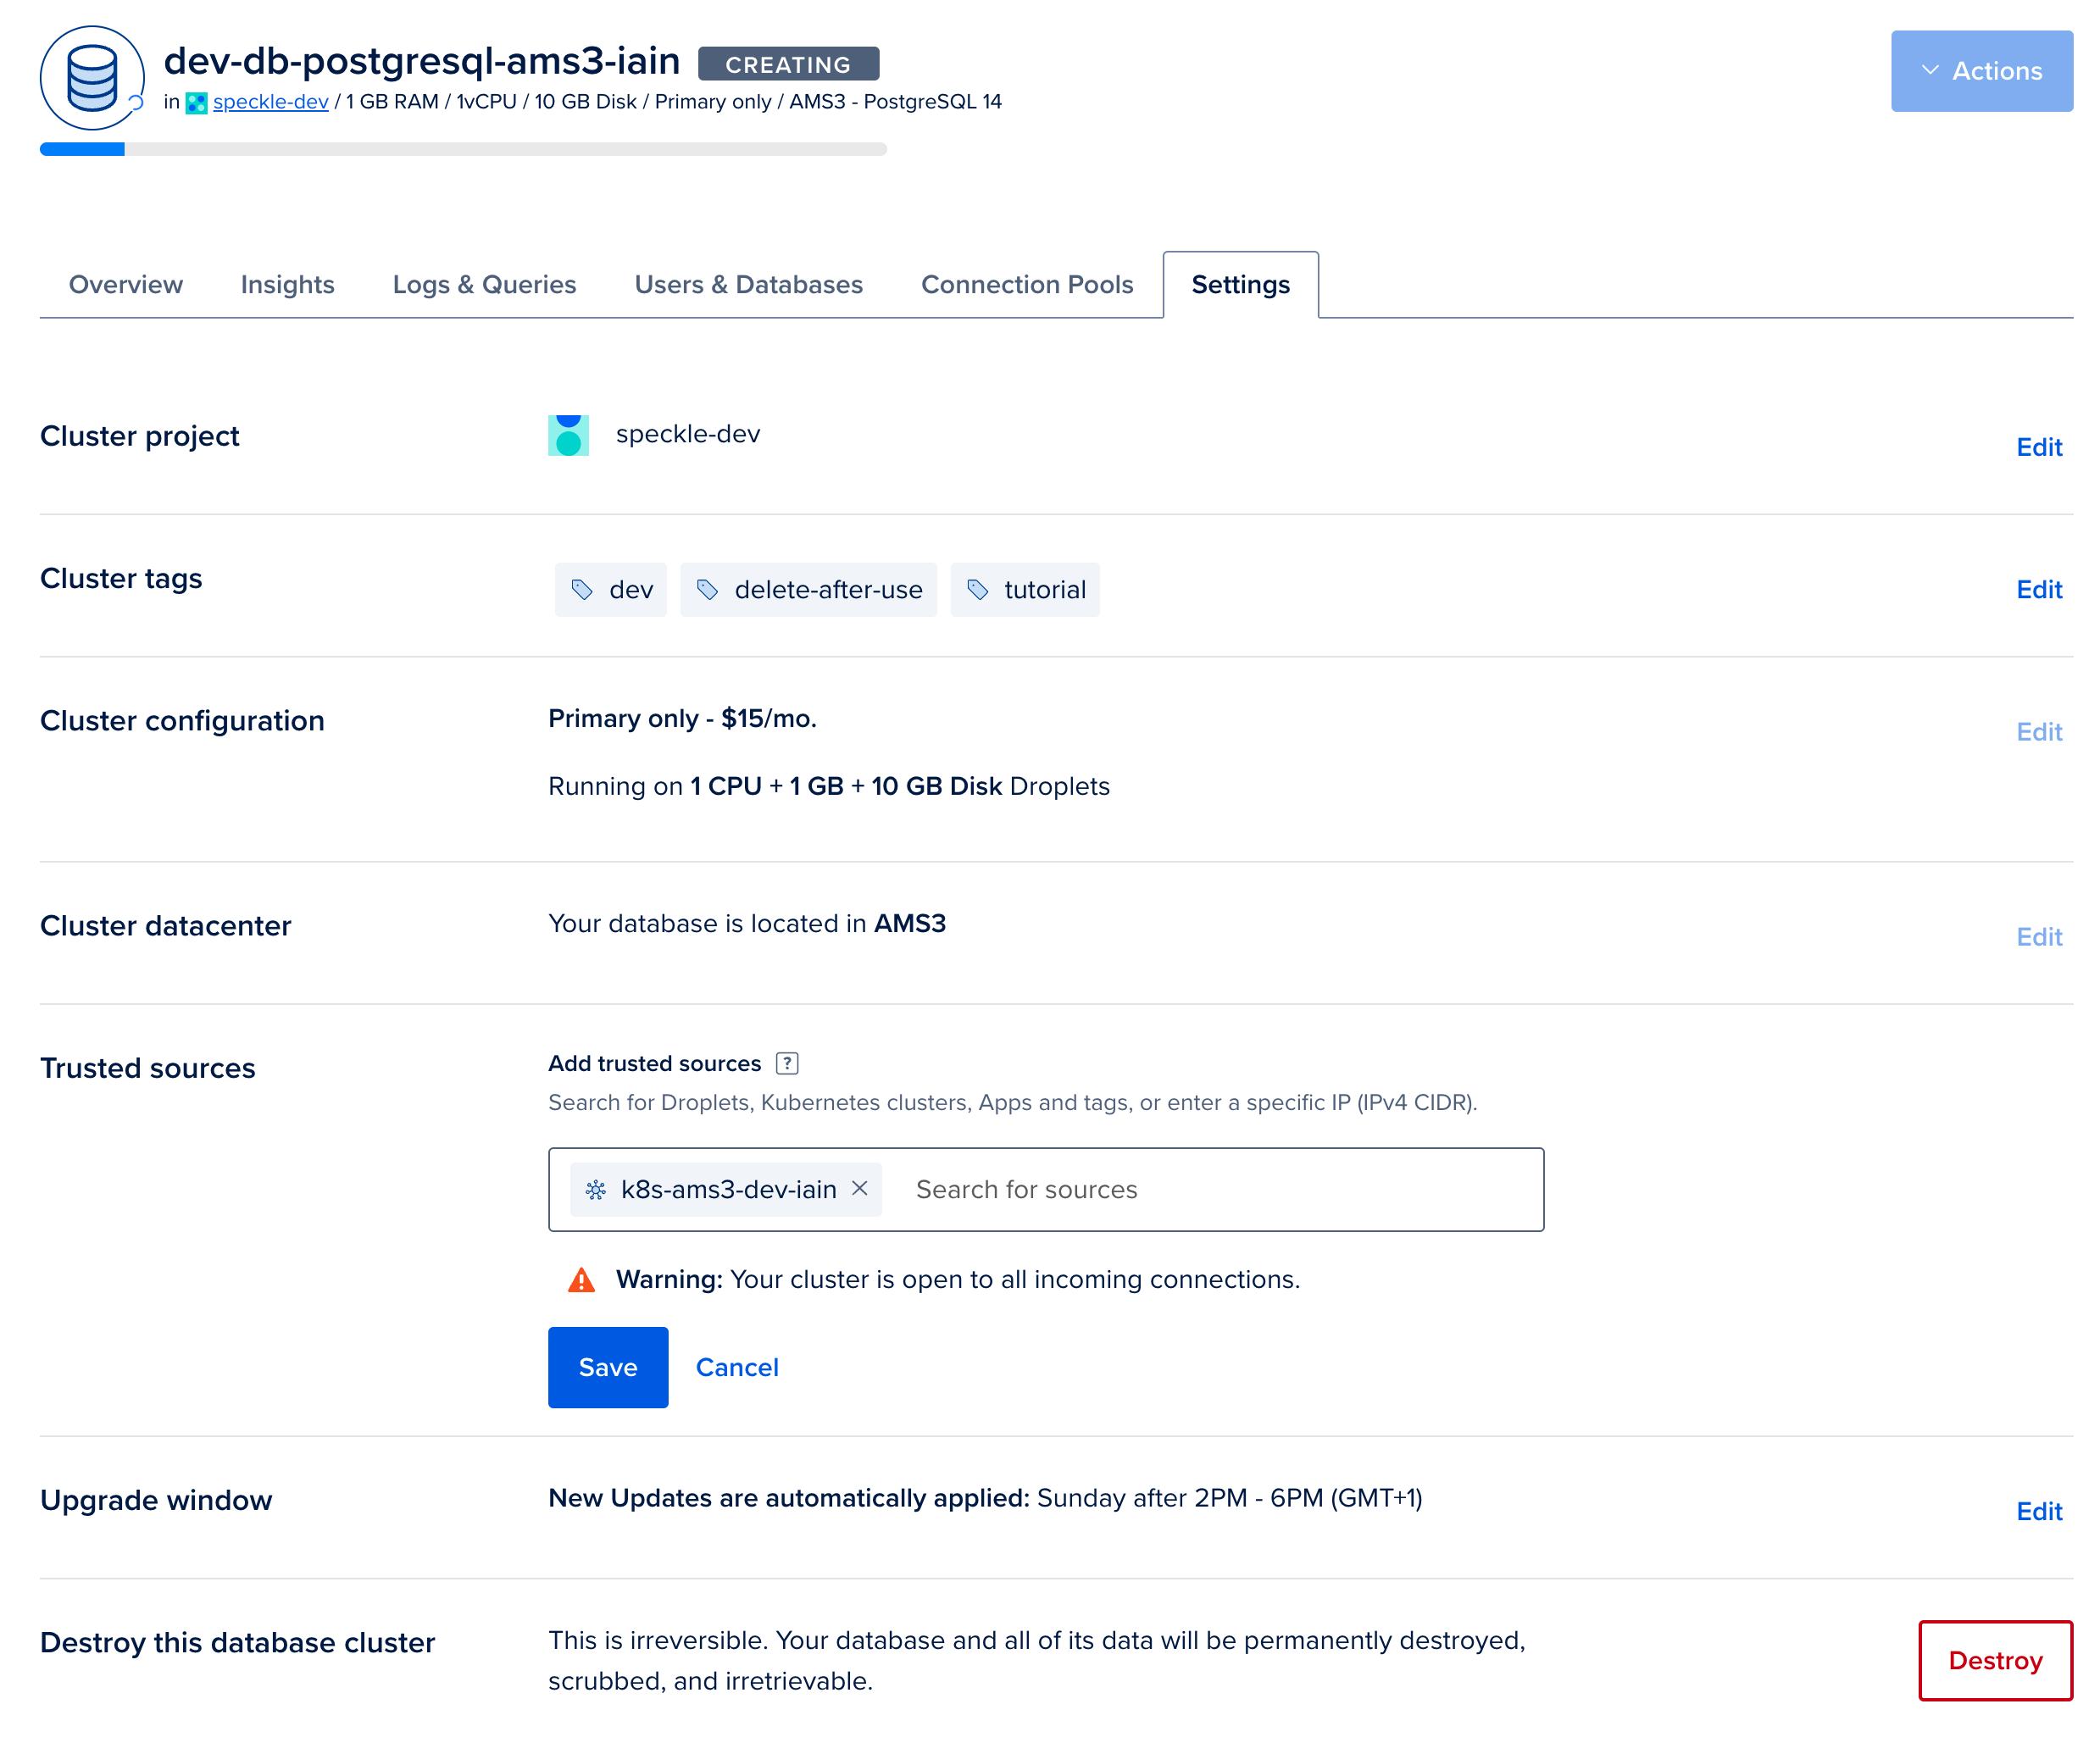
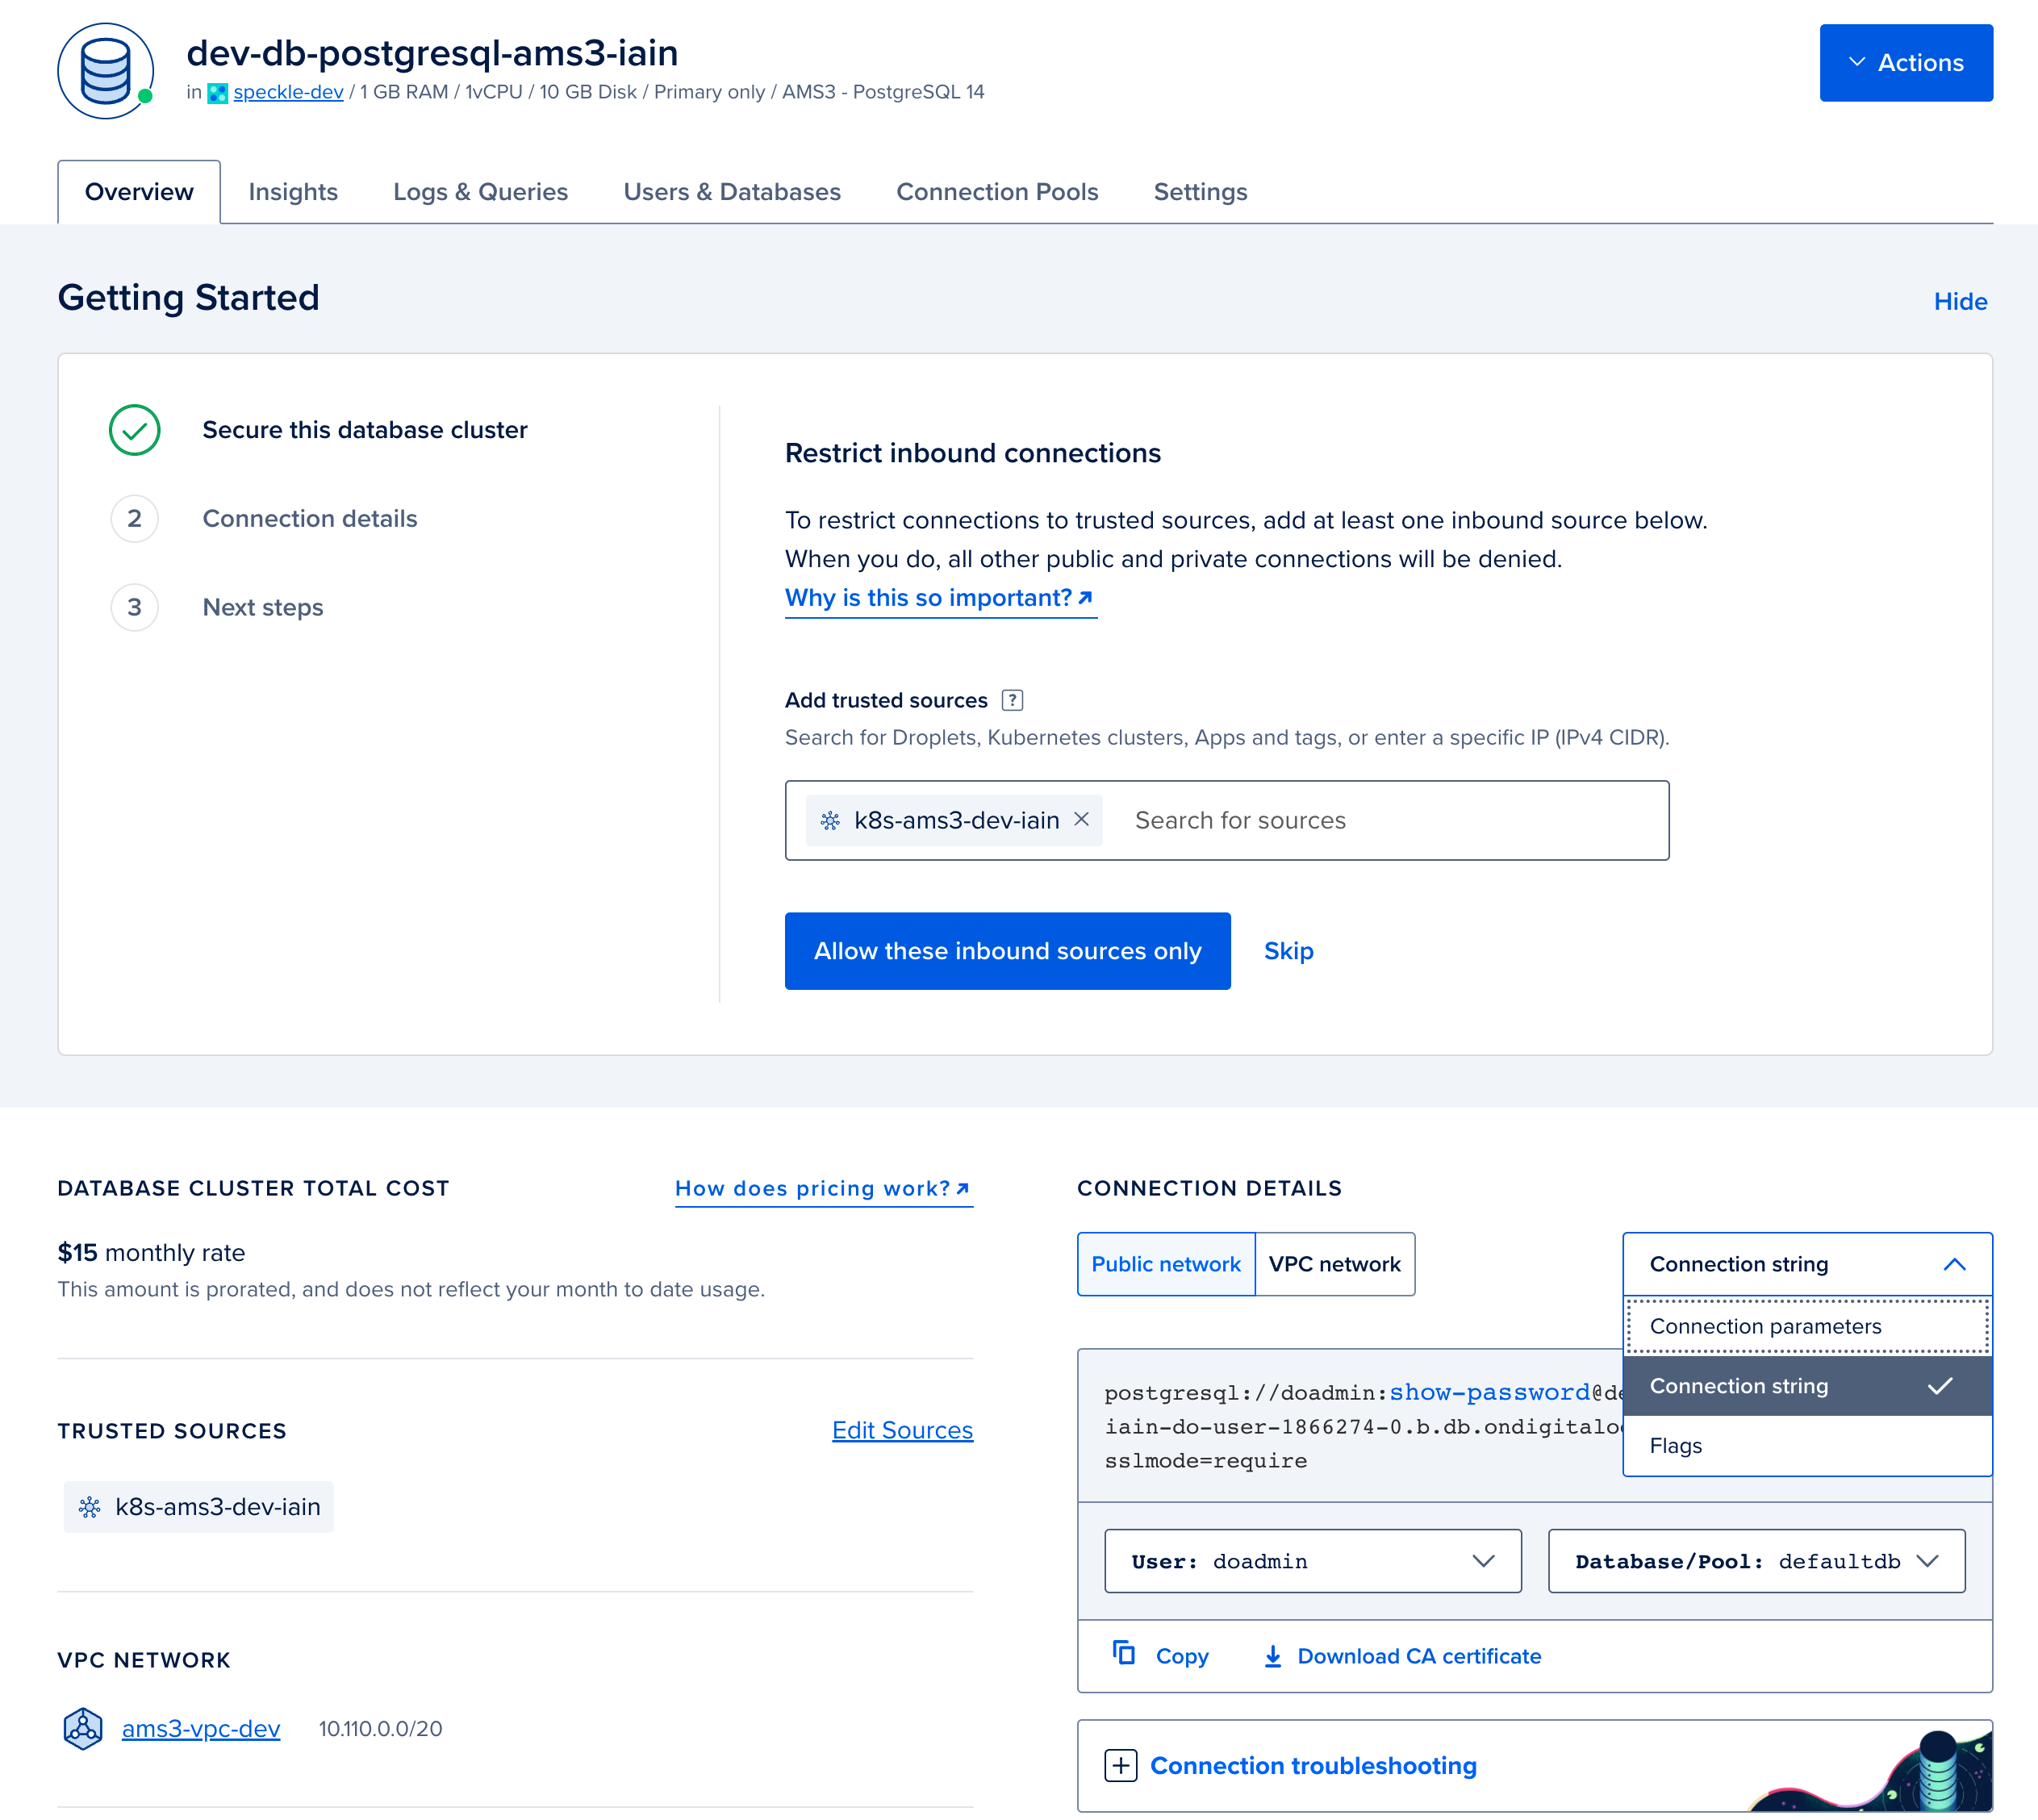
 * From the overview page for your Postgres database, click on `Secure this database cluster by restricting access`. This will take you to the Trusted Sources panel in the Settings tab. Here, we will improve the security of your database by only allowing connections from your Kubernetes cluster. Type the name of your Kubernetes cluster and add it as a Trusted Source.
 * In the Overview tab for your Valkey database. Select `connection string` from the dropdown, and copy the displayed Connection String. You will require this for when configuring your deployment in [step 4](#step-4-configure-your-deployment).
 ### (Optional): Configure Blob Storage (DigitalOcean Spaces)
Speckle requires Blob Storage to store files and other data. You can provide your own if you have an existing blob storage which is compatible with the [Amazon S3 API](https://docs.aws.amazon.com/AmazonS3/latest/API/Welcome.html). Otherwise, follow the following steps to create a new S3-compatible blob storage on DigitalOcean.
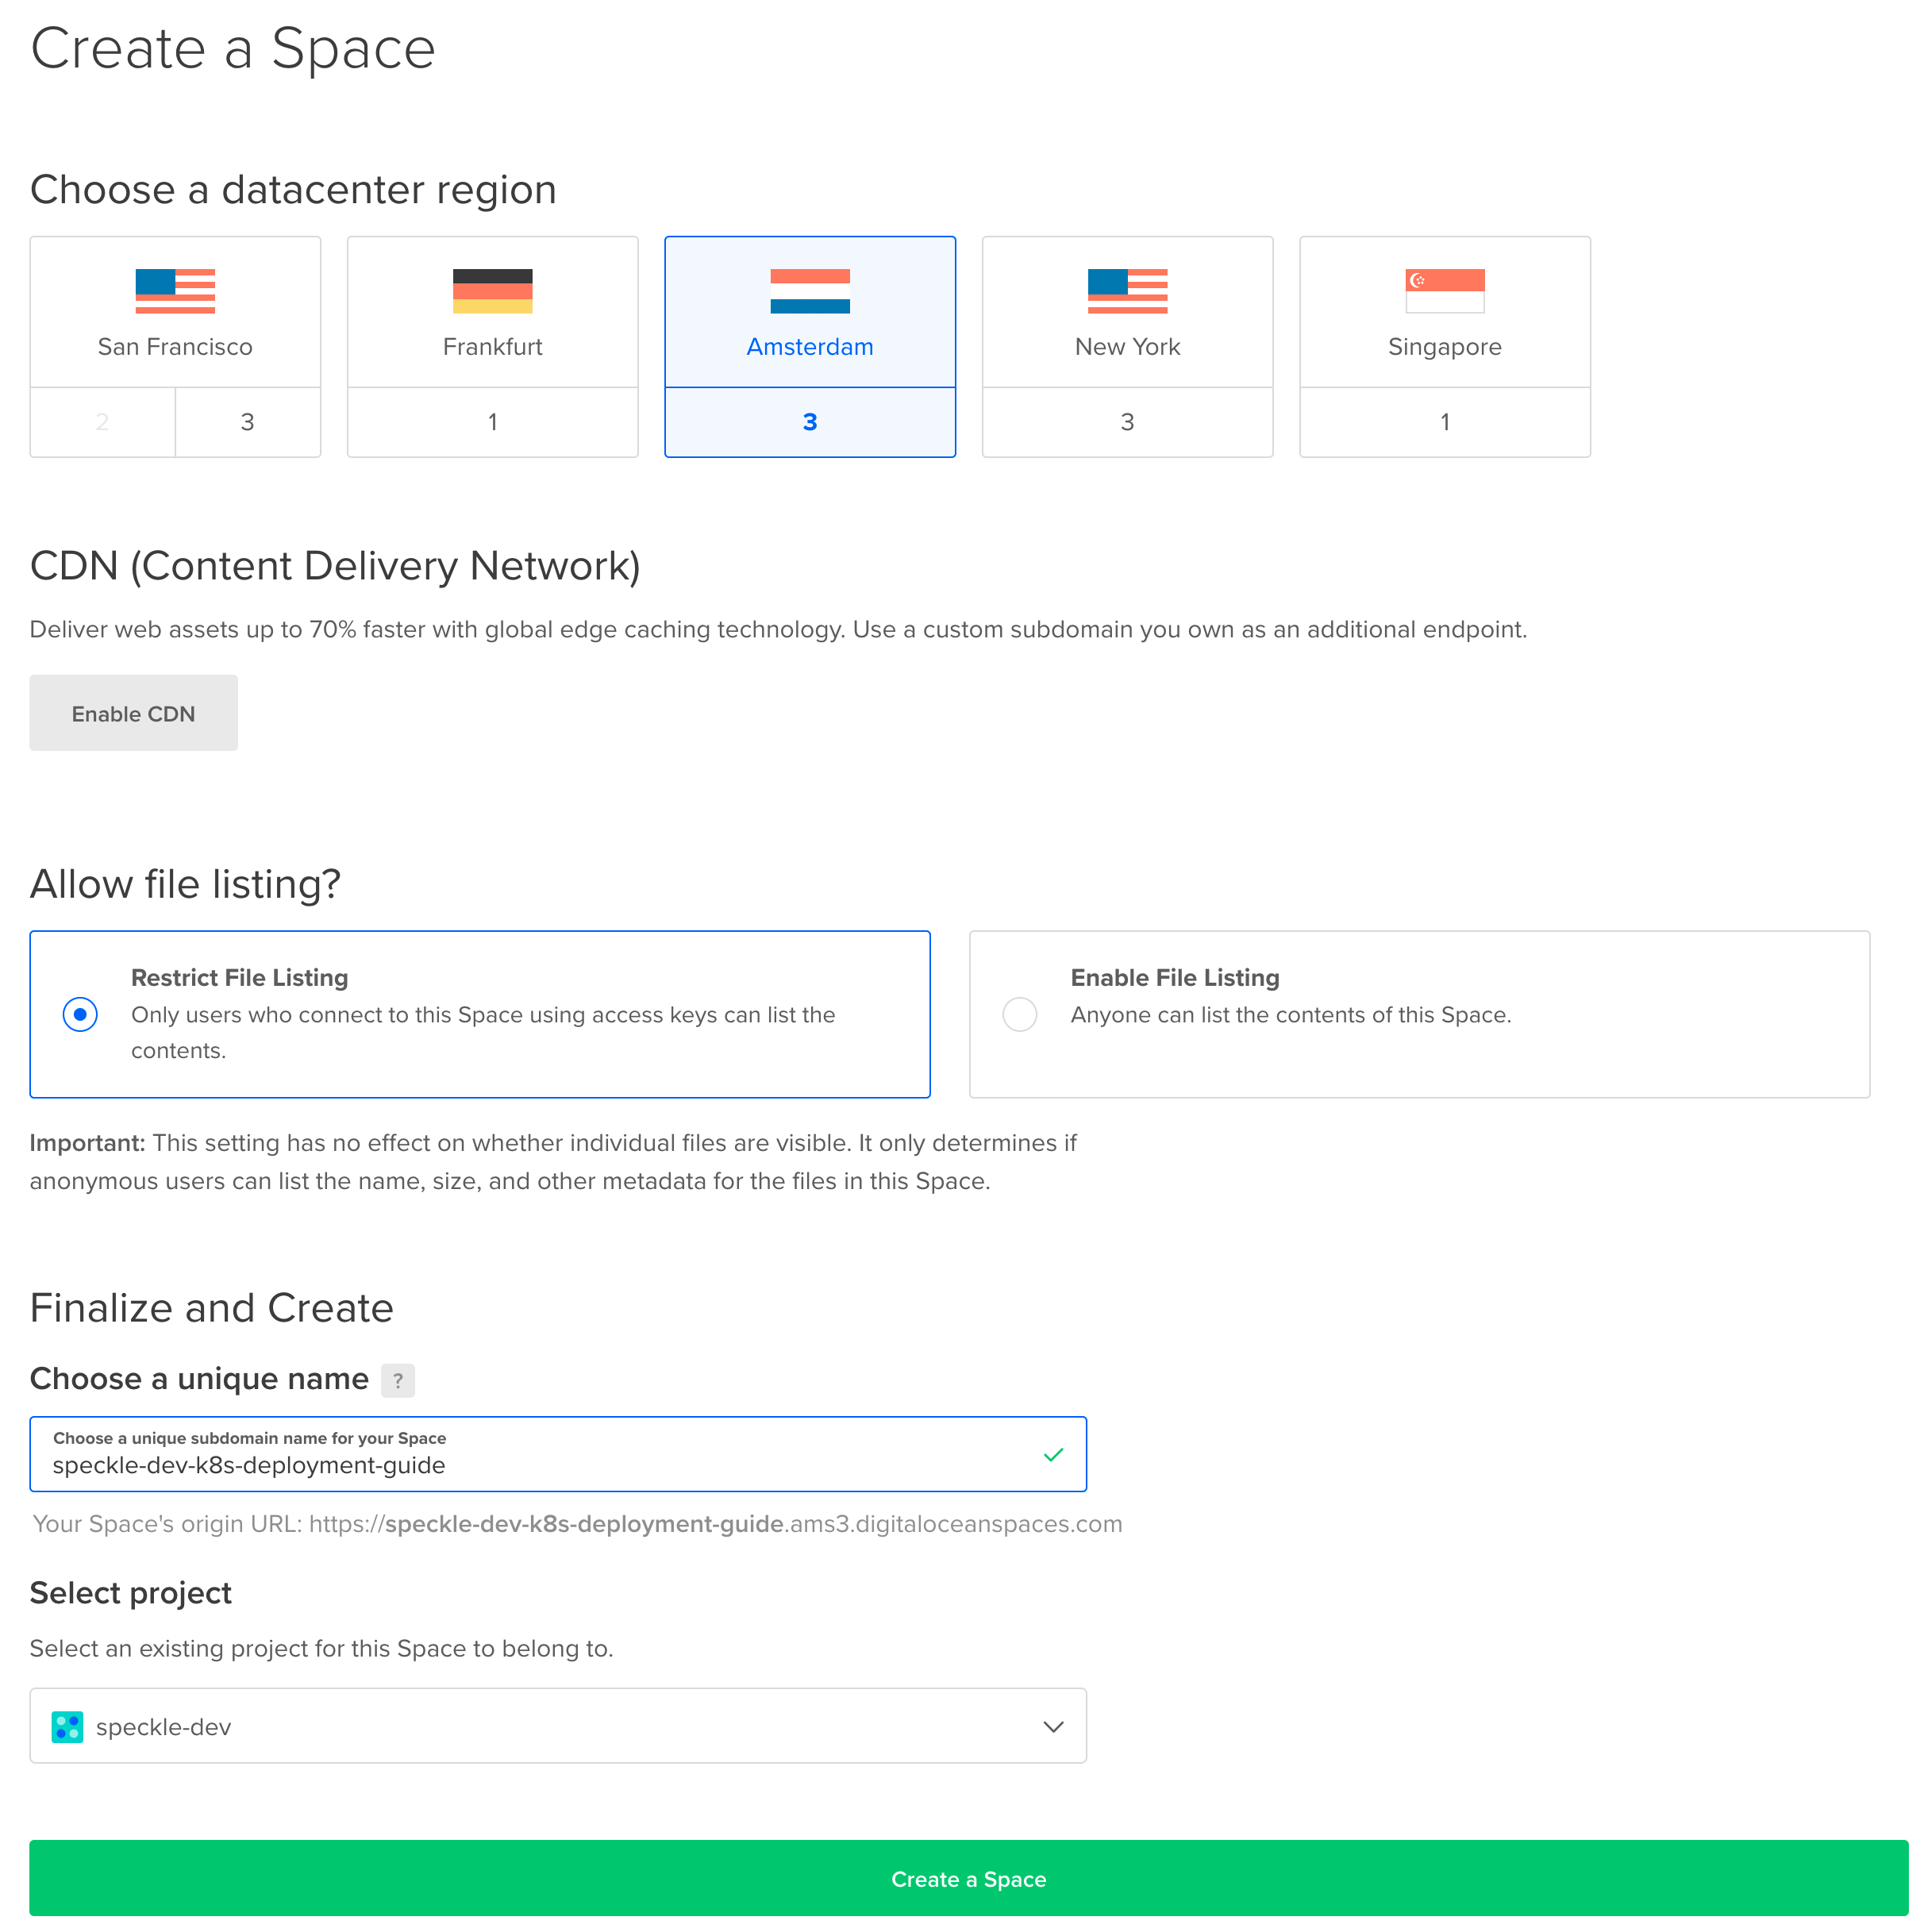
* Navigate to the [Create a Space page](https://cloud.digitalocean.com/spaces/new). Please select a region of your choice, we recommend the same region as you have deployed the cluster. We did not enable the CDN, and we restricted the file listing for security purposes. Please provide a name for your Space, this has to be unique in the region so please use a different name than our example. Make a note of this name; this is the `bucket` value, which we will require when configuring your deployment in subsequent steps. Click on `Create Space`.
### (Optional): Configure Blob Storage (DigitalOcean Spaces)
Speckle requires Blob Storage to store files and other data. You can provide your own if you have an existing blob storage which is compatible with the [Amazon S3 API](https://docs.aws.amazon.com/AmazonS3/latest/API/Welcome.html). Otherwise, follow the following steps to create a new S3-compatible blob storage on DigitalOcean.
* Navigate to the [Create a Space page](https://cloud.digitalocean.com/spaces/new). Please select a region of your choice, we recommend the same region as you have deployed the cluster. We did not enable the CDN, and we restricted the file listing for security purposes. Please provide a name for your Space, this has to be unique in the region so please use a different name than our example. Make a note of this name; this is the `bucket` value, which we will require when configuring your deployment in subsequent steps. Click on `Create Space`.
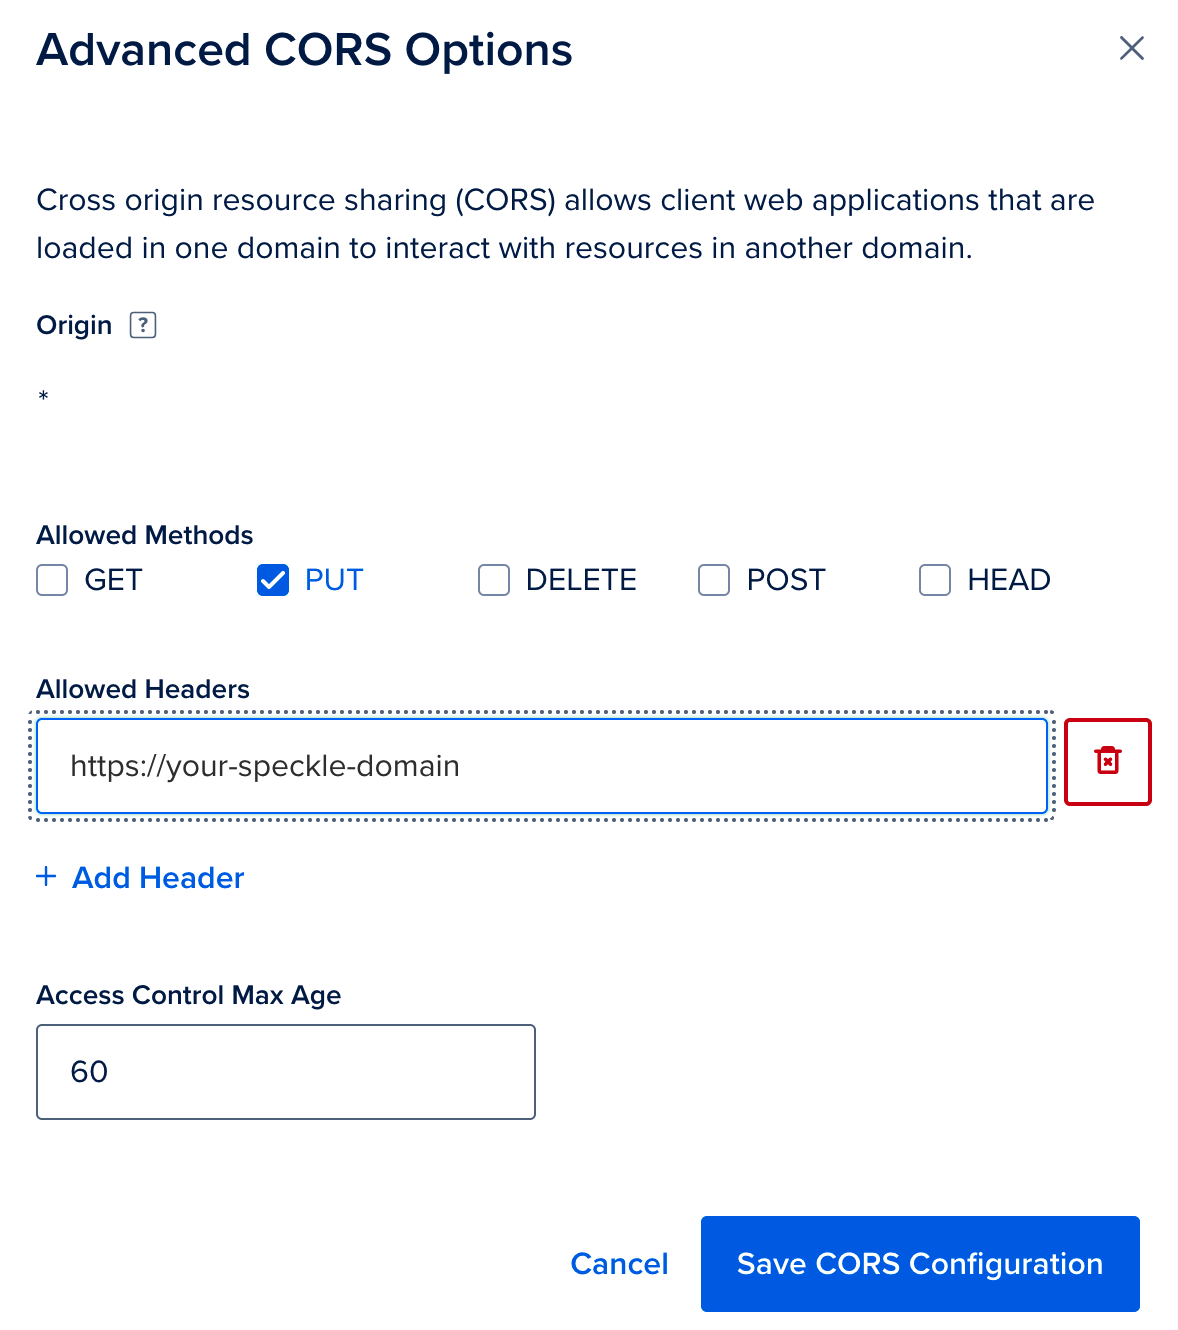
 * Once created, click on the `Settings` tab and add a `CORS Configurations`.
* Add a CORS Configuration which allows `PUT` requests from your domain.
* Once created, click on the `Settings` tab and add a `CORS Configurations`.
* Add a CORS Configuration which allows `PUT` requests from your domain.
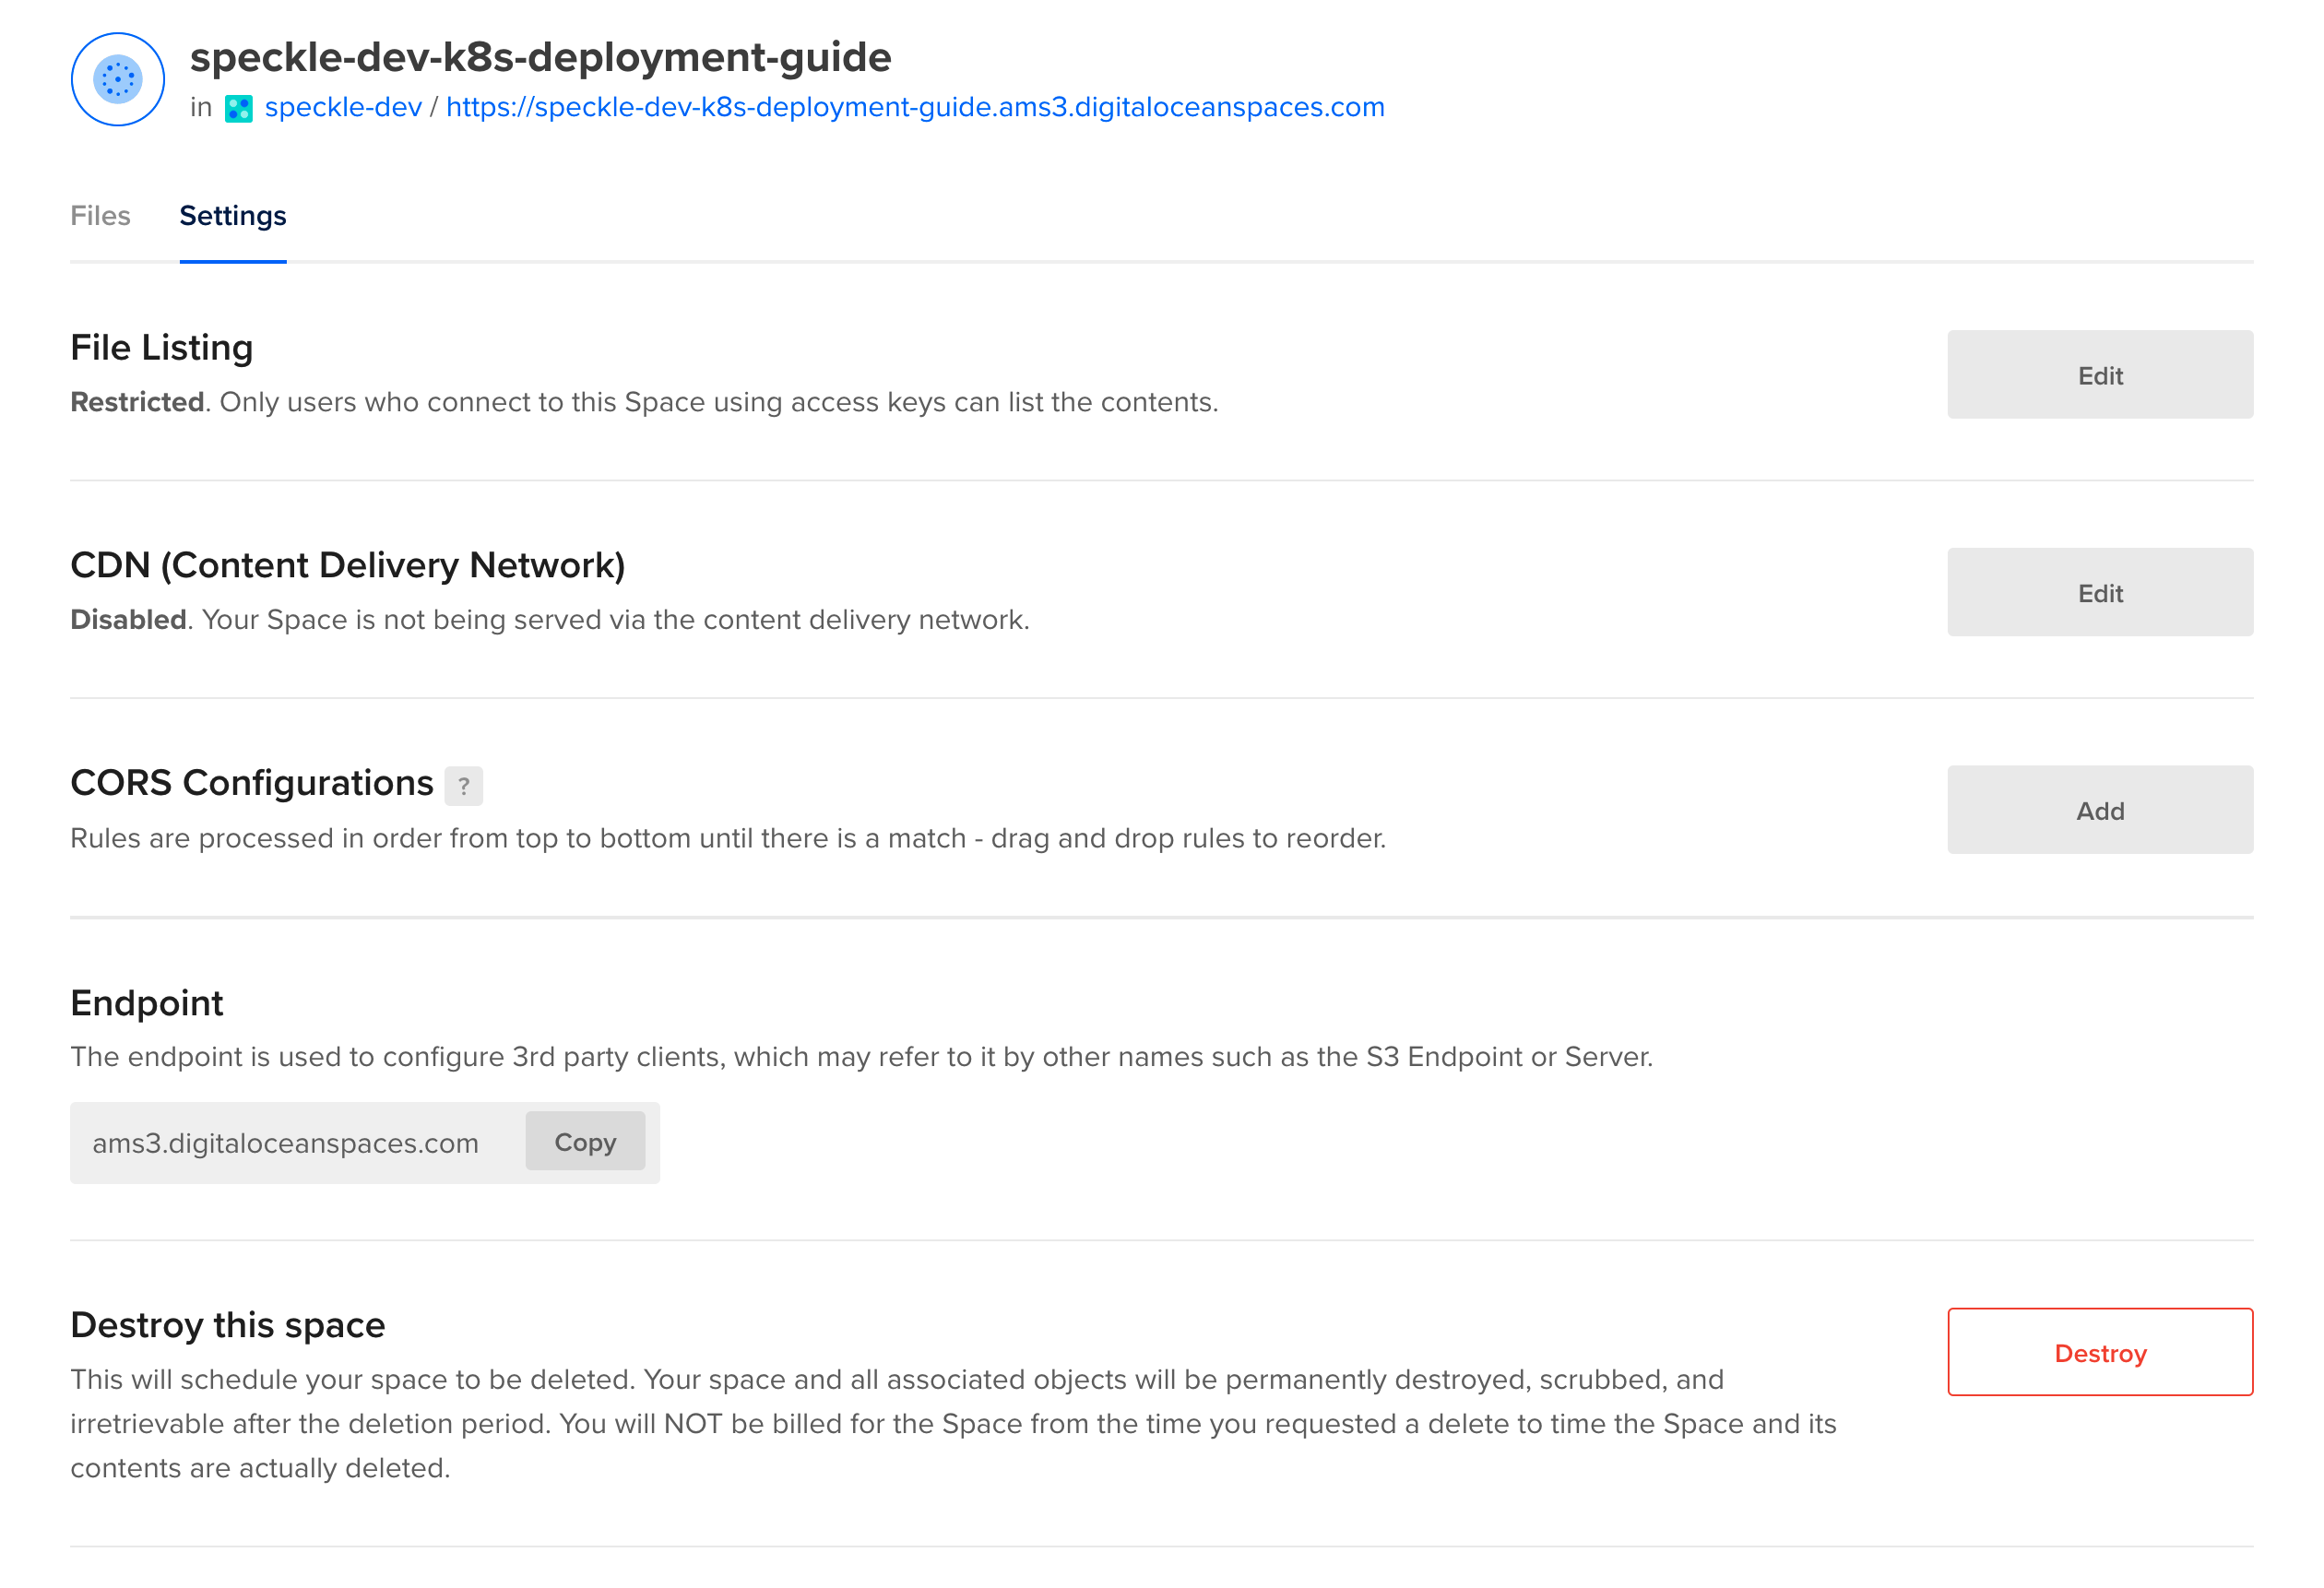
 * Now click on the `Settings` tab and copy the `Endpoint` value.
 * Now navigate to the [API page](https://cloud.digitalocean.com/account/api/tokens) in DigitalOcean. Next to the `Spaces access keys` heading, click `Generate New Key`. You will only be able to see the Secret value once, so copy the name, the key and the secret and store this securely.
 ### Create a Namespace
Kubernetes allows applications to be separated into different namespaces. We can create a namespace in our Kubernetes cluster with the following command. Replace `${YOUR_CLUSTER_CONTEXT_NAME}` with the name of your cluster.:
```shell theme={null}
kubectl create namespace speckle --context "${YOUR_CLUSTER_CONTEXT_NAME}"
```
### Create a Namespace
Kubernetes allows applications to be separated into different namespaces. We can create a namespace in our Kubernetes cluster with the following command. Replace `${YOUR_CLUSTER_CONTEXT_NAME}` with the name of your cluster.:
```shell theme={null}
kubectl create namespace speckle --context "${YOUR_CLUSTER_CONTEXT_NAME}"
```
 Verify that the namespace was created by running the following command. You should see a list of namespaces, including `speckle`. The other existing namespaces were created by Kubernetes and are required for Kubernetes to run. Replace `${YOUR_CLUSTER_CONTEXT_NAME}` with the name of your cluster.
```shell theme={null}
kubectl get namespace --context "${YOUR_CLUSTER_CONTEXT_NAME}"
```
Verify that the namespace was created by running the following command. You should see a list of namespaces, including `speckle`. The other existing namespaces were created by Kubernetes and are required for Kubernetes to run. Replace `${YOUR_CLUSTER_CONTEXT_NAME}` with the name of your cluster.
```shell theme={null}
kubectl get namespace --context "${YOUR_CLUSTER_CONTEXT_NAME}"
```
 ### Create Secrets
To securely store the connection details for Speckle's dependencies, we will create a secret in the Kubernetes Cluster's `speckle` namespace. Replace all the items starting with `${YOUR_...}` with the appropriate value. `${YOUR_SECRET}` should be replaced with a value unique to this cluster. We recommend creating a random value of at least 10 characters long.
```shell theme={null}
kubectl create secret generic server-vars \
--context "${YOUR_CLUSTER_CONTEXT_NAME}" \
--namespace speckle \
--from-literal=redis_url="${YOUR_REDIS_CONNECTION_STRING}" \
--from-literal=postgres_url="${YOUR_POSTGRES_CONNECTION_STRING}" \
--from-literal=s3_secret_key="${YOUR_SPACES_SECRET}" \
--from-literal=session_secret="${YOUR_SECRET}" \
--from-literal=email_password="${YOUR_EMAIL_SERVER_PASSWORD}" # optional, only required if you wish to enable email invitations
```
You can verify that your secret was created correctly by running the following command. Replace `${YOUR_CLUSTER_CONTEXT_NAME}` with the name of your cluster.:
```shell theme={null}
kubectl describe secret server-vars --namespace speckle --context "${YOUR_CLUSTER_CONTEXT_NAME}"
```
### Create Secrets
To securely store the connection details for Speckle's dependencies, we will create a secret in the Kubernetes Cluster's `speckle` namespace. Replace all the items starting with `${YOUR_...}` with the appropriate value. `${YOUR_SECRET}` should be replaced with a value unique to this cluster. We recommend creating a random value of at least 10 characters long.
```shell theme={null}
kubectl create secret generic server-vars \
--context "${YOUR_CLUSTER_CONTEXT_NAME}" \
--namespace speckle \
--from-literal=redis_url="${YOUR_REDIS_CONNECTION_STRING}" \
--from-literal=postgres_url="${YOUR_POSTGRES_CONNECTION_STRING}" \
--from-literal=s3_secret_key="${YOUR_SPACES_SECRET}" \
--from-literal=session_secret="${YOUR_SECRET}" \
--from-literal=email_password="${YOUR_EMAIL_SERVER_PASSWORD}" # optional, only required if you wish to enable email invitations
```
You can verify that your secret was created correctly by running the following command. Replace `${YOUR_CLUSTER_CONTEXT_NAME}` with the name of your cluster.:
```shell theme={null}
kubectl describe secret server-vars --namespace speckle --context "${YOUR_CLUSTER_CONTEXT_NAME}"
```
 To view the contents of an individual secret, you can run the following, replacing `redis_url` with the key you require and replacing `${YOUR_CLUSTER_CONTEXT_NAME}` with the name of your cluster.:
```shell theme={null}
kubectl get secret server-vars --context "${YOUR_CLUSTER_CONTEXT_NAME}" \
--namespace speckle \
--output jsonpath='{.data.redis_url}' | base64 --decode
```
Should you need to amend any values after creating the secret, use the following command. More information about working with secrets can be found on the [Kubernetes website](https://kubernetes.io/docs/concepts/configuration/secret/#editing-a-secret). Replace `${YOUR_CLUSTER_CONTEXT_NAME}` with the name of your cluster.
```shell theme={null}
kubectl edit secrets server-vars --namespace speckle --context "${YOUR_CLUSTER_CONTEXT_NAME}"
```
### Priority Classes
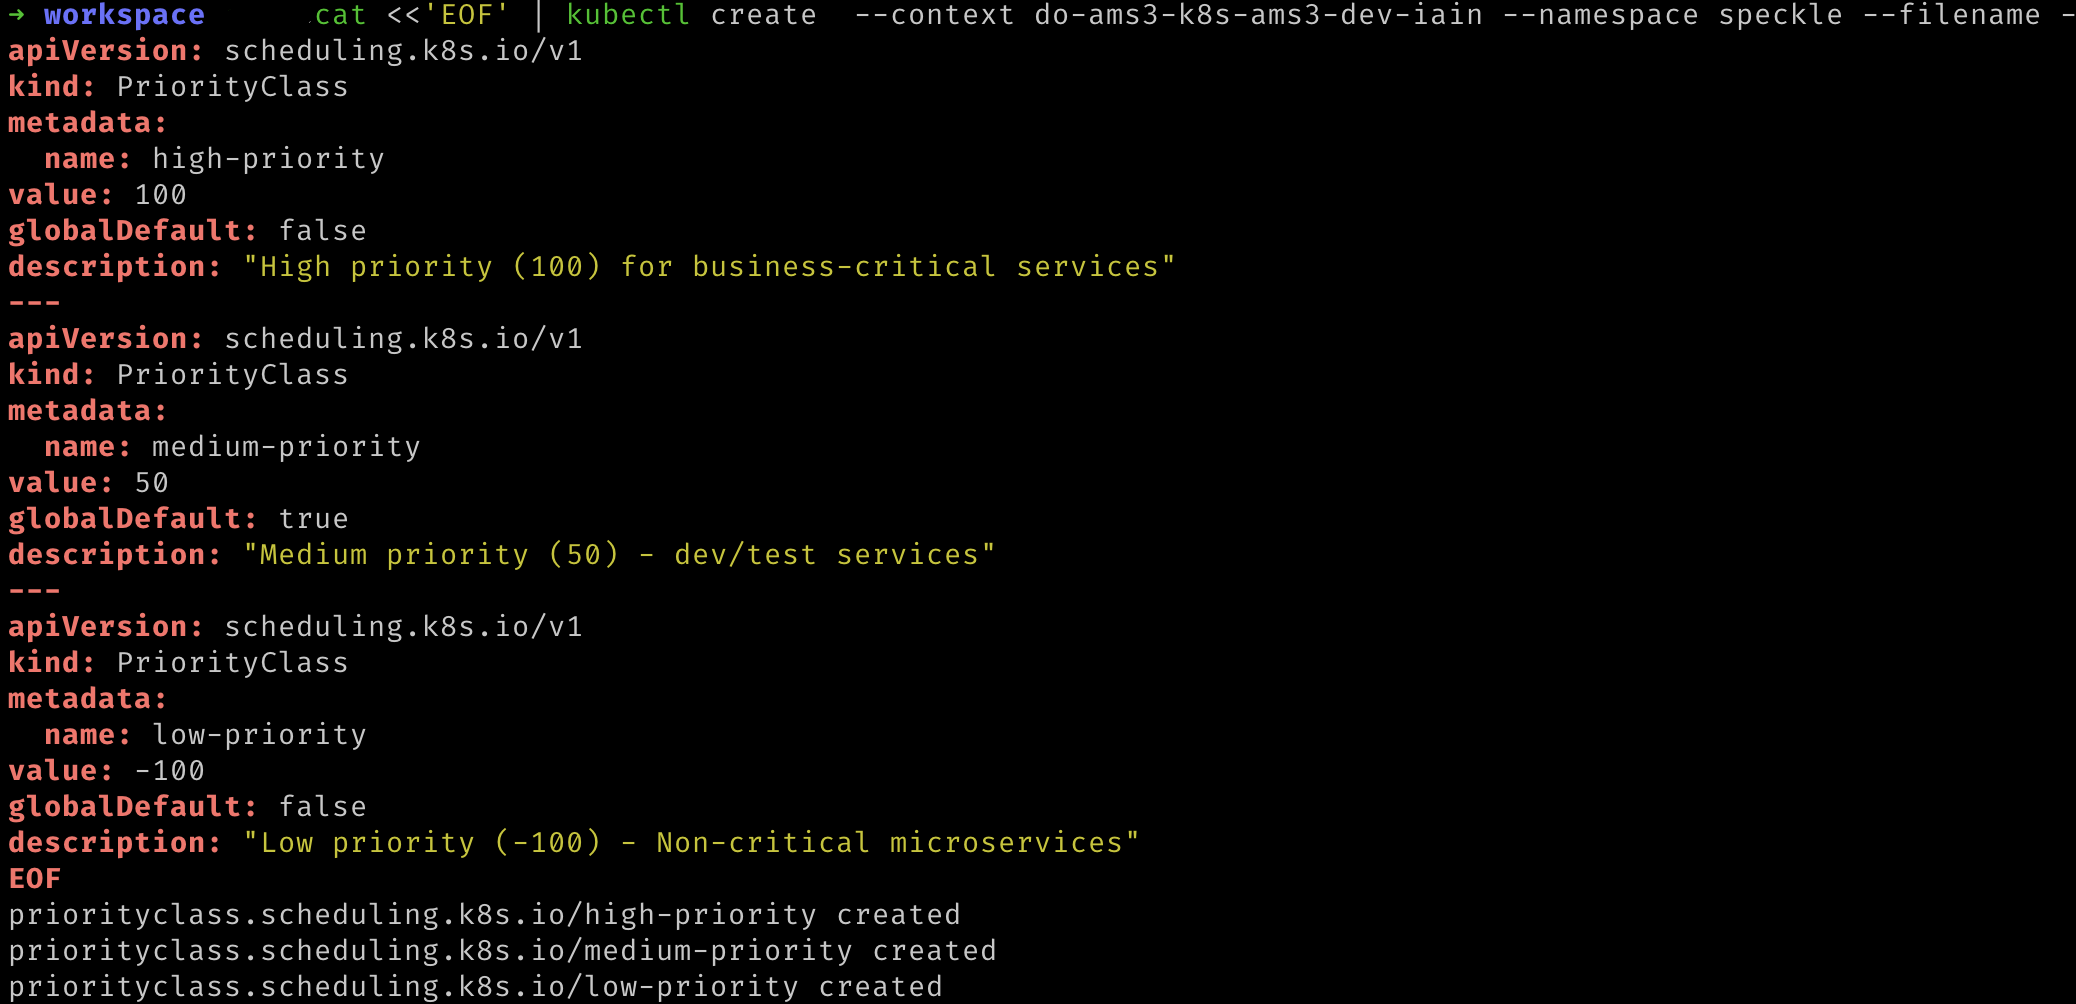
If Kubernetes ever begins to run out of resources (such as processor or memory) on a node, then Kubernetes will have to terminate some of the processes. Kubernetes decides which processes to terminate based on their priority. Here we will specify the priority that Speckle will have.
Run the following command. Replace `${YOUR_CLUSTER_CONTEXT_NAME}` with the name of your cluster.:
```shell theme={null}
cat <<'EOF' | kubectl create --context "${YOUR_CLUSTER_CONTEXT_NAME}" --namespace speckle --filename -
apiVersion: scheduling.k8s.io/v1
kind: PriorityClass
metadata:
name: high-priority
value: 100
globalDefault: false
description: "High priority (100) for business-critical services."
apiVersion: scheduling.k8s.io/v1
kind: PriorityClass
metadata:
name: medium-priority
value: 50
globalDefault: true
description: "Medium priority (50) - dev/test services."
apiVersion: scheduling.k8s.io/v1
kind: PriorityClass
metadata:
name: low-priority
value: -100
globalDefault: false
description: "Low priority (-100) - Non-critical microservices."
EOF
```
To view the contents of an individual secret, you can run the following, replacing `redis_url` with the key you require and replacing `${YOUR_CLUSTER_CONTEXT_NAME}` with the name of your cluster.:
```shell theme={null}
kubectl get secret server-vars --context "${YOUR_CLUSTER_CONTEXT_NAME}" \
--namespace speckle \
--output jsonpath='{.data.redis_url}' | base64 --decode
```
Should you need to amend any values after creating the secret, use the following command. More information about working with secrets can be found on the [Kubernetes website](https://kubernetes.io/docs/concepts/configuration/secret/#editing-a-secret). Replace `${YOUR_CLUSTER_CONTEXT_NAME}` with the name of your cluster.
```shell theme={null}
kubectl edit secrets server-vars --namespace speckle --context "${YOUR_CLUSTER_CONTEXT_NAME}"
```
### Priority Classes
If Kubernetes ever begins to run out of resources (such as processor or memory) on a node, then Kubernetes will have to terminate some of the processes. Kubernetes decides which processes to terminate based on their priority. Here we will specify the priority that Speckle will have.
Run the following command. Replace `${YOUR_CLUSTER_CONTEXT_NAME}` with the name of your cluster.:
```shell theme={null}
cat <<'EOF' | kubectl create --context "${YOUR_CLUSTER_CONTEXT_NAME}" --namespace speckle --filename -
apiVersion: scheduling.k8s.io/v1
kind: PriorityClass
metadata:
name: high-priority
value: 100
globalDefault: false
description: "High priority (100) for business-critical services."
apiVersion: scheduling.k8s.io/v1
kind: PriorityClass
metadata:
name: medium-priority
value: 50
globalDefault: true
description: "Medium priority (50) - dev/test services."
apiVersion: scheduling.k8s.io/v1
kind: PriorityClass
metadata:
name: low-priority
value: -100
globalDefault: false
description: "Low priority (-100) - Non-critical microservices."
EOF
```
 ### Certificate Manager
To enable secure (https) access to your Speckle server from the internet, we need to provide a means to create a TLS (X.509) certificate. This certificate must be renewed and kept up to date. To automate this, we will install CertManager and connect it to a Certificate Authority. CertManager will create a new certificate, request that the Certificate Authority sign it, and renew it when required. The Certificate Authority in our case will be [Let's Encrypt](https://letsencrypt.org/). If you are interested, you can read more about how Let's Encrypt knows to trust your server with an [HTTP-01 challenge](https://letsencrypt.org/docs/challenge-types/#http-01-challenge), in our case, CertManager acts as the ACME client.
We first need to let Helm know where CertManager can be found:
```shell theme={null}
helm repo add jetstack https://charts.jetstack.io
```
### Certificate Manager
To enable secure (https) access to your Speckle server from the internet, we need to provide a means to create a TLS (X.509) certificate. This certificate must be renewed and kept up to date. To automate this, we will install CertManager and connect it to a Certificate Authority. CertManager will create a new certificate, request that the Certificate Authority sign it, and renew it when required. The Certificate Authority in our case will be [Let's Encrypt](https://letsencrypt.org/). If you are interested, you can read more about how Let's Encrypt knows to trust your server with an [HTTP-01 challenge](https://letsencrypt.org/docs/challenge-types/#http-01-challenge), in our case, CertManager acts as the ACME client.
We first need to let Helm know where CertManager can be found:
```shell theme={null}
helm repo add jetstack https://charts.jetstack.io
```
 Then update Helm, so it knows what the newly added repo contains
```shell theme={null}
helm repo update
```
Deploy the CertManager Helm release with the following command. Replace `${YOUR_CLUSTER_CONTEXT_NAME}` with the name of your cluster.
```shell theme={null}
helm upgrade cert-manager jetstack/cert-manager --namespace cert-manager --version v1.8.0 --set installCRDs=true --install --create-namespace --kube-context "${YOUR_CLUSTER_CONTEXT_NAME}"
```
Then update Helm, so it knows what the newly added repo contains
```shell theme={null}
helm repo update
```
Deploy the CertManager Helm release with the following command. Replace `${YOUR_CLUSTER_CONTEXT_NAME}` with the name of your cluster.
```shell theme={null}
helm upgrade cert-manager jetstack/cert-manager --namespace cert-manager --version v1.8.0 --set installCRDs=true --install --create-namespace --kube-context "${YOUR_CLUSTER_CONTEXT_NAME}"
```
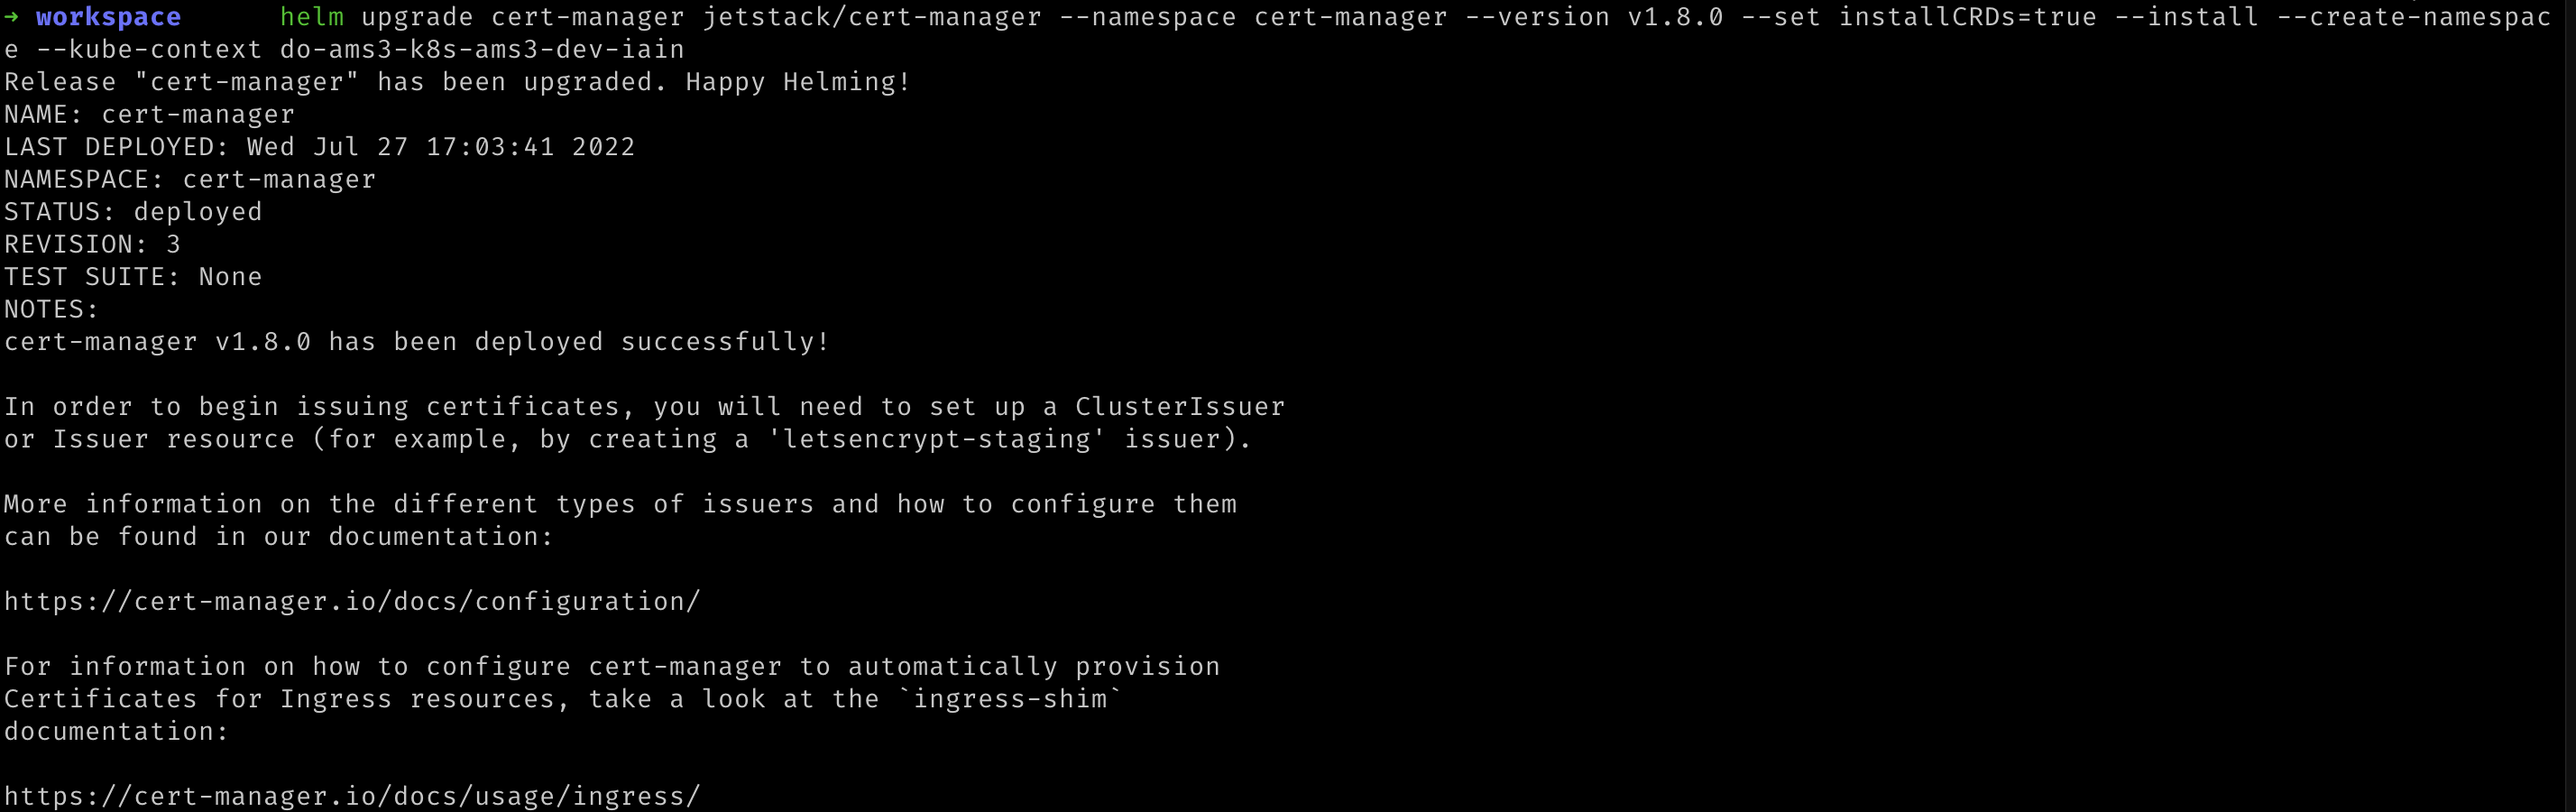 We can verify that this was deployed to Kubernetes with the following command. Replace `${YOUR_CLUSTER_CONTEXT_NAME}` with the name of your cluster.:
```shell theme={null}
kubectl get pods --namespace cert-manager --context "${YOUR_CLUSTER_CONTEXT_NAME}"
```
We can verify that this was deployed to Kubernetes with the following command. Replace `${YOUR_CLUSTER_CONTEXT_NAME}` with the name of your cluster.:
```shell theme={null}
kubectl get pods --namespace cert-manager --context "${YOUR_CLUSTER_CONTEXT_NAME}"
```
 We now need to tell CertManager which Certificate Authority should be issuing the certificate. We will deploy a CertIssuer. Run the following command, replacing `${YOUR_EMAIL_ADDRESS}` and `${YOUR_CLUSTER_CONTEXT_NAME}` with the appropriate values.
```shell theme={null}
cat <<'EOF' | kubectl apply --context "${YOUR_CLUSTER_CONTEXT_NAME}" --namespace cert-manager --filename -
apiVersion: cert-manager.io/v1
kind: ClusterIssuer
metadata:
name: letsencrypt-staging
spec:
acme:
# The ACME server URL
server: https://acme-staging-v02.api.letsencrypt.org/directory
# Email address used for ACME registration
email: ${YOUR_EMAIL_ADDRESS}
# Name of a secret used to store the ACME account private key
privateKeySecretRef:
name: letsencrypt-staging
# Enable the HTTP-01 challenge provider
solvers:
- http01:
ingress:
class: nginx
apiVersion: cert-manager.io/v1
kind: ClusterIssuer
metadata:
name: letsencrypt-prod
spec:
acme:
# The ACME server URL
server: https://acme-v02.api.letsencrypt.org/directory
# Email address used for ACME registration
email: ${YOUR_EMAIL_ADDRESS}
# Name of a secret used to store the ACME account private key
privateKeySecretRef:
name: letsencrypt-prod
# Enable the HTTP-01 challenge provider
solvers:
- http01:
ingress:
class: nginx
EOF
```
We now need to tell CertManager which Certificate Authority should be issuing the certificate. We will deploy a CertIssuer. Run the following command, replacing `${YOUR_EMAIL_ADDRESS}` and `${YOUR_CLUSTER_CONTEXT_NAME}` with the appropriate values.
```shell theme={null}
cat <<'EOF' | kubectl apply --context "${YOUR_CLUSTER_CONTEXT_NAME}" --namespace cert-manager --filename -
apiVersion: cert-manager.io/v1
kind: ClusterIssuer
metadata:
name: letsencrypt-staging
spec:
acme:
# The ACME server URL
server: https://acme-staging-v02.api.letsencrypt.org/directory
# Email address used for ACME registration
email: ${YOUR_EMAIL_ADDRESS}
# Name of a secret used to store the ACME account private key
privateKeySecretRef:
name: letsencrypt-staging
# Enable the HTTP-01 challenge provider
solvers:
- http01:
ingress:
class: nginx
apiVersion: cert-manager.io/v1
kind: ClusterIssuer
metadata:
name: letsencrypt-prod
spec:
acme:
# The ACME server URL
server: https://acme-v02.api.letsencrypt.org/directory
# Email address used for ACME registration
email: ${YOUR_EMAIL_ADDRESS}
# Name of a secret used to store the ACME account private key
privateKeySecretRef:
name: letsencrypt-prod
# Enable the HTTP-01 challenge provider
solvers:
- http01:
ingress:
class: nginx
EOF
```
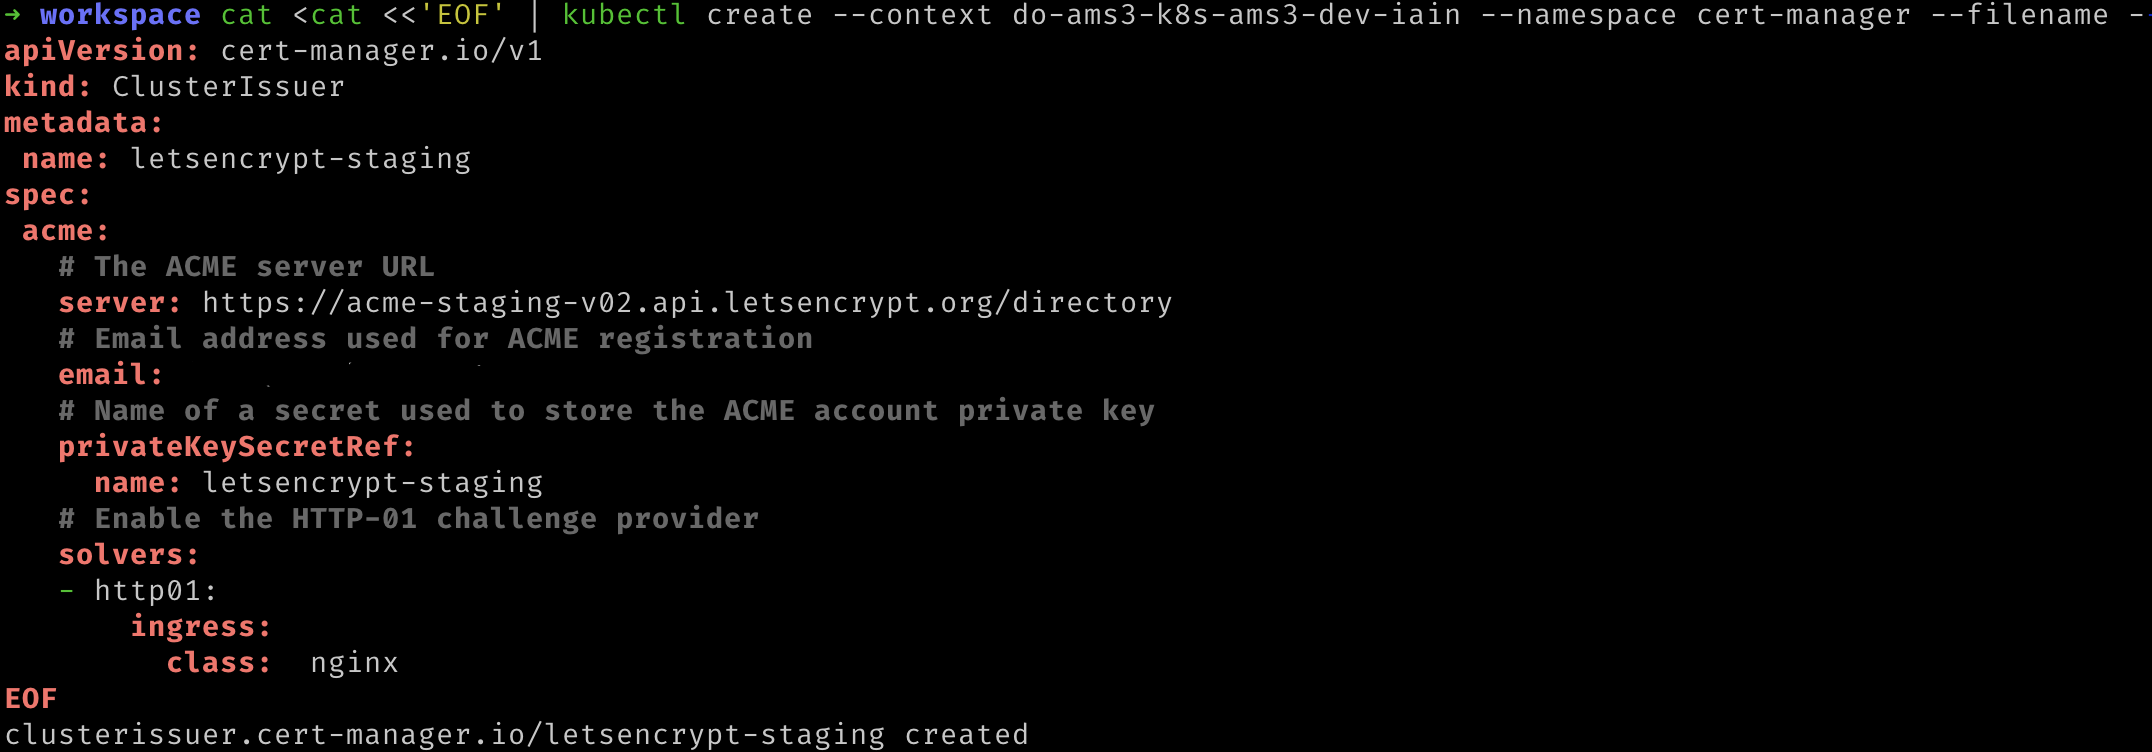 We can verify that this worked by running the following command. Replace `${YOUR_CLUSTER_CONTEXT_NAME}` with the name of your cluster. The response should state that the message was "*The ACME account was registered with the ACME server*".
```shell theme={null}
kubectl describe clusterissuer.cert-manager.io/letsencrypt-staging \
--namespace cert-manager --context "${YOUR_CLUSTER_CONTEXT_NAME}"
```
We can verify that this worked by running the following command. Replace `${YOUR_CLUSTER_CONTEXT_NAME}` with the name of your cluster. The response should state that the message was "*The ACME account was registered with the ACME server*".
```shell theme={null}
kubectl describe clusterissuer.cert-manager.io/letsencrypt-staging \
--namespace cert-manager --context "${YOUR_CLUSTER_CONTEXT_NAME}"
```
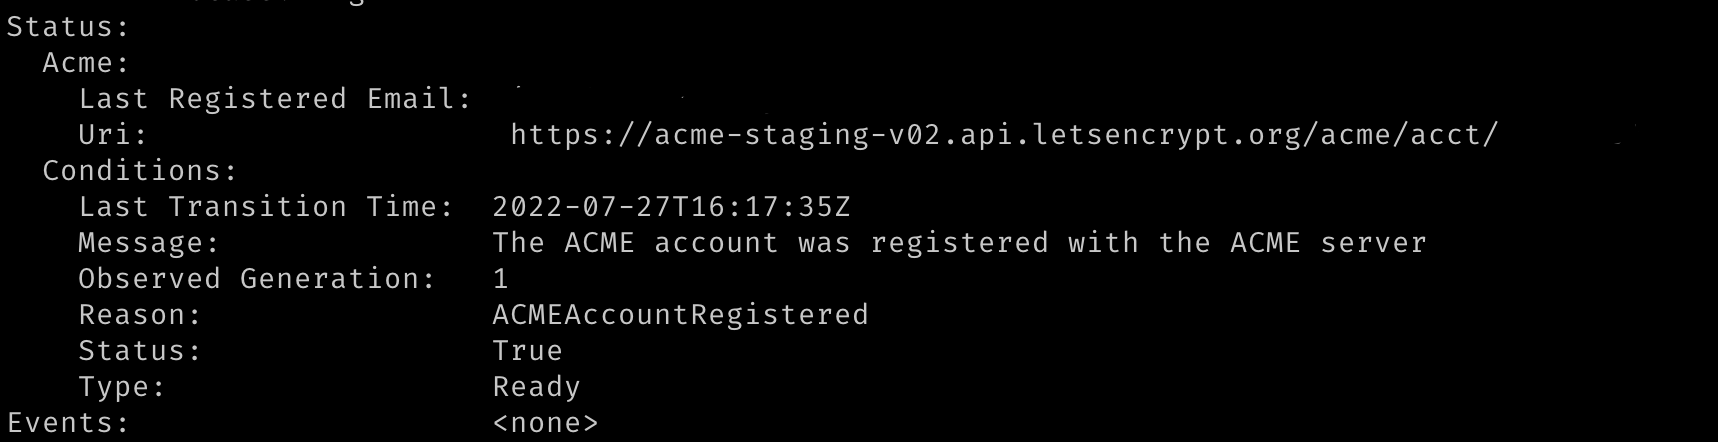 We repeat this command to verify that the production certificate was created as well. Replace `${YOUR_CLUSTER_CONTEXT_NAME}` with the name of your cluster. Again, the response should state that the message was "*The ACME account was registered with the ACME server*".
```shell theme={null}
kubectl describe clusterissuer.cert-manager.io/letsencrypt-prod \
--namespace cert-manager --context "${YOUR_CLUSTER_CONTEXT_NAME}"
```
### Ingress
To allow access from the internet to your kubernetes cluster, Speckle will deploy a [Kubernetes Ingress](https://kubernetes.io/docs/concepts/services-networking/ingress/), which defines how that external traffic should be managed. The component that manages the traffic per Speckle's ingress definition is known as an Ingress Controller. In this step, we will deploy our Ingress Controller, [NGINX](https://www.nginx.com/).
* We first let Helm know where NGINX ingress can be found:
```shell theme={null}
helm repo add ingress-nginx https://kubernetes.github.io/ingress-nginx
```
We repeat this command to verify that the production certificate was created as well. Replace `${YOUR_CLUSTER_CONTEXT_NAME}` with the name of your cluster. Again, the response should state that the message was "*The ACME account was registered with the ACME server*".
```shell theme={null}
kubectl describe clusterissuer.cert-manager.io/letsencrypt-prod \
--namespace cert-manager --context "${YOUR_CLUSTER_CONTEXT_NAME}"
```
### Ingress
To allow access from the internet to your kubernetes cluster, Speckle will deploy a [Kubernetes Ingress](https://kubernetes.io/docs/concepts/services-networking/ingress/), which defines how that external traffic should be managed. The component that manages the traffic per Speckle's ingress definition is known as an Ingress Controller. In this step, we will deploy our Ingress Controller, [NGINX](https://www.nginx.com/).
* We first let Helm know where NGINX ingress can be found:
```shell theme={null}
helm repo add ingress-nginx https://kubernetes.github.io/ingress-nginx
```
 Then update Helm so that it can discover what the newly added repo contains:
```shell theme={null}
helm repo update
```
Then update Helm so that it can discover what the newly added repo contains:
```shell theme={null}
helm repo update
```
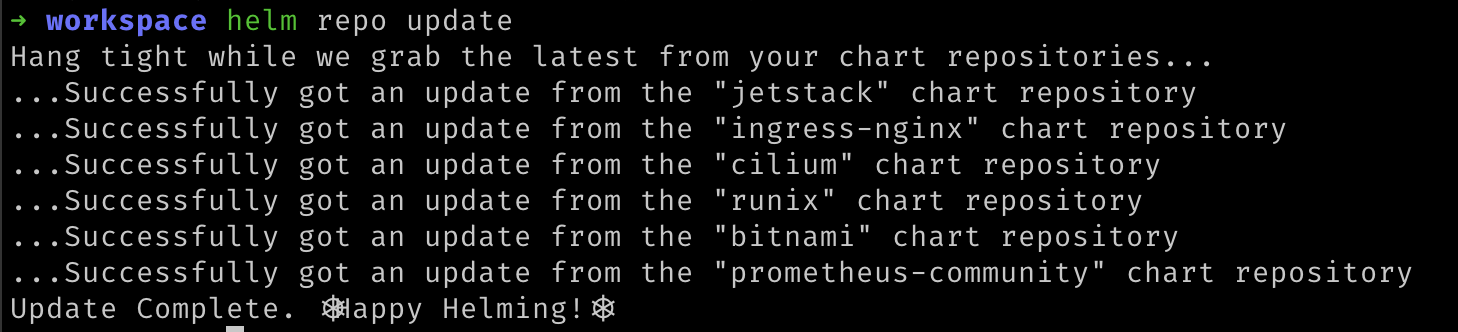 Now we can deploy NGINX to our kubernetes cluster. The additional annotation allows CertManager, deployed in the [previous step](#3d-certificate-manager), to advise NGINX which certificate to use for https connections. Replace `${YOUR_CLUSTER_CONTEXT_NAME}` with the name of your cluster.
```shell theme={null}
cat <<'EOF' | helm upgrade ingress-nginx ingress-nginx/ingress-nginx \
--install --create-namespace \
--set-string controller.podAnnotations."acme.cert-manager.io/http01-edit-in-place"=true \
--namespace ingress-nginx \
--kube-context "${YOUR_CLUSTER_CONTEXT_NAME}" \
--values -
controller:
replicaCount: 2
publishService:
enabled: true
config:
http2-max-concurrent-streams: "512"
use-http2: "true"
keep-alive-requests: "1000"
EOF
```
Now we can deploy NGINX to our kubernetes cluster. The additional annotation allows CertManager, deployed in the [previous step](#3d-certificate-manager), to advise NGINX which certificate to use for https connections. Replace `${YOUR_CLUSTER_CONTEXT_NAME}` with the name of your cluster.
```shell theme={null}
cat <<'EOF' | helm upgrade ingress-nginx ingress-nginx/ingress-nginx \
--install --create-namespace \
--set-string controller.podAnnotations."acme.cert-manager.io/http01-edit-in-place"=true \
--namespace ingress-nginx \
--kube-context "${YOUR_CLUSTER_CONTEXT_NAME}" \
--values -
controller:
replicaCount: 2
publishService:
enabled: true
config:
http2-max-concurrent-streams: "512"
use-http2: "true"
keep-alive-requests: "1000"
EOF
```
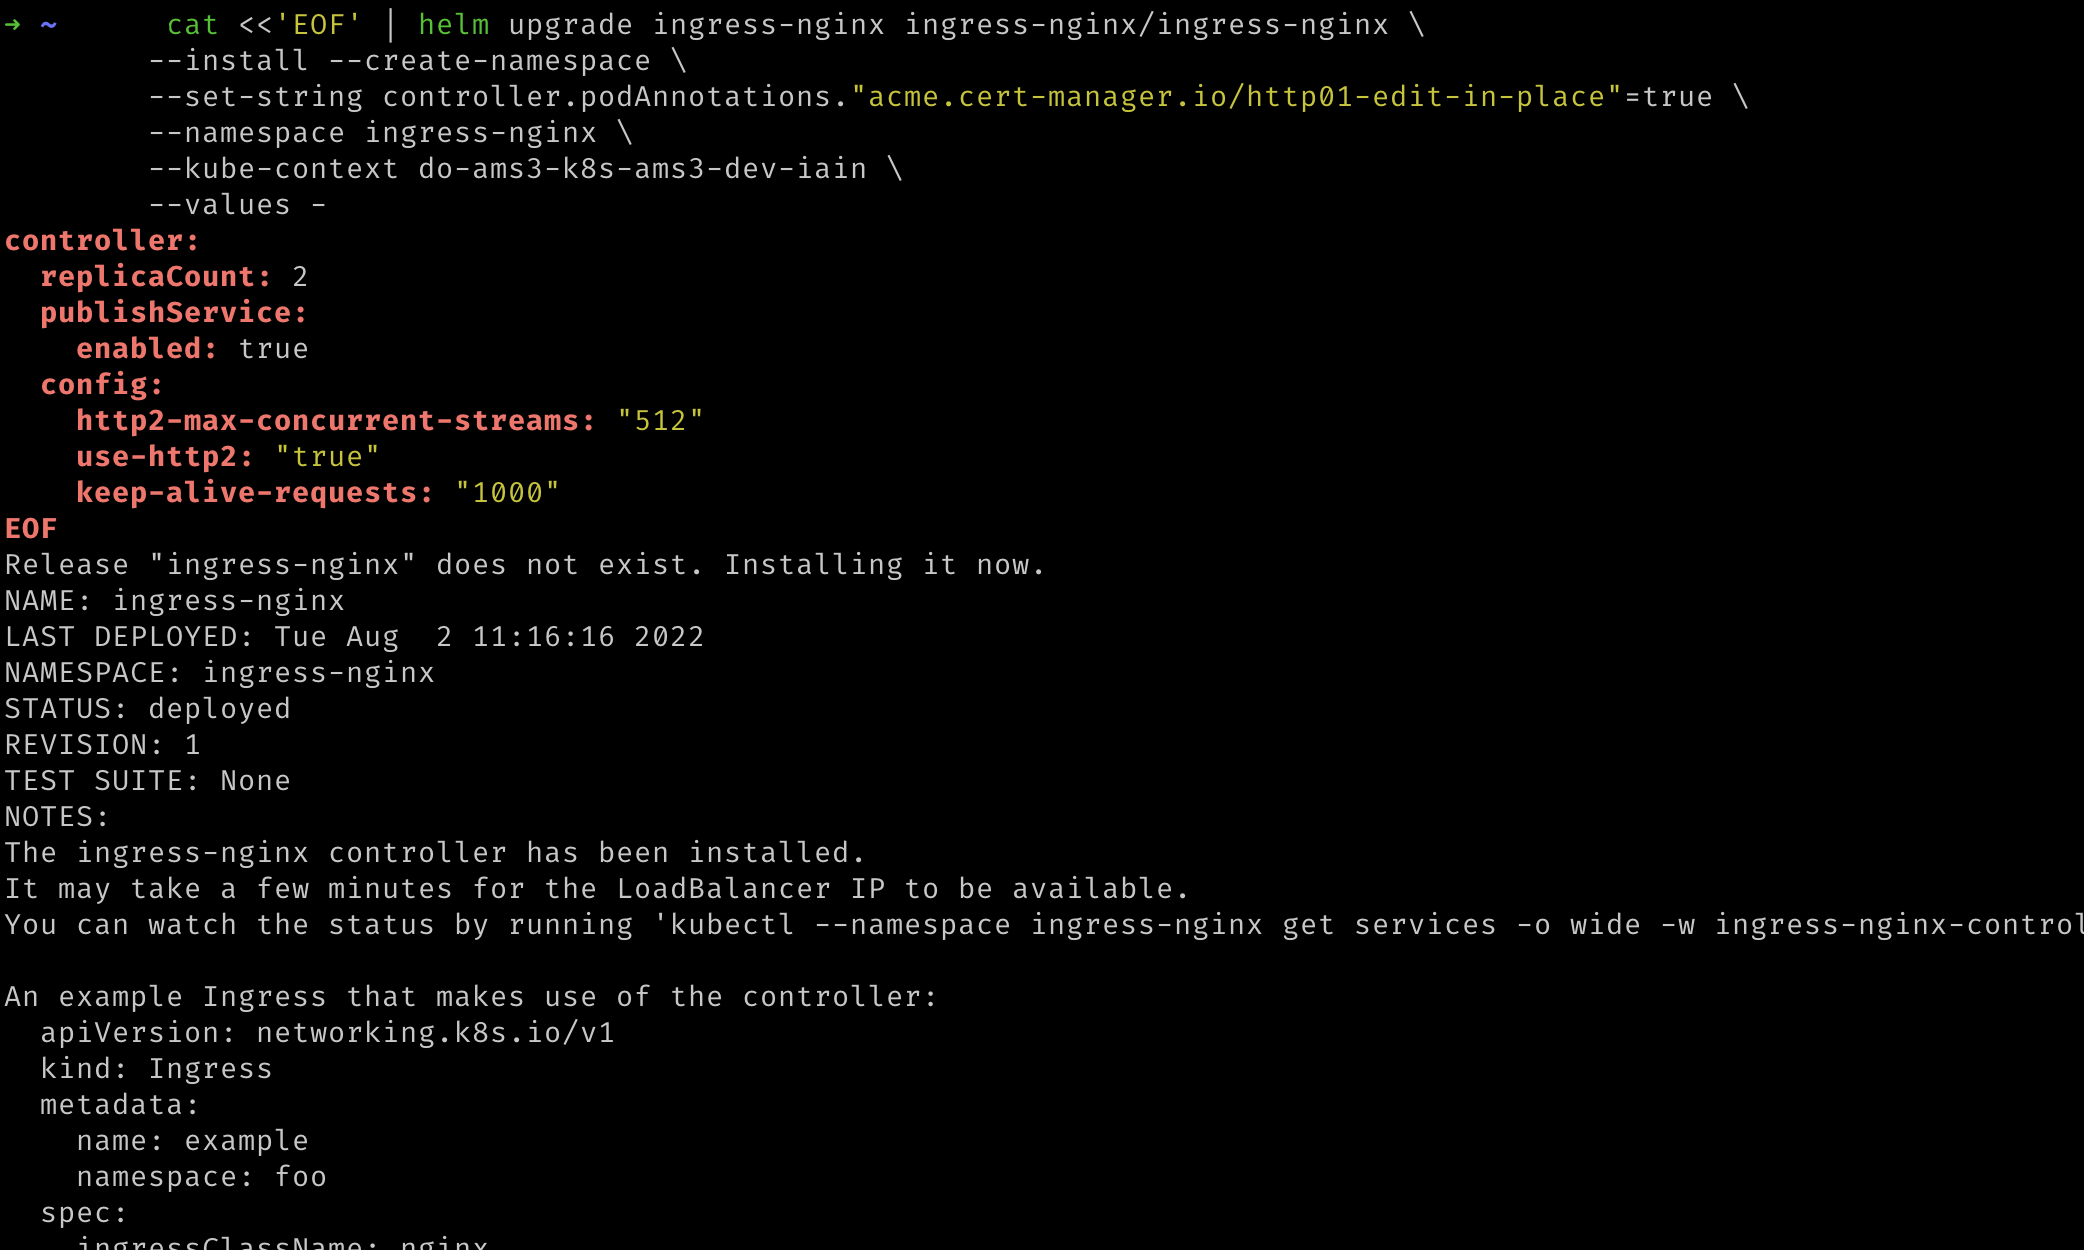 We can ignore the instructions printed out by the NGINX Helm chart as the
required resources will be provided by the Speckle Helm chart.
## Configure your Deployment
[Download the `values.yaml` file from the Speckle server GitHub repository](https://raw.githubusercontent.com/specklesystems/speckle-server/refs/heads/main/utils/helm/speckle-server/values.yaml) and save it as `values.yaml` to the current directory on your local machine. We will edit and use this file in the following steps.
* Fill in the requested fields and save the file:
* `namespace`: required, we are using `speckle` in this guide, so change this value
* `domain`: required, this is the domain name at which your Speckle server will be available.
* `db.useCertificate`: required, this should be set to true and will force Speckle to use the certificate for Postgres we shall provide in `db.certificate`.
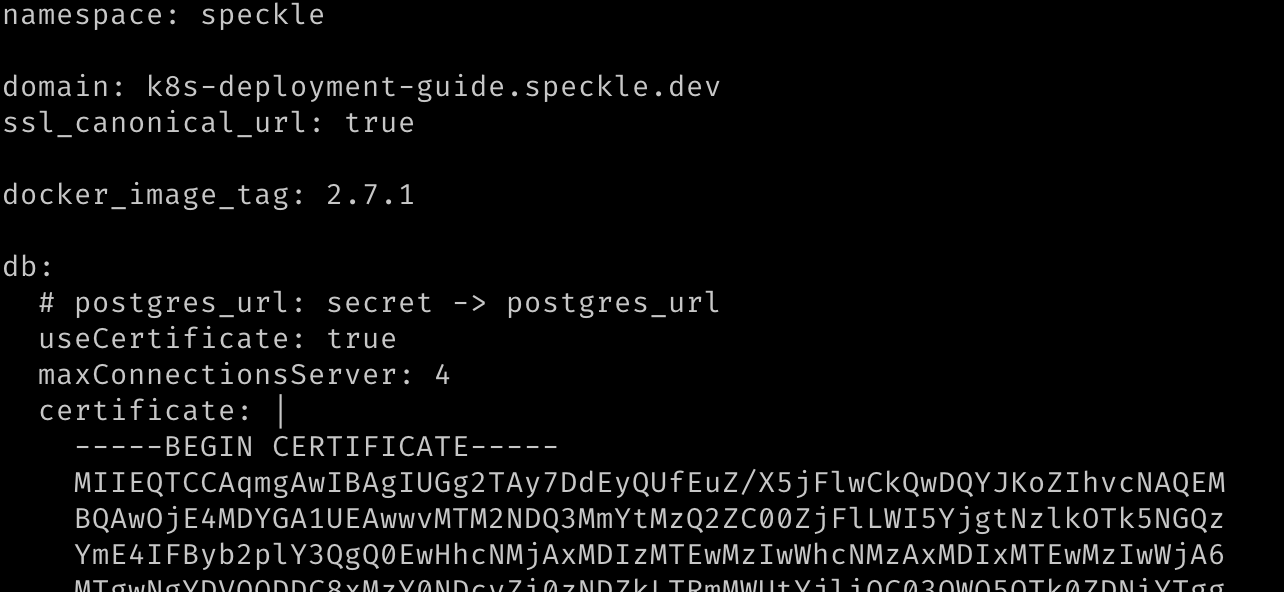
* `db.certificate`: required, this can be found by clicking `Download CA certificate` in your database's overview page on DigitalOcean. You can find your Postgres database by selecting it from the [Database page on DigitalOcean](https://cloud.digitalocean.com/databases). When entering the data, please use Helm's pipe operator for multiline strings and be careful with indentation. We recommend reading [Helm's guide on formatting multiline strings](https://helm.sh/docs/chart_template_guide/yaml_techniques/#strings-in-yaml), and refer to the image below for an example of this format.
* `s3.endpoint`: required, the endpoint can be found in the Settings Page of your DigitalOcean Space. You can find your Space by selecting it from the [Spaces page on DigitalOcean](https://cloud.digitalocean.com/spaces?i=b49c54). This value must be prepended with `https://`.
* `s3.bucket`: required, this is the name of your DigitalOcean space.
* `s3.access_key`: required, this is the `Key` of your Spaces API key. You can find this by viewing it from the [Spaces API Key page on DigitalOcean](https://cloud.digitalocean.com/account/api/tokens)
* `s3.auth.local.enabled`: this is enabled by default. This requires users to register on your Speckle cluster with a username and password. If you wish to use a different authorization provider, such as Azure AD, GitHub, or Google, set this value to `false` and amend the relevant section below by enabling it and providing the necessary details.
* `server.email`: optional, enabling emails will enable extra features like sending invites.
* You will need to set `server.email.enabled` to `true`.
* Please set `server.email.host`, `server.email.username`, and optionally, depending on your email server, `server.email.port`
* This also requires the `email_password` secret to have been set in [Step 3](#step-3b-create-secrets).
* `cert_manager_issuer`: optional, the default is set for Let's Encrypt staging api `letsencrypt-staging`. For production, or if you encounter an issue with certificates, change the value to `letsencrypt-prod`.
The remaining values can be left as their defaults.
We can ignore the instructions printed out by the NGINX Helm chart as the
required resources will be provided by the Speckle Helm chart.
## Configure your Deployment
[Download the `values.yaml` file from the Speckle server GitHub repository](https://raw.githubusercontent.com/specklesystems/speckle-server/refs/heads/main/utils/helm/speckle-server/values.yaml) and save it as `values.yaml` to the current directory on your local machine. We will edit and use this file in the following steps.
* Fill in the requested fields and save the file:
* `namespace`: required, we are using `speckle` in this guide, so change this value
* `domain`: required, this is the domain name at which your Speckle server will be available.
* `db.useCertificate`: required, this should be set to true and will force Speckle to use the certificate for Postgres we shall provide in `db.certificate`.
* `db.certificate`: required, this can be found by clicking `Download CA certificate` in your database's overview page on DigitalOcean. You can find your Postgres database by selecting it from the [Database page on DigitalOcean](https://cloud.digitalocean.com/databases). When entering the data, please use Helm's pipe operator for multiline strings and be careful with indentation. We recommend reading [Helm's guide on formatting multiline strings](https://helm.sh/docs/chart_template_guide/yaml_techniques/#strings-in-yaml), and refer to the image below for an example of this format.
* `s3.endpoint`: required, the endpoint can be found in the Settings Page of your DigitalOcean Space. You can find your Space by selecting it from the [Spaces page on DigitalOcean](https://cloud.digitalocean.com/spaces?i=b49c54). This value must be prepended with `https://`.
* `s3.bucket`: required, this is the name of your DigitalOcean space.
* `s3.access_key`: required, this is the `Key` of your Spaces API key. You can find this by viewing it from the [Spaces API Key page on DigitalOcean](https://cloud.digitalocean.com/account/api/tokens)
* `s3.auth.local.enabled`: this is enabled by default. This requires users to register on your Speckle cluster with a username and password. If you wish to use a different authorization provider, such as Azure AD, GitHub, or Google, set this value to `false` and amend the relevant section below by enabling it and providing the necessary details.
* `server.email`: optional, enabling emails will enable extra features like sending invites.
* You will need to set `server.email.enabled` to `true`.
* Please set `server.email.host`, `server.email.username`, and optionally, depending on your email server, `server.email.port`
* This also requires the `email_password` secret to have been set in [Step 3](#step-3b-create-secrets).
* `cert_manager_issuer`: optional, the default is set for Let's Encrypt staging api `letsencrypt-staging`. For production, or if you encounter an issue with certificates, change the value to `letsencrypt-prod`.
The remaining values can be left as their defaults.
 ## Deploy Speckle to Kubernetes
Run the following command to deploy the Helm chart to your Kubernetes cluster configured with the values you configured in the [prior step](#step-4-configure-your-deployment). Replace `${YOUR_CLUSTER_CONTEXT_NAME}` with the name of your cluster.
```shell theme={null}
helm upgrade my-speckle-server oci://registry-1.docker.io/speckle/speckle-server \
--values values.yaml \
--namespace speckle \
--install --create-namespace \
--kube-context "${YOUR_CLUSTER_CONTEXT_NAME}"
```
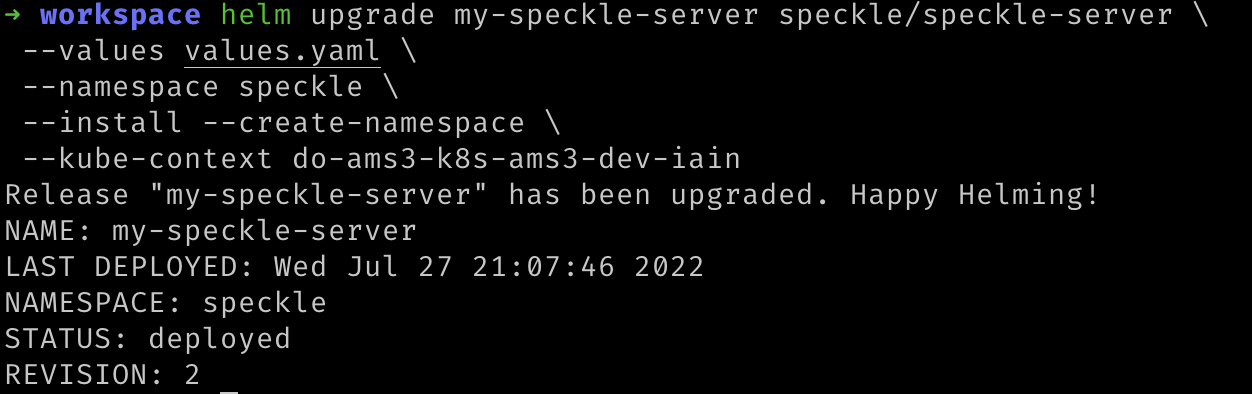
After configuration is done, you should see this success message:
## Deploy Speckle to Kubernetes
Run the following command to deploy the Helm chart to your Kubernetes cluster configured with the values you configured in the [prior step](#step-4-configure-your-deployment). Replace `${YOUR_CLUSTER_CONTEXT_NAME}` with the name of your cluster.
```shell theme={null}
helm upgrade my-speckle-server oci://registry-1.docker.io/speckle/speckle-server \
--values values.yaml \
--namespace speckle \
--install --create-namespace \
--kube-context "${YOUR_CLUSTER_CONTEXT_NAME}"
```
After configuration is done, you should see this success message:
 Verify that all deployed Helm charts were successful by checking their deployment status. Replace `${YOUR_CLUSTER_CONTEXT_NAME}` with the name of your cluster.:
```shell theme={null}
helm list --all-namespaces --kube-context "${YOUR_CLUSTER_CONTEXT_NAME}"
```
You should see something similar to the following:
Verify that all deployed Helm charts were successful by checking their deployment status. Replace `${YOUR_CLUSTER_CONTEXT_NAME}` with the name of your cluster.:
```shell theme={null}
helm list --all-namespaces --kube-context "${YOUR_CLUSTER_CONTEXT_NAME}"
```
You should see something similar to the following:
 ## Update your Domain
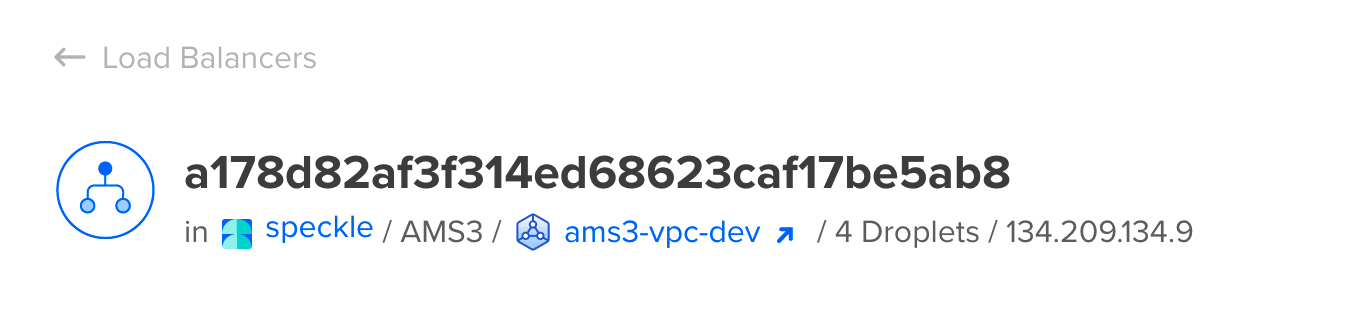
Initially, accessing Speckle may take some time as DigitalOcean must create a load balancer and Let's Encrypt must sign the Certificate. The DigitalOcean load balancer was automatically requested from the Infrastructure provider (DigitalOcean) by the Ingress controller we deployed earlier. You can see the progress of the load balancer's deployment on the [Networking page](https://cloud.digitalocean.com/networking/load_balancers) of your DigitalOcean dashboard.
Once the load balancer has finished creating, DigitalOcean will display an externally-accessible IP address for it. Please make a note of the IP address.
## Update your Domain
Initially, accessing Speckle may take some time as DigitalOcean must create a load balancer and Let's Encrypt must sign the Certificate. The DigitalOcean load balancer was automatically requested from the Infrastructure provider (DigitalOcean) by the Ingress controller we deployed earlier. You can see the progress of the load balancer's deployment on the [Networking page](https://cloud.digitalocean.com/networking/load_balancers) of your DigitalOcean dashboard.
Once the load balancer has finished creating, DigitalOcean will display an externally-accessible IP address for it. Please make a note of the IP address.
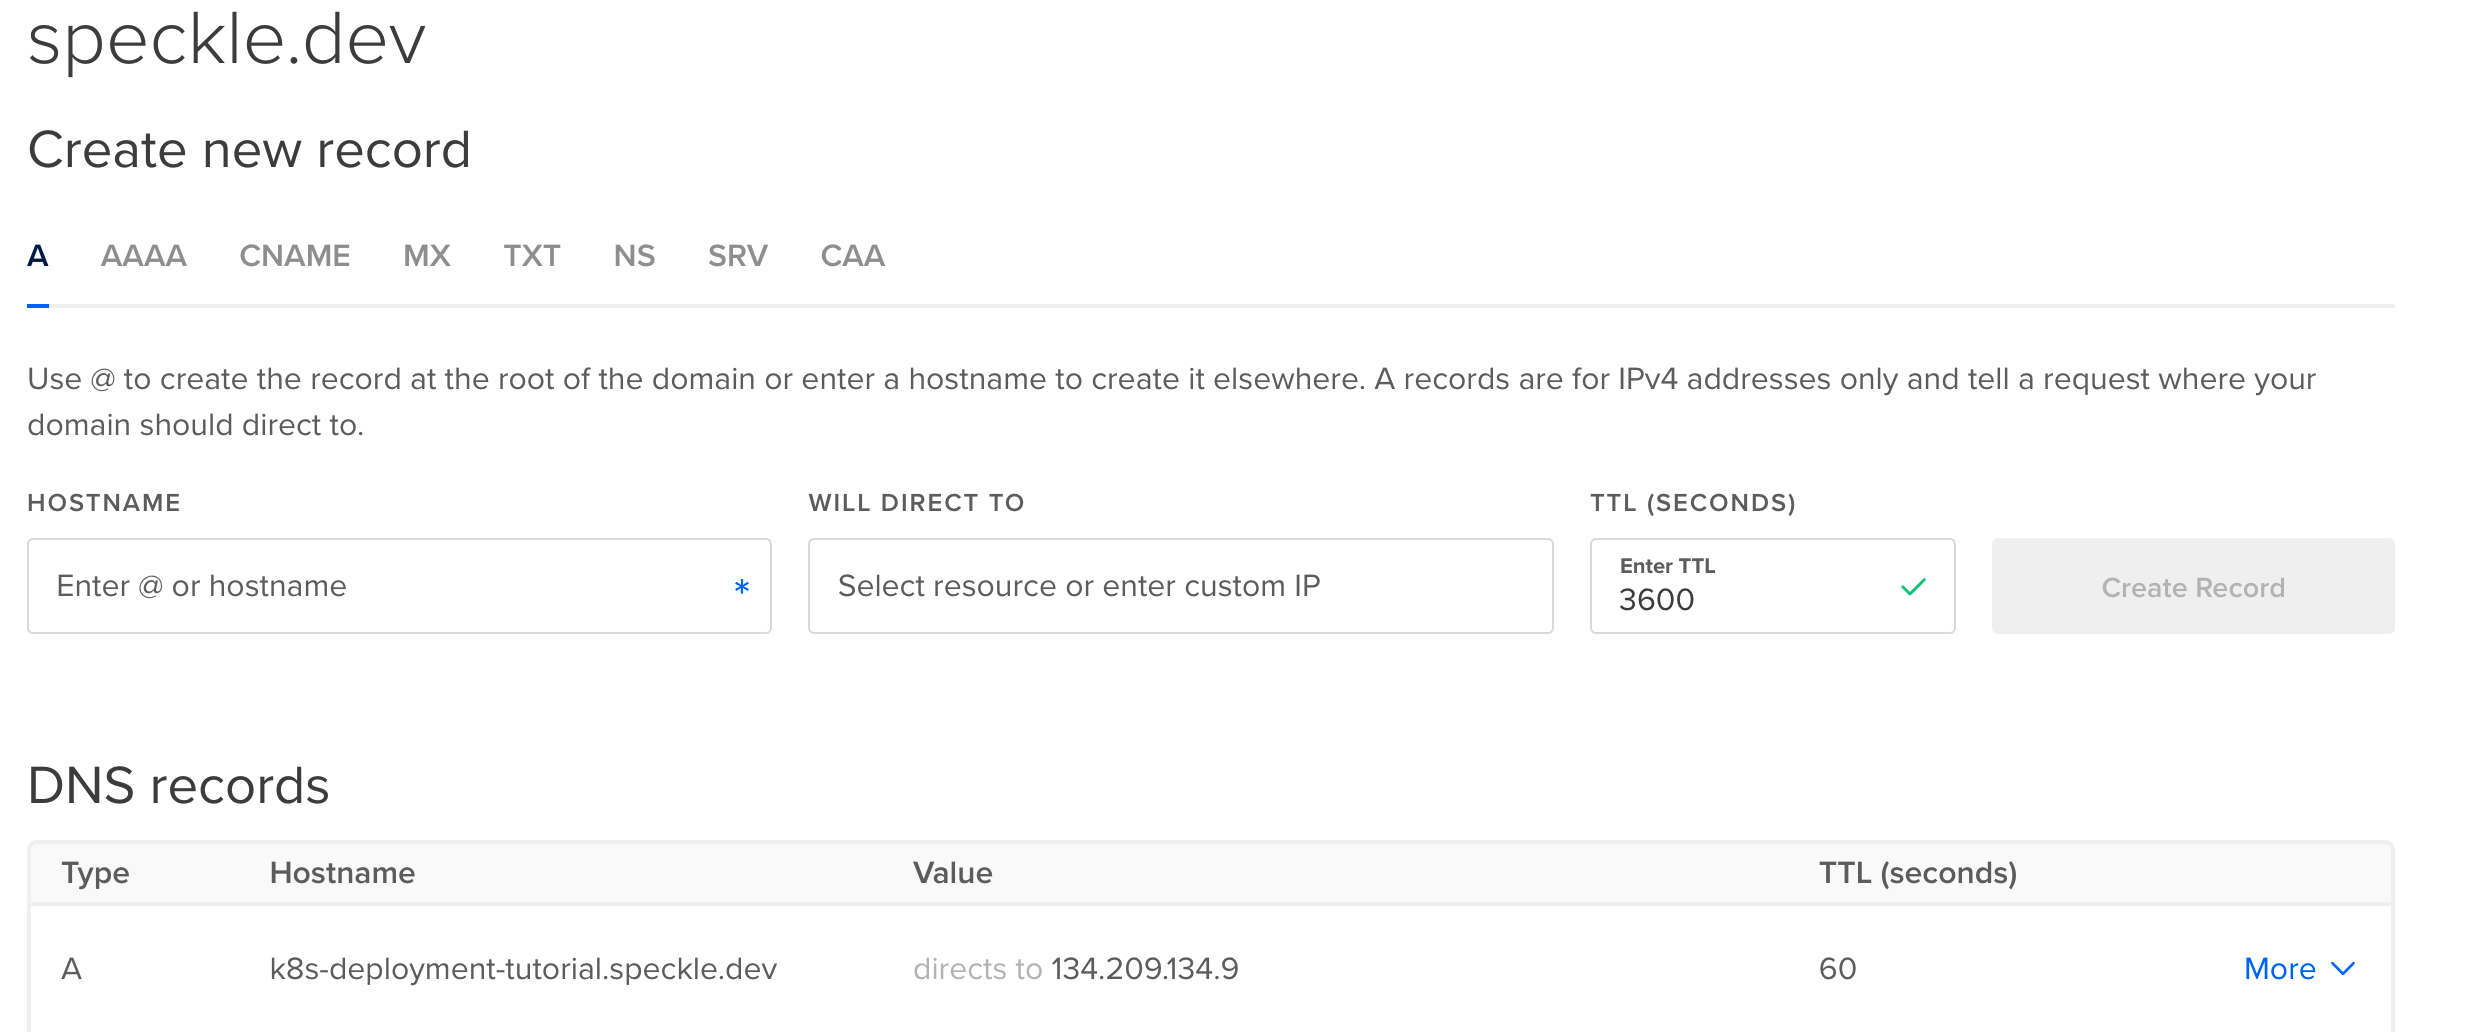
 Navigate to your domain registrar's website for your domain name and add a DNS A record. This will allow web browsers to resolve your domain name to the load balancer's IP address. The domain must match the domain name provided to Speckle in the `values.yaml` file you edited previously. If DigitalOcean manages your Domain Names, adding a DNS A record using [DigitalOcean's Domain page](https://cloud.digitalocean.com/networking/domains) will look something like the following:
 It may take a moment for the domain name and A Record to be propagated to all relevant DNS servers, and then for Let's Encrypt to reach your domain and generate a certificate. Please be patient while this is updated.
## Create an account on your Server
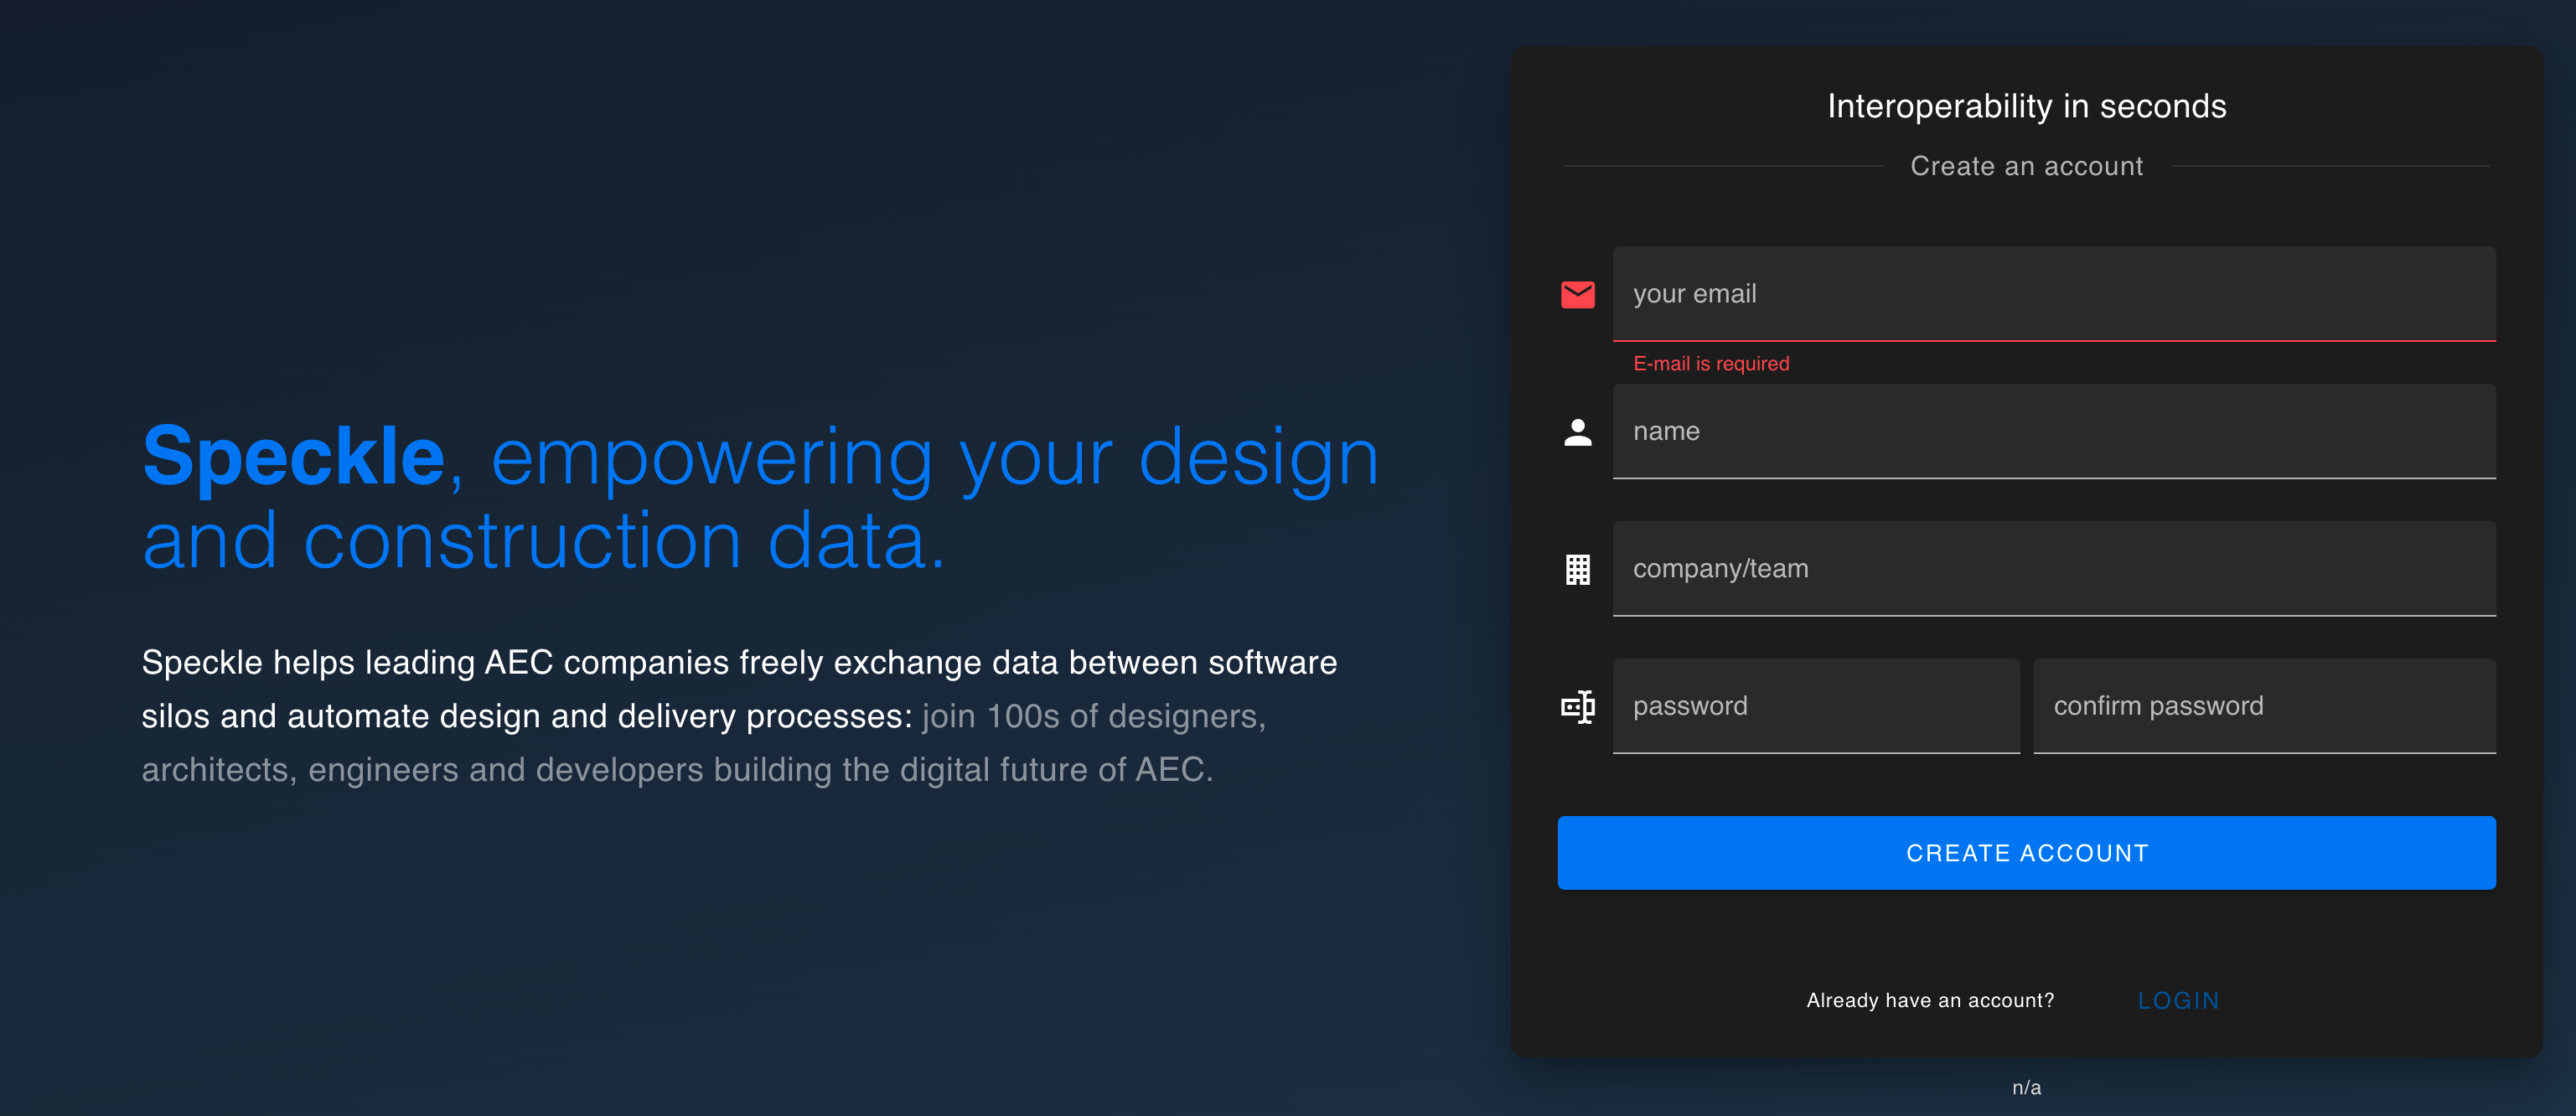
You should be able to now visit your domain name and see the same Speckle welcome page.
Finally, register the first user. The first user who registers will be the administrator account for that server.
It may take a moment for the domain name and A Record to be propagated to all relevant DNS servers, and then for Let's Encrypt to reach your domain and generate a certificate. Please be patient while this is updated.
## Create an account on your Server
You should be able to now visit your domain name and see the same Speckle welcome page.
Finally, register the first user. The first user who registers will be the administrator account for that server.
 ## That's it
You have deployed a Speckle Server on a fully controlled Kubernetes cluster.
To reconfigure the server, you can change the values in `values.yaml` and run the following command. Replace `${YOUR_CLUSTER_CONTEXT_NAME}` with the name of your cluster.:
```shell theme={null}
helm upgrade my-speckle-server --values values.yaml --kube-context "${YOUR_CLUSTER_CONTEXT_NAME}"
```
## Common Issues
### Untrusted Certificate
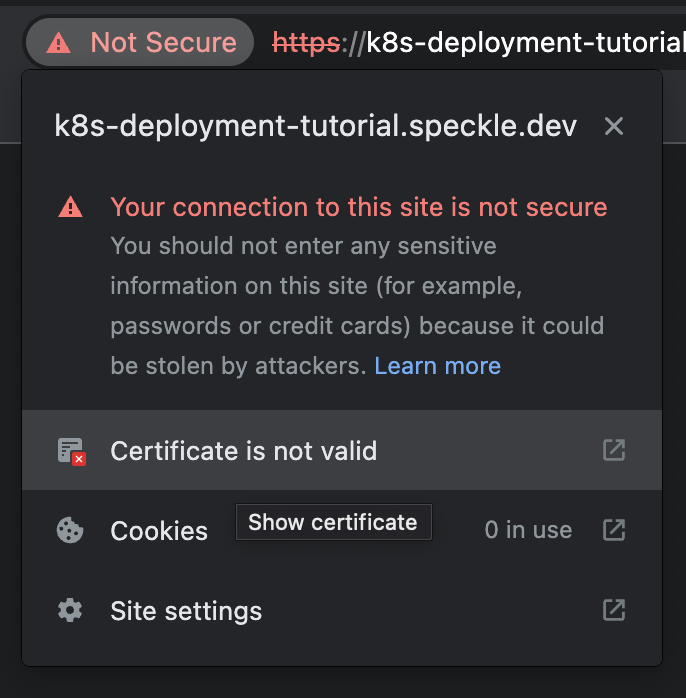
Your browser may not trust the certificate generated by Let's Encrypt's staging API. In Google's Chrome browser, the warning will appear as follows:
## That's it
You have deployed a Speckle Server on a fully controlled Kubernetes cluster.
To reconfigure the server, you can change the values in `values.yaml` and run the following command. Replace `${YOUR_CLUSTER_CONTEXT_NAME}` with the name of your cluster.:
```shell theme={null}
helm upgrade my-speckle-server --values values.yaml --kube-context "${YOUR_CLUSTER_CONTEXT_NAME}"
```
## Common Issues
### Untrusted Certificate
Your browser may not trust the certificate generated by Let's Encrypt's staging API. In Google's Chrome browser, the warning will appear as follows:
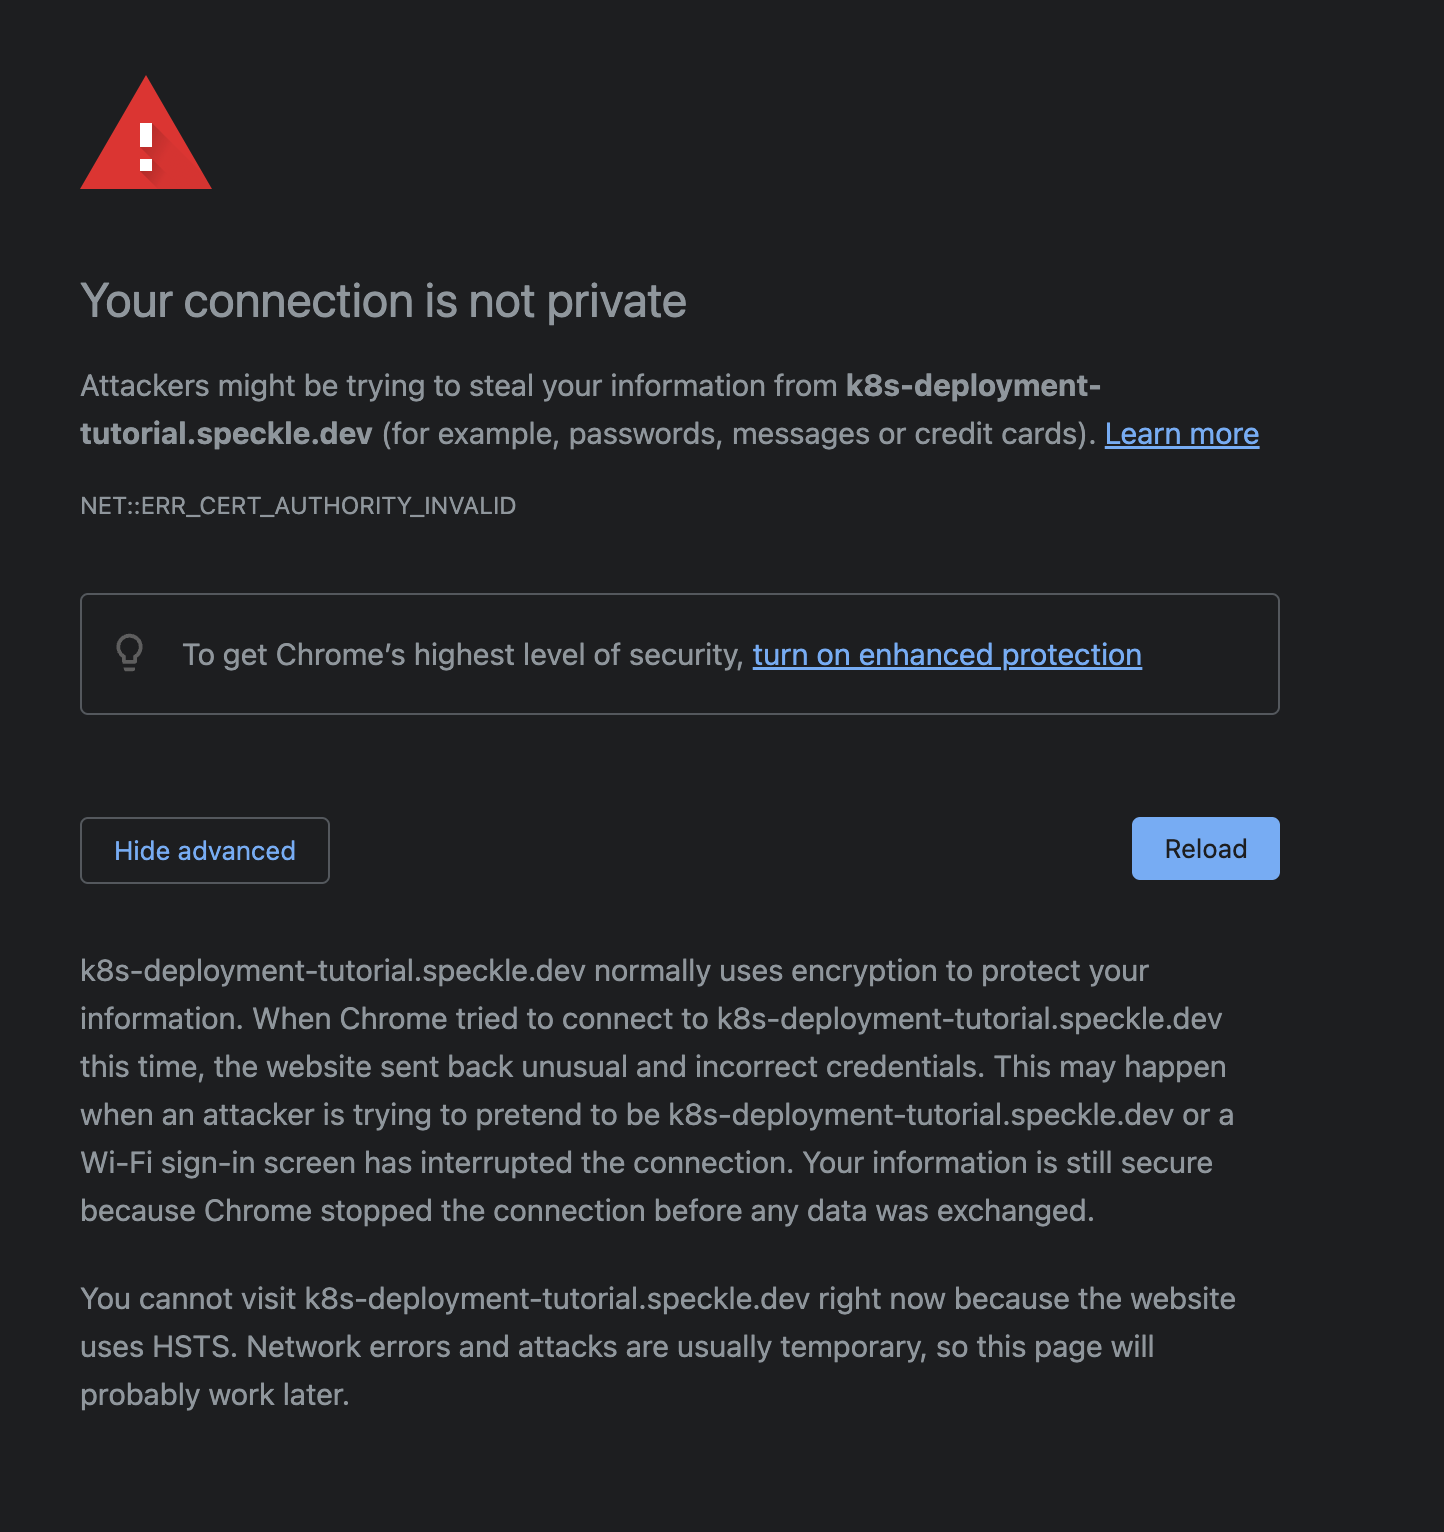 You can verify that the certificate was generated correctly by inspecting the Certificate's Issuing Authority. If the Certificate was correctly generated, the root certificate should be one of either `(STAGING) Pretend Pear X1` and/or `(STAGING) Bogus Broccoli X2`. Click the `Not Secure` warning next to the address bar, then click `Certificate is not valid` for more details.
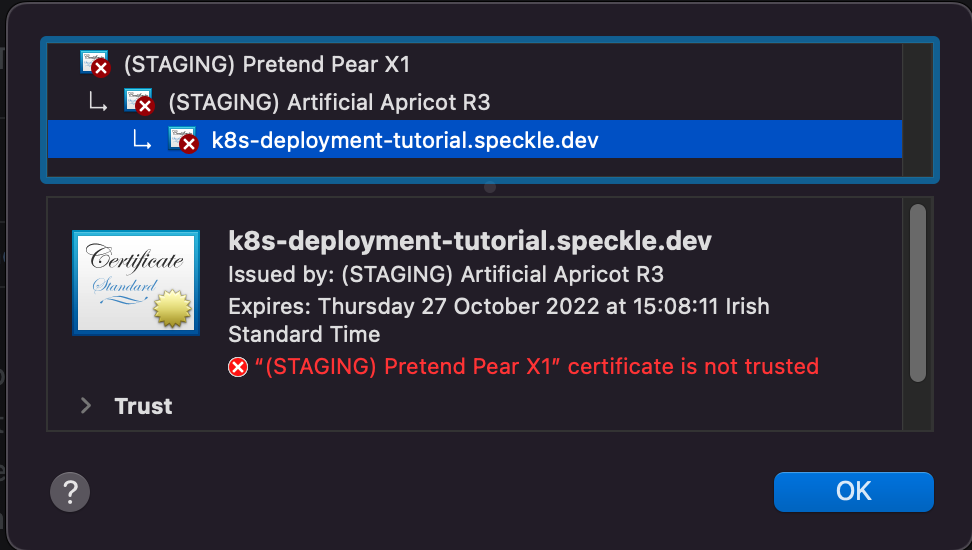 In this case, our deployment is correct, but our browser rightly does not trust Let's Encrypt's staging environment. To resolve this issue, we recommend amending the Certificate to a production certificate. Please refer to the notes above on how to amend your Speckle deployment to use Let's Encrypt's Production environment.
More information about Let's Encrypt's Staging Environment can be found on [Let's Encrypt's website](https://letsencrypt.org/docs/staging-environment/#root-certificates).
### Other Issues
If you encounter any other issue, have any question or just want to say hi, reach out in [our forum](https://speckle.community/).
In this case, our deployment is correct, but our browser rightly does not trust Let's Encrypt's staging environment. To resolve this issue, we recommend amending the Certificate to a production certificate. Please refer to the notes above on how to amend your Speckle deployment to use Let's Encrypt's Production environment.
More information about Let's Encrypt's Staging Environment can be found on [Let's Encrypt's website](https://letsencrypt.org/docs/staging-environment/#root-certificates).
### Other Issues
If you encounter any other issue, have any question or just want to say hi, reach out in [our forum](https://speckle.community/).