> ## Documentation Index
> Fetch the complete documentation index at: https://docs.speckle.systems/llms.txt
> Use this file to discover all available pages before exploring further.
# Model validation workflow
> Validate models with Property Checker and Model Validation widgets, then iterate on fixes.
Use this guide when you want a repeatable way to check model data quality in Speckle using Intelligence dashboards. All validation in this workflow is dashboard‑based: **Property Checker** and **Model Validation** widgets, with results in the dashboard, 3D viewer, and connectors. For BIM coordinators and modellers who define and run quality rules.
This workflow documents the **dashboard-based validation widget** path. For **Web app Data
Validation** (checks and standards), use [Data Validation
Overview](/analytics/data-validation/overview).
**Before you start:** You need a Speckle project with at least one model and access to
**Intelligence dashboards**. Open your project and click **Intelligence** in the project
navigation to reach the dashboard editor.
## Choose Your Validation Approach
**When to use:** Before setting up any widgets or rules.
List the questions you need to answer, such as "Do all doors have fire rating?", "Are floor
names following our naming standard?", or "Are all elements on valid levels?". Group them by
discipline or project phase.
Use **Property Checker** for one‑off or exploratory checks on a single property. Use **Model
Validation** when you want a reusable ruleset that checks many properties at once. See
[Validation overview](/analytics/data-validation/overview) for capabilities and limits.
Decide whether people will mainly see validation results in dashboards, in the 3D viewer, or in
desktop connectors. This affects which approaches you prioritise and how much detail you include
in rule messages.
Outcome: A clear idea of which validation questions you need to answer and whether you need quick checks, full rulesets, or both.
## Run Quick Checks With Property Checker
**When to use:** You want to test a single property or rule quickly, or explore model health without building a full ruleset.
In your Speckle project, click **Intelligence** in the project navigation, then create a new dashboard or open an existing one. Ensure the dashboard has a **Model Viewer** widget with your target model. See
[Dashboards](/analytics/intelligence-dashboards) for setup details.
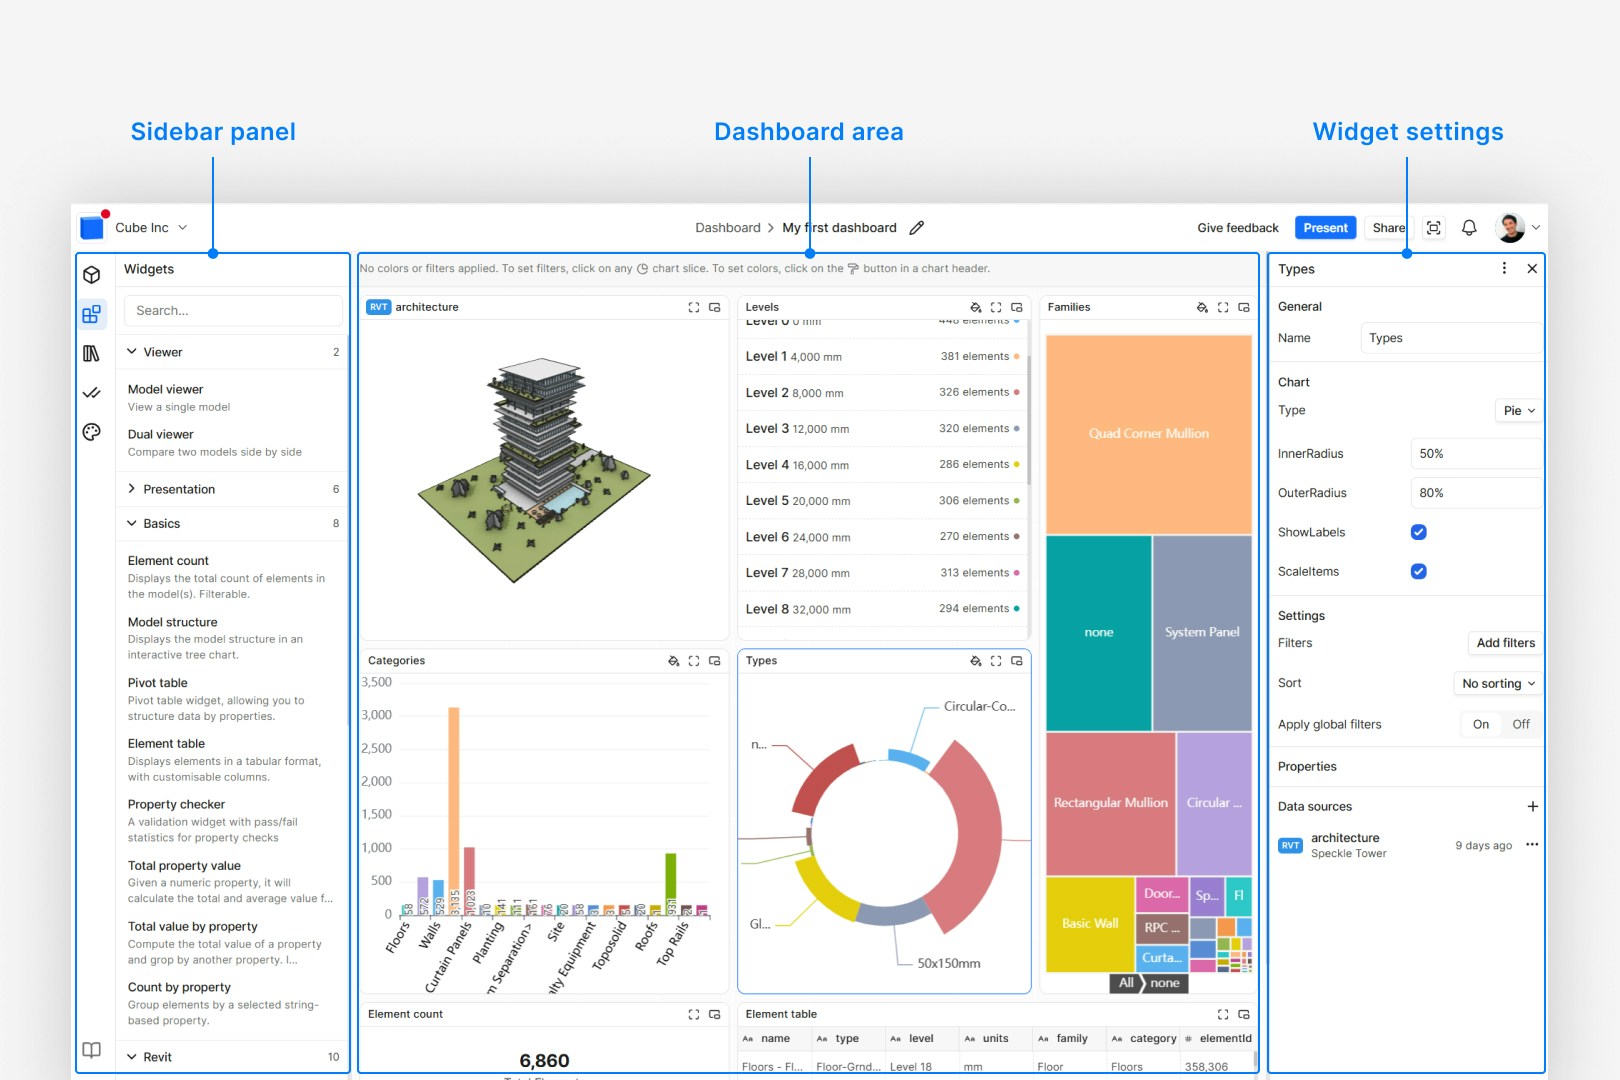 In the dashboard editor, open the **widget panel** (left sidebar) and add **Property checker**. Connect it to the Model Viewer or data sources that contain the elements you want to validate.
In the Property Checker settings, choose the property to check (e.g. `fireRating`, `Level`, `Type Name`) and the predicate (e.g. **Exists**, **Equals**, **Matches pattern**). Set the reference value where
required. See [Checks](/analytics/data-validation/checks#predicates-and-matching)
for the full list.
The widget shows pass/fail counts and percentages. Enable colorization to see passing and failing elements in the 3D viewer. Click on segments of the chart to highlight subsets of elements.
In the dashboard editor, open the **widget panel** (left sidebar) and add **Property checker**. Connect it to the Model Viewer or data sources that contain the elements you want to validate.
In the Property Checker settings, choose the property to check (e.g. `fireRating`, `Level`, `Type Name`) and the predicate (e.g. **Exists**, **Equals**, **Matches pattern**). Set the reference value where
required. See [Checks](/analytics/data-validation/checks#predicates-and-matching)
for the full list.
The widget shows pass/fail counts and percentages. Enable colorization to see passing and failing elements in the 3D viewer. Click on segments of the chart to highlight subsets of elements.
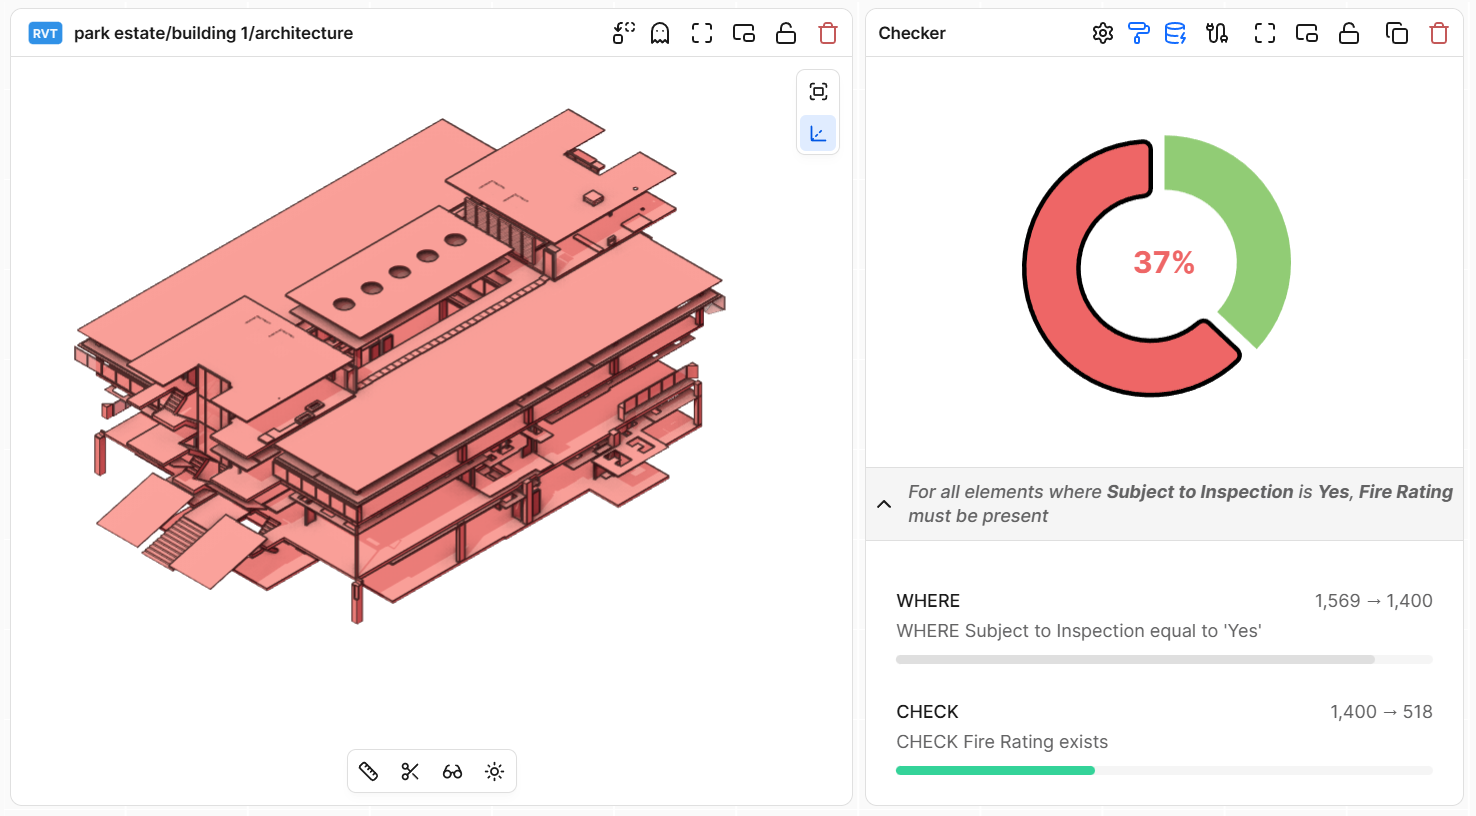 If the quick check proves useful, note the rule logic (property, predicate, value, severity, and message). You will reuse it when building a full ruleset in Model Validation.
Outcome: A fast, visual check of one property at a time, helping you discover which rules are worth codifying in a full ruleset.
## Build A Ruleset With Model Validation
**When to use:** You want a reusable set of rules that can be applied consistently to one model.
In the dashboard editor, add a **Model Validation** widget from the widget panel and connect it to a Model Viewer that loads the model you want to validate. This widget will show the status of a whole ruleset for that model.
Open the ruleset configuration from the widget (e.g. via the widget’s settings or menu). Create a new ruleset for this project or select an existing one. Give it a descriptive name and description so others know what it checks (e.g. "Fire
strategy – core and escape routes").
For each validation requirement, add one or more rules. Use `WHERE` conditions to select the elements to consider (e.g. all doors), `AND` conditions to refine that set, and `CHECK` conditions to assert
what must be true (e.g. fire rating exists and meets a threshold). See
[Checks](/analytics/data-validation/checks) for rule structure and examples.
For each rule, set a severity (ERROR, WARNING, INFO) that matches its impact. Use clear, actionable messages so that someone fixing the model understands what to do when they see a failure.
Save your changes and run the ruleset against the model. The Model Validation widget will update to show how many elements passed, failed, or were not applicable for each rule.
Outcome: A reusable ruleset that captures your data quality requirements and can be re‑run on demand against a specific model.
## Understand And Explore Validation Results
**When to use:** After running a ruleset and before asking model authors to fix anything.
In the Model Validation widget, start with the breakdown or overview tab to see passes, failures, and not‑applied counts per rule. Identify which rules cause the most failures or affect the most
elements. See [Viewing results](/analytics/data-validation/viewing-results) for more details.
Select a rule to see which elements failed and why. Use filters in the widget or dashboard to slice by level, category, or other properties. Check that failures match your expectations and that the rule
logic is correct.
Click through failing rows or categories and use colorization to highlight them in the 3D viewer. Confirm that they are genuinely problematic and not edge cases or intentional exceptions.
If the quick check proves useful, note the rule logic (property, predicate, value, severity, and message). You will reuse it when building a full ruleset in Model Validation.
Outcome: A fast, visual check of one property at a time, helping you discover which rules are worth codifying in a full ruleset.
## Build A Ruleset With Model Validation
**When to use:** You want a reusable set of rules that can be applied consistently to one model.
In the dashboard editor, add a **Model Validation** widget from the widget panel and connect it to a Model Viewer that loads the model you want to validate. This widget will show the status of a whole ruleset for that model.
Open the ruleset configuration from the widget (e.g. via the widget’s settings or menu). Create a new ruleset for this project or select an existing one. Give it a descriptive name and description so others know what it checks (e.g. "Fire
strategy – core and escape routes").
For each validation requirement, add one or more rules. Use `WHERE` conditions to select the elements to consider (e.g. all doors), `AND` conditions to refine that set, and `CHECK` conditions to assert
what must be true (e.g. fire rating exists and meets a threshold). See
[Checks](/analytics/data-validation/checks) for rule structure and examples.
For each rule, set a severity (ERROR, WARNING, INFO) that matches its impact. Use clear, actionable messages so that someone fixing the model understands what to do when they see a failure.
Save your changes and run the ruleset against the model. The Model Validation widget will update to show how many elements passed, failed, or were not applicable for each rule.
Outcome: A reusable ruleset that captures your data quality requirements and can be re‑run on demand against a specific model.
## Understand And Explore Validation Results
**When to use:** After running a ruleset and before asking model authors to fix anything.
In the Model Validation widget, start with the breakdown or overview tab to see passes, failures, and not‑applied counts per rule. Identify which rules cause the most failures or affect the most
elements. See [Viewing results](/analytics/data-validation/viewing-results) for more details.
Select a rule to see which elements failed and why. Use filters in the widget or dashboard to slice by level, category, or other properties. Check that failures match your expectations and that the rule
logic is correct.
Click through failing rows or categories and use colorization to highlight them in the 3D viewer. Confirm that they are genuinely problematic and not edge cases or intentional exceptions.
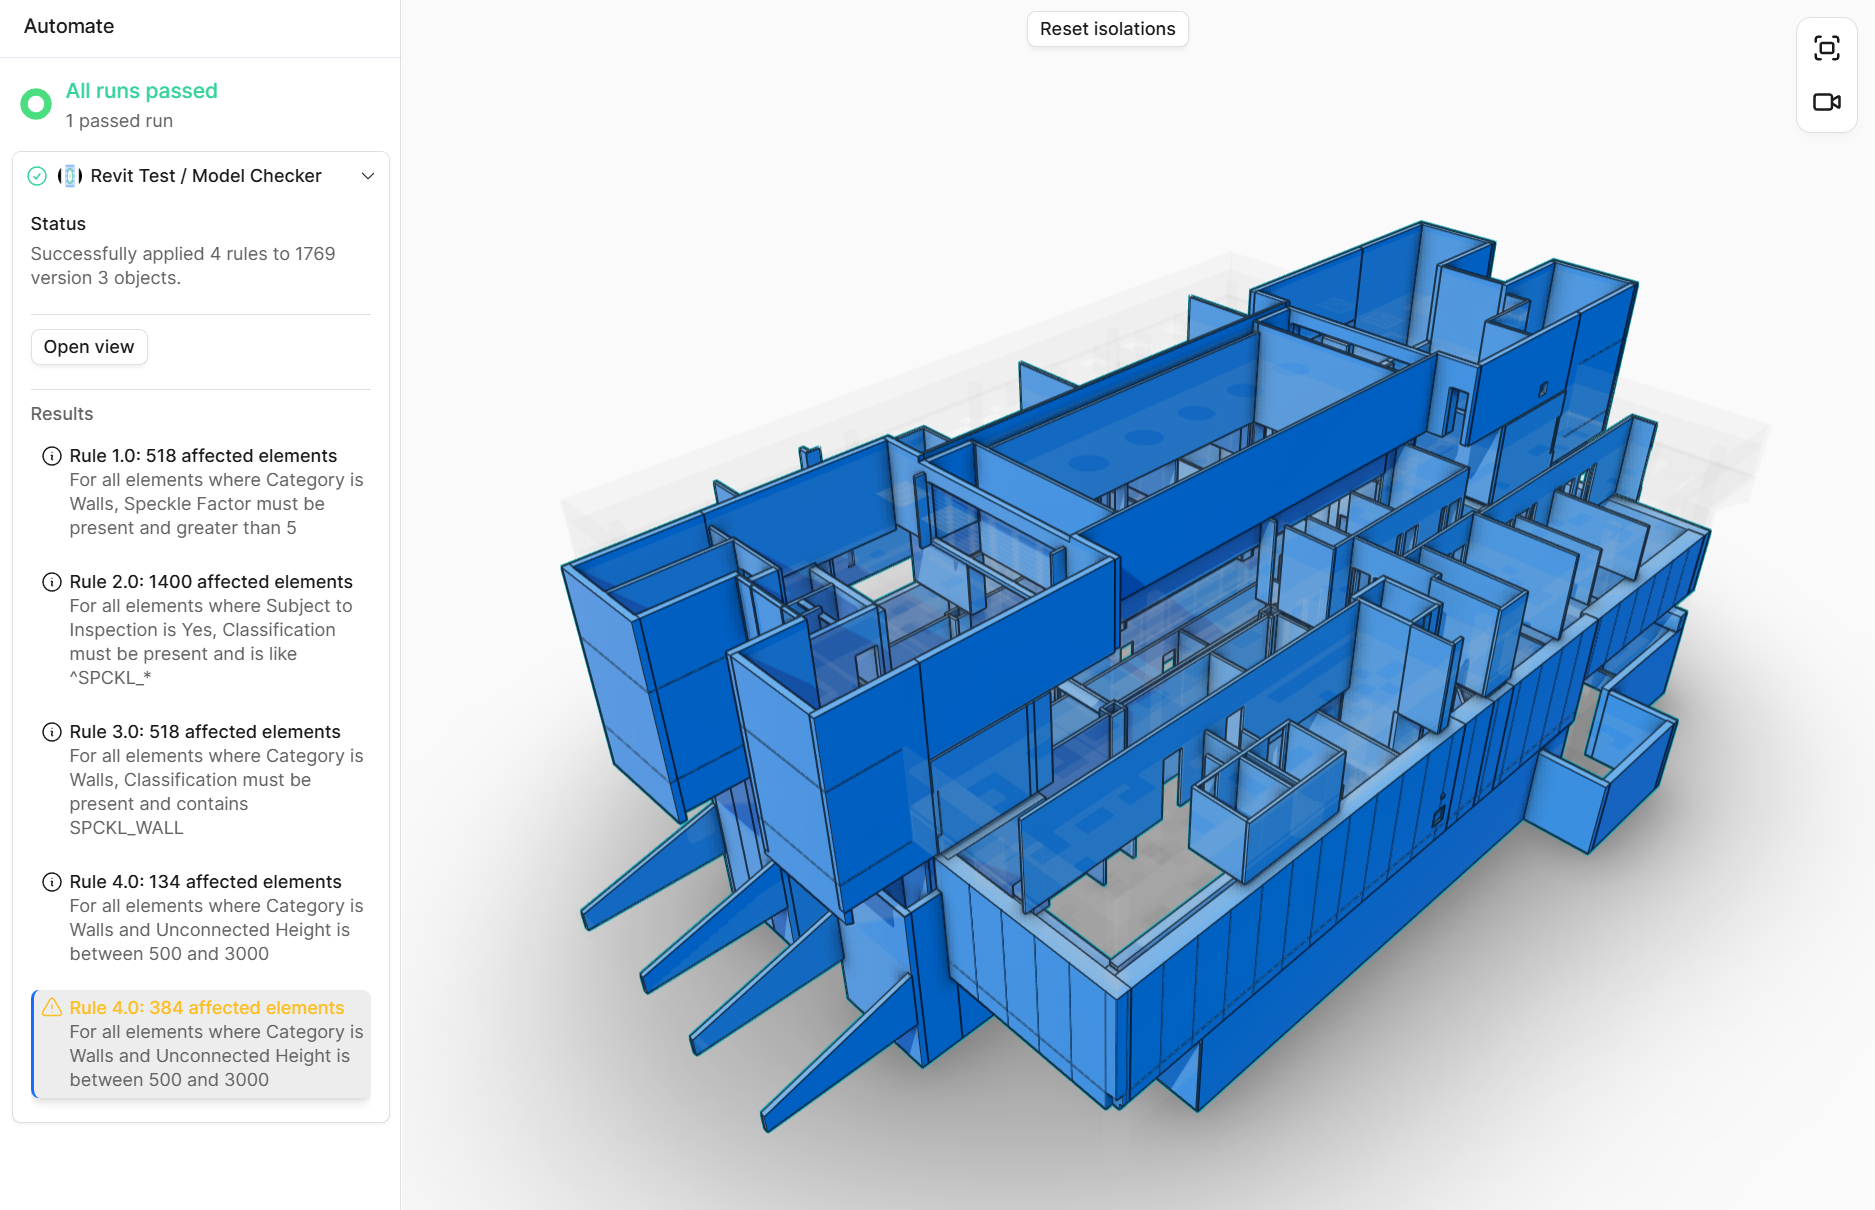 If you see many false positives or negatives, adjust the WHERE/AND/CHECK conditions, severity, or messages. Rerun the ruleset until the failures reflect meaningful issues rather than noise.
Outcome: A validated ruleset whose failures represent real quality issues, with a clear understanding of their impact and location.
## Fix Issues And Iterate On Validation
**When to use:** Once you trust the ruleset and want to improve the model.
Share the dashboard and explain which rules need attention. Point authors to the most critical
rules first and confirm which projects, models, and versions are in scope for the current
validation round.
In desktop applications such as Revit or Rhino, use the Speckle connectors to locate elements
that failed validation. Where available, use validation‑related filters and highlighting to
focus on problem areas. Fix properties, naming, and assignments directly in the authoring tool.
After making changes, publish new model versions to Speckle. Re‑run the Model Validation ruleset
or refresh the dashboard to see updated pass/fail counts. Verify that previously failing
elements now pass and that no new failures were introduced.
Continue iterating until failure counts are within acceptable limits for the current phase of
work. You may decide that some warnings are acceptable if they represent known exceptions.
Outcome: Models improve over time as validation failures are resolved and regression checks become part of the normal publishing workflow.
## Manage And Share Rulesets
**When to use:** You want to reuse rules across projects or keep a durable record of them.
Create separate rulesets for different purposes (e.g. "Fire safety", "Naming conventions",
"Level assignments") and, if needed, for different model types or disciplines. Use names that
make scope obvious.
When you need a backup or want to move rules between workspaces, export a ruleset as a TSV file.
Store these in version‑controlled repositories alongside your project documentation. See
[Standards](/analytics/data-validation/standards) for import and reuse guidance.
If multiple projects share the same standards, either reuse the same ruleset where appropriate
or import from a canonical TSV that your team maintains as the source of truth.
When you change rules, communicate what is changing and why. Prefer adding new rules or
adjusting messages and severities over deleting rules, so historical results remain
interpretable.
Outcome: Rulesets become shared assets that encode your standards and can be applied consistently across projects and time.
## Best Practices
* **Start small**: Begin with a few high‑value rules and add more as teams build confidence, rather than starting with an exhaustive but noisy ruleset.
* **Separate checks by intent**: Group rules into rulesets that share a goal, such as safety, naming, or documentation; this keeps results easier to interpret.
* **Treat rules as living standards**: Update rules as your standards evolve, but communicate changes clearly so teams understand new failures.
* **Use severity consistently**: Reserve ERROR for blocking issues, WARNING for problems that should be fixed, and INFO for helpful hints.
* **Document assumptions**: When a rule encodes an assumption (e.g. level naming or parameter usage), capture that assumption in the message text.
## FAQ
Use Property Checker when you want to explore one property quickly or test a new idea without
managing a full ruleset. Use Model Validation when the rule is stable, important, and should be
reused across versions or projects.
Yes, as long as the models share similar structure and properties. For shared standards,
maintain a central ruleset or TSV file and import it where needed. Adjust only where
project‑specific differences require it.
Future validations use the updated rule, but past results reflect the logic at the time they
were run. If you need a clear break, create a new ruleset version and reference it separately in
your dashboards.
Use labels or comments in authoring tools to mark intentional exceptions, and adjust your WHERE
conditions to exclude them where practical. For rare exceptions, you may decide to tolerate
specific failures instead of weakening the rule.
Model Validation checks one model at a time, but dashboards can aggregate results from multiple
models. Use multiple widgets or dashboards to see how rulesets perform across a project or
portfolio.
If a rule produces many failures that are not actionable or realistic to fix, revisit its scope
and severity. Consider splitting it into smaller rules or downgrading severity so teams can
focus on the most important issues.
Use dashboards to compare failure counts per rule and per version. You can also connect
dashboard or project data to external tools such as Power BI to chart trends; see [Intelligence
Dashboards](/analytics/intelligence-dashboards) for data and sharing options.
Typically, BIM managers, information managers, or discipline leads own rulesets. They coordinate
changes, review new rules, and ensure that project teams understand how validation fits into
their workflows.
## See Also
* [Data Validation Overview](/analytics/data-validation/overview)
* [Validation Widgets in Dashboards](/analytics/dashboards/validation-widgets)
* [Intelligence Dashboards](/analytics/intelligence-dashboards)
If you see many false positives or negatives, adjust the WHERE/AND/CHECK conditions, severity, or messages. Rerun the ruleset until the failures reflect meaningful issues rather than noise.
Outcome: A validated ruleset whose failures represent real quality issues, with a clear understanding of their impact and location.
## Fix Issues And Iterate On Validation
**When to use:** Once you trust the ruleset and want to improve the model.
Share the dashboard and explain which rules need attention. Point authors to the most critical
rules first and confirm which projects, models, and versions are in scope for the current
validation round.
In desktop applications such as Revit or Rhino, use the Speckle connectors to locate elements
that failed validation. Where available, use validation‑related filters and highlighting to
focus on problem areas. Fix properties, naming, and assignments directly in the authoring tool.
After making changes, publish new model versions to Speckle. Re‑run the Model Validation ruleset
or refresh the dashboard to see updated pass/fail counts. Verify that previously failing
elements now pass and that no new failures were introduced.
Continue iterating until failure counts are within acceptable limits for the current phase of
work. You may decide that some warnings are acceptable if they represent known exceptions.
Outcome: Models improve over time as validation failures are resolved and regression checks become part of the normal publishing workflow.
## Manage And Share Rulesets
**When to use:** You want to reuse rules across projects or keep a durable record of them.
Create separate rulesets for different purposes (e.g. "Fire safety", "Naming conventions",
"Level assignments") and, if needed, for different model types or disciplines. Use names that
make scope obvious.
When you need a backup or want to move rules between workspaces, export a ruleset as a TSV file.
Store these in version‑controlled repositories alongside your project documentation. See
[Standards](/analytics/data-validation/standards) for import and reuse guidance.
If multiple projects share the same standards, either reuse the same ruleset where appropriate
or import from a canonical TSV that your team maintains as the source of truth.
When you change rules, communicate what is changing and why. Prefer adding new rules or
adjusting messages and severities over deleting rules, so historical results remain
interpretable.
Outcome: Rulesets become shared assets that encode your standards and can be applied consistently across projects and time.
## Best Practices
* **Start small**: Begin with a few high‑value rules and add more as teams build confidence, rather than starting with an exhaustive but noisy ruleset.
* **Separate checks by intent**: Group rules into rulesets that share a goal, such as safety, naming, or documentation; this keeps results easier to interpret.
* **Treat rules as living standards**: Update rules as your standards evolve, but communicate changes clearly so teams understand new failures.
* **Use severity consistently**: Reserve ERROR for blocking issues, WARNING for problems that should be fixed, and INFO for helpful hints.
* **Document assumptions**: When a rule encodes an assumption (e.g. level naming or parameter usage), capture that assumption in the message text.
## FAQ
Use Property Checker when you want to explore one property quickly or test a new idea without
managing a full ruleset. Use Model Validation when the rule is stable, important, and should be
reused across versions or projects.
Yes, as long as the models share similar structure and properties. For shared standards,
maintain a central ruleset or TSV file and import it where needed. Adjust only where
project‑specific differences require it.
Future validations use the updated rule, but past results reflect the logic at the time they
were run. If you need a clear break, create a new ruleset version and reference it separately in
your dashboards.
Use labels or comments in authoring tools to mark intentional exceptions, and adjust your WHERE
conditions to exclude them where practical. For rare exceptions, you may decide to tolerate
specific failures instead of weakening the rule.
Model Validation checks one model at a time, but dashboards can aggregate results from multiple
models. Use multiple widgets or dashboards to see how rulesets perform across a project or
portfolio.
If a rule produces many failures that are not actionable or realistic to fix, revisit its scope
and severity. Consider splitting it into smaller rules or downgrading severity so teams can
focus on the most important issues.
Use dashboards to compare failure counts per rule and per version. You can also connect
dashboard or project data to external tools such as Power BI to chart trends; see [Intelligence
Dashboards](/analytics/intelligence-dashboards) for data and sharing options.
Typically, BIM managers, information managers, or discipline leads own rulesets. They coordinate
changes, review new rules, and ensure that project teams understand how validation fits into
their workflows.
## See Also
* [Data Validation Overview](/analytics/data-validation/overview)
* [Validation Widgets in Dashboards](/analytics/dashboards/validation-widgets)
* [Intelligence Dashboards](/analytics/intelligence-dashboards)