> ## Documentation Index
> Fetch the complete documentation index at: https://docs.speckle.systems/llms.txt
> Use this file to discover all available pages before exploring further.
# Enable Databricks Integration
> IT administrator setup steps to prepare Databricks and connect a SQL warehouse in Speckle.
This guide is for IT administrators who need to prepare Databricks and connect a SQL warehouse in Speckle before users can register tables and query them in AI chat and data tools.
The Databricks integration is in **Beta** and is enabled per workspace. If you don't see
Databricks under your project's **Integrations**, submit the [beta access request
form](https://share-eu1.hsforms.com/2Jy0rZrUfQpKkbvtomaxXMA2fs1ws).
If your organisation has not prepared Databricks for Speckle yet, an IT administrator (or anyone with Databricks admin access) must complete the steps below.
Speckle undertakes all Databricks actions via a **service principal** you create (OAuth machine-to-machine). The SQL grants you assign to that service principal in Databricks define exactly what Speckle can read — grant only the catalogs, schemas, and tables you want to expose.
## Prepare the service principal and grants
In your Databricks account console, go to **User management > Service principals** and add a new service principal for Speckle.
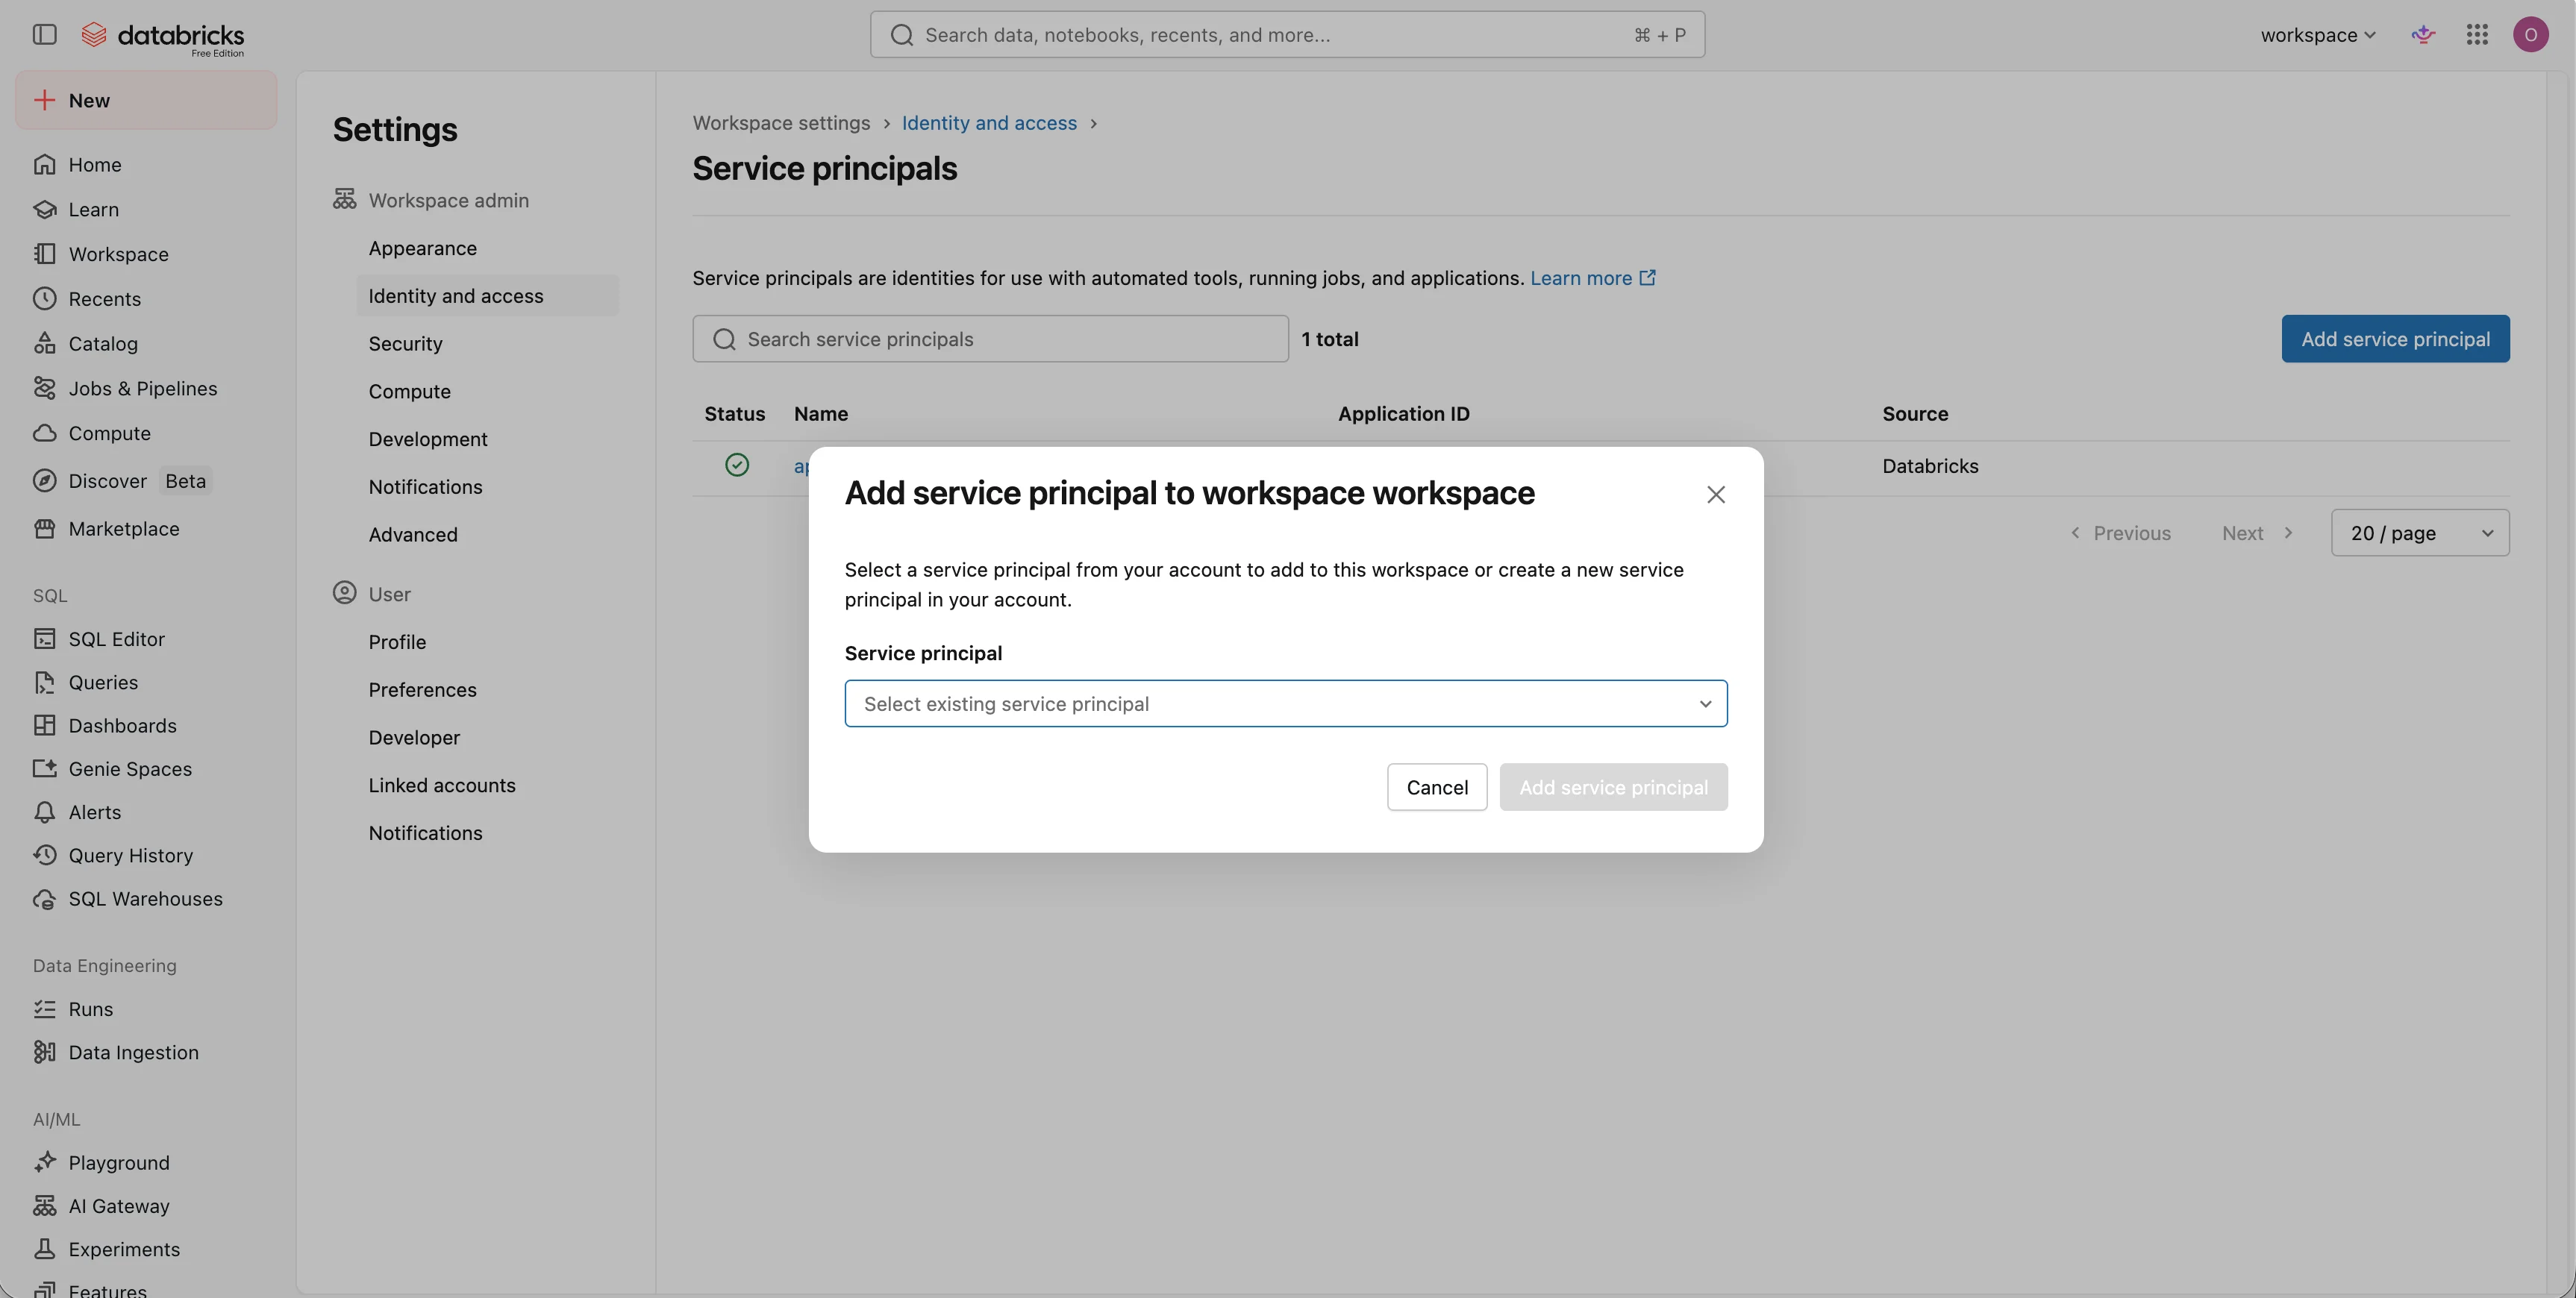 You should see the new service principal in **User management > Service principals**.
On the service principal, open **Secrets** and generate a new **OAuth secret**.
You should see the new service principal in **User management > Service principals**.
On the service principal, open **Secrets** and generate a new **OAuth secret**.
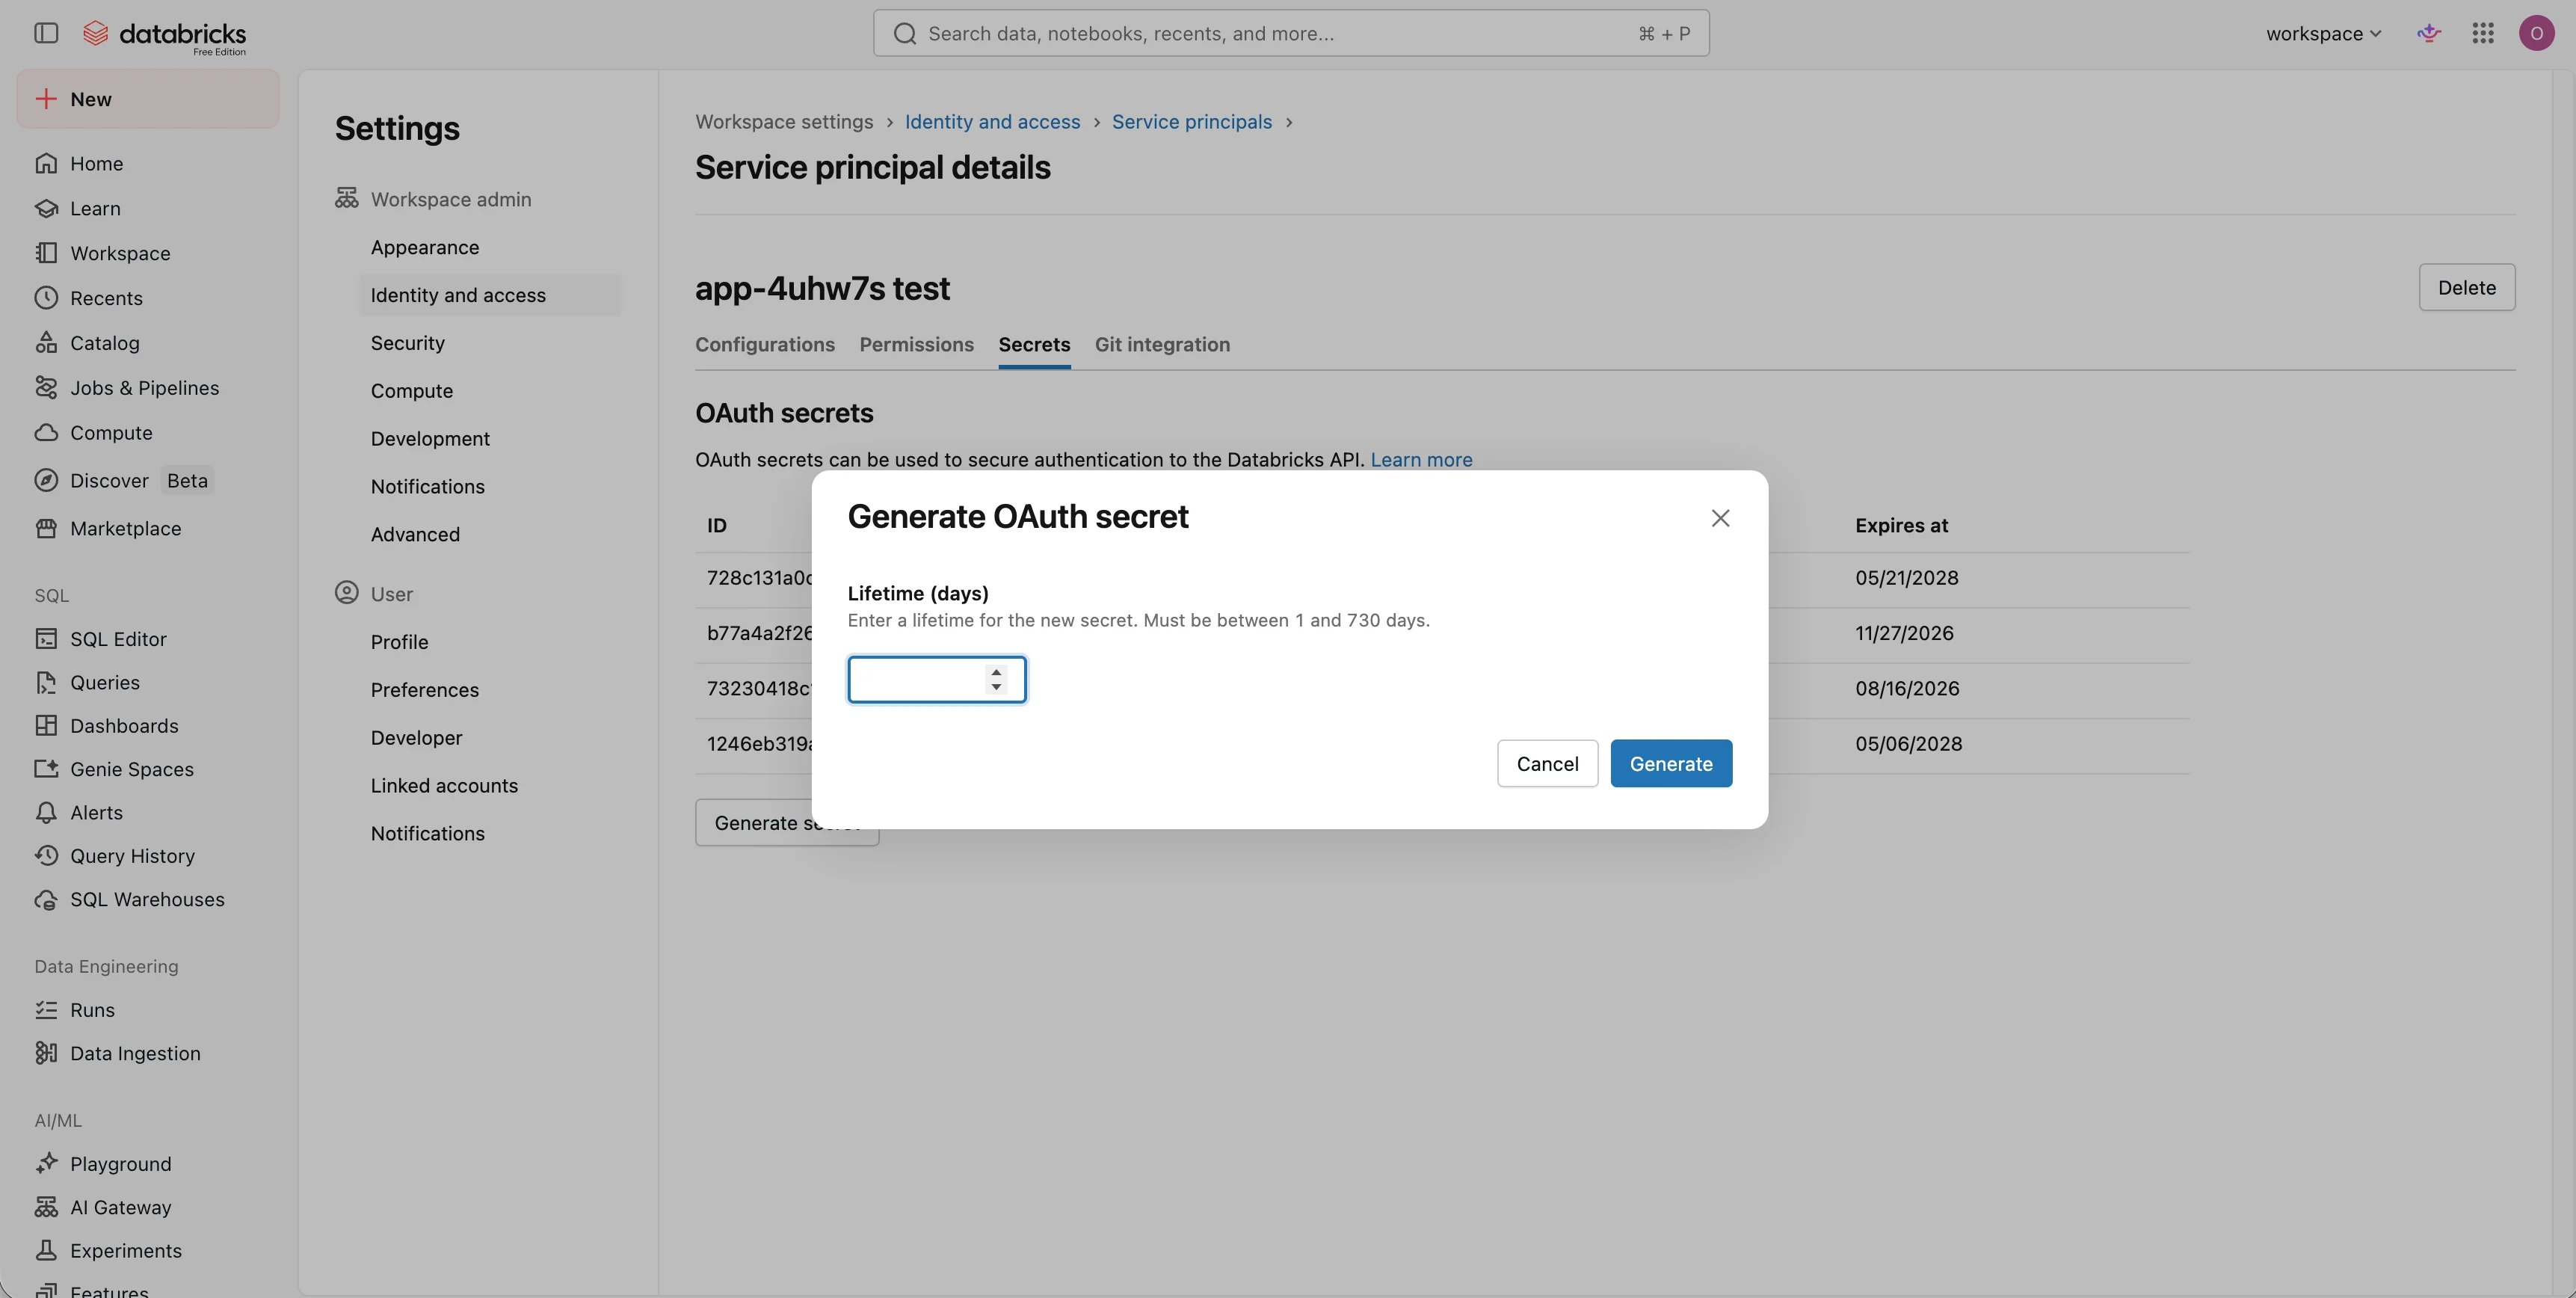 A new OAuth secret is listed and ready to copy.
Copy the **Client ID** (the service principal's Application ID) and the **Client secret**. The secret is shown only once at creation — copy it now and store it securely.
A new OAuth secret is listed and ready to copy.
Copy the **Client ID** (the service principal's Application ID) and the **Client secret**. The secret is shown only once at creation — copy it now and store it securely.
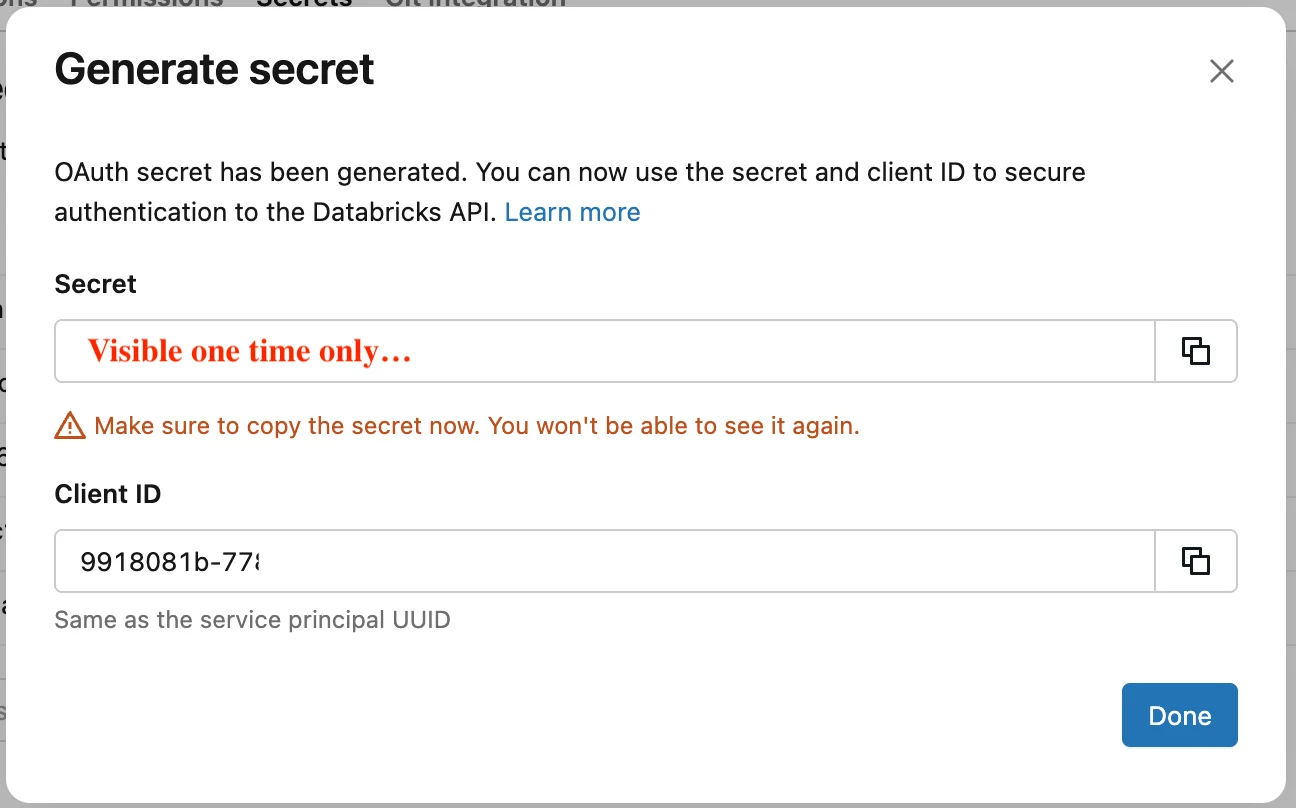 You now have the Client ID and secret ready to paste into Speckle.
Open **SQL Warehouses > your warehouse > Connection details** and note the **Server hostname** (your *Workspace host*) and the **HTTP path**.
You now have the Client ID and secret ready to paste into Speckle.
Open **SQL Warehouses > your warehouse > Connection details** and note the **Server hostname** (your *Workspace host*) and the **HTTP path**.
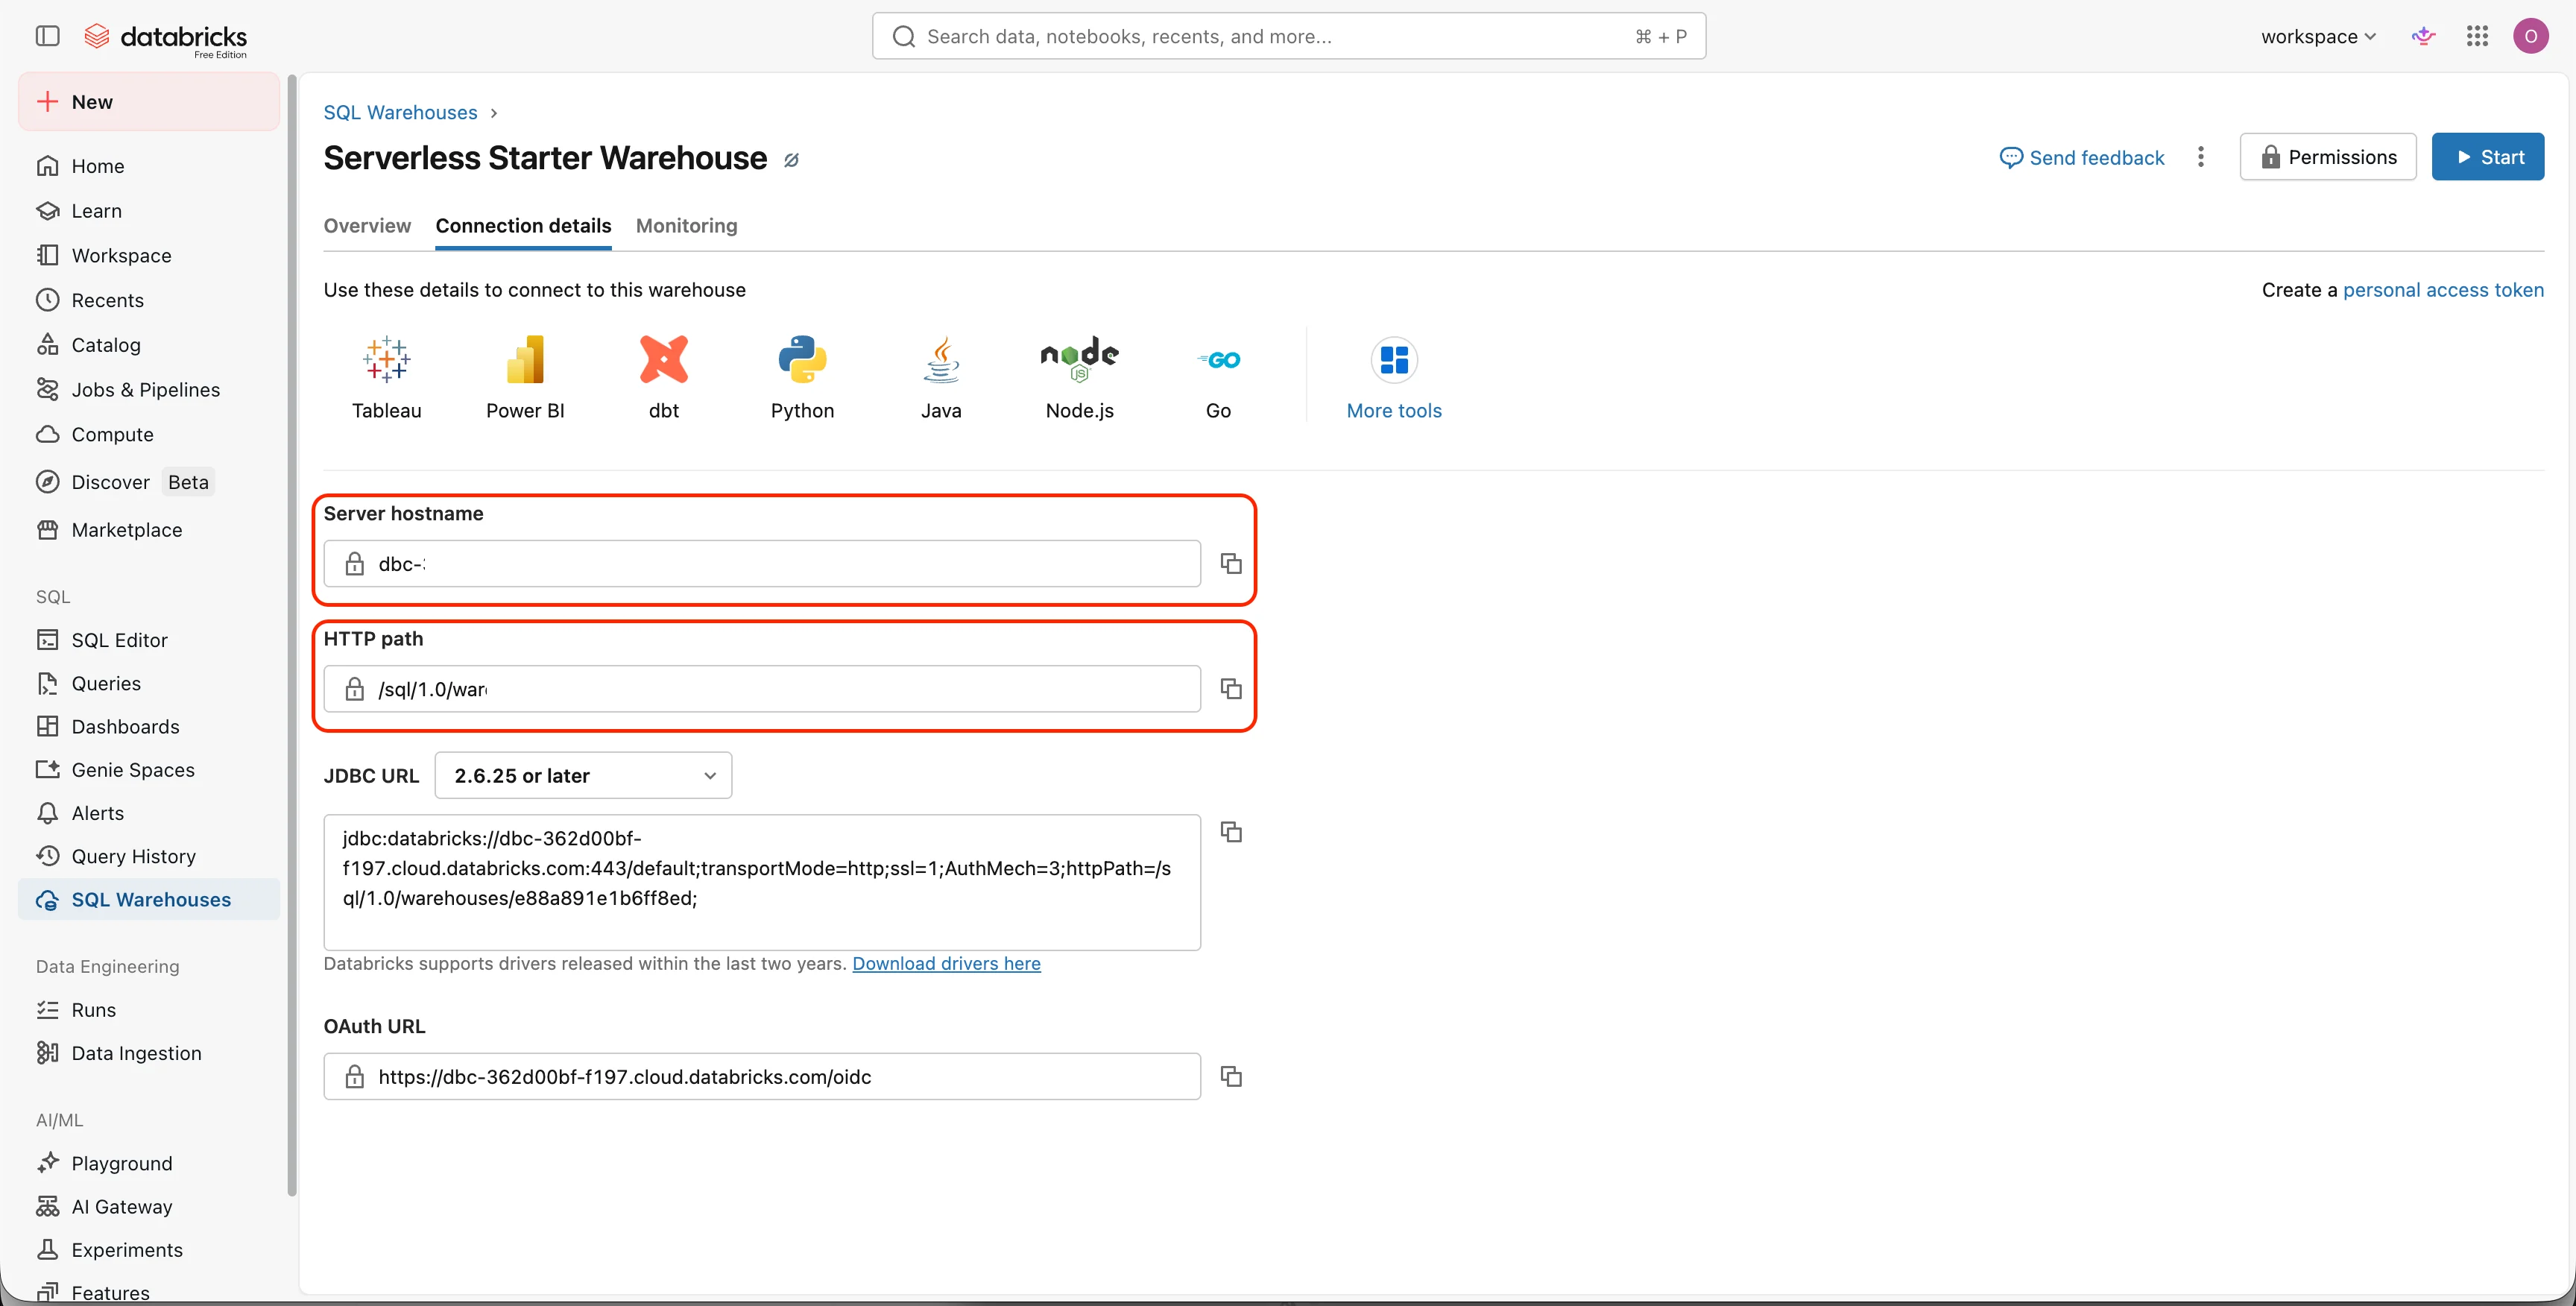 You now have the server hostname and HTTP path needed to connect.
Grant the service principal `USE CATALOG`, `USE SCHEMA`, and `SELECT` on the specific catalogs, schemas, and tables users need — plus access to the SQL warehouse. `SELECT` on a table requires `USE CATALOG` on its catalog and `USE SCHEMA` on its schema, so grant all three. To expose every table in a schema at once, grant `SELECT` on the schema instead of listing each table.
Run the grants in a Databricks SQL editor or notebook. The grantee is the service principal's **Client ID** (its Application ID, from the earlier step):
```sql title="Grant read access to the Speckle service principal" theme={null}
-- Replace the catalog/schema/table names and the Client ID with your own.
GRANT USE CATALOG ON CATALOG `speckle` TO `9918081b-778e-469a-a69b-acc950b08e09`;
GRANT USE SCHEMA ON SCHEMA `speckle`.`cost` TO `9918081b-778e-469a-a69b-acc950b08e09`;
GRANT SELECT ON TABLE `speckle`.`cost`.`diamonds` TO `9918081b-778e-469a-a69b-acc950b08e09`;
GRANT SELECT ON TABLE `speckle`.`cost`.`walls` TO `9918081b-778e-469a-a69b-acc950b08e09`;
```
The service principal can now read only the catalogs, schemas, and tables you granted.
## Connect the warehouse in Speckle
In Speckle, open your project's **Integrations > Databricks** and select **Connect to Databricks**.
The connection form opens.
Fill in:
* **Workspace host** — e.g. `dbc-xxxxxxxx.cloud.databricks.com` (hostname only, no `https://`).
* **SQL warehouse HTTP path** — e.g. `/sql/1.0/warehouses/abcd1234efgh5678`.
* **Authentication method** — **OAuth (service principal)** with your **Client ID** and **Client secret**, or **Personal access token** with your token.
You now have the server hostname and HTTP path needed to connect.
Grant the service principal `USE CATALOG`, `USE SCHEMA`, and `SELECT` on the specific catalogs, schemas, and tables users need — plus access to the SQL warehouse. `SELECT` on a table requires `USE CATALOG` on its catalog and `USE SCHEMA` on its schema, so grant all three. To expose every table in a schema at once, grant `SELECT` on the schema instead of listing each table.
Run the grants in a Databricks SQL editor or notebook. The grantee is the service principal's **Client ID** (its Application ID, from the earlier step):
```sql title="Grant read access to the Speckle service principal" theme={null}
-- Replace the catalog/schema/table names and the Client ID with your own.
GRANT USE CATALOG ON CATALOG `speckle` TO `9918081b-778e-469a-a69b-acc950b08e09`;
GRANT USE SCHEMA ON SCHEMA `speckle`.`cost` TO `9918081b-778e-469a-a69b-acc950b08e09`;
GRANT SELECT ON TABLE `speckle`.`cost`.`diamonds` TO `9918081b-778e-469a-a69b-acc950b08e09`;
GRANT SELECT ON TABLE `speckle`.`cost`.`walls` TO `9918081b-778e-469a-a69b-acc950b08e09`;
```
The service principal can now read only the catalogs, schemas, and tables you granted.
## Connect the warehouse in Speckle
In Speckle, open your project's **Integrations > Databricks** and select **Connect to Databricks**.
The connection form opens.
Fill in:
* **Workspace host** — e.g. `dbc-xxxxxxxx.cloud.databricks.com` (hostname only, no `https://`).
* **SQL warehouse HTTP path** — e.g. `/sql/1.0/warehouses/abcd1234efgh5678`.
* **Authentication method** — **OAuth (service principal)** with your **Client ID** and **Client secret**, or **Personal access token** with your token.
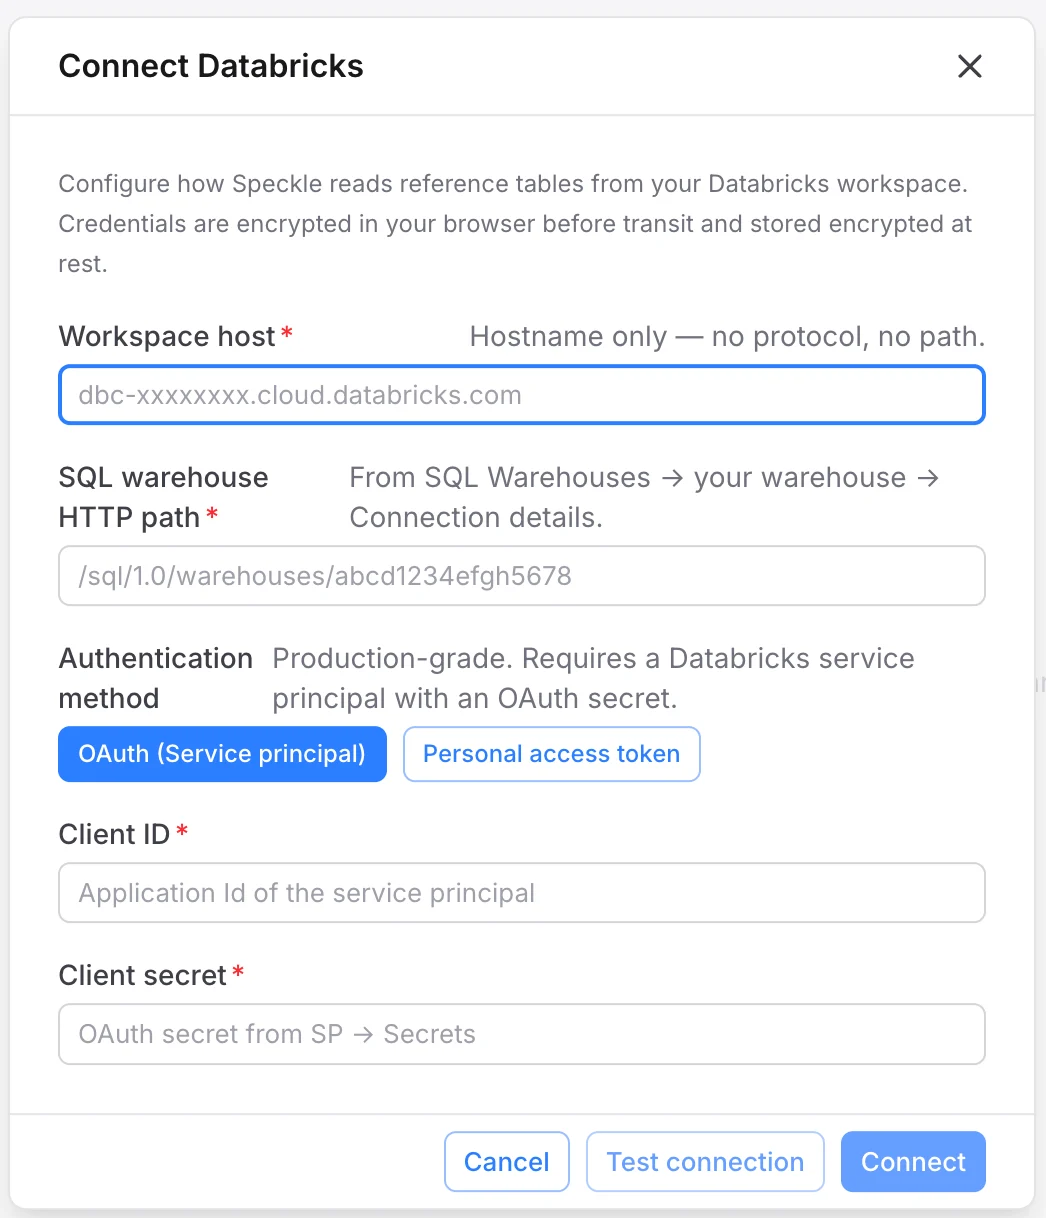 Your warehouse connection details are ready to test.
Select **Test connection**. Speckle runs a `SELECT 1` round-trip against your warehouse. Auto-stopped or Free-Edition warehouses can take a minute to wake on the first query — if the test times out on a cold warehouse, try again once it's running.
You should see a success message with the response time, or an error explaining what failed.
Select **Connect** (or **Save changes**). The connection is now stored for your workspace and you can browse it.
**Speckle is read-only in Databricks.** It only runs `SELECT` queries against tables users register and never writes, alters, or deletes data in your warehouse.
**Databricks SQL grants define the boundary.** Speckle can only read catalogs, schemas, and tables you explicitly granted to the service principal — nothing more.
**Connection secrets are protected in Speckle.** They are encrypted in your browser before they are sent, stored encrypted at rest, and never shown again after you save the connection.
After this is enabled, users can continue with [Databricks user setup](/connectors/cloud-integrations/databricks).
Your warehouse connection details are ready to test.
Select **Test connection**. Speckle runs a `SELECT 1` round-trip against your warehouse. Auto-stopped or Free-Edition warehouses can take a minute to wake on the first query — if the test times out on a cold warehouse, try again once it's running.
You should see a success message with the response time, or an error explaining what failed.
Select **Connect** (or **Save changes**). The connection is now stored for your workspace and you can browse it.
**Speckle is read-only in Databricks.** It only runs `SELECT` queries against tables users register and never writes, alters, or deletes data in your warehouse.
**Databricks SQL grants define the boundary.** Speckle can only read catalogs, schemas, and tables you explicitly granted to the service principal — nothing more.
**Connection secrets are protected in Speckle.** They are encrypted in your browser before they are sent, stored encrypted at rest, and never shown again after you save the connection.
After this is enabled, users can continue with [Databricks user setup](/connectors/cloud-integrations/databricks).