> ## Documentation Index
> Fetch the complete documentation index at: https://docs.speckle.systems/llms.txt
> Use this file to discover all available pages before exploring further.
# Enable Snowflake Integration
> IT administrator setup steps to prepare Snowflake and connect a warehouse in Speckle.
This guide is for IT administrators who need to prepare Snowflake and connect a warehouse in Speckle before users can register tables and query them in AI chat and data tools.
The Snowflake integration is in **Beta** and is enabled per workspace. If you don't see Snowflake
under your project's **Integrations**, submit the [beta access request
form](https://share-eu1.hsforms.com/2Jy0rZrUfQpKkbvtomaxXMA2fs1ws).
If your organisation has not prepared Snowflake for Speckle yet, an IT administrator (or anyone with Snowflake admin access) must complete the steps below.
Speckle undertakes all Snowflake actions via a dedicated **service user** you create (`TYPE = SERVICE`). The Snowflake grants you assign to that user define exactly what Speckle can read — grant only the databases, schemas, tables, and views you want to expose.
## Prepare the service user and grants
On your local machine, generate a PKCS8 RSA private key and matching public key:
```bash title="Generate Snowflake key-pair credentials" theme={null}
openssl genrsa 2048 | openssl pkcs8 -topk8 -inform PEM -nocrypt -out rsa_key.p8
openssl rsa -in rsa_key.p8 -pubout -out rsa_key.pub
```
The private key (`rsa_key.p8`) goes into Speckle. Keep it secret. The public key (`rsa_key.pub`) goes into Snowflake.
Verify that the private key is in the expected PKCS8 format:
```bash theme={null}
head -1 rsa_key.p8
# Expected: -----BEGIN PRIVATE KEY-----
```
Then copy the public key as a single line for the Snowflake SQL in the next step:
```bash theme={null}
cat rsa_key.pub | grep -v '^-----' | tr -d '\n'
```
In Snowsight, open a worksheet and run the script below. Replace the warehouse, database, and public key values with your own. The example grants read access to all current and future tables and views in one database; narrow these grants if you only want to expose specific schemas, tables, or views.
```sql title="Create a Snowflake service user for Speckle" theme={null}
-- 1. Service user and read-only role.
USE ROLE SECURITYADMIN;
CREATE ROLE IF NOT EXISTS SPECKLE_READER;
CREATE USER IF NOT EXISTS SPECKLE_SVC
TYPE = SERVICE
DEFAULT_ROLE = SPECKLE_READER
DEFAULT_WAREHOUSE = COMPUTE_WH;
GRANT ROLE SPECKLE_READER TO USER SPECKLE_SVC;
-- 2. Install the public key from the previous step.
-- Replace with the single-line public key.
ALTER USER SPECKLE_SVC SET RSA_PUBLIC_KEY = '';
-- 3. Warehouse access. Reuse COMPUTE_WH or substitute your own warehouse.
USE ROLE ACCOUNTADMIN;
GRANT USAGE, OPERATE ON WAREHOUSE COMPUTE_WH TO ROLE SPECKLE_READER;
-- 4. Data access. Replace SPECKLE with the database you want Speckle to browse.
GRANT USAGE ON DATABASE SPECKLE TO ROLE SPECKLE_READER;
GRANT USAGE ON ALL SCHEMAS IN DATABASE SPECKLE TO ROLE SPECKLE_READER;
GRANT USAGE ON FUTURE SCHEMAS IN DATABASE SPECKLE TO ROLE SPECKLE_READER;
GRANT SELECT ON ALL TABLES IN DATABASE SPECKLE TO ROLE SPECKLE_READER;
GRANT SELECT ON FUTURE TABLES IN DATABASE SPECKLE TO ROLE SPECKLE_READER;
GRANT SELECT ON ALL VIEWS IN DATABASE SPECKLE TO ROLE SPECKLE_READER;
GRANT SELECT ON FUTURE VIEWS IN DATABASE SPECKLE TO ROLE SPECKLE_READER;
```
The service user can now read only the databases, schemas, tables, and views you granted.
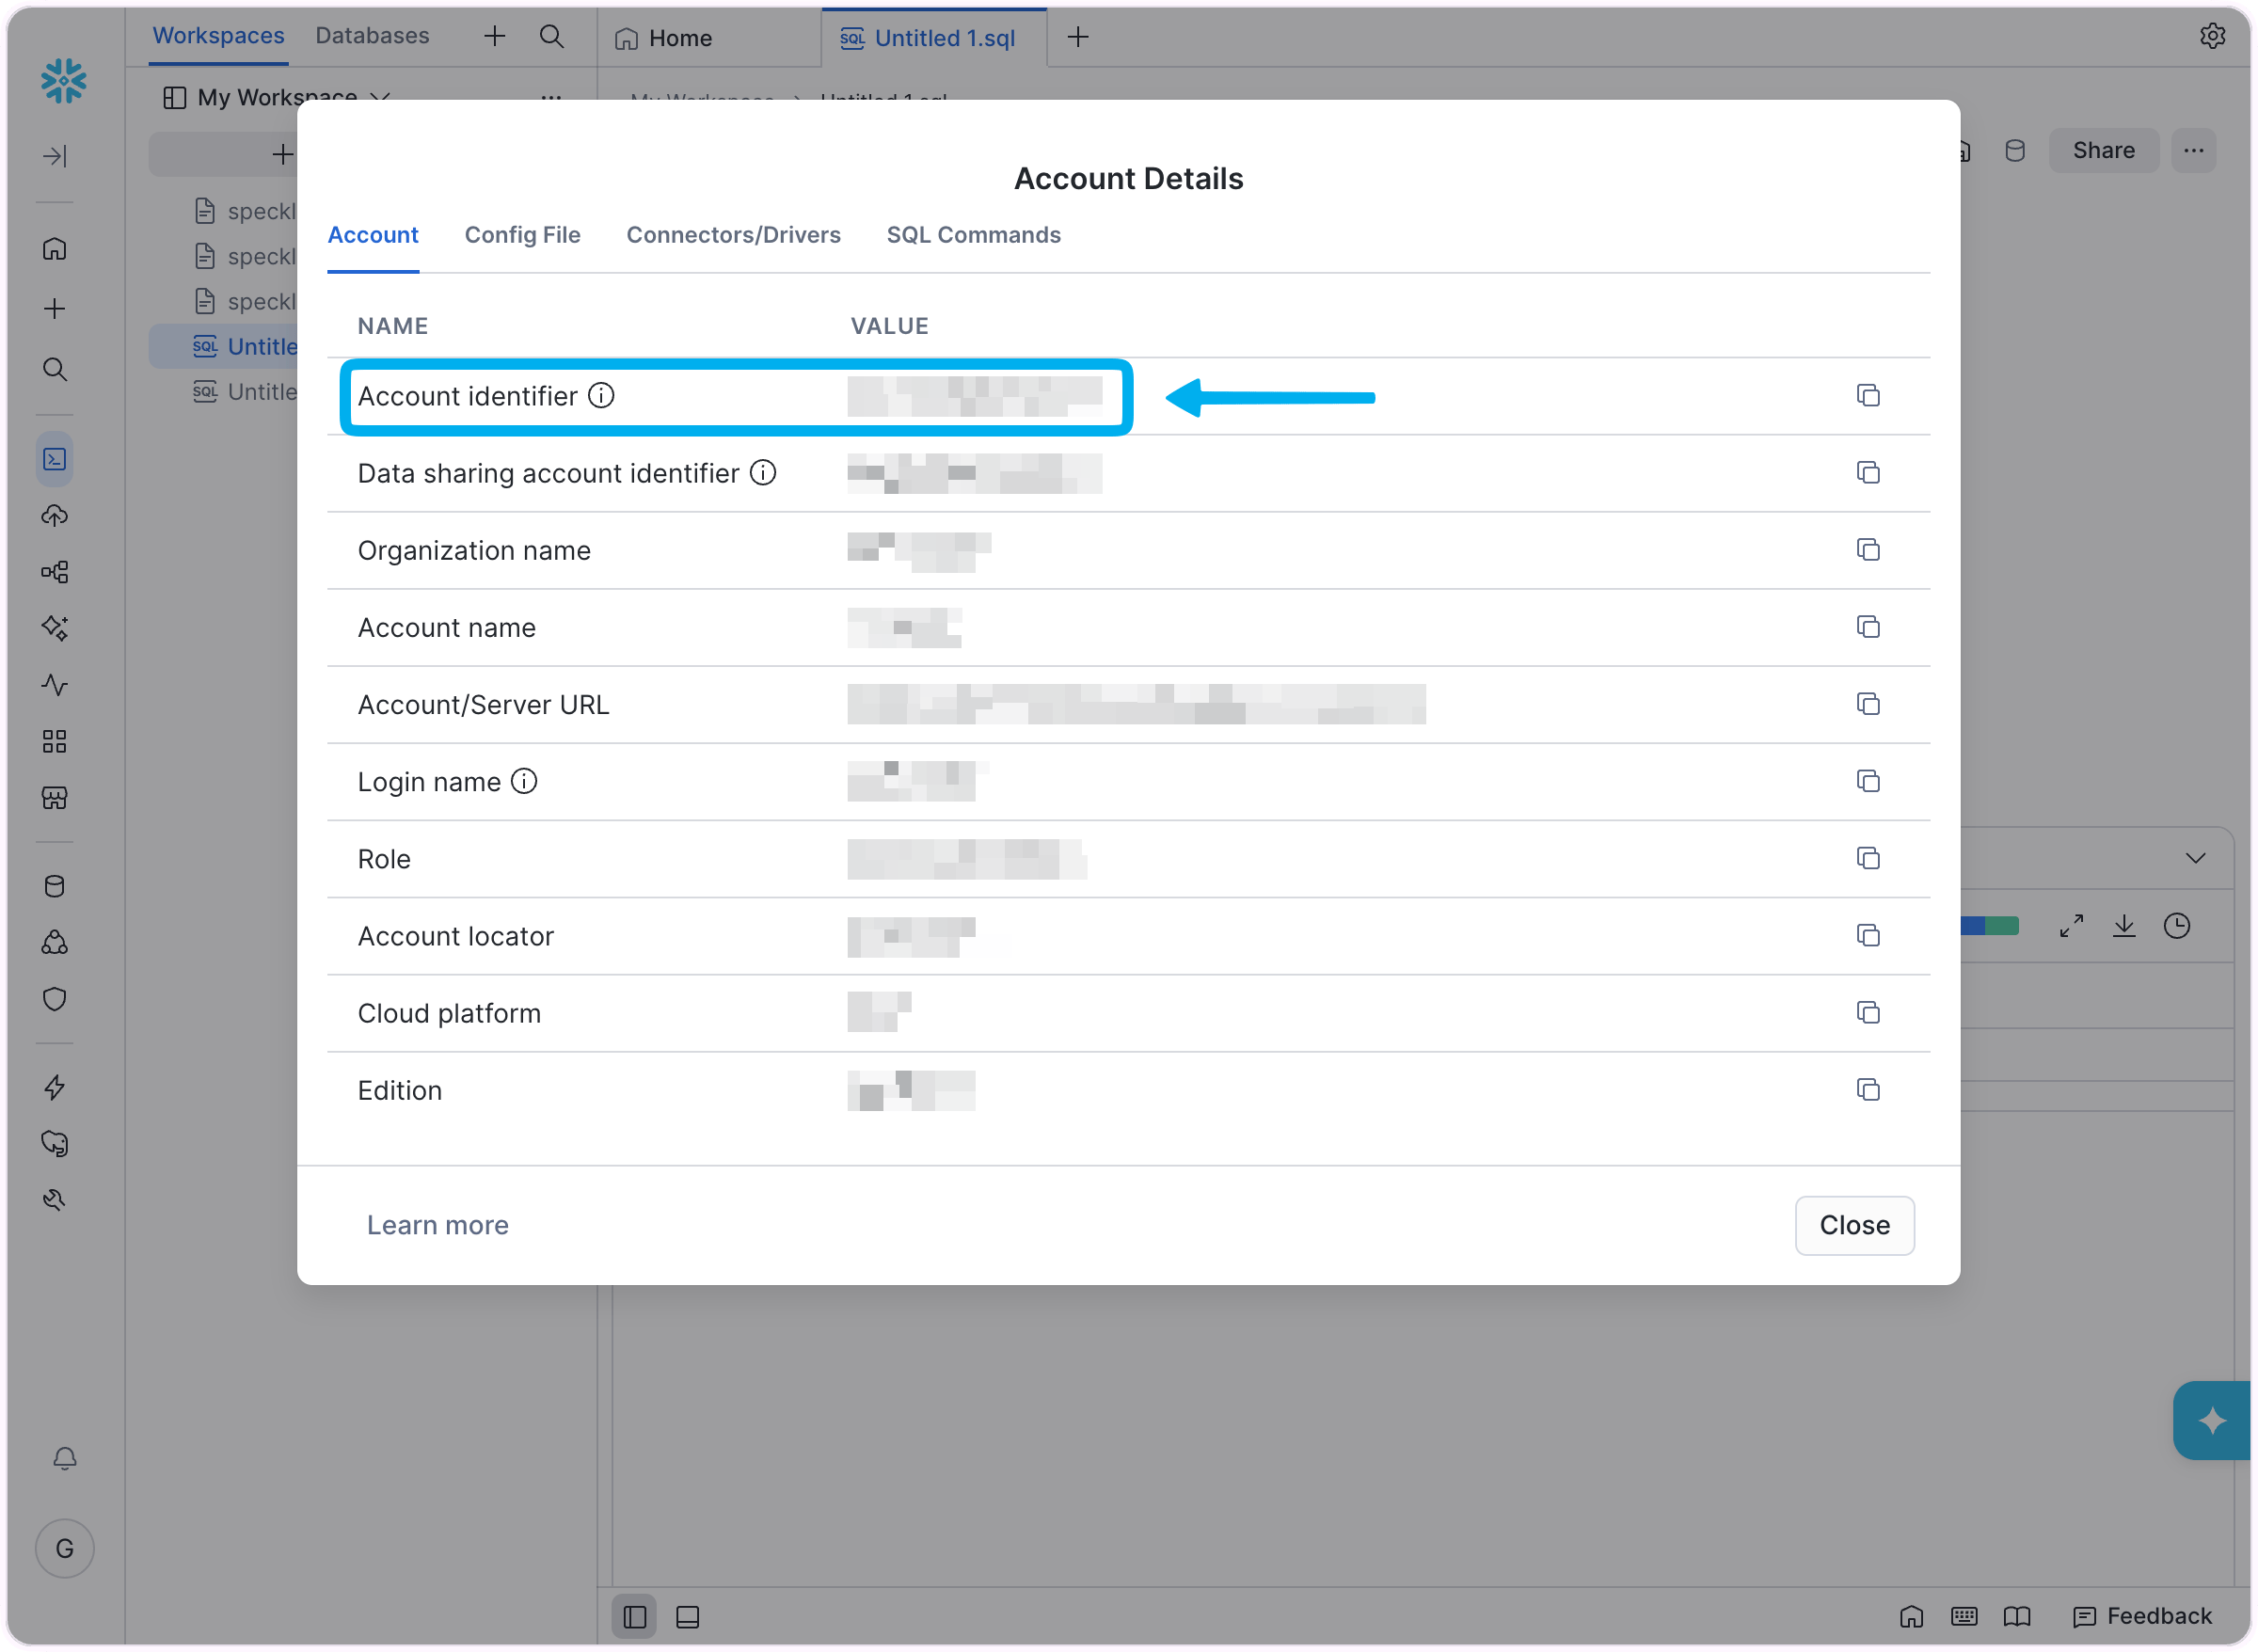
Account admins can find the account identifier in Snowsight from **Profile > Account > View account details**.
You can also run this in any Snowsight worksheet:
```sql title="Get the Snowflake account identifier" theme={null}
SELECT CURRENT_ORGANIZATION_NAME() || '-' || CURRENT_ACCOUNT_NAME() AS account_identifier;
```
Copy the value exactly. Speckle uses Snowflake's modern `orgname-account_name` account identifier, so you do not need a separate region field.
 **Using Snowflake CoCo.** If Snowflake's AI assistant is available in your
account, you can ask it to generate the RSA key pair, create the service user,
role, grants, and return the connection details you need for Speckle.
```text theme={null}
Configure read-only Snowflake access for Speckle.
Use these values:
- Service user: SPECKLE_SVC
- Read-only role: SPECKLE_READER
- Warehouse: COMPUTE_WH
- Database to expose: SPECKLE
Please do the following:
1. Generate a Snowflake key-pair credential for SPECKLE_SVC. The private key must be PKCS8 PEM format and the public key must be suitable for ALTER USER ... SET RSA_PUBLIC_KEY.
2. Create the SPECKLE_READER role if it does not exist.
3. Create the SPECKLE_SVC user as TYPE = SERVICE with SPECKLE_READER as the default role and COMPUTE_WH as the default warehouse.
4. Assign SPECKLE_READER to SPECKLE_SVC.
5. Set the generated RSA public key on SPECKLE_SVC.
6. Grant SPECKLE_READER access to use COMPUTE_WH.
7. Grant SPECKLE_READER read-only access to the SPECKLE database, including current and future schemas, tables, and views.
8. Verify the user, role, public key, warehouse grant, and data grants.
When you are done, output the exact values I should enter in Speckle:
- Account identifier
- Service user
- Default warehouse
- Role
- Database
- Schema, if you recommend setting one
- Private key PEM, including the BEGIN and END markers
- Key passphrase, if the private key is encrypted
```
Paste that prompt into CoCo, then copy the returned values into Speckle.
## Connect the warehouse in Speckle
In Speckle, open your project's **Integrations > Snowflake** and select **Connect to Snowflake**.
Fill in:
* **Account identifier** — e.g. `myorg-account_name`.
* **Service user** — e.g. `SPECKLE_SVC`.
* **Default warehouse** — e.g. `COMPUTE_WH` or the warehouse you granted to the service user.
* **Session defaults** — optional **Role**, **Database**, and **Schema** values. Setting the role to your read-only role, such as `SPECKLE_READER`, is recommended.
* **Private key (PEM)** — the full contents of `rsa_key.p8`, including the `BEGIN` and `END` markers.
* **Key passphrase** — leave blank unless you generated an encrypted private key.
**Using Snowflake CoCo.** If Snowflake's AI assistant is available in your
account, you can ask it to generate the RSA key pair, create the service user,
role, grants, and return the connection details you need for Speckle.
```text theme={null}
Configure read-only Snowflake access for Speckle.
Use these values:
- Service user: SPECKLE_SVC
- Read-only role: SPECKLE_READER
- Warehouse: COMPUTE_WH
- Database to expose: SPECKLE
Please do the following:
1. Generate a Snowflake key-pair credential for SPECKLE_SVC. The private key must be PKCS8 PEM format and the public key must be suitable for ALTER USER ... SET RSA_PUBLIC_KEY.
2. Create the SPECKLE_READER role if it does not exist.
3. Create the SPECKLE_SVC user as TYPE = SERVICE with SPECKLE_READER as the default role and COMPUTE_WH as the default warehouse.
4. Assign SPECKLE_READER to SPECKLE_SVC.
5. Set the generated RSA public key on SPECKLE_SVC.
6. Grant SPECKLE_READER access to use COMPUTE_WH.
7. Grant SPECKLE_READER read-only access to the SPECKLE database, including current and future schemas, tables, and views.
8. Verify the user, role, public key, warehouse grant, and data grants.
When you are done, output the exact values I should enter in Speckle:
- Account identifier
- Service user
- Default warehouse
- Role
- Database
- Schema, if you recommend setting one
- Private key PEM, including the BEGIN and END markers
- Key passphrase, if the private key is encrypted
```
Paste that prompt into CoCo, then copy the returned values into Speckle.
## Connect the warehouse in Speckle
In Speckle, open your project's **Integrations > Snowflake** and select **Connect to Snowflake**.
Fill in:
* **Account identifier** — e.g. `myorg-account_name`.
* **Service user** — e.g. `SPECKLE_SVC`.
* **Default warehouse** — e.g. `COMPUTE_WH` or the warehouse you granted to the service user.
* **Session defaults** — optional **Role**, **Database**, and **Schema** values. Setting the role to your read-only role, such as `SPECKLE_READER`, is recommended.
* **Private key (PEM)** — the full contents of `rsa_key.p8`, including the `BEGIN` and `END` markers.
* **Key passphrase** — leave blank unless you generated an encrypted private key.
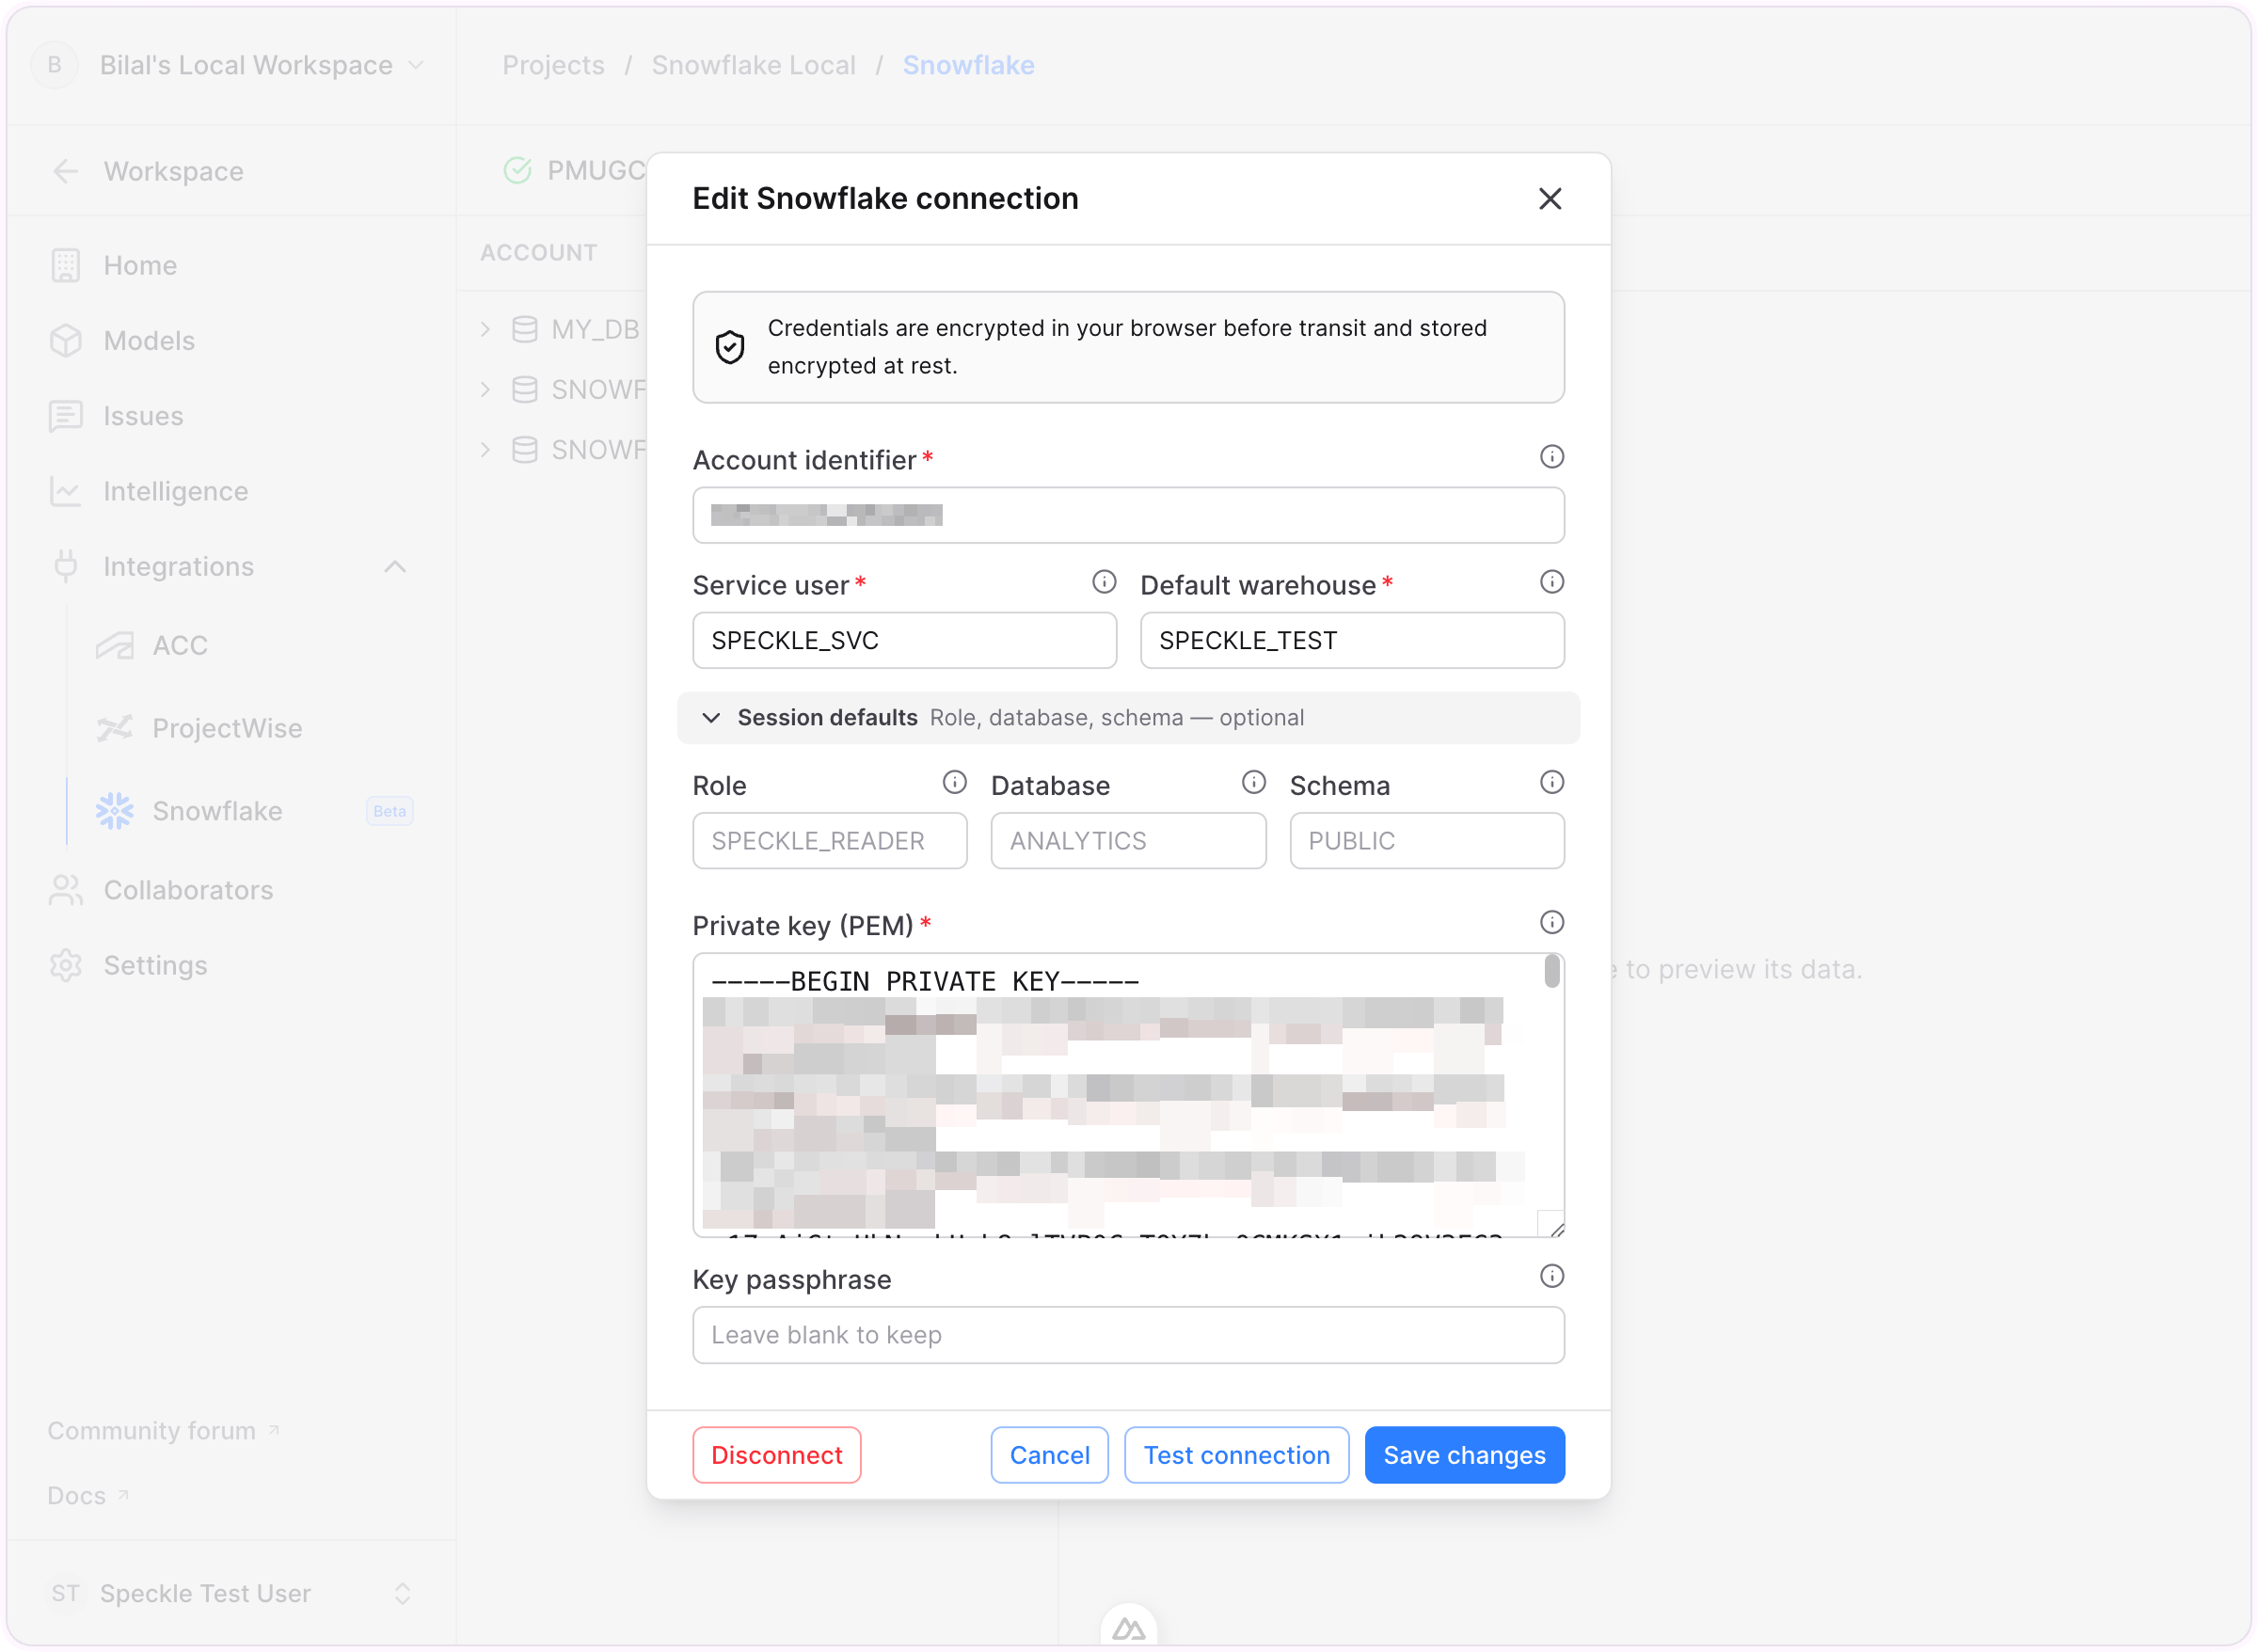 Your warehouse connection details are ready to test.
Select **Test connection**. Speckle runs a `SELECT 1` round-trip against your warehouse. Auto-suspended warehouses can take a few seconds to resume on the first query — if the test times out on a cold warehouse, try again once it's running.
You should see a success message with the response time, or an error explaining what failed.
Select **Connect**. The connection is now stored for your workspace and you can browse it.
## FAQ
No. Speckle is read-only in Snowflake. It only runs `SELECT`, `SHOW`, and `DESCRIBE` queries
against objects users browse or register and never writes, alters, or deletes data in your
warehouse.
Snowflake grants define the boundary. Speckle can only read databases, schemas, tables, and
views you explicitly granted to the service user — nothing more.
Connection secrets are encrypted in your browser before they are sent, stored encrypted at rest,
and never shown again after you save the connection.
After this is enabled, users can continue with [Snowflake user setup](/connectors/cloud-integrations/snowflake).
Your warehouse connection details are ready to test.
Select **Test connection**. Speckle runs a `SELECT 1` round-trip against your warehouse. Auto-suspended warehouses can take a few seconds to resume on the first query — if the test times out on a cold warehouse, try again once it's running.
You should see a success message with the response time, or an error explaining what failed.
Select **Connect**. The connection is now stored for your workspace and you can browse it.
## FAQ
No. Speckle is read-only in Snowflake. It only runs `SELECT`, `SHOW`, and `DESCRIBE` queries
against objects users browse or register and never writes, alters, or deletes data in your
warehouse.
Snowflake grants define the boundary. Speckle can only read databases, schemas, tables, and
views you explicitly granted to the service user — nothing more.
Connection secrets are encrypted in your browser before they are sent, stored encrypted at rest,
and never shown again after you save the connection.
After this is enabled, users can continue with [Snowflake user setup](/connectors/cloud-integrations/snowflake).