

Layout
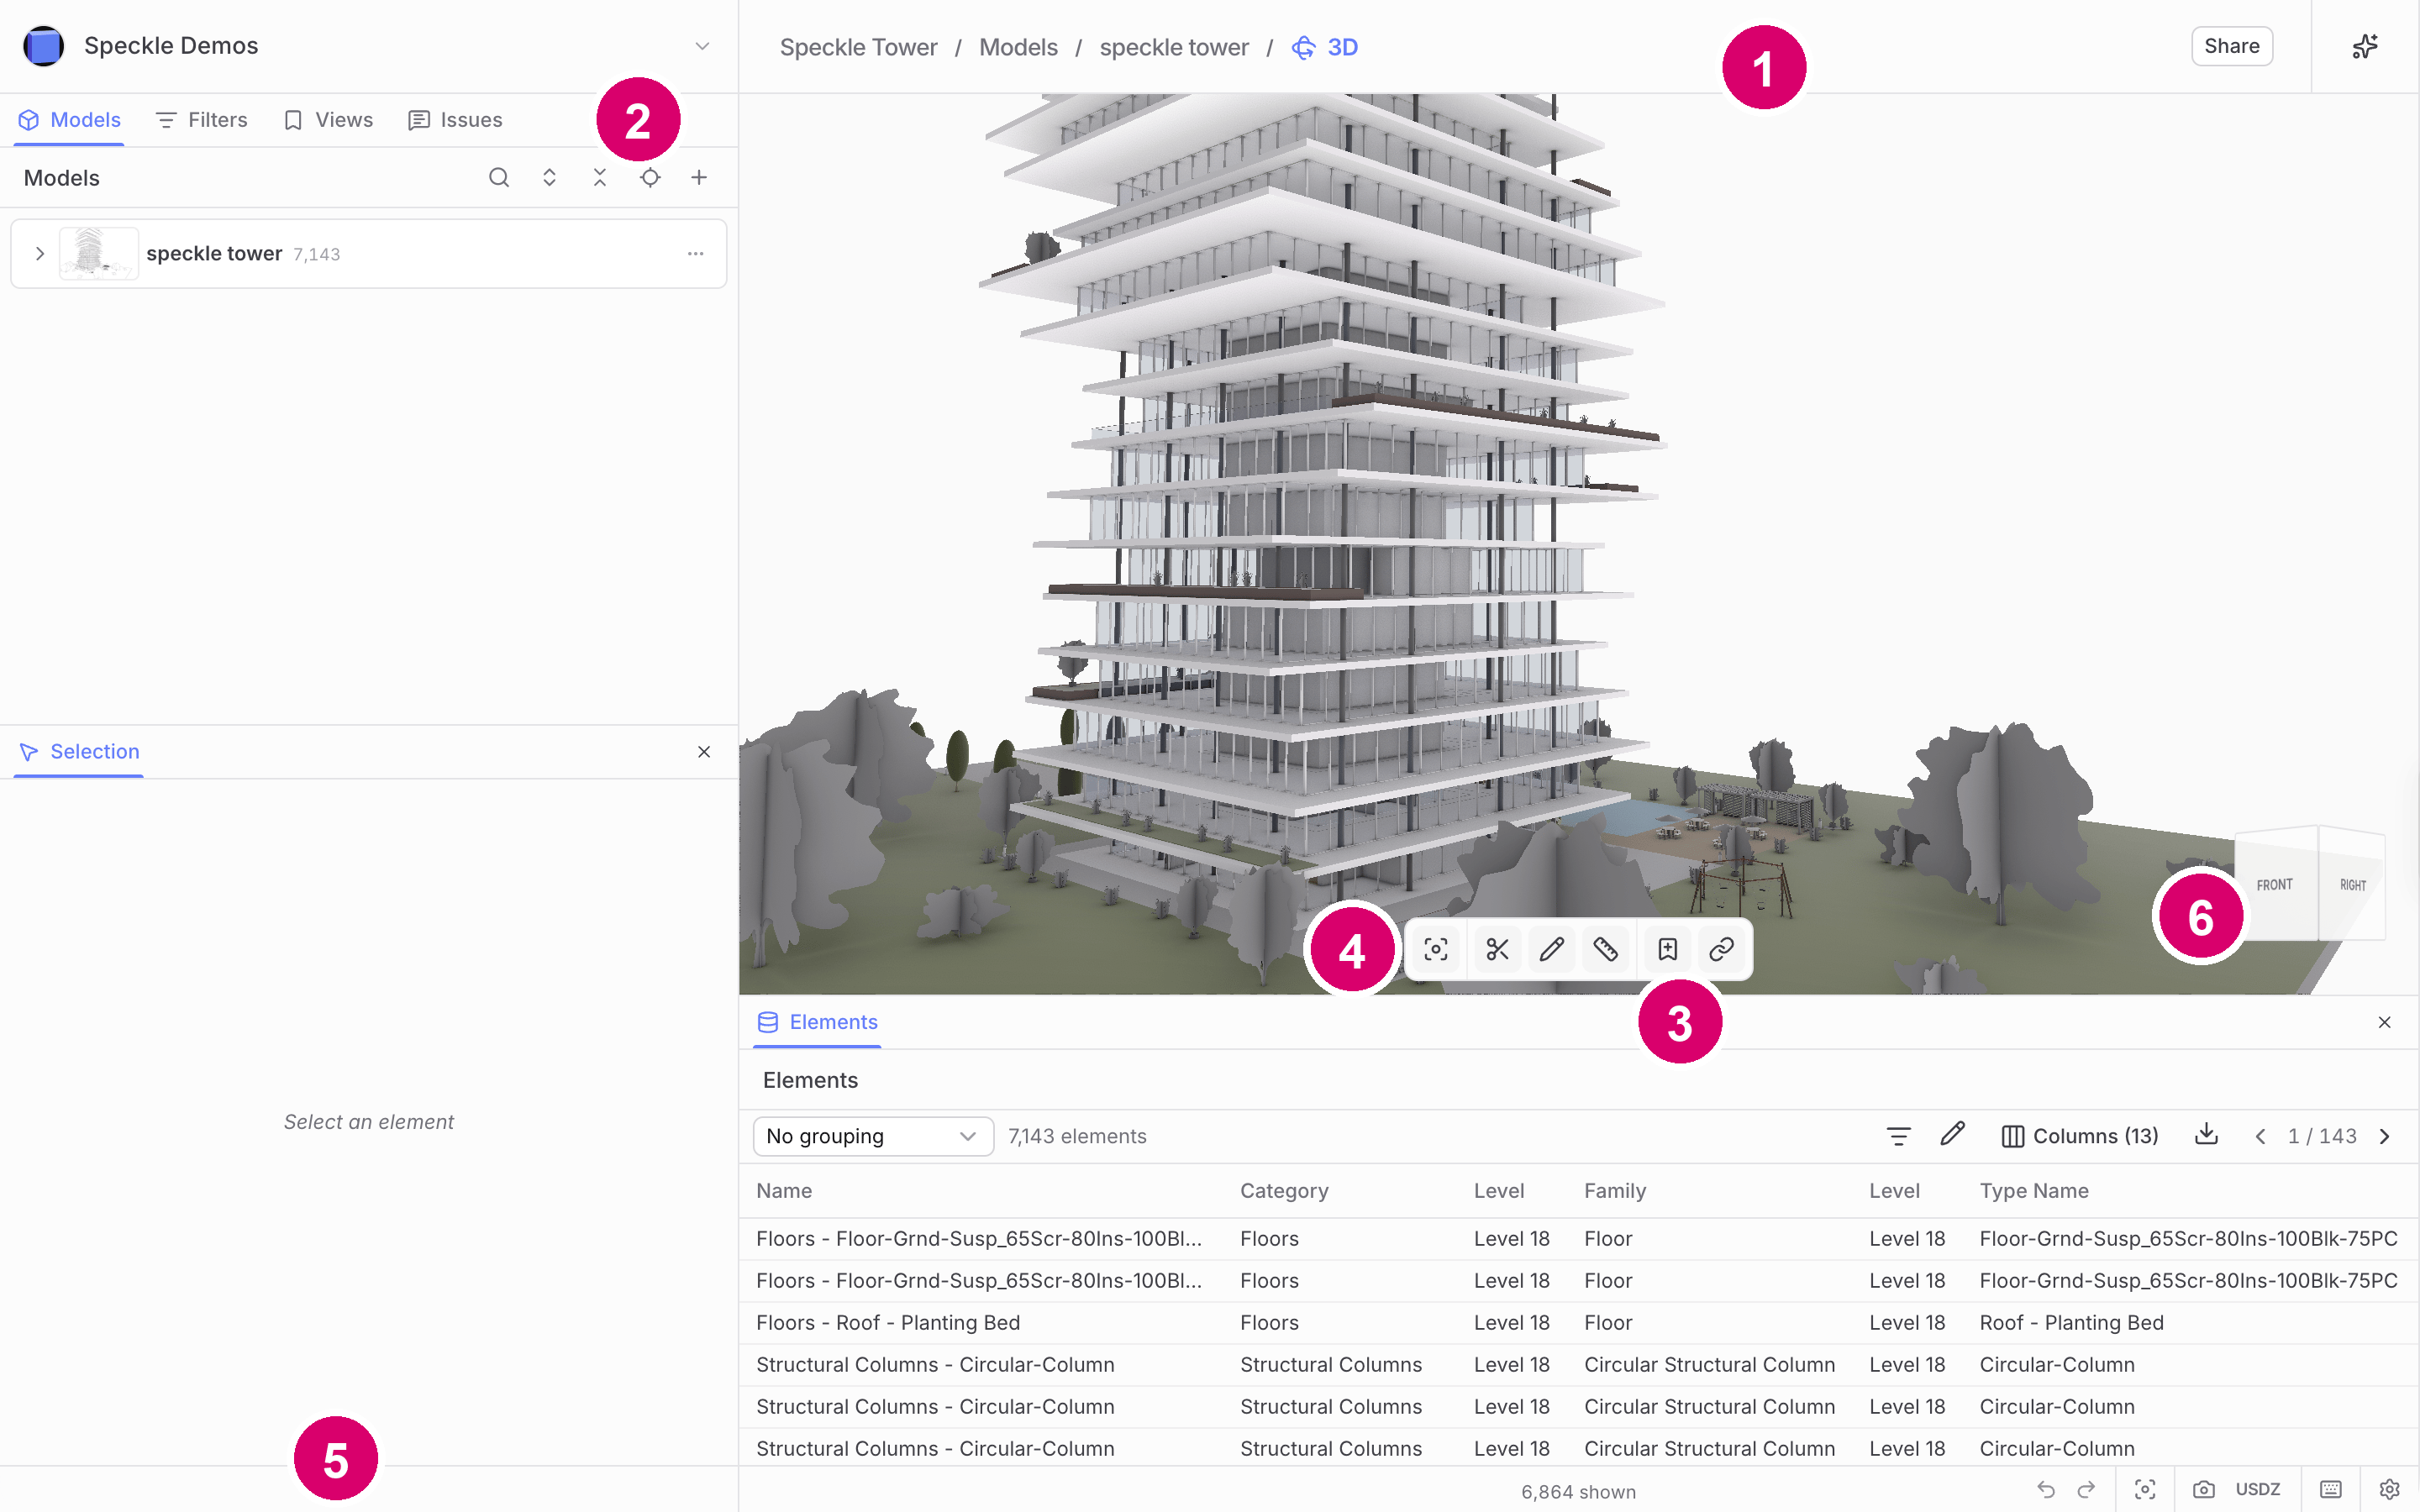
1 Top bar · 2 Left sidebar · 3 Elements · 4 Toolbar · 5 Status bar · 6 Navigation cube
- Top bar: the breadcrumb (project, Models, model name) and Share. Share offers Share model…, Embed model…, Copy ID, and Download image. See Share your models. When Speckle Intelligence is available, the sparkle sits next to Share.
- Left sidebar: the workspace switcher at the top, then the Models, Filters, Views, and Issues tabs. Selection sits under those tabs by default. On a first visit, Selection is open so the canvas is not empty. On narrower widths the left sidebar becomes a slide-over.
- Bottom dock: Elements, a table of every object in the loaded models.
- Toolbar: fit to view (or zoom to selection), Section, Sketch, Measure, Save view, and Copy view link. Show all appears when objects are hidden or isolated, and Reset filters appears when filters are active.
- Status bar: panel icons, undo, redo, fit, Screenshot (downloads a PNG of the canvas, including sketches and measurements), Export USDZ, keyboard shortcuts, and Settings.
- Navigation cube: at the bottom-right of the canvas, for standard camera directions.
Arrange panels
Panels are dockable. Drag a panel icon onto another panel to make a labelled tab group, split it into the bottom dock, collapse it, or resize it. The status bar Settings menu holds Orthographic, Grid, and Reference points. Layout in that menu lists every panel as a checkbox. Models stays on. Lock layout stops accidental drags. Reset layout restores the default arrangement after you unlock. Right-click a panel icon in the tab strip or status bar to move it. The menu lists only slots that panel can occupy: Move to sidebar, Move to sidebar bottom, Move to bottom panel, or Move to bottom right. Remove panel hides it; turn it back on from Layout. Models has no Remove panel. With Lock layout on, the move options are omitted.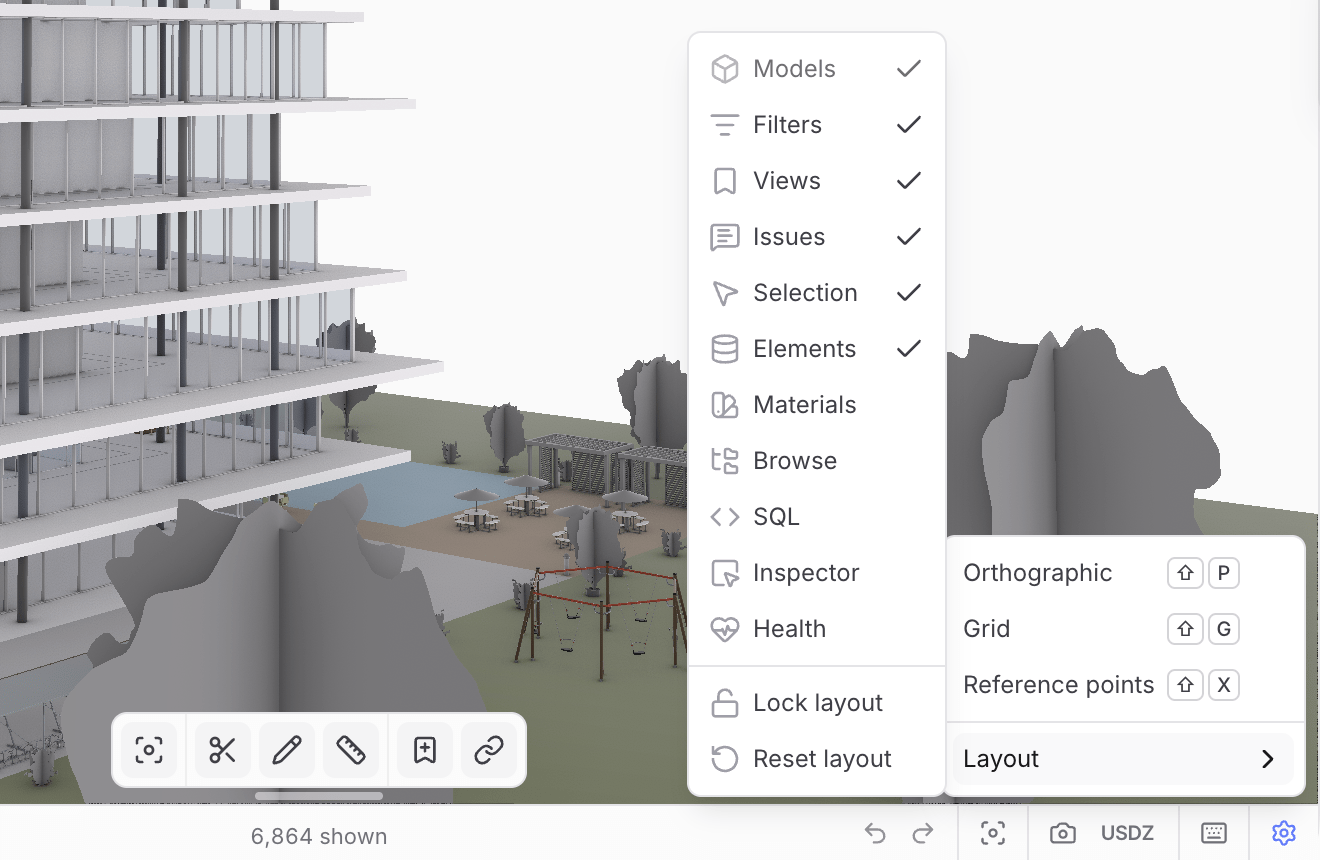
Settings, with Layout open
- Materials lists materials and colours in the loaded models. Select the usage count to pick the objects that use that material.
- Browse pages through tables in the published data.
- SQL runs a query against the attached models.
- Inspector shows relations and the raw property table for the selected object.
- Health lists Revit warnings and Revit links that were not included, where the published model carries them. See Model health.
Right-click the canvas
Right-click the canvas for Hide or Show, Isolate or Un-isolate, Fit to view, Copy application ID, Add to chat, and Clear selection.- With more than one object selected, the options read Hide selection, Isolate selection (or Show selection and Un-isolate selection), and Add selection to chat.
- Right-clicking a selected object keeps the whole selection. Right-clicking an unselected object replaces the selection with that pick.
- Add to chat pins the pick for Speckle Intelligence. If too many objects are selected to pin individually, right-click a group in the Models tree instead; the option then reads Add ”…” to chat with the group’s name.
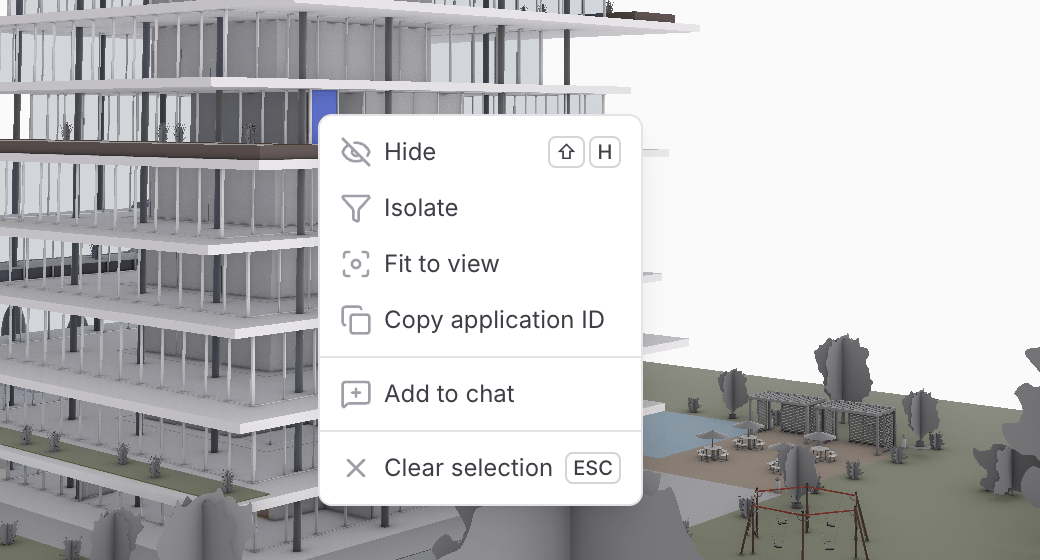
Canvas context menu
Use the Models panel
Models shows the loaded models as a tree. Click a row to select that object in the scene, and the scene highlights it. Select an object in the scene and its row is revealed in the tree. The panel header holds Add model to scene (+), search, Expand one level, Collapse one level, and Follow 3D selection. To add more models to the scene, see Model federation. Right-click a model card header, or use ⋯, for:- Expand one level and Collapse one level
- Group by… — opens the grouping editor (see below). While it is open, the option reads Hide grouping options.
- Search this model — opens a search field on the card.
- Model placement — see Inspect model placement.
- Use published hierarchy — appears when the model carries the hierarchy it was published with and the tree is currently grouped another way.
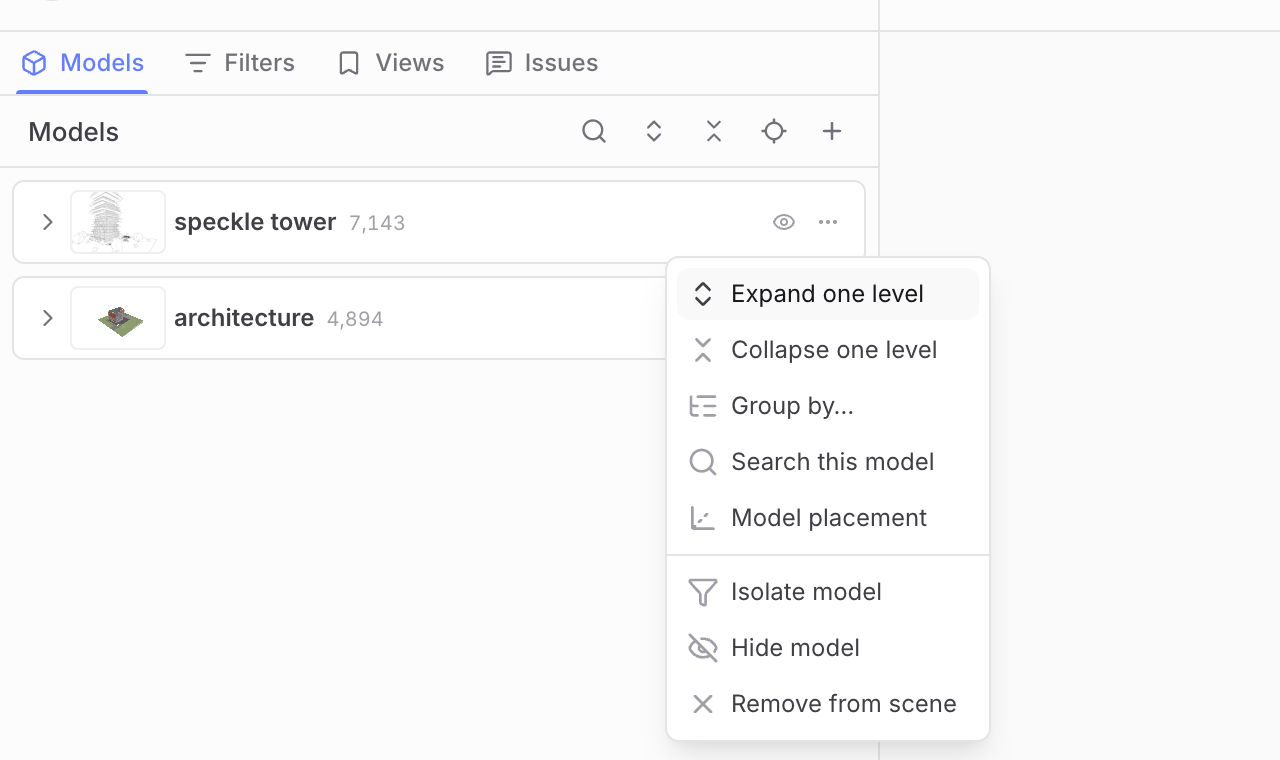
Model card menu
Group objects in the tree
Group by… opens the grouping strip and its editor. A collapsed strip shows Grouped by plus the current levels joined with ›. Select that summary to reopen the editor. The editor lists one row per tree level. Drag the grip to reorder levels. Each row is a searchable picker: options show a label, a coverage count, and the full property path. Relationships such as Level, Collection, Model, and Network appear first when those relations exist; properties such as Family or Category follow. The default grouping is a spatial relationship (Collection or Level) over the highest-coverage property. Add grouping appends a level. Done collapses the editor. If a grouping is too fine to precompute, the deepest level loads when you expand it.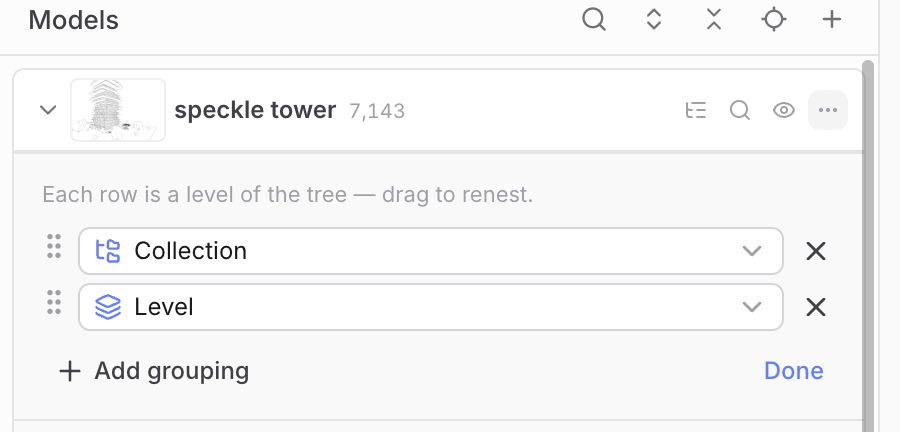
Grouping editor
Inspect model placement
Model placement opens a dialog that shows the published placement, geometry storage, Project True North, CRS, and translation. Inspect placement option lists Internal Origin, Project Base Point, Survey Point origin, and Shared Coordinates. The control shows the published option, such as Internal Origin (published). Choosing an option re-places the model in the scene for this session. Reloading restores the published placement. How Revit stores placement on publish is on Revit.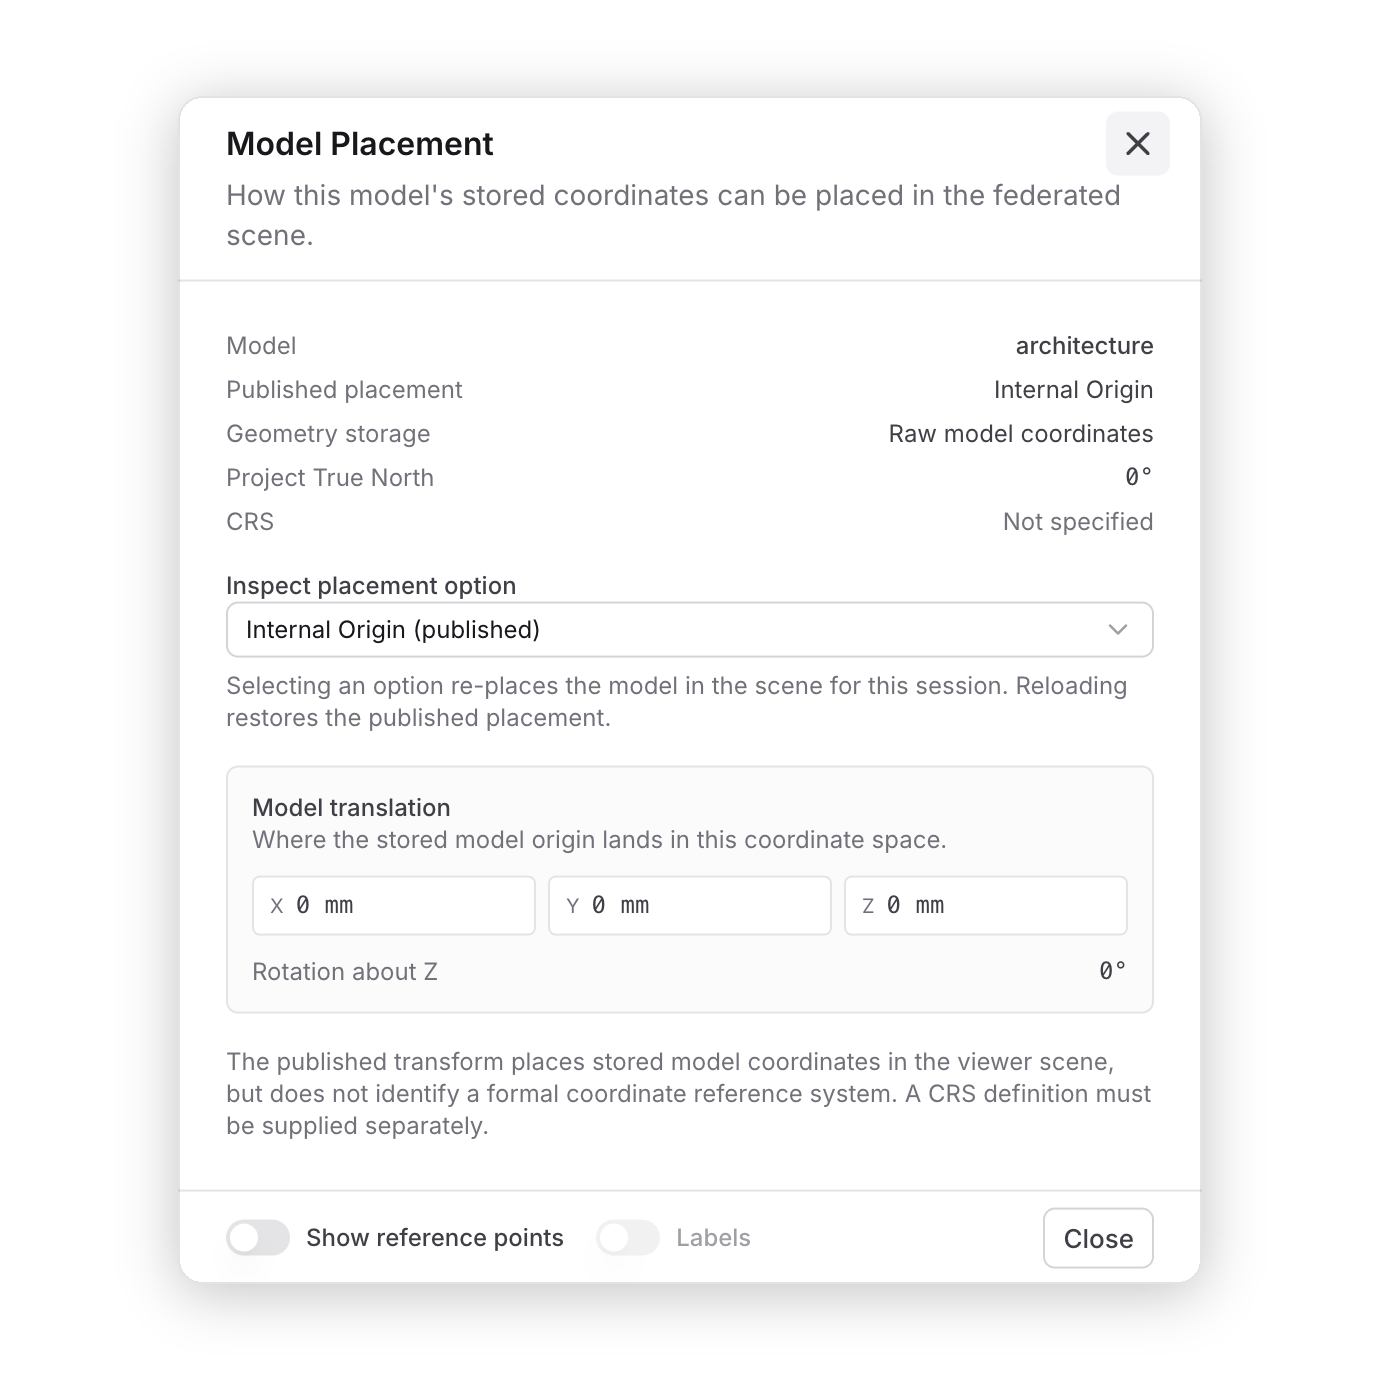
Model placement
Select and inspect
Click geometry, or click rows in Models. Open Selection with Shift+O. Selection shows properties for the pick. The title uses the first non-blank of name, type, or category. Property groups auto-expand. A Pinned group stays at the top when you pin a path. Revit material quantity blocks are condensed into readable rows named like Concrete Area or Concrete Volume, using the material name. A Relations group at the bottom lists related objects by relation kind. Search the list with Filter properties. When nothing is selected, Selection shows Select an element. The panel header has Zoom, Isolate, and Hide for the selected object. Right-click a property to:- Add to filters — open an empty Filters card for that property. The scene does not narrow until you set the condition.
- Filter to this value — add a card already set to this value. The scene narrows immediately. Relation rows skip this action.
- Add as table column — add the path to Elements. If it is already a column, the option reads Shown as a table column and opens Elements.
- Pin property or Unpin property.
- Copy value — copies the raw value, not the rounded display string.
- Copy path.
- Copy all properties — one
path: valueline per row. - Copy group path — from a group header that has a real path. Pinned and Relations have no path to copy.
- Expand all groups or Collapse all groups.
Move the camera
- Orbit, pan, and zoom with the mouse or trackpad.
- Fit: the toolbar fit control frames everything, or zooms to the selection when something is selected. Shift+Space does the same.
- Standard views: select a face of the navigation cube, or press Alt+1–5 for Top, Front, Left, Back, and Right.
- Projection: Shift+P, or Orthographic in the status bar Settings, toggles orthographic projection.
- Fly: W A S D or the arrow keys move; E or Page Up moves up; Q or Page Down moves down. Hold Shift for faster, Alt for slower.
Keyboard shortcuts
Open the cheat sheet from the status bar or with?. Bindings use Cmd on macOS and Ctrl
elsewhere. Shortcuts are off in embedded viewers.
- Panels: Shift+M Models, Shift+F Filters, Shift+V Views, Shift+I Issues, Shift+T Elements, Shift+O Selection.
- Tools: Shift+R Measure, Shift+B Section, Shift+K Sketch. Esc leaves a tool or clears the selection.
- Selection: Shift+H hides or shows the selection.
- Camera: Shift+Space Fit view / zoom to selection, Shift+P Orthographic projection, Alt+1–5 standard views.
- Display: Shift+G Grid, Shift+X Reference points.
- History: Cmd/Ctrl+Z Undo, Cmd/Ctrl+Shift+Z Redo.
FAQ
Can I open a single object in a new window?
Can I open a single object in a new window?
No. Select it and use Isolate in Selection, or Isolate from the canvas right-click
menu, to focus on it.
Where did Dev mode go?
Where did Dev mode go?
The viewer has no Dev mode. To see an object’s raw property rows and its relations, turn on
Inspector from Settings → Layout. See Inspect raw data and
relations.
I moved panels around and want the default back. How?
I moved panels around and want the default back. How?
Open Settings → Layout in the status bar, turn off Lock layout if it is on, then
select Reset layout.
Can I reposition federated models in the viewer?
Can I reposition federated models in the viewer?
No. Model placement lets you inspect the published datum. Changing placement on publish is
documented for Revit on Revit.