The Autodesk Construction Cloud integration is available on Team and
Enterprise plans. To enable it for your organisation,get a quoteor see New plans FAQ for plan details.
The Speckle integration must be enabled on your ACC Hub before you can sign
in. If you don’t see the option to log in to Autodesk Construction Cloud in
Speckle workspace settings, your IT administrator needs to add the integration
in ACC first. See Enabling the integration on ACC (IT
Admin) for the steps they follow.
Want to shape this workflow? Join the user testing study for NWC and NWD
uploads with ACC sync on the User testing opportunities
page.
Setup
These steps assume the Speckle integration has already been enabled on your organisation’s ACC Hub. If it hasn’t, your IT administrator must complete the steps in Enabling the integration on ACC (IT Admin) first.Sign in to Autodesk Construction Cloud
-
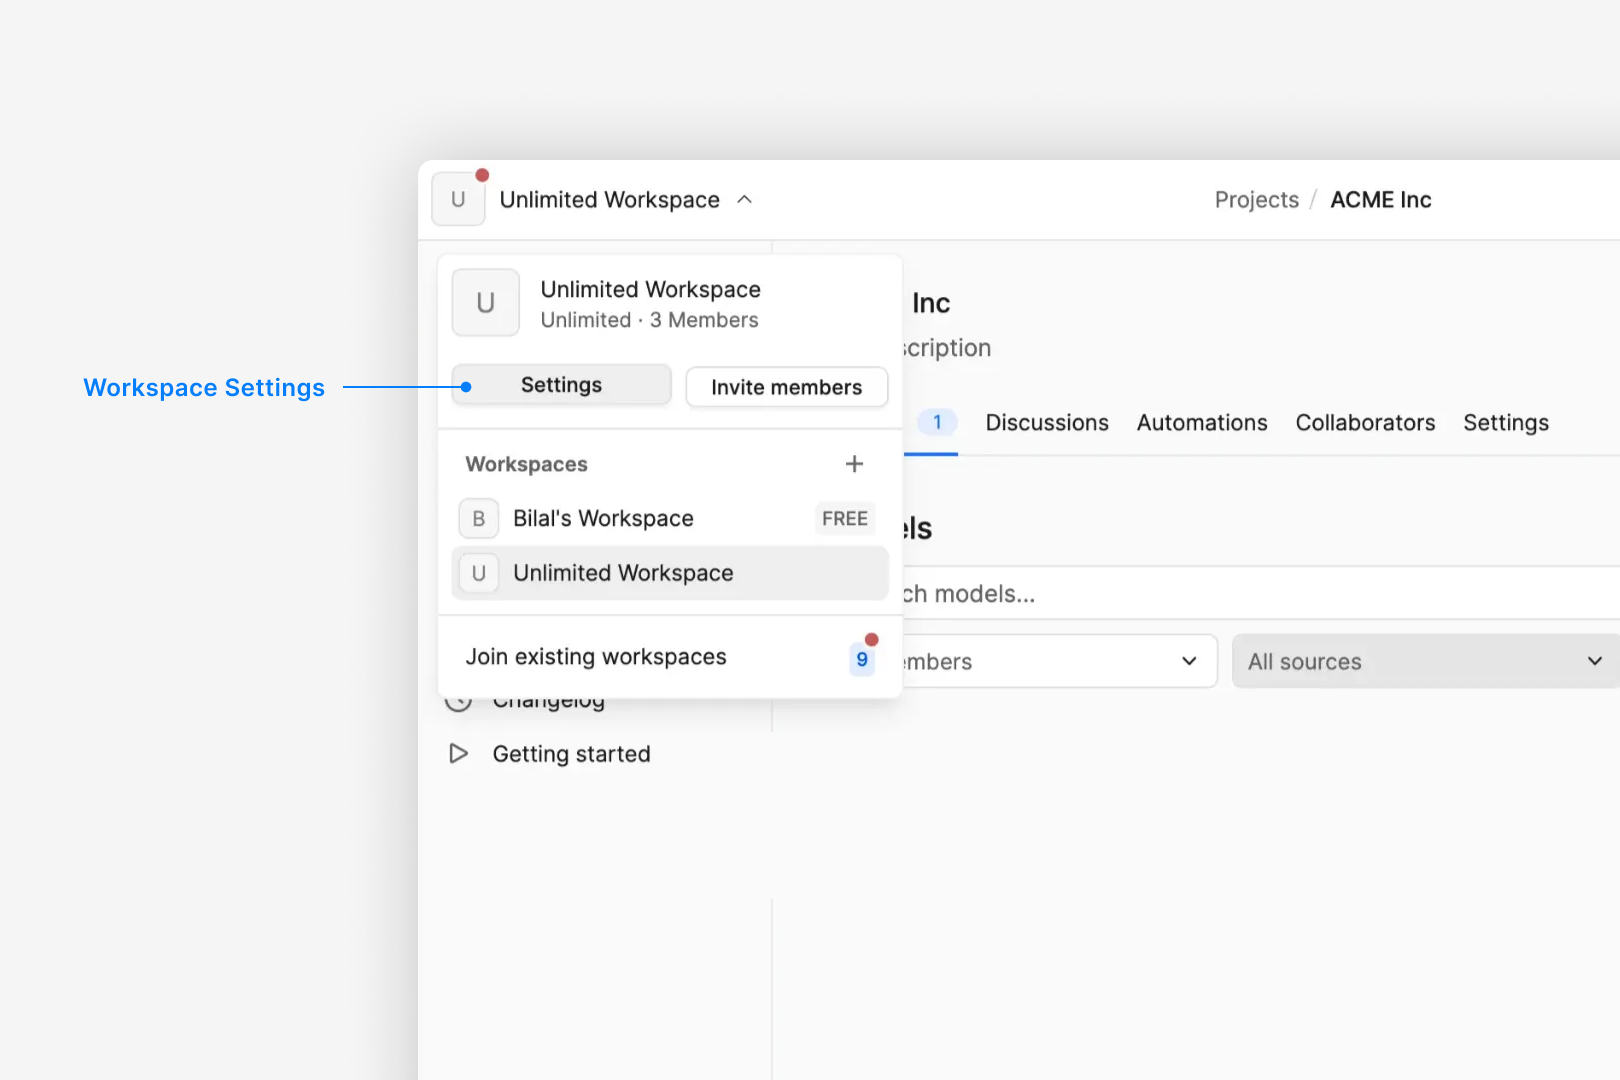
Select workspace settings from the workspace dropdown (top left).
-
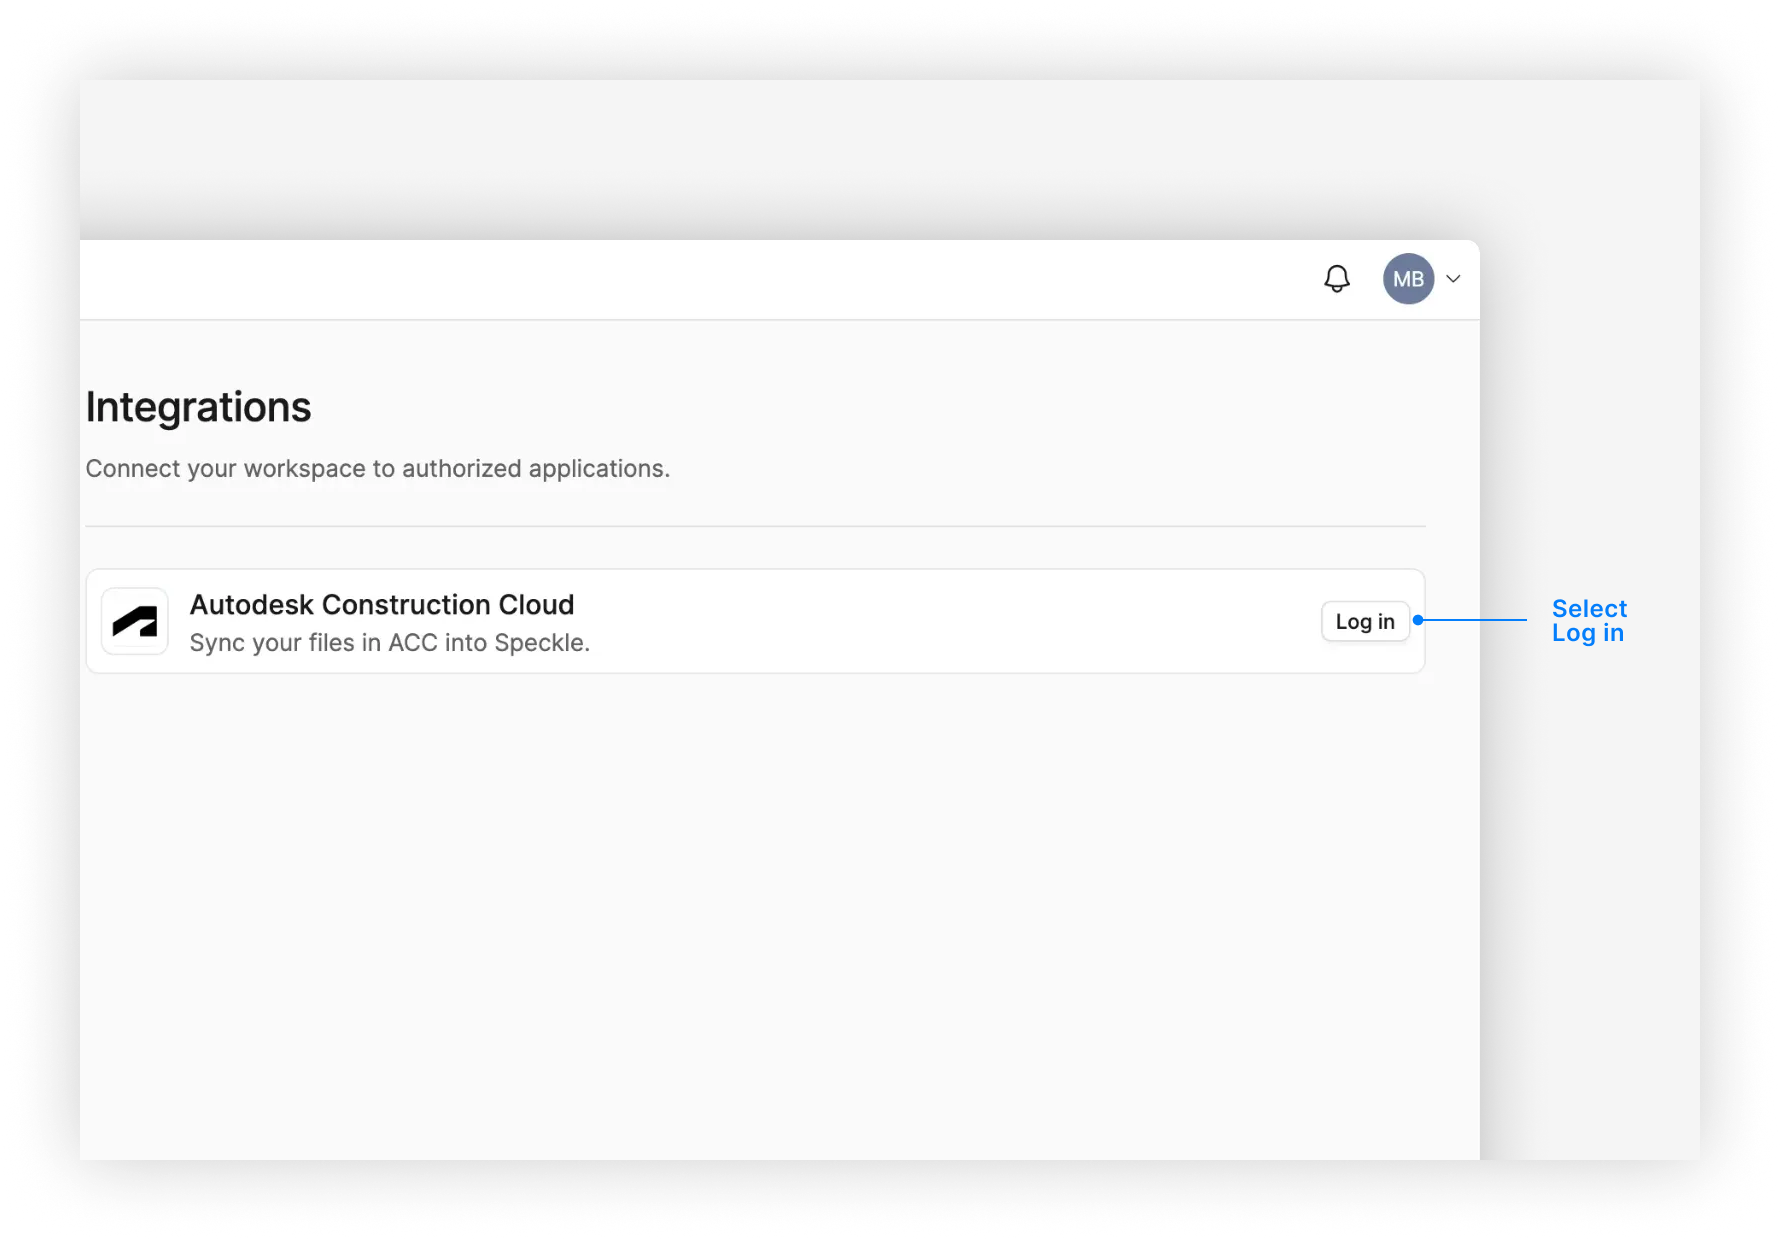
Select Log in next to Autodesk Construction Cloud.
-
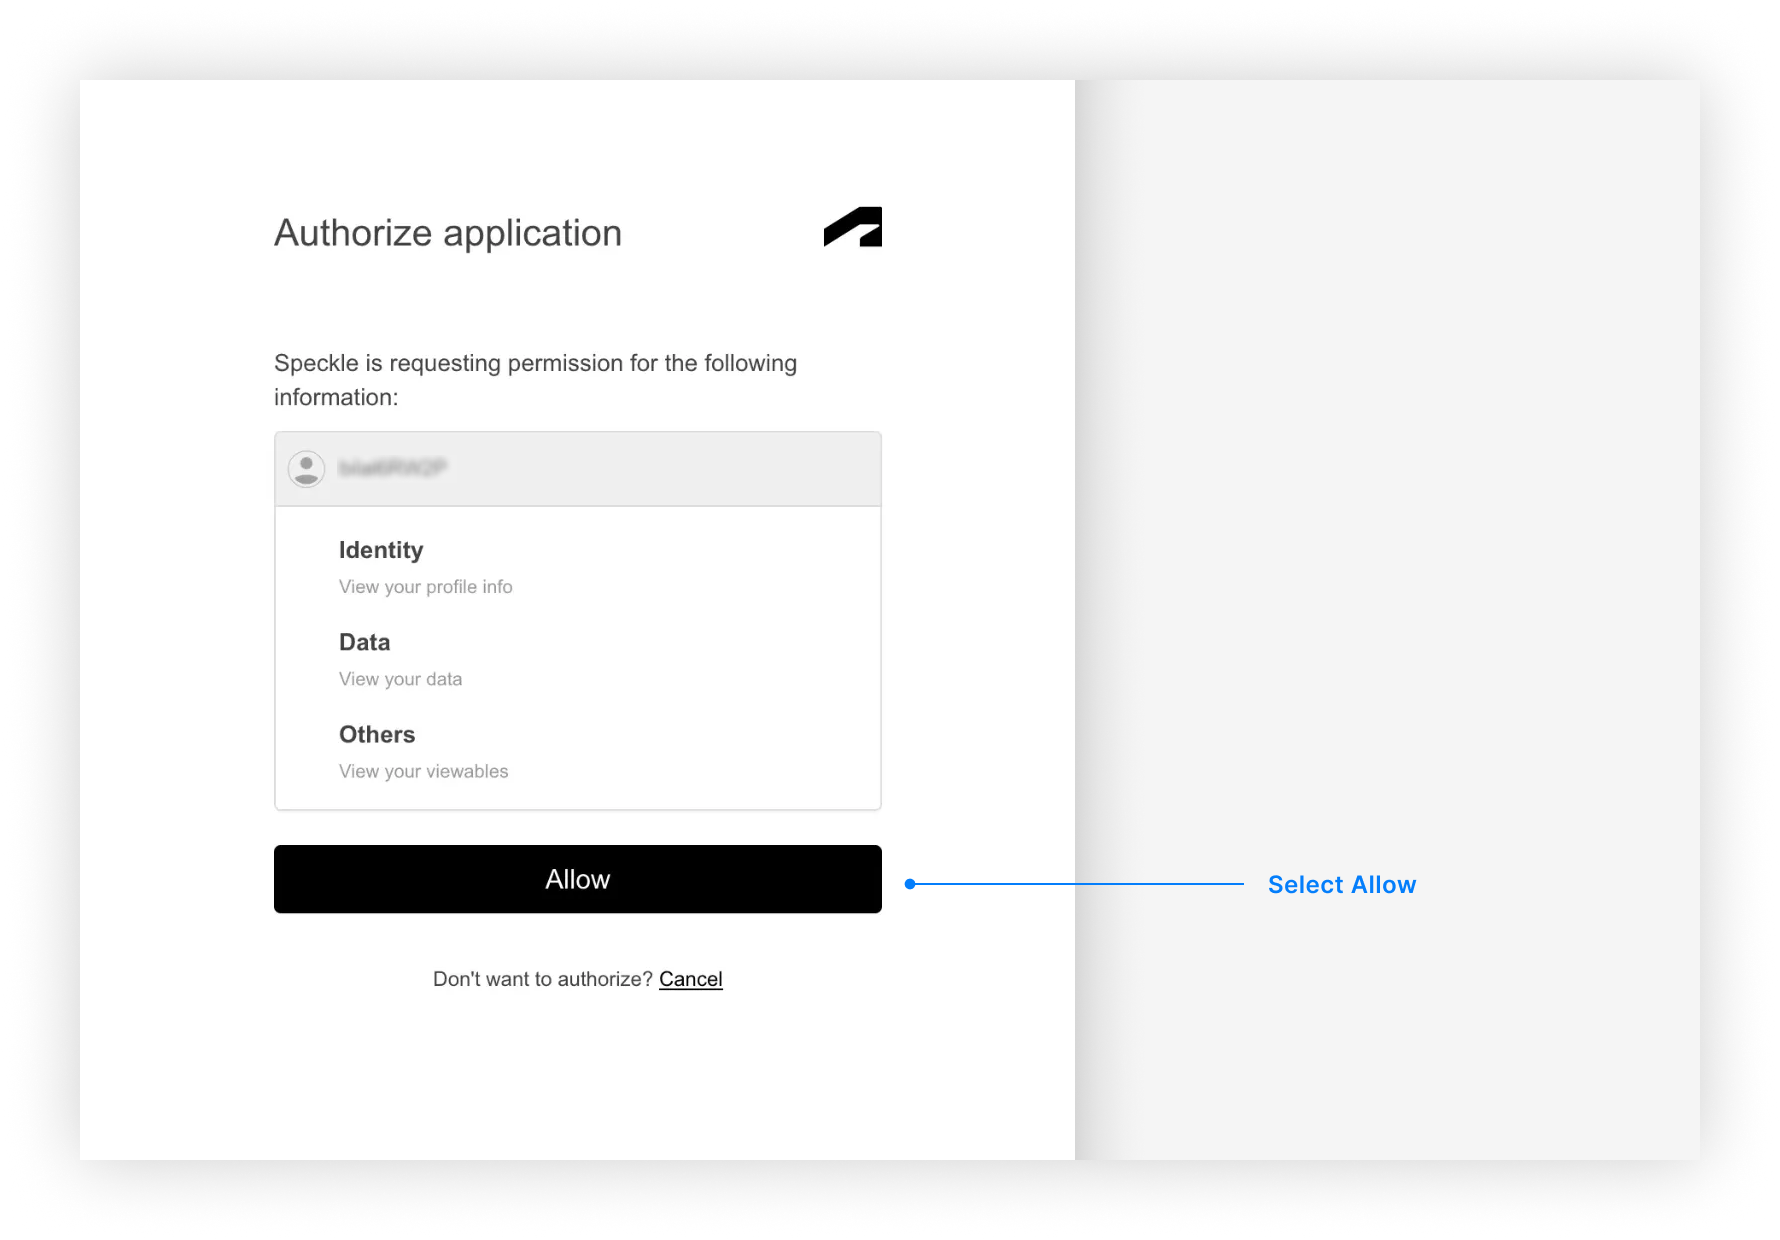
Sign in to your ACC account and select Allow from the authorization dialog.
Sync your first model
-
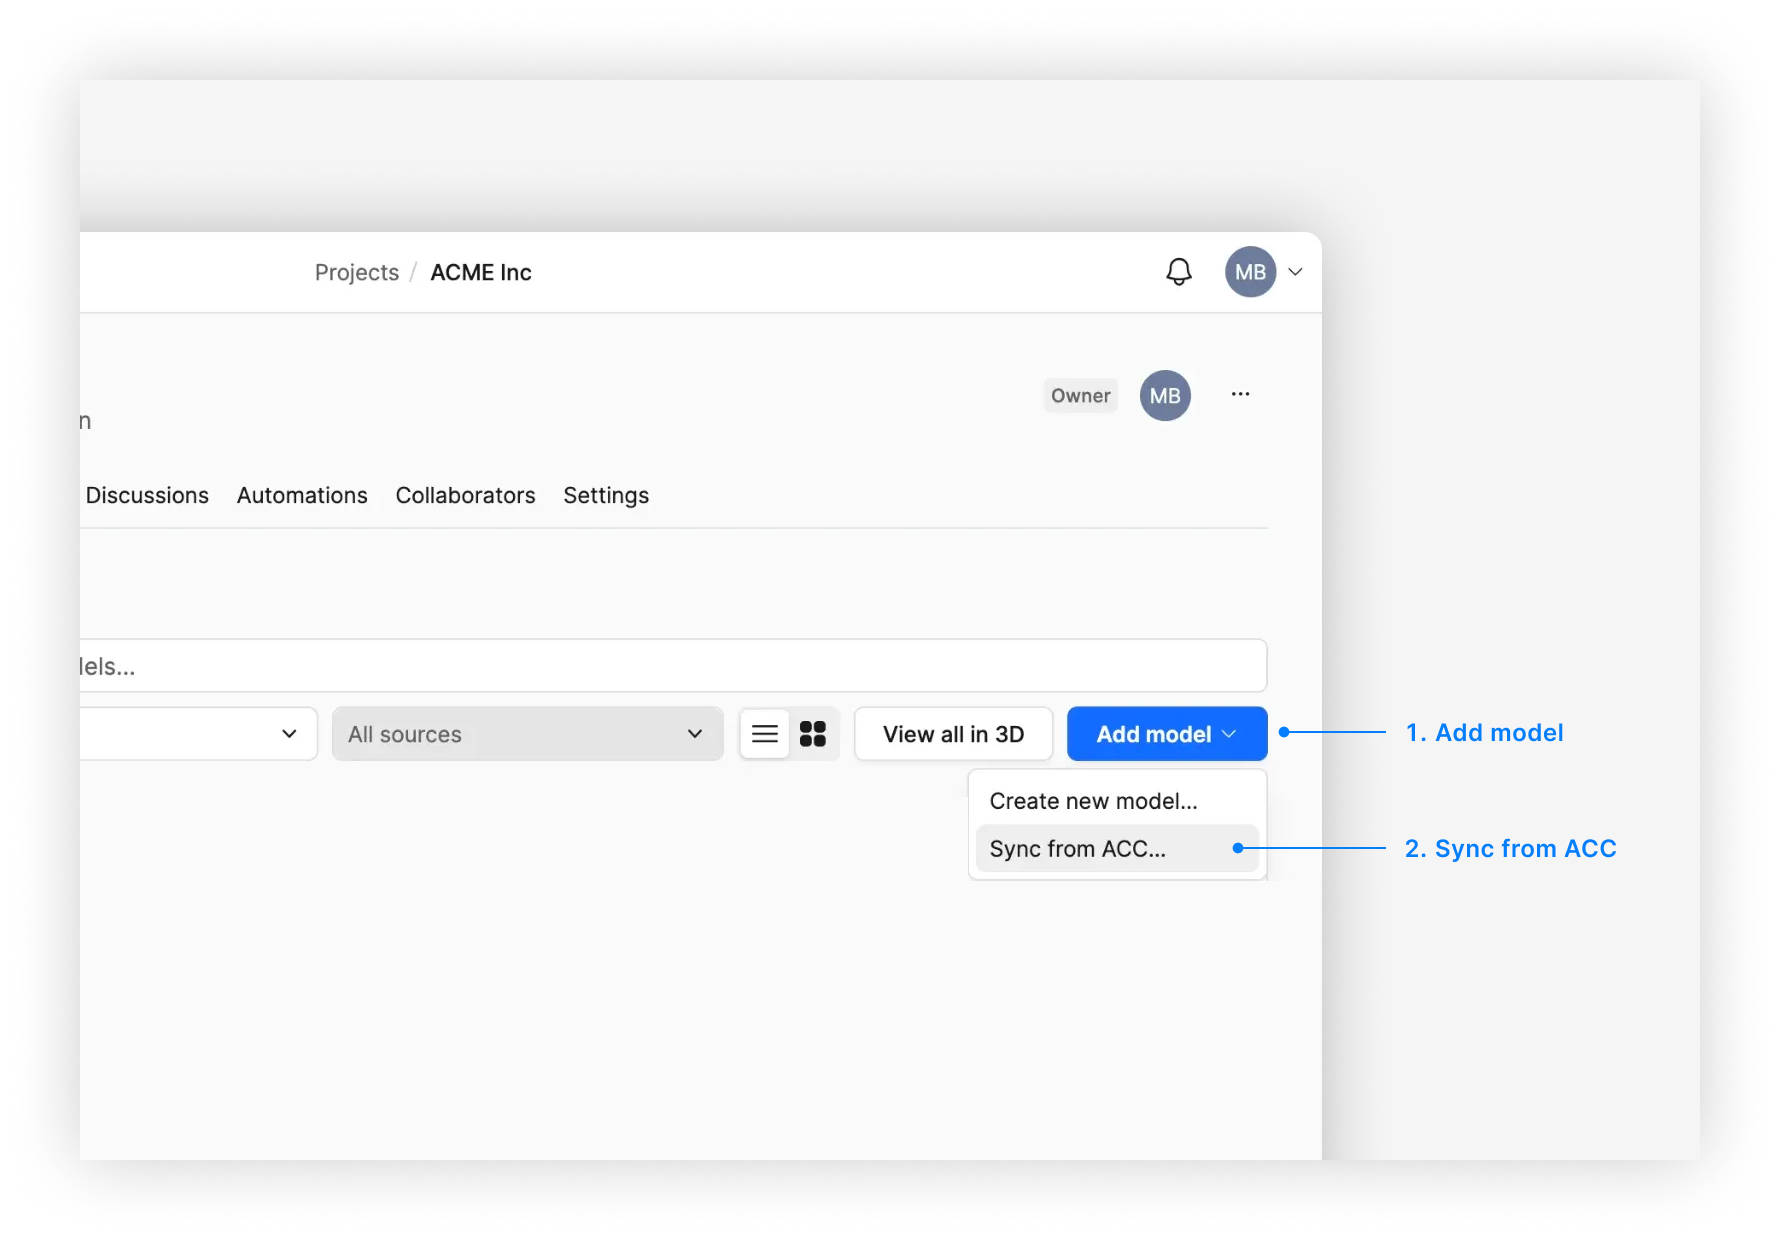
From your project in Speckle, select Add model > Sync from ACC.
-
Select the file you want to sync. Your hubs, projects, folders and files from ACC will be listed here.
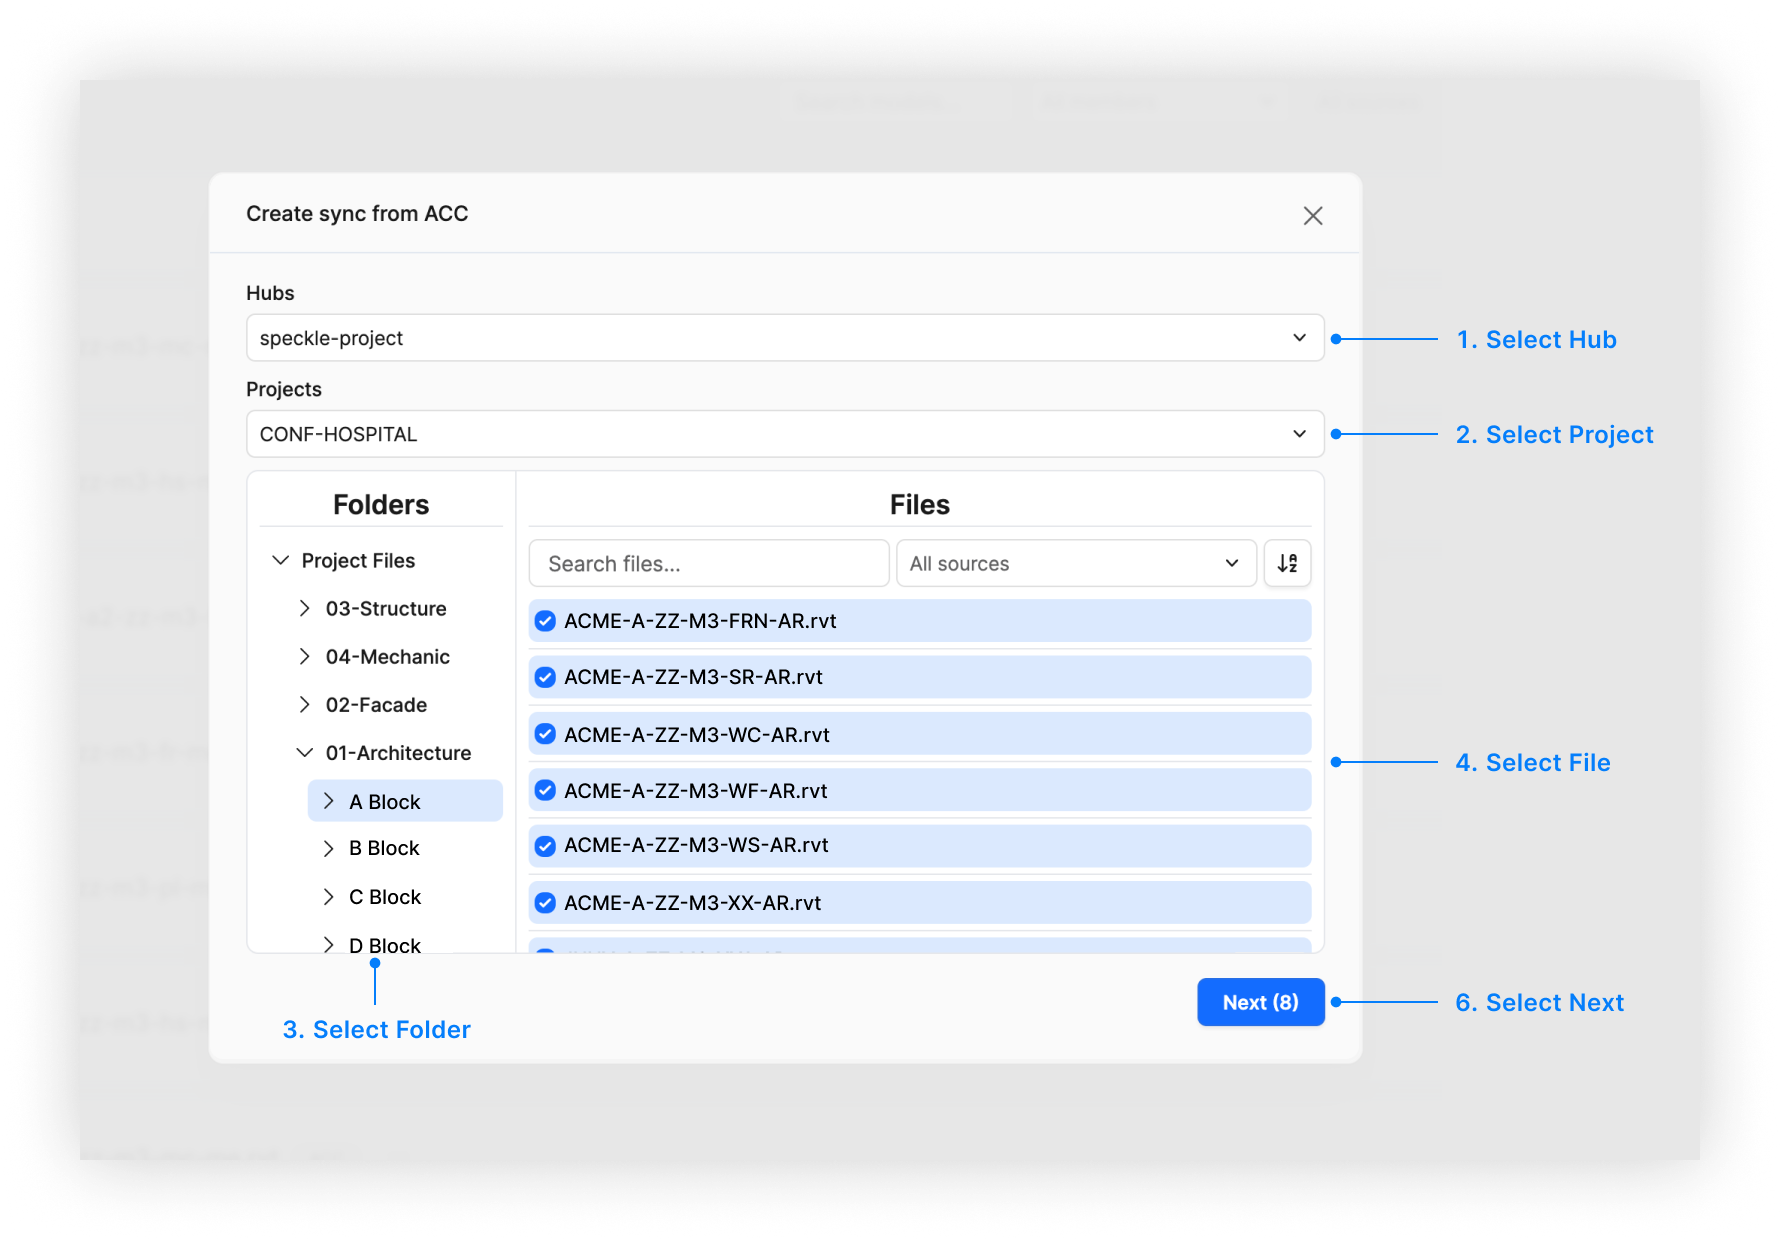
- Optionally, define the view to export. See View Selection below for details on how this affects what gets synced.
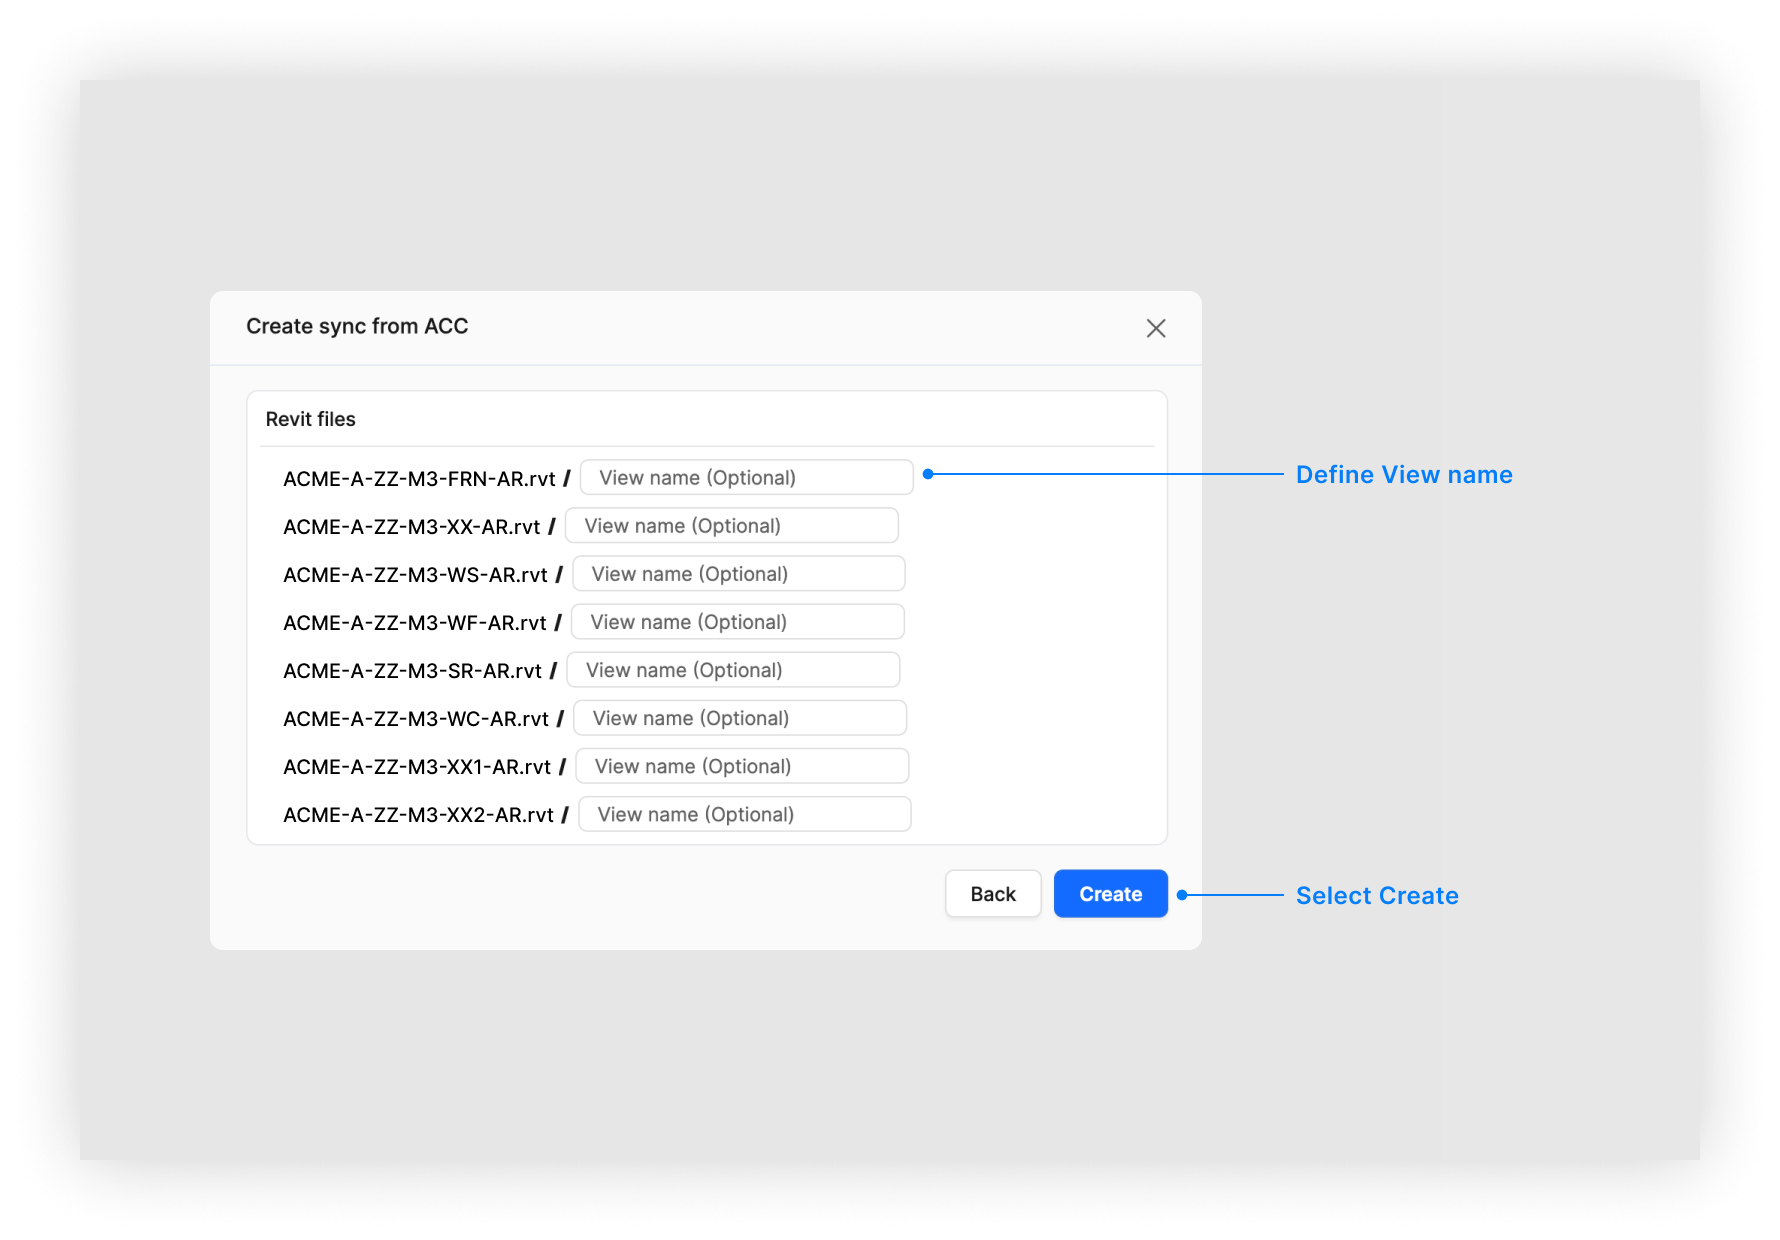
- Select Create.
Supported File Formats
The following file formats are currently supported for syncing from Autodesk Construction Cloud:| Format | Extension | Status |
|---|---|---|
| Revit | .rvt | ✅ Supported |
| IFC | .ifc | ✅ Supported |
| Navisworks | .nwc .nwd | ⚠️ Beta |
Navisworks files (
.nwc and .nwd) are supported for manual upload and ACC
sync as a beta feature. Many Autodesk (and other) products can export
Navisworks Cache files without requiring a Navisworks license, so you can
upload those exports to Speckle.We’re planning to add support for additional formats like
.dwg in future
releases.Enabling the integration on ACC (IT Admin)
If your organisation hasn’t enabled the Speckle integration on the ACC Hub yet, an IT administrator (or anyone with Account Admin access in ACC) must add it first. After that, users can sign in from Speckle workspace settings and sync projects as described in Setup above.If Custom Integrations is not visible in the Account Admin panel, the
account may not have the required role. Contact your Autodesk administrator.
Add a custom integration to ACC
- Go to the ACC Account Admin page (or acc.autodesk.eu for the European region).
- In the Account Admin panel, select Custom Integrations.
- Select Add custom integrations.
-
Enter the integration details (copy the Client ID exactly, with no extra spaces):
- Client ID:
5Y2LzxsL3usaD1xAMyElBY8mcN6XKyfHfulZDV3up0jfhN5Y - Name:
Speckle
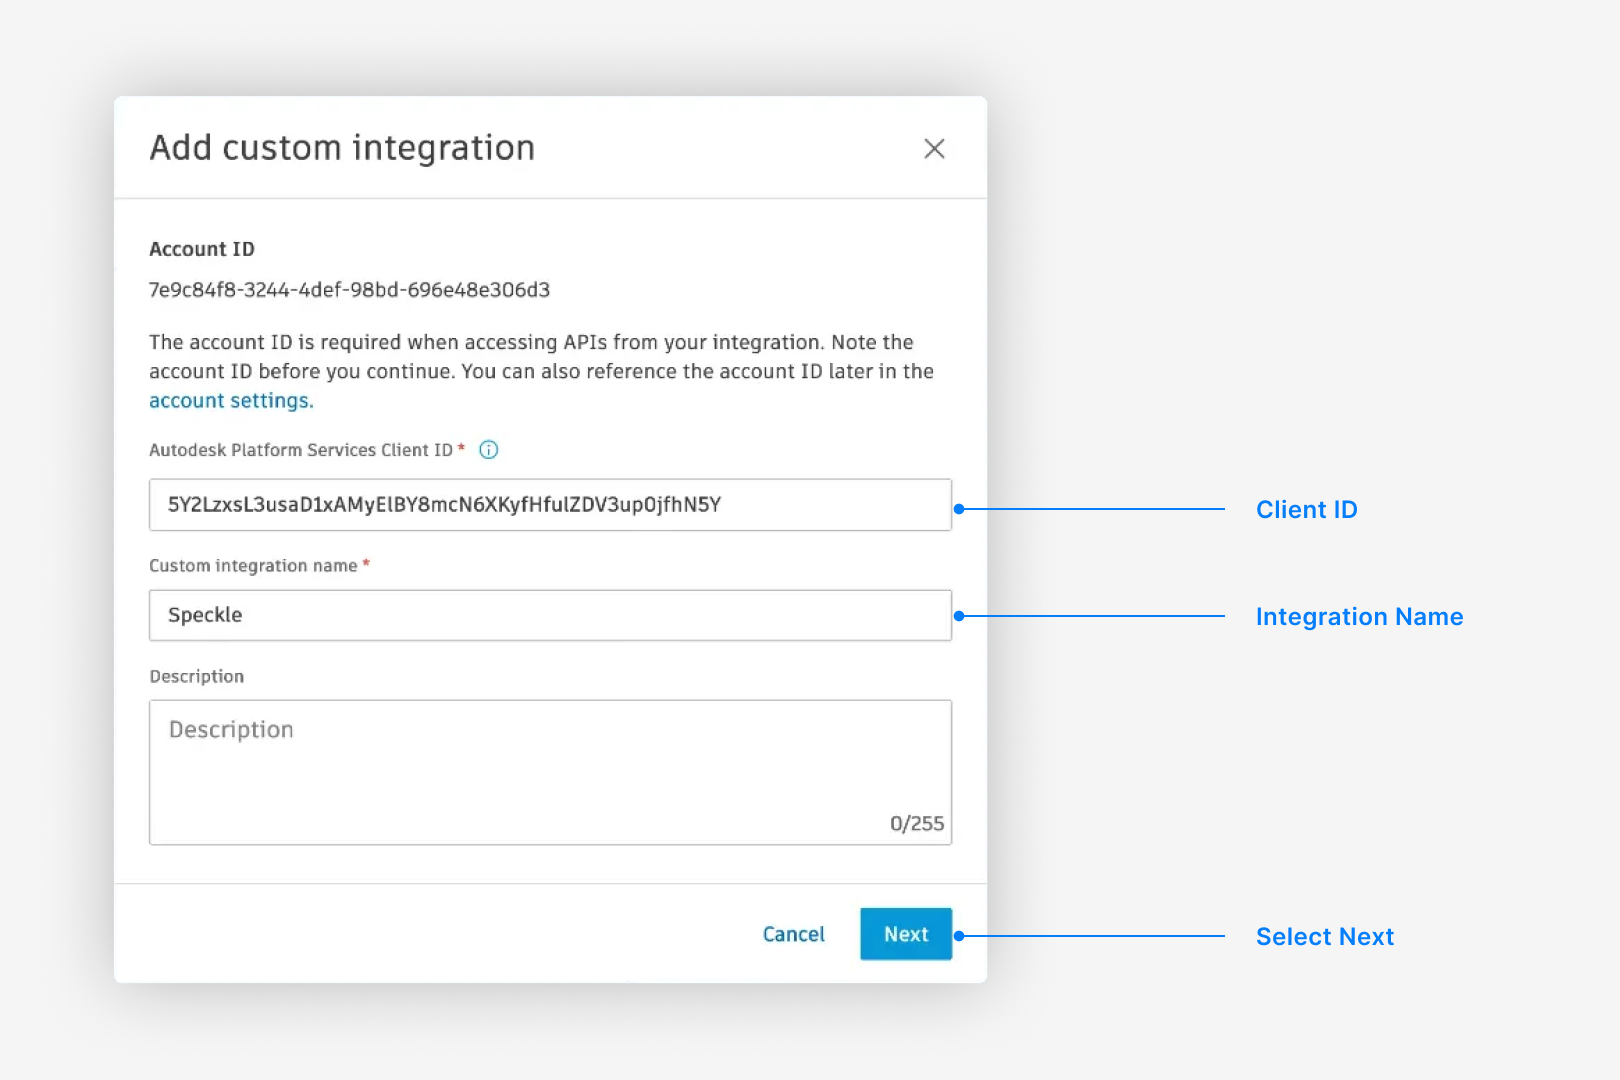
- Client ID:
- Select Next.
-
On the permission warning, select Proceed Anyway.
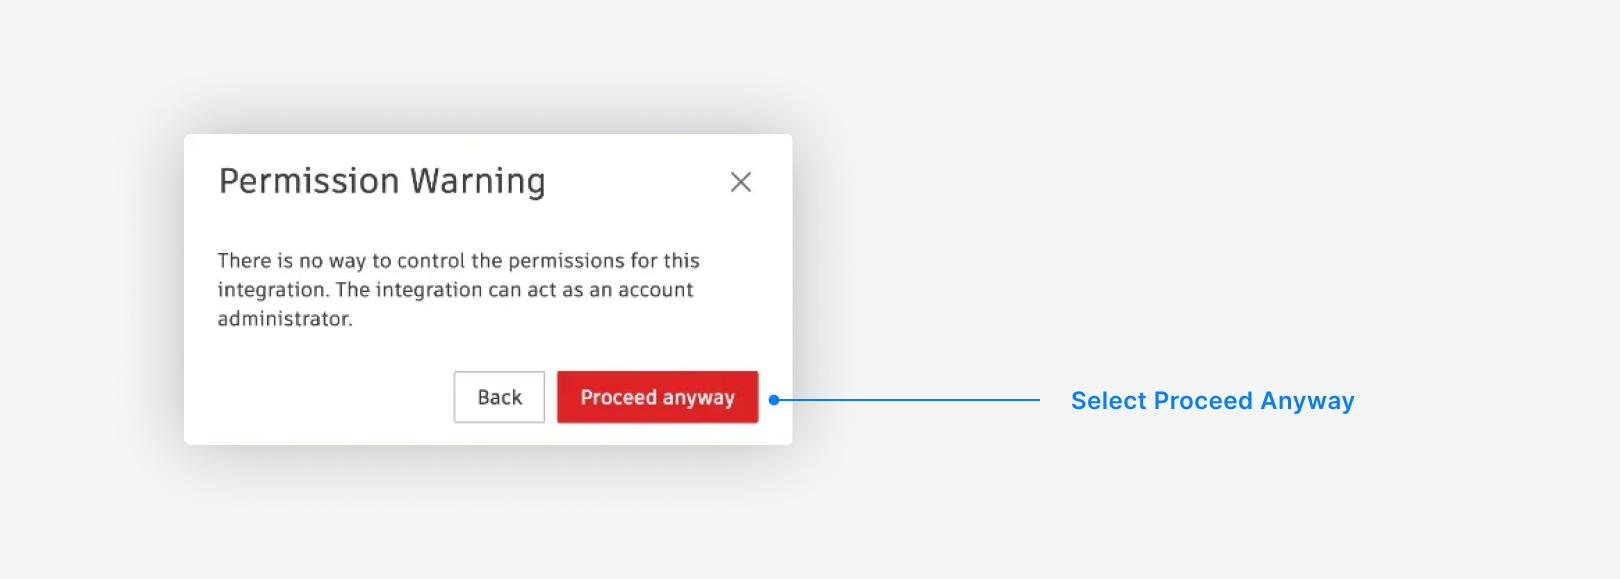
The warning comes from Autodesk, not Speckle. Autodesk does not offer granular permission controls for Custom Integrations, so the dialog cannot show the actual scope.Speckle requests only read-only scopes (
account:read, user-profile:read, data:read, data:search, bucket:read, viewables:read, openid) to reach files and metadata for conversion. See Autodesk’s scope definitions for details.Speckle inherits each user’s existing ACC permissions. Users see only hubs, projects, and folders they already have access to. There is no elevation of access. Autodesk’s API enforces these boundaries.For extra control, create a dedicated ACC account with limited access to specific projects or folders and use it for Speckle syncs.View Selection
When syncing a Revit file from ACC, you can optionally specify a view name to control which elements are included in the sync.No view specified (default)
When you don’t specify a view name, all supported elements from the entire model are synced. This includes every element across all model. This is the recommended option when you want:- A complete representation of your model
- Access to all elements for analytics and dashboards
- Maximum data availability for downstream workflows
Specifying a view name
When you enter a specific view name, only elements visible in that view are synced. The view name must match exactly (case-sensitive) with a view in your Revit model. This is useful when you want to:- Sync only a portion of your model
- Focus on specific areas or disciplines
- Match the scope of a particular coordination view
- Sync views that correspond to different design options
Is the connection read-only?
Is the connection read-only?
Yes. Speckle establishes a read-only connection with Autodesk Construction Cloud, which means we can sync and analyze your data but can’t modify the original files. This ensures data integrity and security.
How often do files sync?
How often do files sync?
Once you’ve created a sync model, it automatically syncs whenever a new version of the file is published to Autodesk Construction Cloud. You don’t need to manually trigger ongoing synchronization.
Why are my models in the wrong location?
Why are my models in the wrong location?
ACC sync converts models using Internal Origin and does not apply Revit Shared Coordinates. Synced models are not placed in a coordinated space. For coordination workflows that rely on Shared Coordinates, use the Revit connector to publish and load models so coordinate modifications are preserved.
What if my sync fails?
What if my sync fails?
Common causes include file access issues, authorization problems, or unsupported file formats. Check that:
- The file is accessible
- Your permissions are correct
- The file is in .rvt, .ifc, .nwc, or .nwd format
How do I get access?
How do I get access?
Contact us at [email protected] to request access.
What's the difference between the ACC integration and other integrations?
What's the difference between the ACC integration and other integrations?
The ACC integration provides direct integration with Autodesk Construction Cloud and enables automatic synchronization of construction data. Unlike other integrations that require manual file uploads or connectors, ACC syncs happen automatically when files are updated in the cloud.
Can I use Autodesk Construction Cloud models with Speckle Intelligence?
Can I use Autodesk Construction Cloud models with Speckle Intelligence?
Yes. Once synced, your Autodesk Construction Cloud models can be used with Speckle Intelligence for analytics, dashboard creation, and generating insights from your construction data.
Roadmap
| Feature | Status |
|---|---|
| ACC account connection and authorization | ✅ Complete |
Revit (.rvt) file synchronization | ✅ Complete |
IFC (.ifc) file synchronization | ✅ Complete |
| Automatic sync on file updates | ✅ Complete |
| Basic sync status monitoring | ✅ Complete |
| Enhanced UI/UX for sync management | ✅ Complete |
| Advanced sync configuration options | 🔄 In Progress |
| Improved error handling and reporting | 🔄 In Progress |