Use this guide when you need a repeatable way to run design reviews in Speckle. It ties together saved views, federation, markups, and issues into one end‑to‑end workflow. For teams that already use Speckle for viewing and sharing models.
Before you start: You need a Speckle project, at least one model, and access to the 3D viewer. If you are new to Speckle, complete the Quickstart first.

Prepare The Model For Review

When to use: Before a formal review meeting or an asynchronous review round.
1

Create a review project and models

Create or open a Speckle project for your review. Organise separate models per discipline (e.g. Architecture, Structure, MEP) and ensure each author is publishing to the correct model.
2

Federate models if you have multiple disciplines

In the 3D viewer, load the primary model, then open the Federation panel (left sidebar) and add additional models (e.g. structural, MEP). Adjust transforms if needed so models align. See Federation for options and limits.
3D viewer with federated models from multiple sources
3

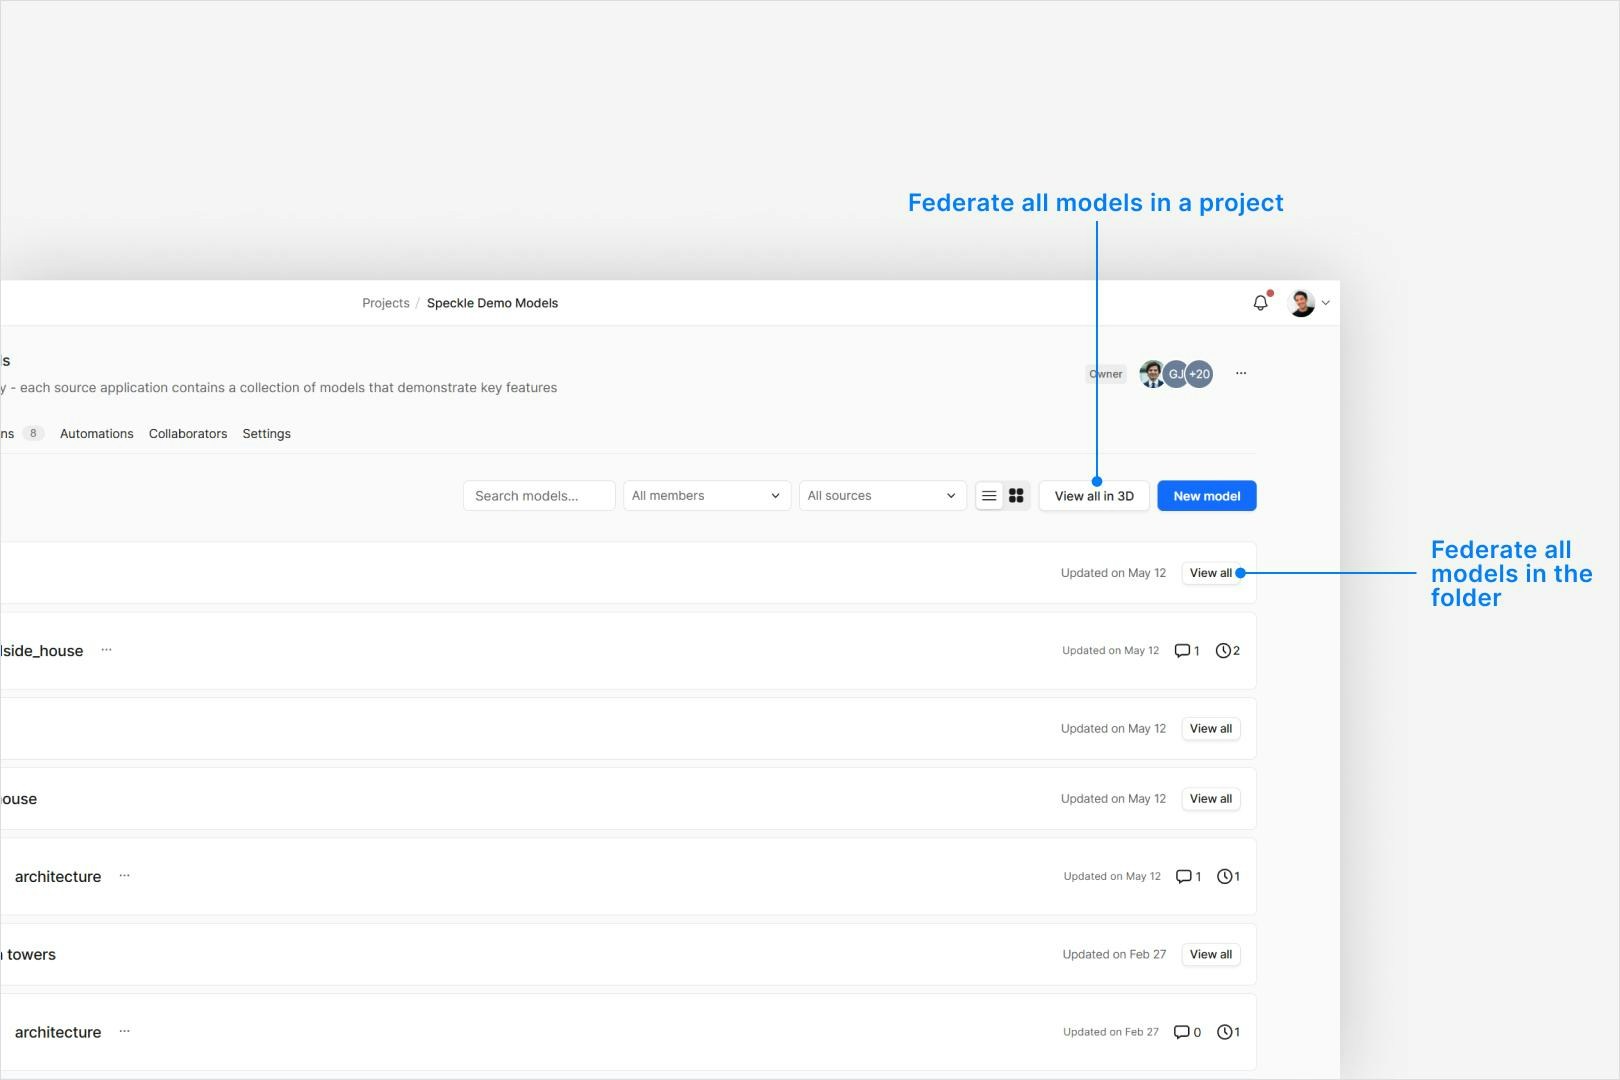
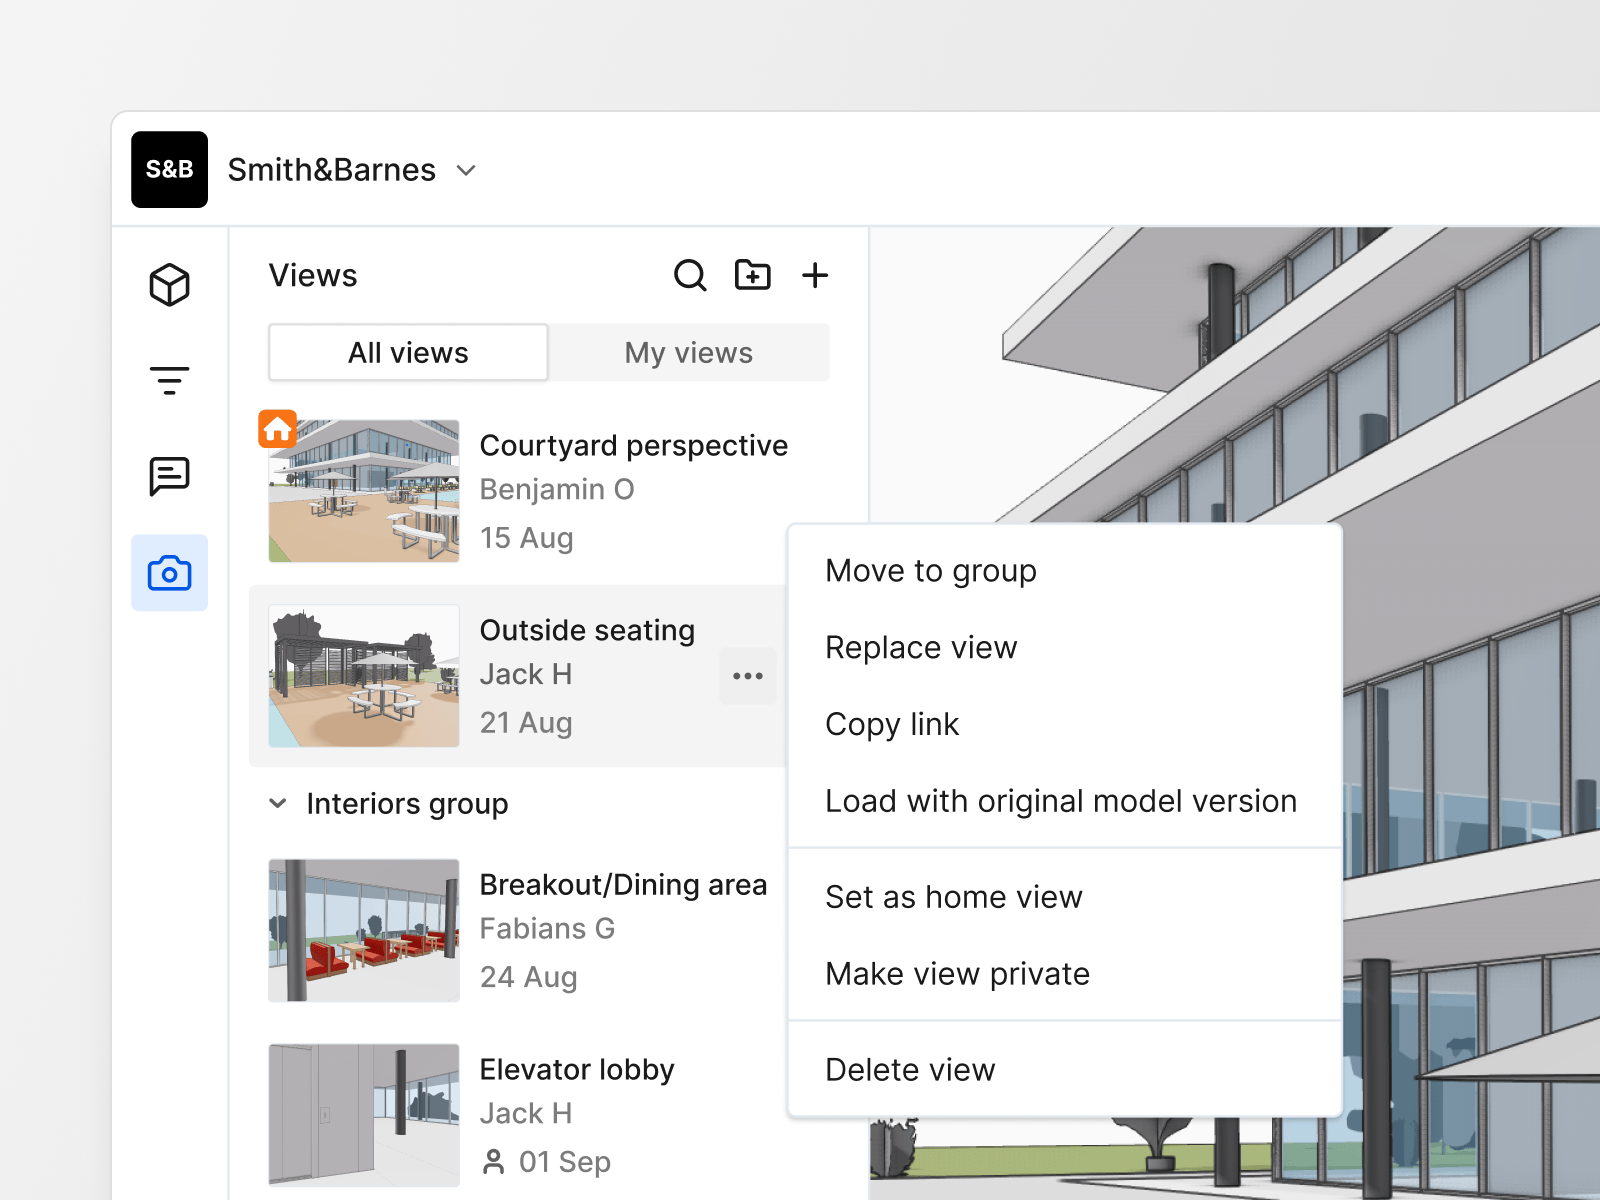
Set up saved views for key topics

Navigate to an important viewpoint (e.g. lobby, core, facade area) and configure section boxes, filters, and view modes. In the left sidebar, open Saved views and save each viewpoint with a clear name such as “Level 02 Lobby – Fire Strategy” or “Facade – North Elevation”. Group related views by discipline or review round. See Saved Views for details.
Saved views list and organisation in the 3D viewer
4

Decide what will be reviewed in each session

For each review session, pick a small set of saved views and topics (e.g. “Stair core clearances”, “Envelope coordination”, “Plant room layout”). Note which disciplines and team members must attend.
5

Share access and links ahead of time

Invite reviewers to the project and confirm they can open the relevant models. Share direct links to saved views in the calendar invite or meeting agenda so everyone lands in the same context.
Outcome: A federated model with named saved views and clear scope for the review session.

Run A Formal Design Review Session

When to use: Live reviews on a call or in a room where one person drives the model.
1

Start from the agreed saved view

Open the project and models in the 3D viewer, then select the first saved view from the review agenda. Confirm that everyone sees the same context before you start.
2

Use presentation tools to keep focus

Use view modes, section tools, and lighting controls to keep geometry readable while you talk through the design. Avoid making large camera movements while others are commenting. See Presentation for options.
3

Capture visual feedback with markups

As people raise comments, draw over the model using Markups (arrows, boxes, text). Use one markup per topic and name them so they match the agenda item or issue they relate to. See Markups for tools and export options.
Markup tools and annotations on the 3D model
4

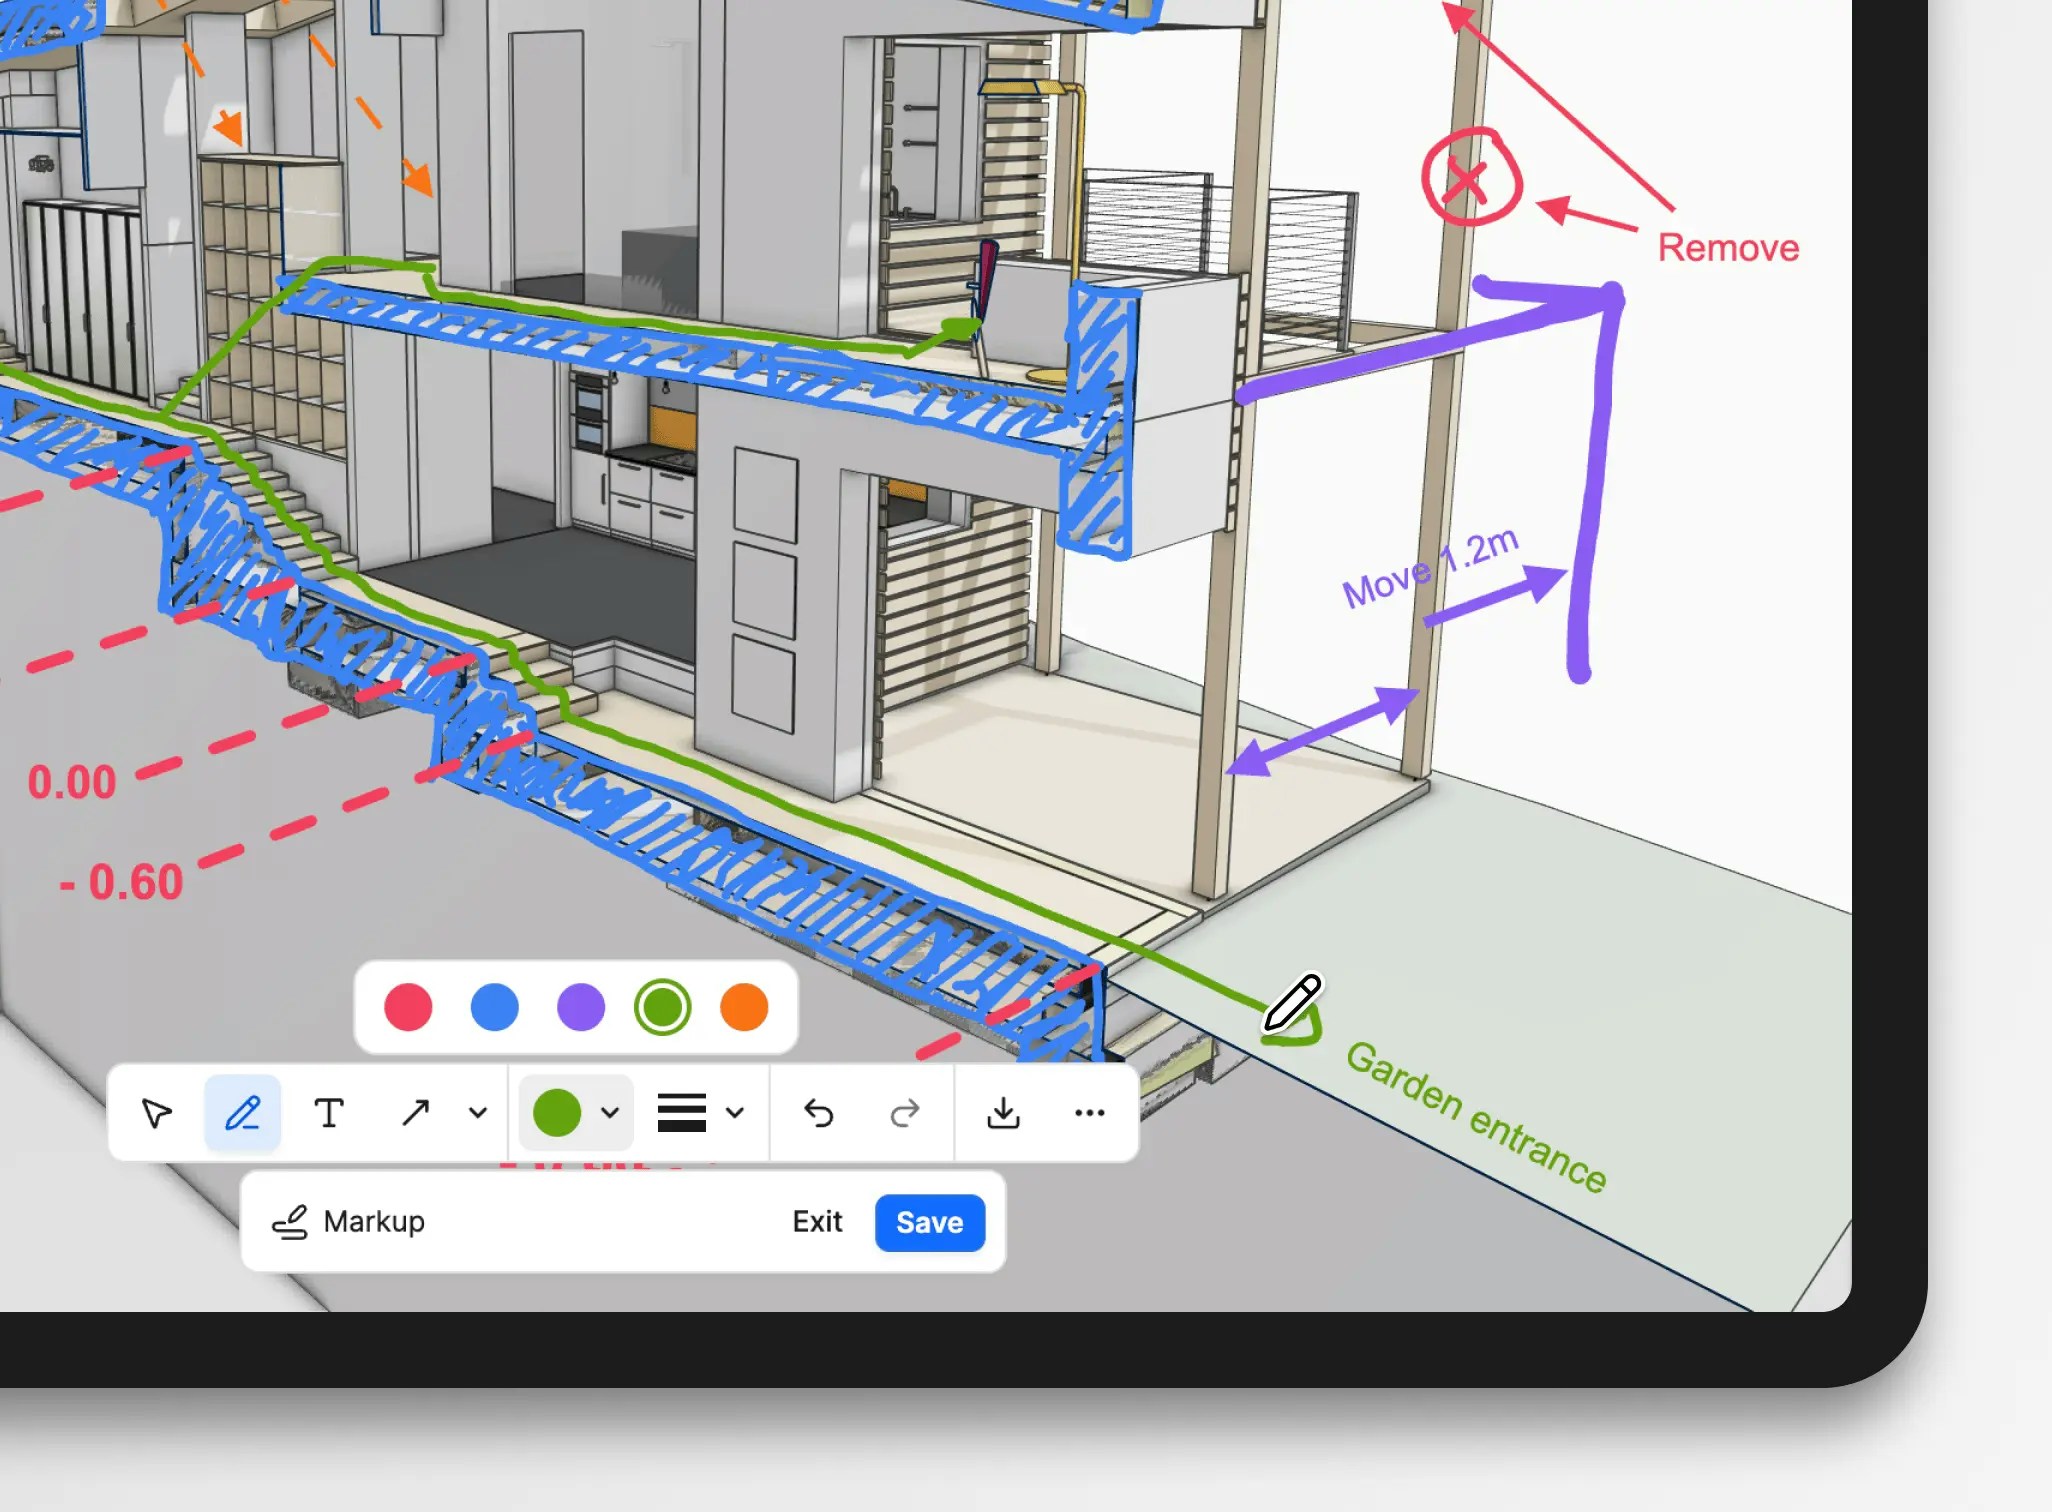
Convert important points into issues

For each decision or required change, create an Issue on the relevant object(s). Set title, description, assignee, priority, and due date while the conversation is fresh. Use labels to tag discipline or review round (e.g. “DR01”, “Structure”). See Issues for full field behaviour.
Issue creation window with title, description, assignee, and status
5

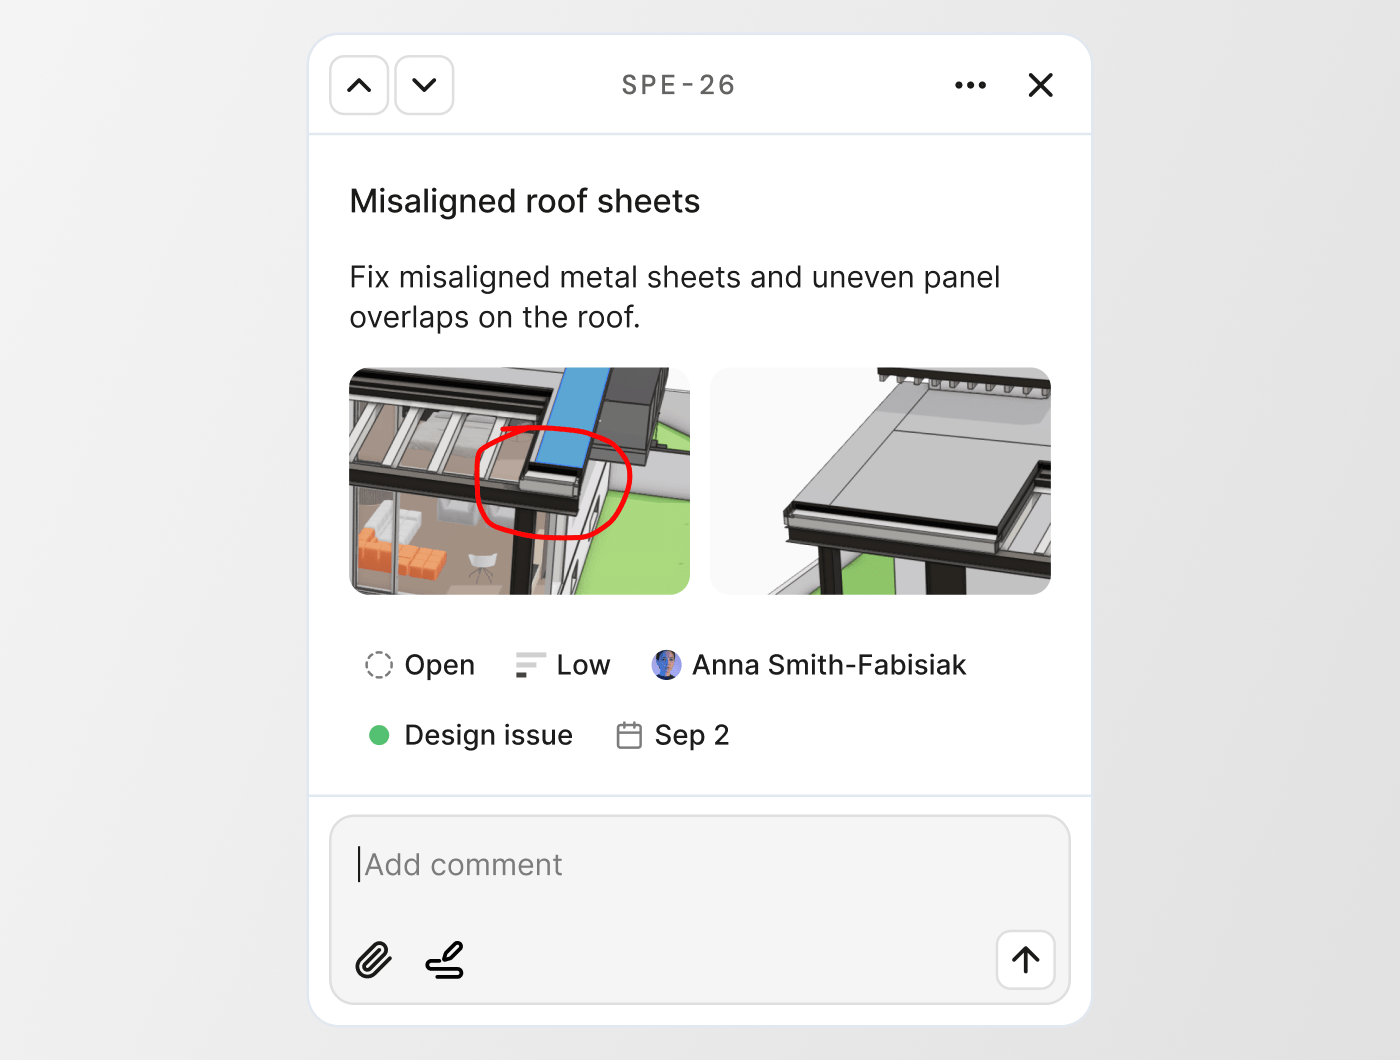
Capture open questions as issues or comments

When there is an open question or debate that will continue after the meeting, either create a separate Issue for it or add a clear comment on an existing issue. Mention the relevant people, summarise options, and link to any supporting files.
6

Bookmark the review state

Once the meeting ends, create or update a saved view that captures the final camera, filters, and visible markups. Use this as the entry point for asynchronous follow‑up work.
Outcome: Key decisions and change requests are captured as issues and comments, with visual markups and saved views tying them back to the 3D model.

Collect Asynchronous Feedback

When to use: Reviewers are in different time zones or cannot attend the same meeting.
1

Send links to review views and issues

Share links to the saved views and specific issues created during the session. Encourage reviewers to reply in‑place instead of sending screenshots or emails.
2

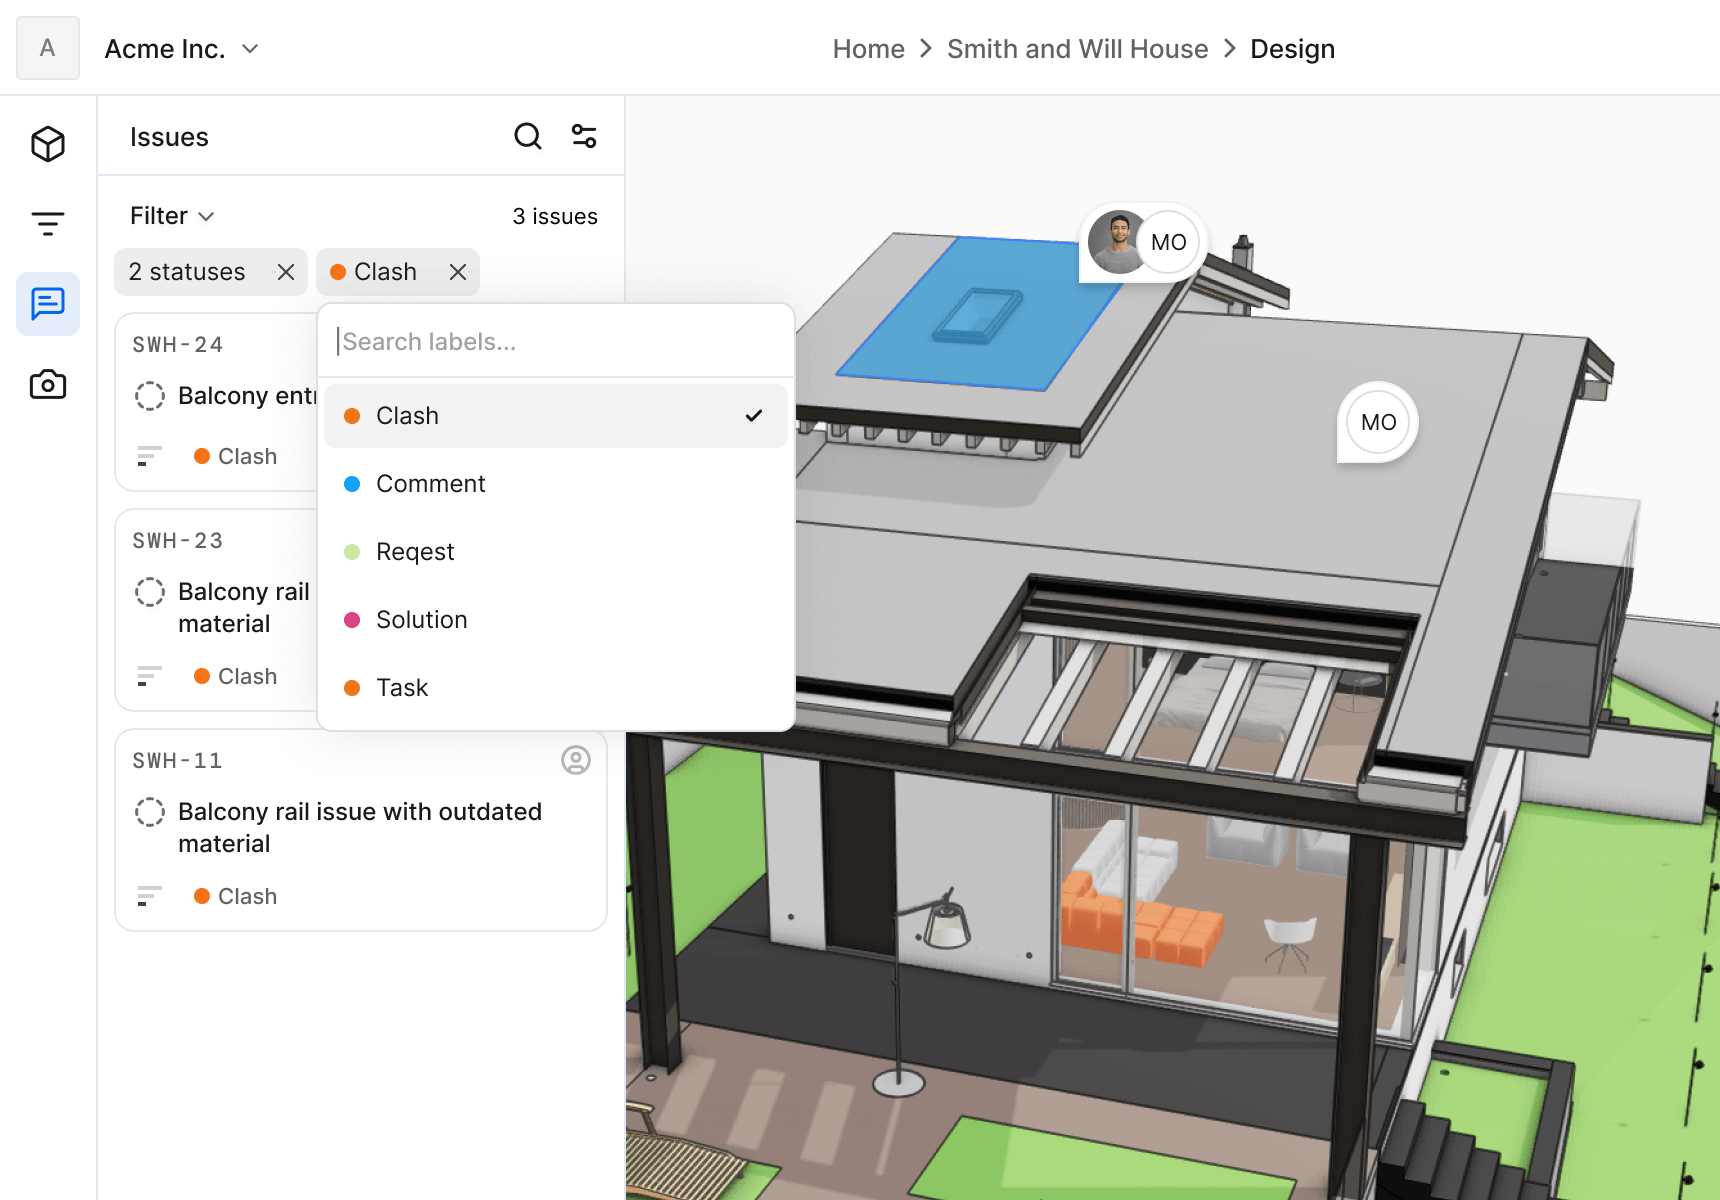
Group related feedback on issues

For topics that affect multiple areas or models (e.g. fire strategy, circulation), keep the conversation in one or a small number of Issues. Encourage people to reply on those issues so context stays in one place instead of spreading across channels.
3

Assign clear owners

Ensure every actionable comment is attached to an Issue with an assignee. Use @mentions in issue comments to bring in additional stakeholders where needed.
4

Close or archive issues when resolved

When a topic is agreed or a question is answered, move the relevant issues to Done (or your team’s equivalent) so they no longer clutter the active list. You can always create follow‑up issues later if required.
Outcome: Feedback from people who were not in the original meeting is captured directly against the model and grouped by issue.

Coordinate Across Disciplines And Versions

When to use: Multi‑disciplinary models or multiple design rounds.
1

Use federation for cross-discipline context

Keep models from different tools and disciplines loaded together so reviewers see clashes and coordination issues in context. Use visibility toggles to focus on one discipline at a time when needed.
2

Compare design rounds with version comparison

When a new version is published, use the Compare versions tools to see what has changed between rounds. Focus comparisons on areas with many issues to confirm that fixes have been applied. See Compare Versions for options.
Version comparison view showing differences between two model versions
3

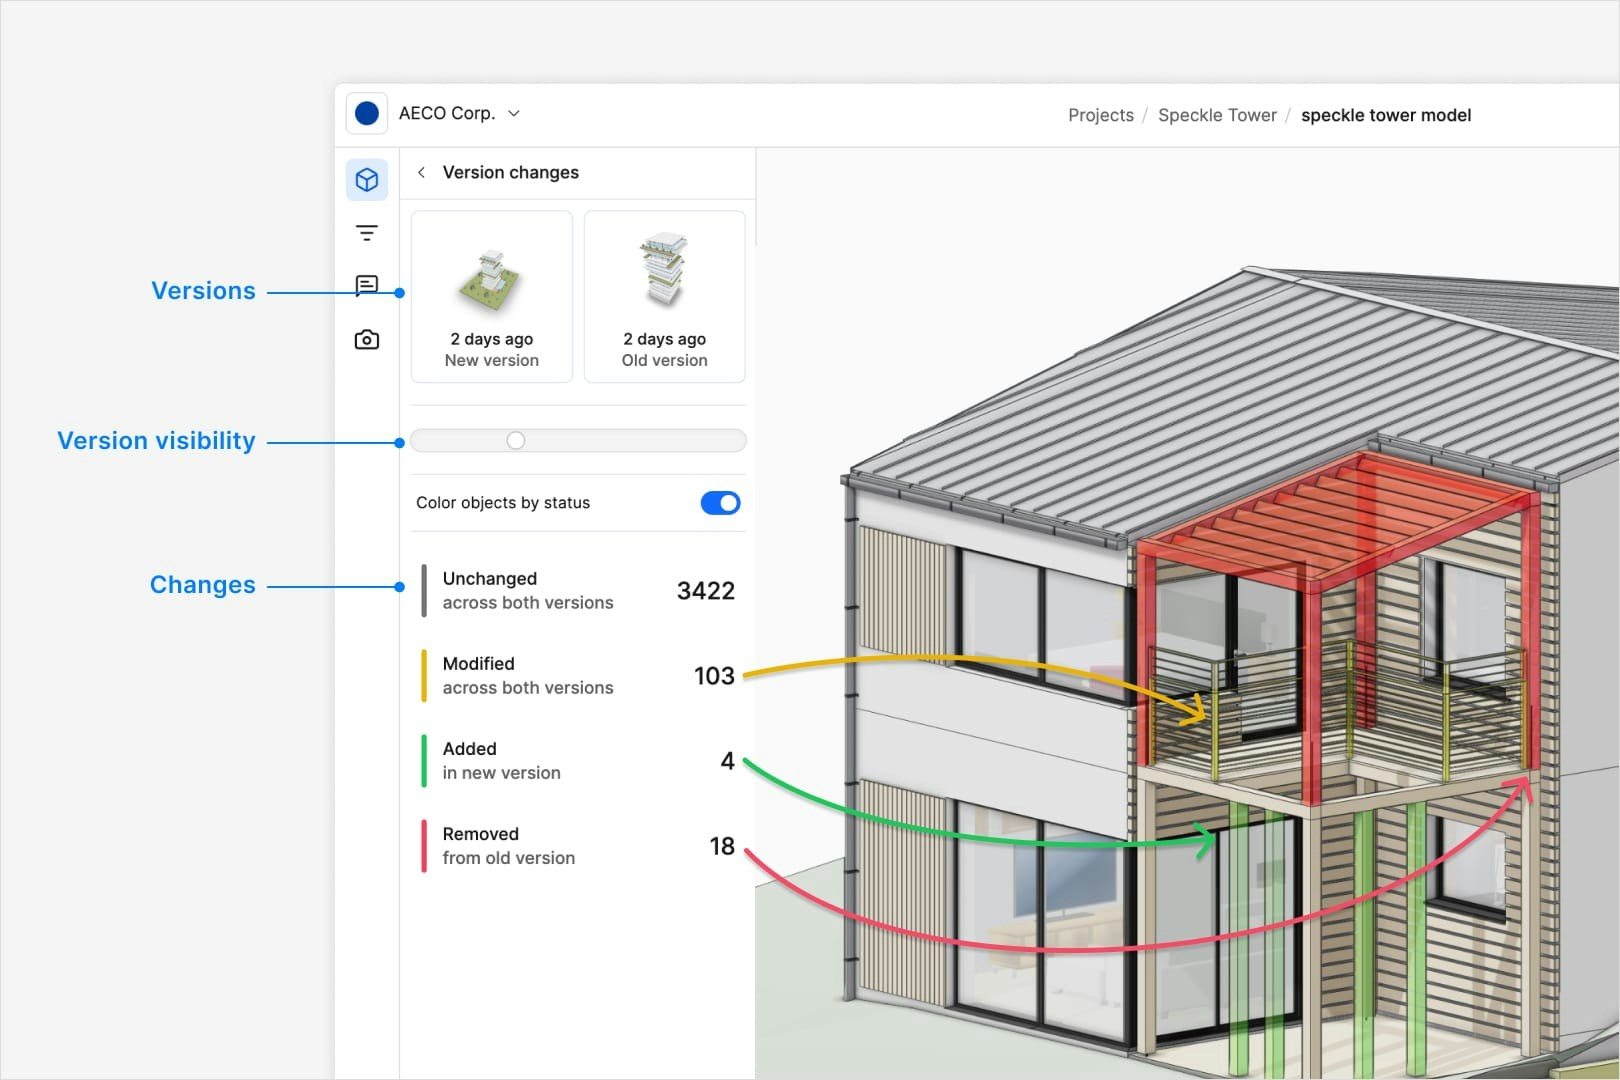
Tie issues to specific versions when needed

For changes that must be tracked precisely, record or pin the model version in your issue descriptions so reviewers know which drop a comment relates to. Use the Issues version filters to revisit the original context when validating fixes.
4

Use labels to group issues by review round

Agree label conventions such as “DR01”, “DR02”, or “Coordination‑MEP” and apply them consistently. This makes it easy to filter issues per round or per coordination topic in both the viewer and dashboards.
Outcome: Discipline teams can see how designs evolve between rounds and confirm that coordination issues are being resolved.

Follow Up And Close The Review

When to use: After a review round, when changes are being implemented and verified.
1

Review open issues by priority and due date

Open the Issues panel in the 3D viewer (left sidebar) or the project’s Issues tab. Filter by status, assignee, labels, and due date. Confirm that high‑priority items from the latest round are clearly assigned and understood.
Issues panel in the 3D viewer with filters and issue list
2

Implement changes in authoring tools

Designers and engineers resolve issues in their native tools, using connectors to see associated issues and markups where available. Keep the Speckle model updated by publishing new versions once fixes are applied.
3

Verify fixes in the viewer

After publishing, load the updated versions and re‑visit the saved views and issues. Confirm that each issue is addressed visually and in the data (e.g. correct geometry, properties, and clearances).
4

Update issue status and resolutions

For each verified fix, move the issue to Ready for Review or Done according to your team’s convention. Add a short note describing what was changed so the history is clear.
5

Prepare for the next round if needed

If further review is required, create new saved views and issues for the next round, and label them accordingly. Close or archive views and labels that are no longer in use to keep things tidy.
Outcome: Design review rounds are closed cleanly, with a clear record of what was requested, what was changed, and when it was verified.

Best Practices

  • Keep scopes small: Limit each review session to a manageable set of views and topics so issues stay focused.
  • Name consistently: Use consistent naming for saved views, markups, issues, and labels so people can find related items quickly.
  • Decide on status conventions: Agree what Open, Ready for Review, and Done mean for your team before you start.
  • Use labels for reporting: Plan labels so dashboards and reports can slice issues by discipline, review round, or risk category.
  • Avoid duplicate channels: Encourage feedback in issues (and their comments) instead of email and chat so history stays with the model.

FAQ

Start with a small number that cover the key questions for the session, typically 5–10 views. You can add more later, but too many views make it harder for reviewers to know where to focus.
Use one issue when several comments all relate to the same location and decision, and separate issues when there are clearly different problems or owners. Each issue should represent a reviewable piece of work with a clear outcome.
Use labels on issues (e.g. DR01, DR02) and include the round in saved view names. You can then filter issues by label in the viewer or dashboards to see everything from a specific round.
Yes. Give them view‑only access to the project and share links to saved views. They can still open and comment on issues if project permissions allow, but they cannot change the model geometry.
You can create issues after the fact from markups and meeting notes by revisiting the saved views and translating important comments into issues. The earlier you do this, the less context you lose.
Before creating a new issue, quickly search existing issues by keywords, labels, or affected area. If one already exists, add a reply or update its properties instead of creating a new one.
Yes. Use Speckle Intelligence dashboards with Issues widgets to track counts by status, label, assignee, or version. See Common workflows for dashboard patterns.
Create a single coordination issue that references all relevant models and clearly describes the cross‑discipline impact. Use labels to tag each discipline and link to any related per‑discipline issues.
Issues stay attached to the objects and versions they were created on. If objects are deleted or heavily modified, you can still load the original version to see the original context, then decide whether to close or recreate issues on the new design.
You can build an Issues dashboard in Speckle Intelligence and share it, or connect data to external reporting tools. Direct export from the Issues list is not yet available; check the Issues documentation for the latest capabilities.
Speckle keeps feedback, issues, and markups tied directly to models and versions, with structured fields (status, assignee, labels) and version awareness. Tools like Miro are excellent for presentation boards, but treat the model as just another frame; you have to manage ownership, status, and version context manually. A common pattern is to run the actual review and tracking in Speckle, then embed Speckle views into Miro or similar tools when you need a storyboard or client presentation.

See Also

Last modified on March 17, 2026