

Setup
Install the connector
Open the Revit connector
- In Revit, select the Speckle tab in the ribbon.
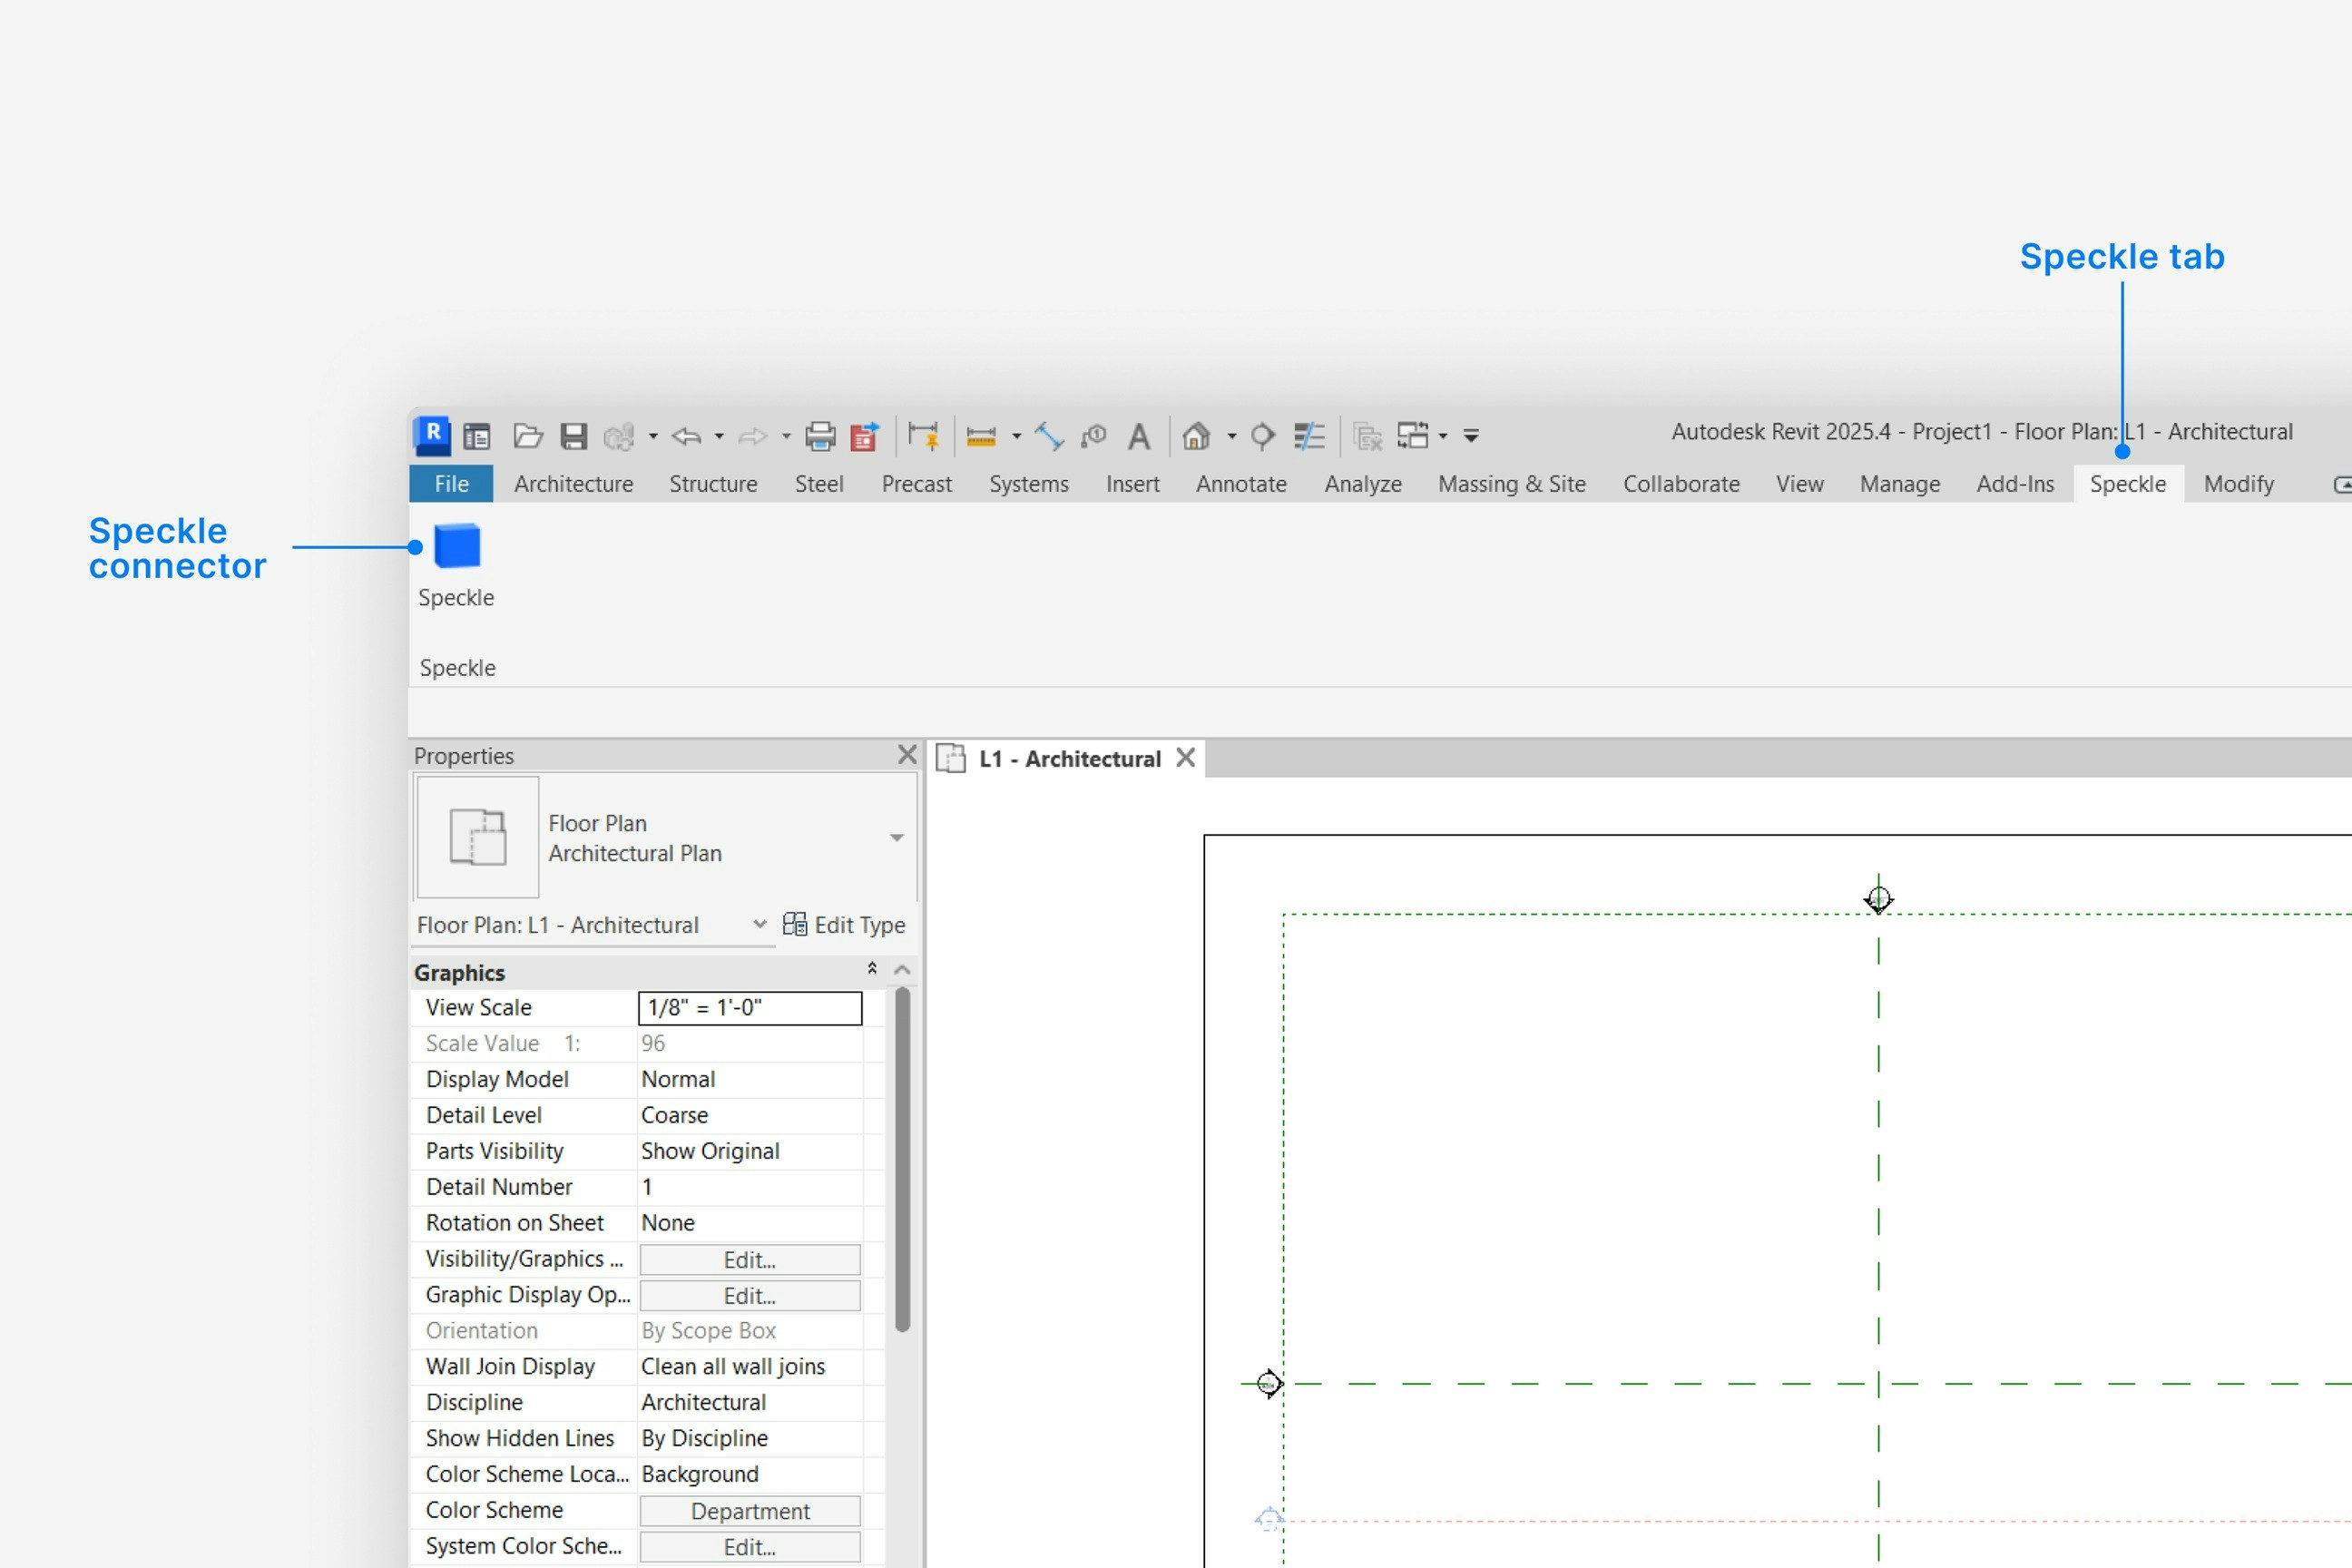
- Select Speckle to open the Revit connector.
- Select Sign in if you haven’t linked your Speckle account.

Why is the Speckle plugin not showing up after I installed the connector?
Why is the Speckle plugin not showing up after I installed the connector?
- Make sure your version of Revit is one of the supported versions.
- Uninstall and reinstall your connector.
.exe, or right-click it and select Open.- Your application version
- Your Speckle connector version
What should I do if the plugin UI is empty or unresponsive, or if my application crashes?
What should I do if the plugin UI is empty or unresponsive, or if my application crashes?
log file in your directory at
AppData\Roaming\Speckle\Logs. Report your problem in our Community
Forum and include your application version, your Speckle
connector version, and a copy of the log.Why can't I add a new account?
Why can't I add a new account?
My connector asks for Speckle Desktop Services. What do I do?
My connector asks for Speckle Desktop Services. What do I do?
How do I uninstall my connector?
How do I uninstall my connector?
Applications. For a full uninstall, also remove Speckle Desktop Services if it
is installed.How do I update my connector to the latest version?
How do I update my connector to the latest version?
Publishing a Model
Select Publish

Choose a project
- Select an existing project - or select New Project to create one

Choose a model
- Select an existing model - or select New Model to create one

Select objects to publish
- In your application viewport, select the elements you want to publish.
- Select Publish.


- Your model is now published to Speckle and is available to the rest of your team.
What types of Revit elements can I publish to Speckle?
What types of Revit elements can I publish to Speckle?
- category, family, and type
- level
- location curve (if any)
- Mesh (solid elements), Curve (model curves), or Pointcloud geometry
- custom properties
- render material
How do I publish models from Revit views?
How do I publish models from Revit views?
- Click the blue filter field at the top of Select objects dialog while publishing a new version.
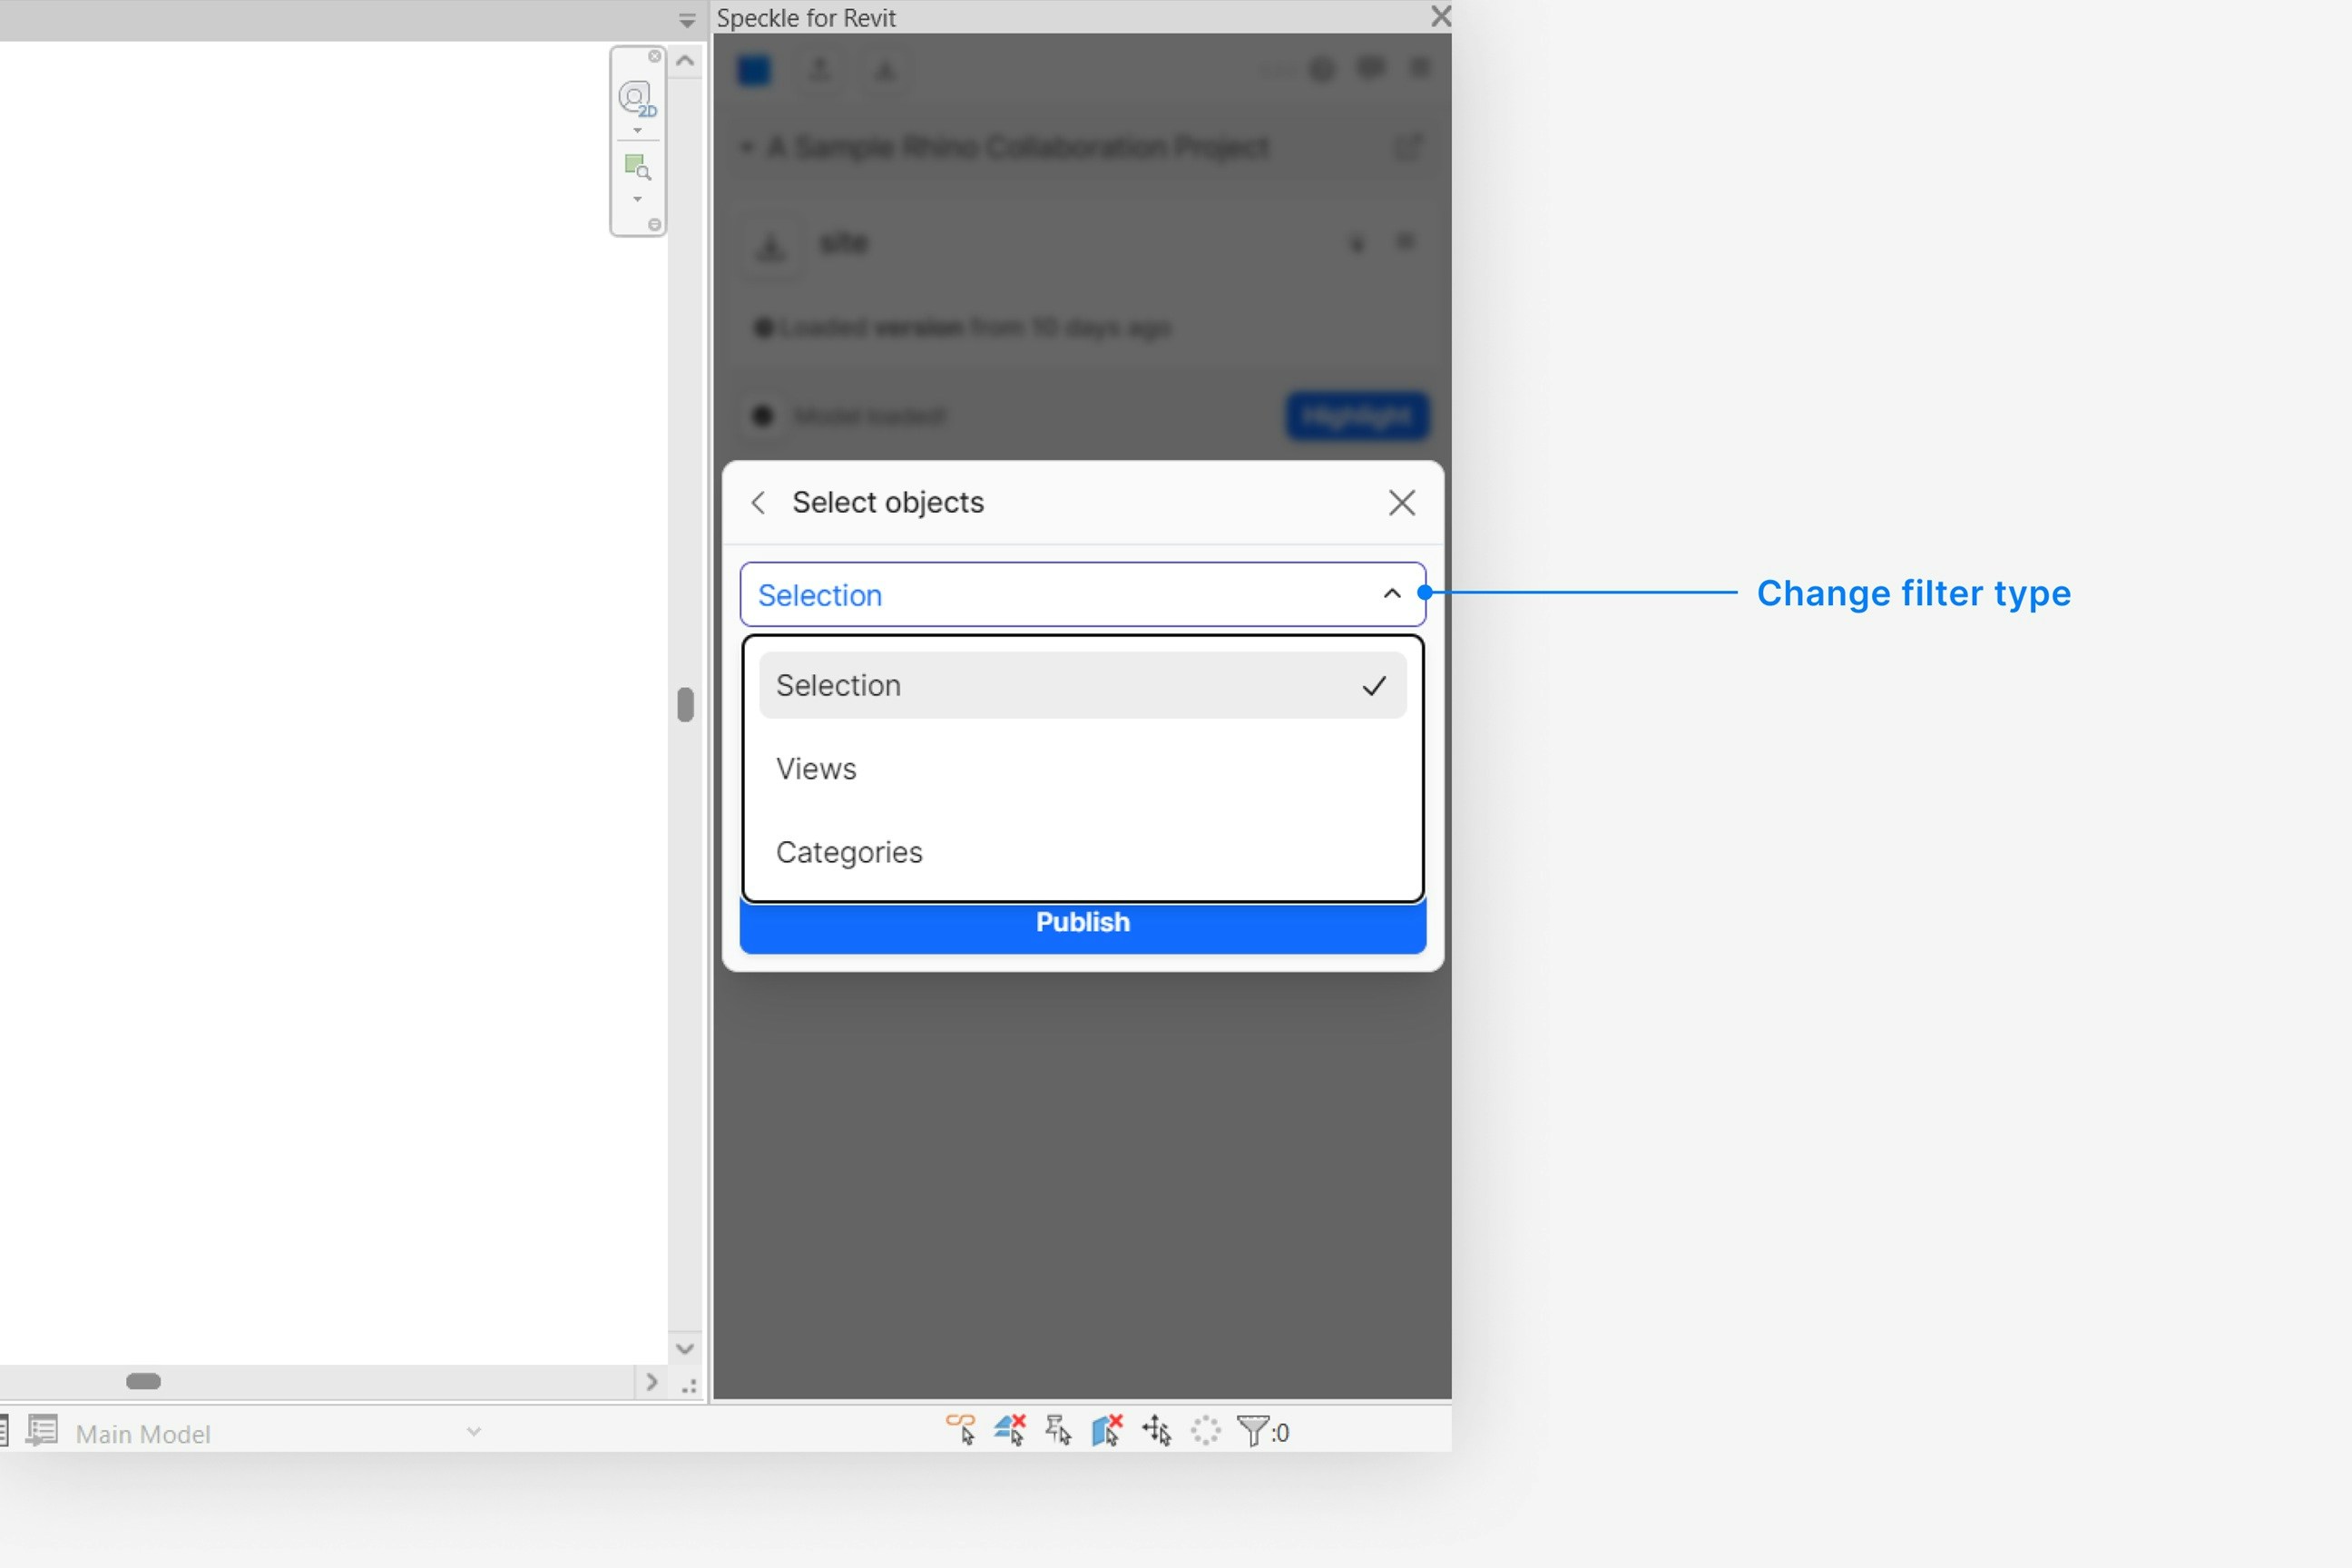
- Select Views, and then select the view you would like to publish from.
How do I publish models by Revit category?
How do I publish models by Revit category?
- Click the blue filter field at the top of Select objects dialog while publishing a new version.
- Select Categories, and then click on any number of categories you would like to add to the filter.
How do I publish linked models?
How do I publish linked models?
- Expand the Settings field at the bottom of the Select objects dialog while publishing a new version.
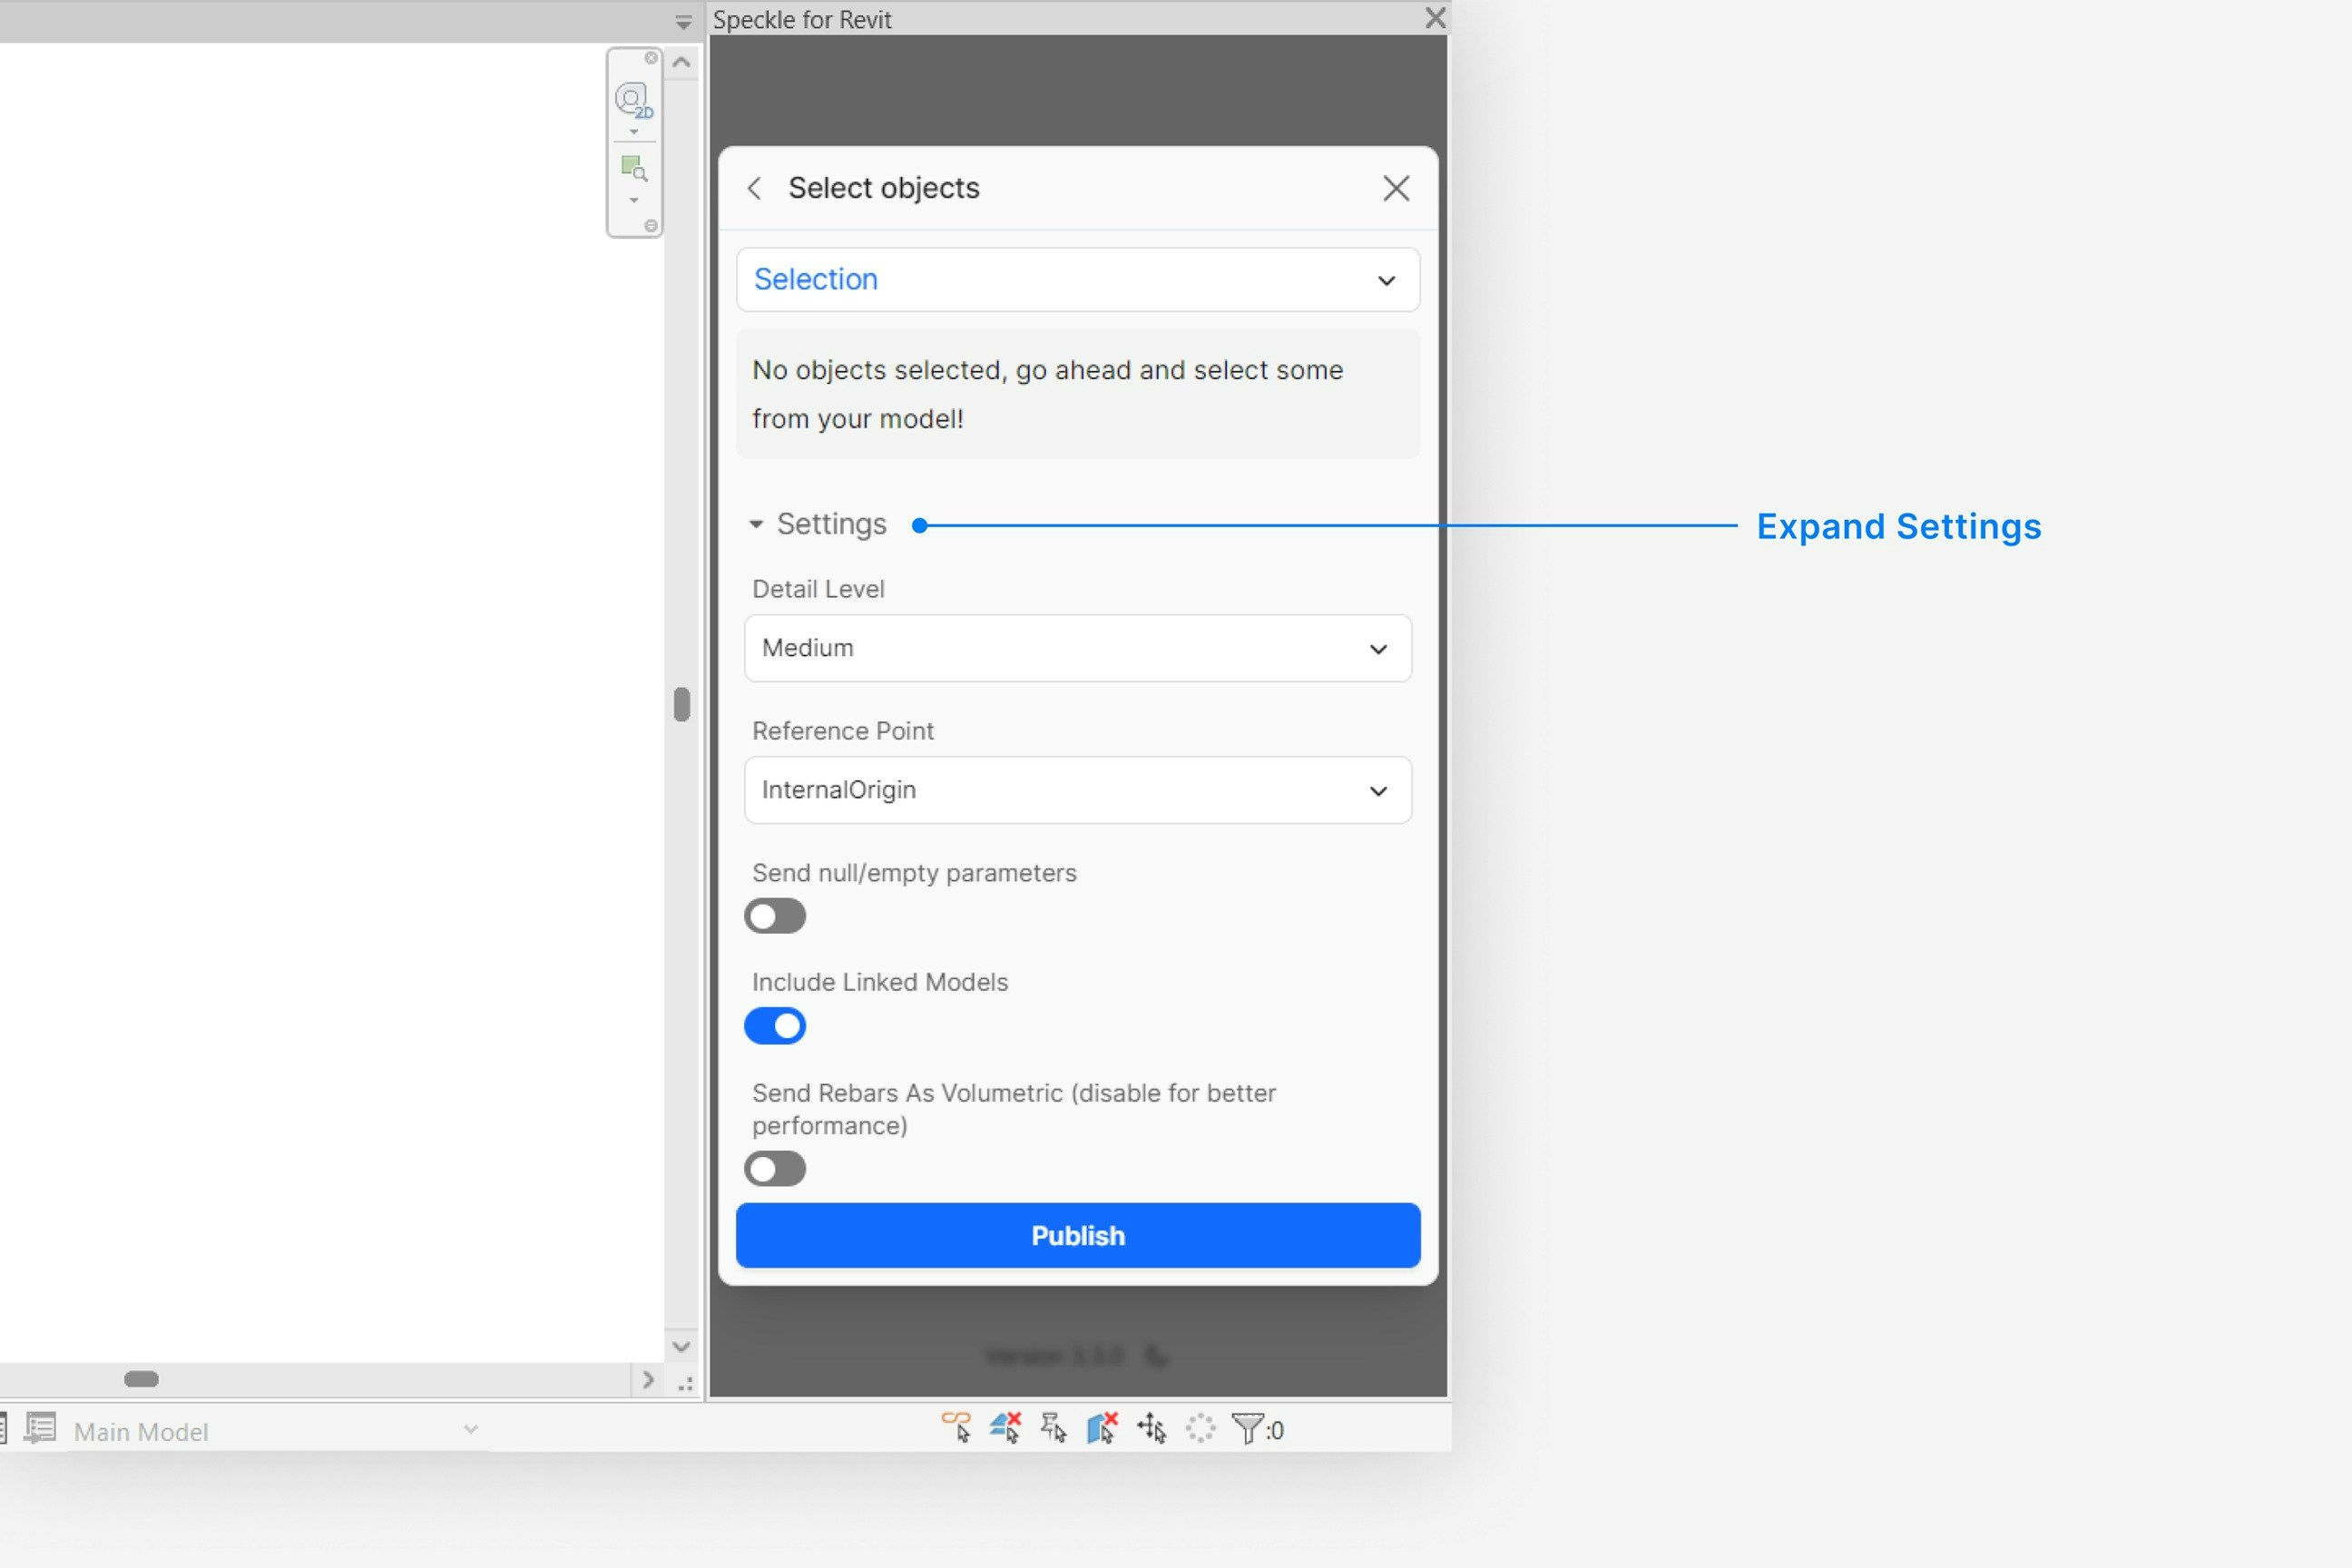
- Check that the Include linked models toggle is turned on.
How do I make sure my Revit model is aligned with my other Speckle models?
How do I make sure my Revit model is aligned with my other Speckle models?
How do I see the custom properties on my published Revit elements, like parameters or material quantities?
How do I see the custom properties on my published Revit elements, like parameters or material quantities?
properties field when you select and view a Revit object in your browser.
Custom properties vary depending on the type of Revit element, and can include:- element id, built-in category, and workset properties
- material quantities
- parameters
- structural material properties (such as density and compressive strength)
How do I publish my rebar as solid objects instead of curves?
How do I publish my rebar as solid objects instead of curves?
- Expand the Settings field at the bottom of the Select objects dialog while publishing a new version.
- Toggle the Send Rebars As Volumetric setting to true. Caution: publishing all rebars as their volumetric representations can significantly slow down publishing speed.
Are my Revit 3D views published to Speckle?
Are my Revit 3D views published to Speckle?
Why does my model have the wrong colors in the web browser viewer?
Why does my model have the wrong colors in the web browser viewer?
Are bitmap or image-based material textures supported?
Are bitmap or image-based material textures supported?
Why are some objects that I published missing from my model?
Why are some objects that I published missing from my model?
Loading a Model
Select Load

Choose a project

Choose a model

Choose a version to load
- Latest version is always first.
- To load a specific version, select it from the UI.


How are Speckle models loaded in Revit?
How are Speckle models loaded in Revit?
- render material (if any)
Mesh,Curve, orSolid(only from Rhino and Grasshopper) geometry.
How do I load custom properties or parameters onto objects in Revit?
How do I load custom properties or parameters onto objects in Revit?
applicationId, so a script or schedule can find the Speckle object behind a Revit element. It is written on every load, including when you load a newer version of the same model. This needs a model published with a 2026.9 or later connector; older versions load without it.To load the rest of an object’s properties (Rhino user text and user dictionaries, Grasshopper attributes, parameters published from another Revit model), expand the Settings field at the bottom of the dialog and turn on Receive Properties as Parameters. Each property becomes an instance parameter on the created element:- A parameter the element already has with the same name (a built-in such as Mark or Comments, a project parameter, or a shared parameter you created) receives the value as it is. The value is converted to that parameter’s type, so a Number parameter gets a number and a Yes/No parameter gets a yes or no. A measurable parameter such as a length reads the value in the project’s display units for that quantity. If your parameter is bound to other categories than the loaded elements use, its binding is extended to those categories.
- A name the element does not have yet is created as a shared parameter in the Speckle group of the Speckle shared parameter file (
%APPDATA%\Speckle\SpeckleSharedParameters.txt), bound to the element’s category under Data, and typed from the loaded values: text, number, or yes/no. A name already in that file keeps the type it was first created with. - Parameters published from another Revit model keep their bare name (
Mark, notParameters.Instance Parameters.Identity Data.Mark); when an instance and a type parameter share a name, the instance value wins. Nested properties keep their dotted path, so a Rhino user dictionary entryphaseinUser DictionarybecomesUser Dictionary.phase, and a record with avaluefield collapses to its parent (area.valuebecomesarea). Characters Revit does not allow in a parameter name are replaced with_.
How do I load a Speckle Model according to a specific reference point in Revit?
How do I load a Speckle Model according to a specific reference point in Revit?
- Expand the Settings field at the bottom of the dialog while loading a model.
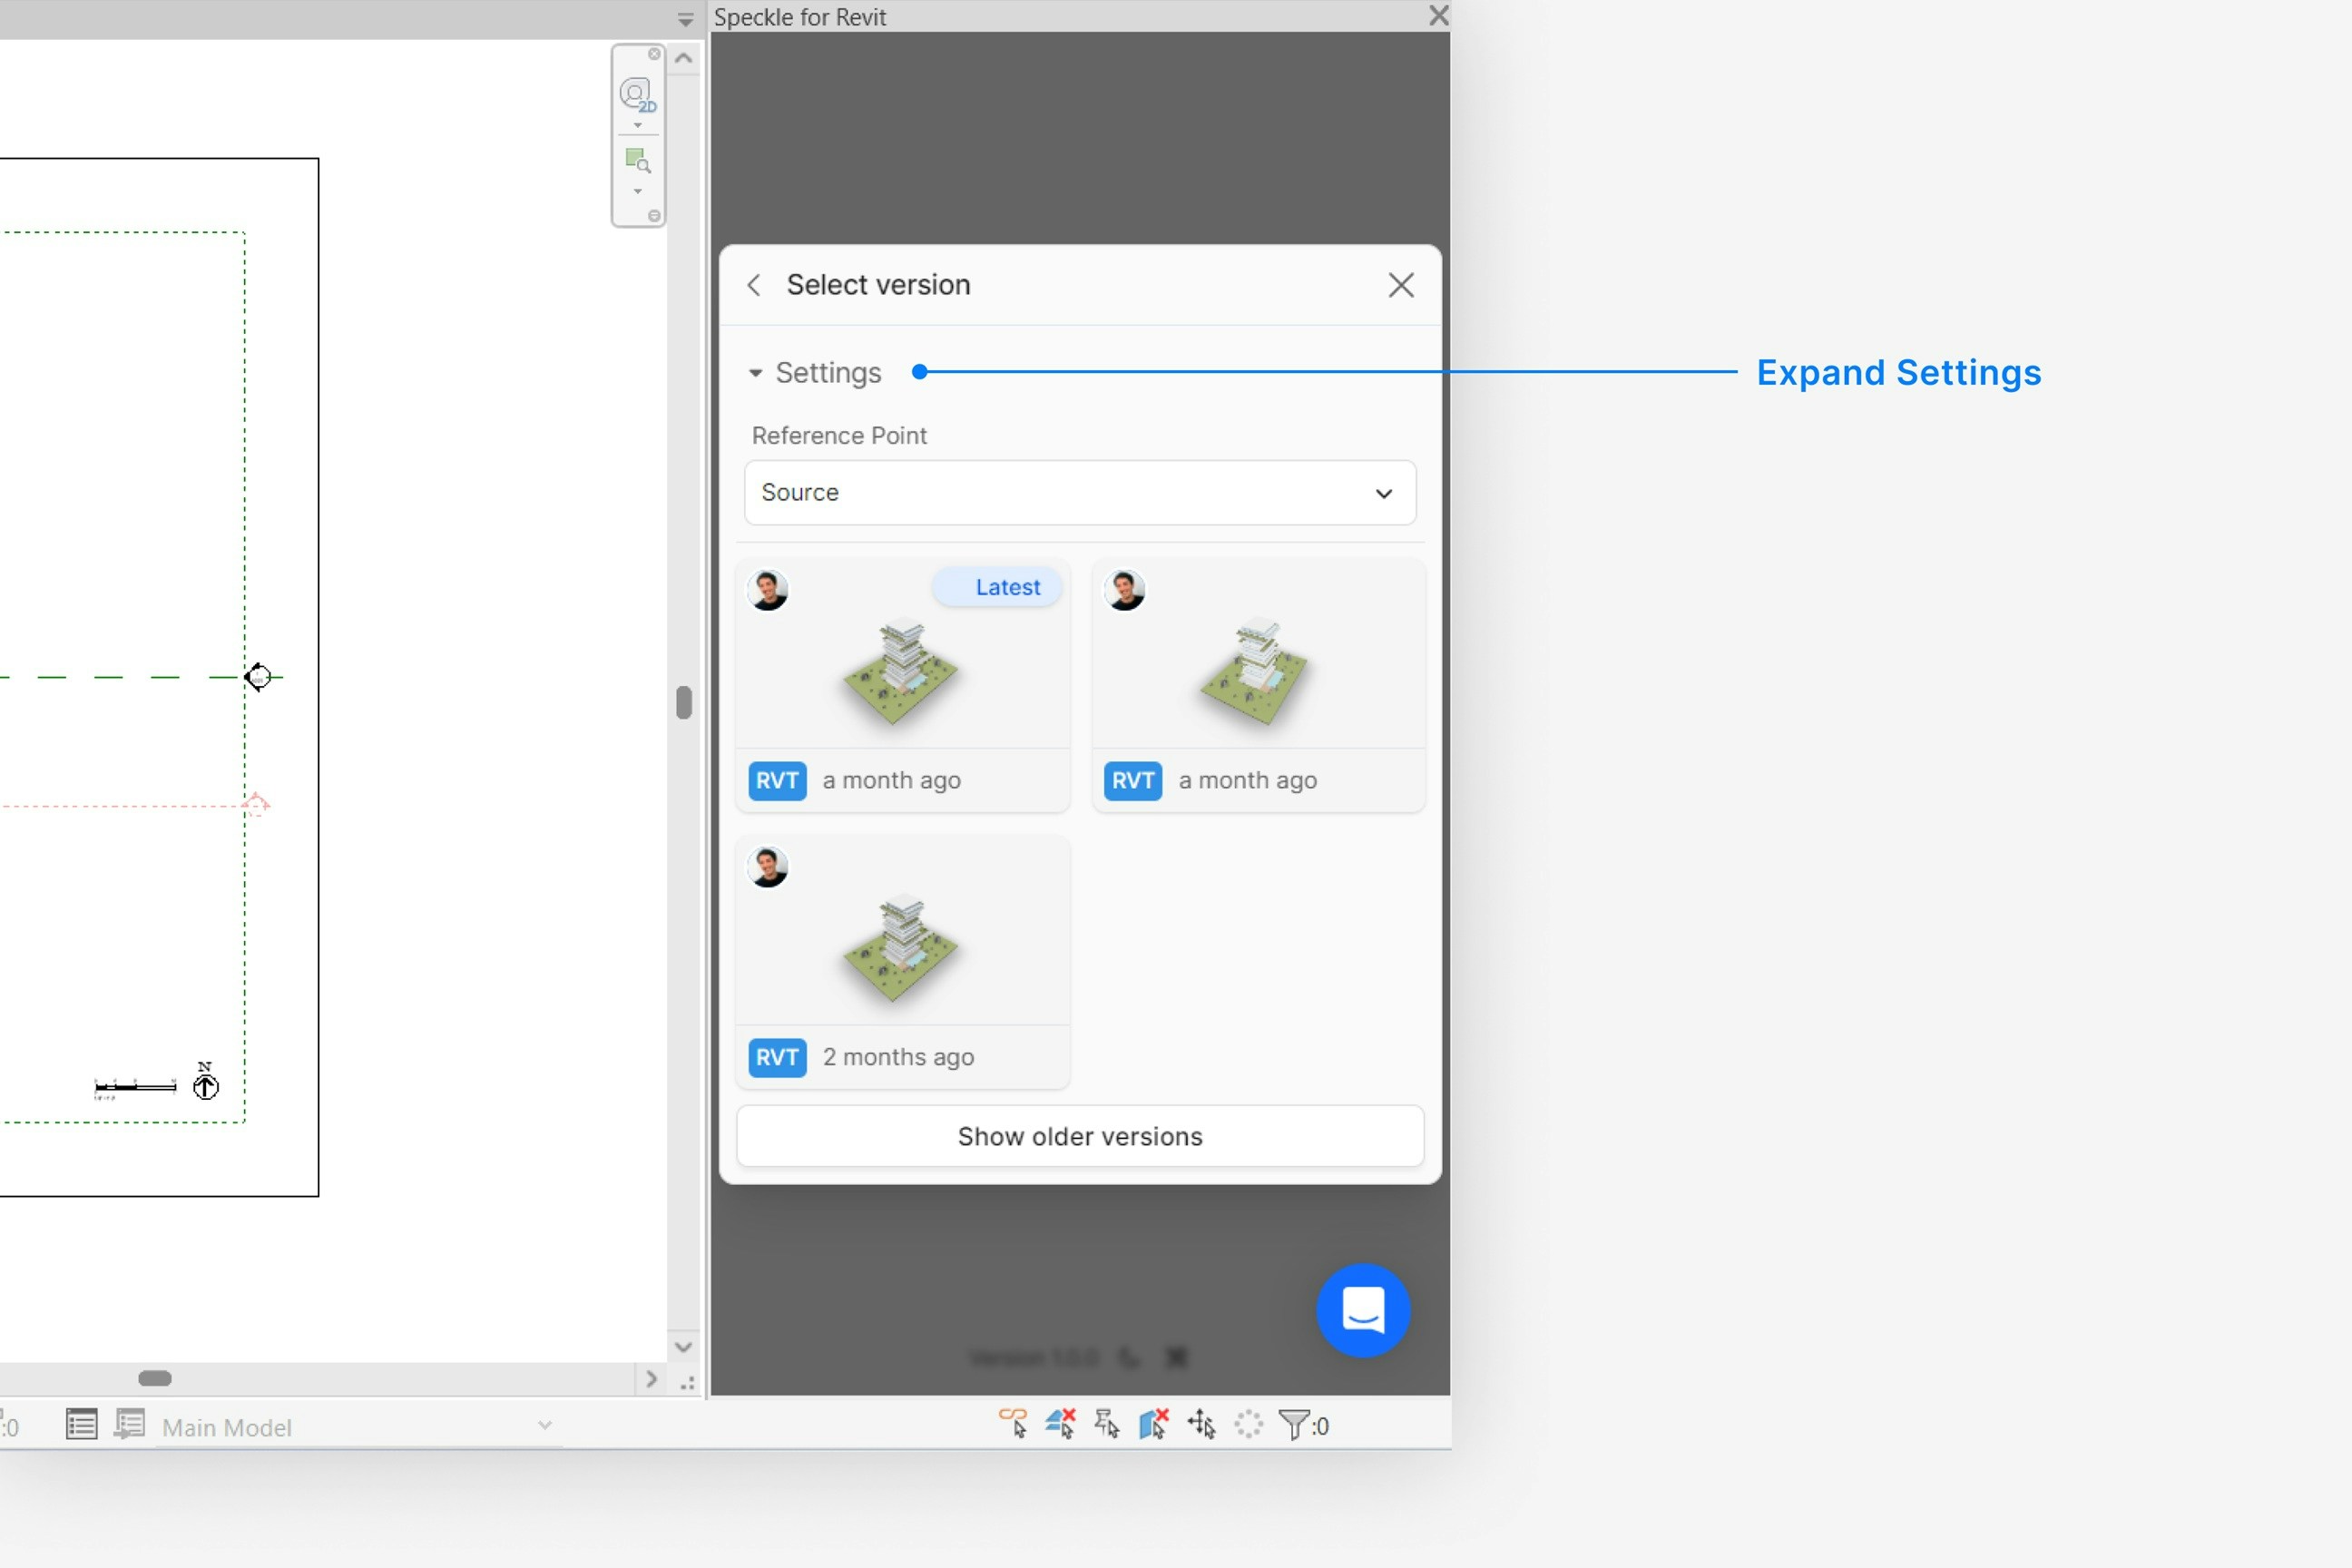
- Set Reference Point to Source (the default) to load the model according to the incoming model’s placement.
- Set it to InternalOrigin, ProjectBase, Survey, or SharedCoordinates to load the model according to that datum in your current document.
How do I change the material of a Speckle model object I loaded in Revit?
How do I change the material of a Speckle model object I loaded in Revit?
- Loaded as direct shapes from Rhino or Grasshopper: the object contains solid geometry, so you can edit the material directly on the direct shape.
- Loaded as families using Receive Blocks as Families: a material type parameter is created on each family, so you can change the material from the project without editing the family definition.
- All other cases: changing the applied material is not currently supported.
What happens when there is a material in the document with the same name?
What happens when there is a material in the document with the same name?
How do I change the category of a Speckle model object I loaded in Revit?
How do I change the category of a Speckle model object I loaded in Revit?
Are 3D views included when I load a model in Revit?
Are 3D views included when I load a model in Revit?
- If a 3D view with the same name already exists in Revit, it will be skipped and not overwritten.
- Views published from other connectors (e.g., Rhino named views) are also received as 3D views in Revit.
Why are some objects that I loaded missing from my model?
Why are some objects that I loaded missing from my model?
Are bitmap or image-based material textures supported?
Are bitmap or image-based material textures supported?
Why can't I select a project in the UI—it's disabled?
Why can't I select a project in the UI—it's disabled?
Can I load a model via URL?
Can I load a model via URL?
Model placement
Published geometry stays in Revit’s internal coordinates. The Reference Point setting selects the datum you want consumers to use, and Speckle stores that choice next to the model as a model placement. The viewer and the Revit connector apply it when they load. One publish serves every datum: collaborators choose their placement on their side instead of asking you to republish. A linked model’s placement in the host document is never written as the model’s reference point.Publish with a reference point
Open publish settings
Choose a reference point
Leave Apply Transform off
View the placement in the web app
The web viewer lands the model using its model placement. A placement picker lets you inspect the same model from any other datum without republishing. The datum you published with is marked (published).Load with a reference point
The Reference Point load setting offers Source (default), InternalOrigin, ProjectBase, Survey, and SharedCoordinates. Models published from a 2026.9 connector land in the right place whatever the sender’s Apply Transform choice. If the sender applied the transform to the geometry, Revit inverts it automatically. With Source:- 2026.9 publish, Apply Transform off: nothing is applied. Geometry is already in internal coordinates.
- 2026.9 publish, Apply Transform on: the sender’s transform is inverted automatically.
- Publish from before 2026.9: the sender’s transform is inverted, as before.
Read the placement in a script
Scripts and SDK consumers readmodelPlacement.* from eav.model. Apply the placement yourself
unless the sender turned Apply Transform on.
modelPlacement.transform: internal origin to the datum selected on publish. The value is 16 row-major doubles. Translation is inmodelPlacement.units.modelPlacement.default: which datum that is (internalOrigin,projectBasePoint,surveyPoint,sharedCoordinates).modelPlacement.source: the same datum, orinternalOriginFallbackwhen the selected base point could not be found in the document.modelPlacement.options.<datum>.transform: the transform for every available datum, so a consumer can switch.modelPlacement.appliedToGeometry:falseby default,trueonly if the sender turned Apply Transform on. If it istrue, invert the transform before you place the model.referencePoints.*andprojectLocation.trueNorthAngle: raw base-point positions, True North, and site location.
Upgrade to 2026.9
Models you already published stay readable, and the 2026.9 connector loads them. Re-publish once from a 2026.9 connector if you need the viewer placement picker and named datums for an existing model. Scripts and SDK consumers that readreferencePointTransform on the root object must move
to modelPlacement.*.
Re-publish an existing model
Update the Revit connector
Publish a new version
Update scripts and SDK consumers
The model is already in scope.- Read
modelPlacement.*fromeav.model. - Apply
modelPlacement.transform. The value is 16 row-major doubles. Translation is expressed inmodelPlacement.units. - If
modelPlacement.appliedToGeometryistrue, invert that transform before you place the model. Do this regardless of the receive datum. - Then apply the receive datum you want, if it is not Source.
I published with Survey and the model shows at the internal origin in the viewer. What happened?
I published with Survey and the model shows at the internal origin in the viewer. What happened?
Where did referencePointTransform go?
Where did referencePointTransform go?
modelPlacement.* from
eav.model. See Read the placement in a script.Something still lands in the wrong place. What should I send?
Something still lands in the wrong place. What should I send?