

On a self-hosted server running a release before 2026.9, the accepted formats differ. See
Compatibility mode.
When to use file uploads
Upload files directly when you:- Need to convert IFC data to Speckle format
- Don’t have the source application or license
- Want to view a model quickly in your browser
- Receive files from collaborators who don’t use Speckle connectors
- Work with file formats that don’t have a dedicated Speckle connector
Uploads and connectors produce different datasets
These differences affect analysis. Intelligence dashboards, Data Validation, Power BI and any querying you build on model data all read the published objects and their properties. If some models in a project arrive by upload and others by connector, counts, groupings, and validation results can differ for the same source file. Choose one route per project and stay with it, and be explicit about which route produced any figures you report. The two routes serve different purposes. Uploads read a file, so they cover formats and situations where no connector exists or the authoring application is not available. Connectors run inside the authoring application, so they can carry data that lives in the session rather than the file — selection and view filters, coordinate settings, and application-specific properties. See the format details below for what each upload path carries.Upload a file
Upload limits: Maximum file size is 2 GB for all plans and formats except ETABS. An ETABS
upload takes files up to 128 MiB each. See Upload an ETABS model.
1
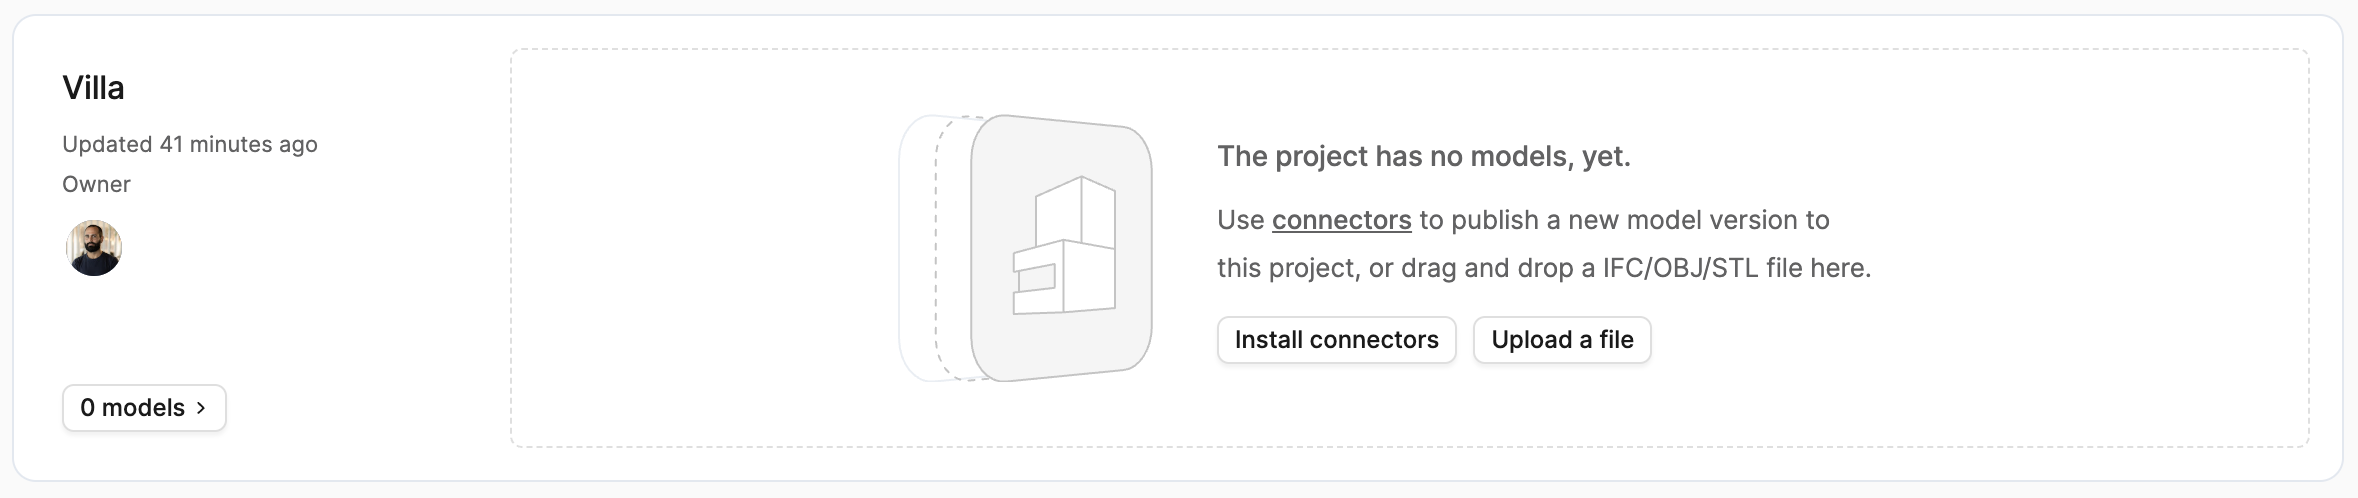
Create a project
Create or open your project and select the file upload option. The upload dialog opens.
2
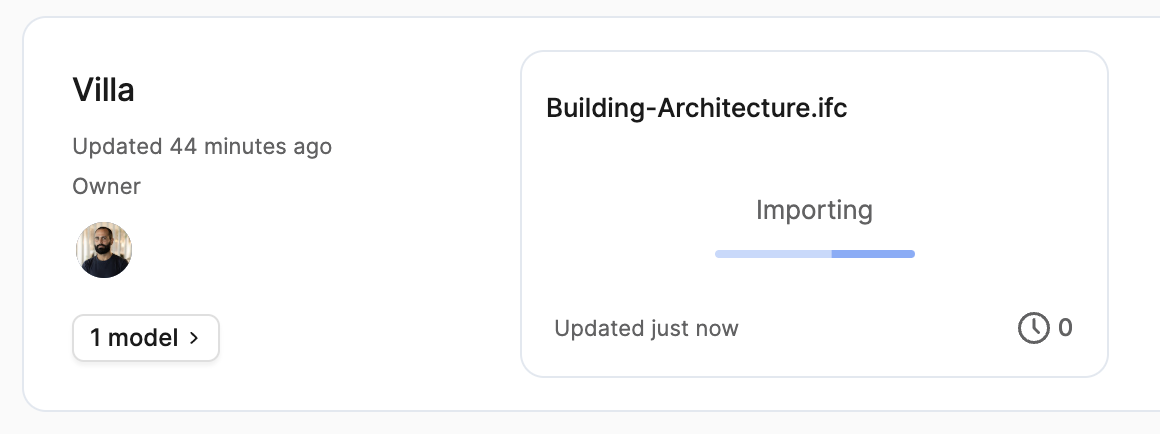
Add your file
Drag and drop your file into the project. Speckle creates a new model with the file name.
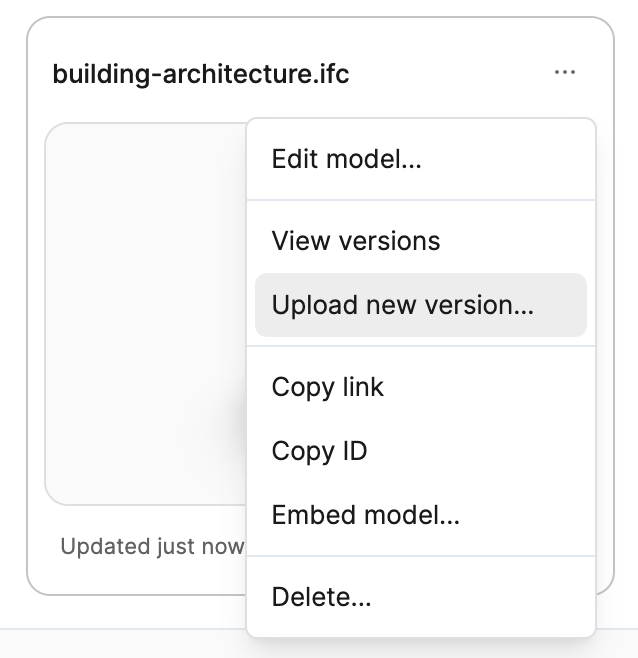
3
Upload new versions
To upload an updated file, open the model’s dropdown menu and select the upload option.
The uploaded file creates a new version of that model.
Supported file formats
The format rules apply to drag-and-drop uploads in the web app and to uploads through the API. Existing models stay readable; the rules affect importing new files and uploading new versions. Availability depends on the conversion services enabled for your workspace. Cloud syncs (ACC, ProjectWise, Trimble Connect, and SharePoint) accept the same formats as uploads, except Tekla Structures: cloud syncs accept neither.tekla nor .db1 files. A synced QGIS project fails to convert,
because a sync cannot add its project folder zip: sync the project’s data files instead. A synced
.rvm publishes without its attribute export and P&IDs. Trimble Connect syncs additionally accept the
formats Trimble Connect converts to TrimBIM; see Sync models from Trimble
Connect.
Compatibility mode applies to the whole workspace and ends on 1 November 2026. See
Compatibility mode and Speckle’s new data
model.
If your Autodesk (or other) software can export a Navisworks Cache file (
.nwc) or a Navisworks
Document file (.nwd), you can upload it to Speckle without owning a Navisworks license.
Navisworks uploads follow the 2 GB upload limit. See Navisworks for
when to use the desktop connector or ACC sync instead.Want to help improve this flow? Join the user testing study for NWC and NWD uploads with ACC sync
on the User testing opportunities page.
Reference point options apply only to Revit (
.rvt) files, in uploads and in Forma Data
Management (ACC) syncs. Other formats, including IFC and Navisworks, are placed using the
coordinates saved in the file. To load a model into Revit at a chosen reference point, use the
Revit connector.Unit conversion
Speckle detects and preserves the source units for these formats:- IFC ✔︎
- 3dm ✔︎
- DGN ✔︎
- SKP ✔︎
- STP ✔︎
- FBX ✔︎
File format details
IFC
IFC files are converted to Speckle format with support for attributes, property sets, and quantities.Supported versions: IFC2x3, IFC4, IFC4x1, IFC4x2, IFC4x3
- Element and element type attributes
- Property sets
- Element quantities
- IFCSpaces are published as volumetric geometry
- IFC2x2_FINAL and Release Candidate versions aren’t supported
- Alternative formats such as XML, ZIP, and databases aren’t supported
- 2D types like IfcAnnotation aren’t currently supported
Rhino (3DM)
Rhino files maintain geometry and layer structure when uploaded.If you need object names, user strings, render materials or named views, publish with the Rhino
connector instead.
- Rhino 9 files aren’t supported
- Dynamic text isn’t supported
SketchUp (SKP)
SketchUp models are converted with geometry and basic organization preserved.If you need SketchUp attributes, publish with the SketchUp connector
instead.
- Attributes aren’t imported
- Dynamic components may not transfer correctly
DWG
Upload AutoCAD drawing files directly. DXF files are accepted only in compatibility mode.If you need object properties such as xdata carried through, publish with the AutoCAD
connector instead.
- Large files may take longer to process
- Dynamic text isn’t supported
Wavefront (OBJ)
OBJ files are converted with geometry preserved. Known limitations:- Materials aren’t supported
Tekla Structures
Speckle converts Tekla Structures model packages (.tekla) and model databases (.db1) on
deployments where Tekla uploads are enabled. This is not enabled by default; confirm availability
with Speckle before relying on it for your workflow.
Upload the complete model folder to preserve profiles, shapes, and materials.
Vectorworks (VWX)
If your design lives in Vectorworks, upload the.vwx file to publish it without opening
Vectorworks or installing its connector. The Vectorworks connector
publishes the objects you select; an upload publishes the 3D content of every design layer.
Speckle reads files last saved in Vectorworks 2021 through 2027. Files from other releases are not
supported yet.
What is published:
- 3D objects on every design layer, including design layers hidden in the document, grouped by story, layer, and type.
- Each object’s name, type, object properties, and IFC properties. An object whose 3D geometry Speckle cannot read arrives with its properties and no geometry.
- Objects in a class that is hidden in the document.
- Sheet layers.
- 2D-only objects, such as callouts, data tags, and section lines.
Speckle follows the class visibility saved in the file. To include a hidden class, make it visible
and save the file before you upload it.
Solibri (SMC)
Upload a Solibri.smc file to publish the whole federation saved in it, without opening Solibri
or installing a connector. You do not need the original IFC files alongside it. After conversion,
open the model in Speckle to view its geometry and inspect its properties.
Files saved in Solibri 9.12 and 26.6 have been verified. Speckle attempts to read .smc files from
other releases, but their compatibility has not been verified. .smv and .smct files are not
supported.
What is published:
- The saved federation, grouped by source model and its spatial hierarchy.
- Component geometry with original colours and transparency.
- Source properties, Solibri-derived properties, and saved classification results, including group, zone and system memberships.
- Rule sets and checking results.
- Presentations.
- Issues and BCF data.
TrimBIM (TRB)
TrimBIM (.trb) is Trimble’s model format. Trimble Connect converts every model it stores into
TrimBIM for its 3D viewer, and Tekla Structures, Trimble Business Center and Trimble Connect for
Windows export it. Upload a .trb file to publish the model without the application that made it.
Speckle reads TrimBIM version 8, the version Trimble Connect writes. Files in another TrimBIM
version are not supported yet.
What is published:
- Every element with its geometry, name, type and property sets, grouped by site, building and storey, or by the groups saved in the file.
- Materials and colours. Textures are not published.
- Openings under the element they cut, and doors and windows linked to the wall that hosts them.
- Elements whose geometry Speckle cannot read, such as alignments, grid lines, labels and bolts, arrive with their properties and no geometry.
Upload an ETABS model
Upload an ETABS.edb file to publish the model without opening ETABS or installing its connector.
Add the result files ETABS saves beside it to publish the analysis results too. For the steps, see
Upload a file. An upload publishes the whole model, with the same objects and
properties as the ETABS connector.
Files that convert
Speckle reads files saved in ETABS 18 through 23.0. Files from other releases are not supported yet. Analysis results from ETABS 18 files are not supported. These limits apply to an ETABS upload:- Each file, including the
.edb, can be up to 128 MiB. - The
.edband its result files together can be up to 640 MiB. - An upload can include up to 100 result files.
Add the analysis results
The.edb holds the model, not its analysis results. ETABS saves the results beside it in result
files with the same name as the model: a .msh file and .Y files, such as .Y, .Y00, .Y01,
.Y$$, .Y_ or .Y_1. Upper and lower case in file names do not matter.
To upload a model with its results, do one of the following:
- Drop the model folder, or select the
.edbtogether with its result files. The upload starts immediately. - Drop the
.edbon its own. In Add the analysis results, drop the model folder or the result files, or use Choose folder or Choose files. Then select Upload with results.
.edb but no result files also opens Add the analysis results. To
publish the model without results, select Upload model only.
Result files must be in the same folder as the .edb. Speckle leaves out files in subfolders and
files that do not match the model, and does not upload them.
If a result file the analysis needs is missing, the model publishes without any analysis results.
The upload does not report an error. Upload every result file ETABS saved for the model.
What is published
- Joints, frames, tendons, shells and links, with their geometry, grouped by level.
- Each object’s type and properties, such as its section, material, length or area.
- Section and material definitions.
- Analysis results, when you upload the result files. An upload publishes them the same way as the ETABS connector.
If an ETABS upload fails
If the upload fails after it starts, check that the file opens in ETABS before retrying. Contact
Speckle support if it still fails.
Upload an AVEVA Review model
Upload an AVEVA Review.rvm file to publish a plant model from AVEVA E3D or PDMS without
installing a connector. Add the attribute export and the DEXPI P&IDs to publish the model’s
properties and its pipeline systems too. For the steps, see
Upload a file.
Files that convert
Speckle reads binary RVM files. ASCII RVM files are not supported. The attribute export is the
CADC_Attributes_File text file AVEVA writes beside the RVM, usually with the same stem as the
RVM file: HO-PIPE.rvm and HO-PIPE.txt.
Add the attribute export and P&IDs
Drop the.rvm on its own, or together with its attribute export and P&IDs. Speckle then asks
for the companion files in two dialogs. Files you dropped together with the .rvm are already
added.
1
Add the attribute export
In Add the attribute export, drop the
.txt or .att file and select Continue. To
publish geometry only, select Upload without attributes.2
Add the P&IDs
In Add P&IDs, drop the DEXPI
.xml exports and select Upload with n P&IDs. To publish
without them, select Upload without P&IDs.
When you add an attribute export, Add P&IDs lists the drawings it cites, marked Included
or Missing. Use the list to find missing P&IDs. A drawing number can contain
*, which file
names cannot, so its file usually has _ in that place: drawing P-100-* is in P-100-_.xml.
Closing either dialog asks first. Select Upload without attributes or Upload without P&IDs
to continue without those files, Cancel upload to stop without creating anything, or Go
back to return to the dialog.
What is published
- Every element of the model tree, such as sites, zones, equipment and pipes, grouped as in the model, with its geometry, colour and transparency.
- Lengths are in millimetres.
- With the attribute export: each element’s name and type, and its attributes in an Attributes property group. Elements the export lists without geometry, such as nozzles outside the exported level range, arrive as objects with properties only.
- With P&IDs: each pipeline on the P&IDs becomes a system holding its pipe and the components on it. Matched objects get a P&ID property group with the tag, drawing number, line number, fluid code, nominal diameter and piping class, and are connected in the flow direction the P&ID draws.
If an AVEVA Review upload fails
If the upload fails, check that the file is a binary RVM export and that it opens in AVEVA Review or Navisworks before retrying. Contact Speckle support if it still fails. If the model publishes without attributes or P&ID links, check that the attribute export starts withCADC_Attributes_File and that the P&IDs are DEXPI exports, then upload again.
Upload GIS data
Upload GIS data to publish map layers in Speckle, without opening a GIS application. Speckle reads these formats:
For the steps, see Upload a file. A QGIS
project needs one more step; see Upload a QGIS project.
Name zipped shapefiles and geodatabases
A shapefile is several files and a file geodatabase is a folder, so upload each as a zip. The name tells Speckle what the zip holds:- Zip the shapefile’s files, such as
.shp,.shx,.dbf,.prjand.cpg, and name the zip<name>.shp.zip. A zip can hold several shapefiles. - Zip the
.gdbfolder and name the zip<name>.gdb.zip.
parcels.shp.zip publishes the model parcels.
Upload a QGIS project
A QGIS project holds the layers, groups and styling of a map, but not the data they show. Upload it together with a zip of its project folder: the folder that holds the project and every file its layers use, subfolders included. QGIS projects cannot be synced from cloud storage; see Supported file formats.1
Zip the project folder
Save the project in QGIS, then zip the folder that holds the
.qgz or .qgs file and its data.2
Upload the project
Upload the
.qgz or .qgs file. To add the zip in the same step, drop both files together.3
Add the project folder
In Add the project folder, drop the zip. When the badge shows Project folder, select
Continue.
A QGIS project converts only together with its project folder, so there is no upload without it.
Closing the dialog asks whether to Cancel upload or Go back.
- Layers keep their legend names, groups and order. The project CRS is the model’s coordinate system.
- Single-symbol, categorized and graduated styles keep their colours. A rule-based style colours the whole layer with its first symbol.
- Layers unchecked in the legend are not published. Layer filters apply.
- Polygon layers with a 3D renderer are extruded as in the QGIS 3D view.
What is published
- Each layer as a collection, and each feature as an object with its fields as properties.
- Points, lines and polygons, including 3D multipatch geometry. Curves are approximated with straight segments.
- A colour for each layer. KML features keep the colour of their style.
- Building footprints with height fields, such as a building height, a roof height and ground elevation, or a storey count, are extruded to their height. Footprints without a usable height stay flat.
- When a GeoPackage holds the same buildings in several levels of detail, such as
lod12_3dandlod22_3dlayers, only the highest 3D level of detail is published, with every layer that is not a level of detail, such as footprints.
- KMZ files and KML network links.
- 3D models in KML placemarks. The placemarks arrive with their properties and no geometry.
- Raster data.
If a GIS upload fails
If the upload fails after it starts, check that the file opens in QGIS before retrying. Contact
Speckle support if it still fails.
Move a workflow off a format the default path does not accept
If your workspace is in compatibility mode, you can keep uploading the formats only it accepts until it ends on 1 November 2026. Before then, export to a supported format or publish through a supported desktop connector. Check the resulting model before switching your workflow: uploads and connector publishing can produce different geometry and properties. See Uploads and connectors produce different datasets. For programmatic uploads, see Uploading IFC and other files.FAQ
Why are my models in the wrong location?
Why are my models in the wrong location?
When you upload a Revit (
.rvt) file, Revit upload settings opens. Choose the Reference
point: Internal Origin (the default), Project Base Point, Survey Point, or Shared
Coordinates. Your choice becomes the default for the next Revit upload to that model. Other
formats are placed using the coordinates saved in the file. In compatibility mode, Shared
Coordinates is not offered. For connector-level control over placement, use the Revit
connector.Can I download uploaded files?
Can I download uploaded files?
Yes, file downloads are available. To download a file
- Select the dropdown menu (…) on the model.
- Select View uploads.
- Select Download next to the version you want.
Why is my file stuck processing?
Why is my file stuck processing?
Uploaded files wait in a processing queue. If processing does not complete, contact Speckle support with:
- Your file type and version
- Your failed file
Will you support additional formats?
Will you support additional formats?
Request a format on the Speckle forum. Include a sample file and describe the workflow it would support.